jaroslav vaculik The University of Adelaide School of Civil, Environmental & Mining Engineering
|
|
|
- Susan Harris
- 5 years ago
- Views:
Transcription
1 U N R E I N F O R C E D M A S O N RY WA L L S S U B J E C T E D T O O U T- O F - P L A N E S E I S M I C A C T I O N S jaroslav vaculik A thesis submitted to The University of Adelaide School of Civil, Environmental & Mining Engineering in fulfilment of the requirements for the degree of Doctor of Philosophy April, 212.
2 Part III A P P E N D I C E S
3
4 AppendixA M AT E R I A L T E S T I N G Abstract This appendix reports the methods and detailed results of material tests performed as part of the experimental studies in Chapters 2 and 3. a.1 introduction As part of the quasistatic and dynamic experimental tests reported in Chapters 2 and 3, complimentary tests on small-sized masonry specimens were conducted in order to quantify values of key material properties. The main engineering parameters of interest were: Flexural tensile strength of the masonry, f mt (Section A.2). Lateral modulus of rupture of the brick units, f ut (Section A.3). Unconfined compressive strength of the masonry, f mc (Section A.4). Young s modulus of elasticity of the brick units (E u ), mortar joints (E j ), and overall masonry (E m ) (Section A.4). Coefficient of friction along the masonry bond, µ m (Section A.). The material tests reported herein were conducted on masonry specimens constructed with two different types of units: (i) perforated full-sized brick units (Figure 2.1) with dimensions mm and 1 mm mortar joints, as used 331
5 332 material testing Table A.1: Types of material properties determined by experimental testing. Material property Full-sized perforated units Half-sized solid units (Quasistatic test study) (Dynamic test study) f mt Yes Yes f ut Yes No f mc Yes Yes E m, E u, E j Yes Yes µ m No Yes in the quasistatic test study; and (ii) solid half-sized brick units with dimensions mm and mm mortar joints, as used in the dynamic test study. Table A.1 summarises the properties determined for the respective types of brickwork. Mean values of the material properties are presented in Sections and The purpose of this appendix is to report these results, including the test methods, in greater detail. a.2 flexural tensile strength a.2.1 Test Method The flexural tensile strength of the masonry, f mt, was determined using the bond wrench method as prescribed by as 37. The test arrangement (Figure A.1) consisted of a clamp and vice system used to secure the test specimen, and the bond wrench fastened to the top unit in the specimen. The test was performed by manually applying a downward force on the wrench handle using one s hands, thus subjecting the joint to a bending moment in addition to a small compressive axial load. The load was slowly increased until failure of the bond. A calibrated strain gauge on the horizontal arm of the wrench conveyed the load applied to the handle to the data acquisition system. For each joint tested, the load to cause failure was recorded and used to calculate the corresponding f mt based on the procedure outlined in Section A.2.2. The bond wrench used for the full-sized brick specimens (Figure A.1) was an as 37 compliant wrench which had already been used in previous experimental studies [Doherty, 2; Willis, 24]. The wrench used for the half-sized brick specimens was designed according to as 37 specifically for this test study. Its specifications are shown by Figure A.2. In both the quasistatic and dynamic test studies, a total of 12 joints were tested for every batch of mortar used in constructing the main test walls. Two types of test specimens were used: five-unit masonry prisms (Figure A.3a), and (ii) masonry

6 a.2 flexural tensile strength 333 Masonry specimen Bond wrench Strain gauge to data acquisition system Applied load Top joint undergoing test Clamp used to stiffen specimen below top joint Stiffened timber plates Entire test specimen held in vice Figure A.1: Bond wrench test arrangement, shown for the five-brick prism specimens constructed using full-sized brick units.
7 334 material testing Figure A.2: Bond wrench designed specifically for the half-sized brick units used in the dynamic test study. Dimensions are in millimetres. (a) Five-brick prism (b) Couplet Figure A.3: Types of masonry specimens used for bond wrench tests.
8 a.2 flexural tensile strength 33 couplets (Figure A.3b). The purpose of the prisms was to reduce the wastage of brick units, since a prism would yield four tests from five bricks, as opposed to a couplet yielding only a single test from two bricks. In both types of specimens, the mortar joint was made to a thickness equal to that used in the construction of the main panels, which was 1 mm for the full-sized units in the quasistatic test study and mm for the half-sized units in the dynamic test study. The prism specimens were used initially, including for mortar batches from walls s1 s6. During tests on prisms, steel-stiffened timber plates were clamped onto the brick units below the top joint, in order to isolate the top joint and protect the joints below by providing additional flexural stiffness (Figure A.1). It was found, however, that this arrangement was not always successful in preventing premature failure of one the other joints, and as a consequence, there were numerous joints for which no data was recorded. Therefore, after testing the prism specimens from walls s1 s6, this arrangement was abolished, and only couplets were used for the remaining walls s7 s8 and d1 d. a.2.2 Calculation of f mt Calculation of f mt assumes that at the point of failure, the section along the bonded interface exhibits a linear stress profile and that failure occurs due to the stress in the extreme tensile fibre exceeding the tensile strength. By accounting for the induced stresses due to the combined applied moment and axial load, the tensile bond strength is calculated as f mt = M Z N A, (A.1) where M is the applied moment at failure, N is the applied axial load at failure, Z is the elastic section modulus of the bedded area, and A is the bedded area. a.2.3 Results for Perforated Full-Sized Brick Specimens Typical examples of the observed bond failure for the perforated brick unit specimens are shown by Figure A.4. Failure occurred predominantly by separation of the bond interface between the brick unit and mortar. In some specimens, the failed surface was confined to one brick unit with the entirety of the mortar remaining adhered to the second unit, whilst in others, the failure surface cut across from one unit to the other. Furthermore, since the mortar had a tendency to key into the perforations in the brick units; in order for the joint to fail, this mortar had to either break or pull out of the holes. Typically, a combination of both of these modes was

9 336 material testing Figure A.4: Typical bond failure of the full-sized perforated brick specimens during bond wrench test. observed, as shown by the examples in Figure A.4. The interlock effects between the brick units and mortar are generally expected to have a beneficial effect on f mt. The values of f mt determined from the bond wrench tests are provided in Table A.2, with three different approaches used to group the data. For each approach, the table provides the number of data points n, mean value of f mt, and the coefficient of variation (CoV). Figure A. also shows the measured f mt data points graphically for each wall. The methods of data grouping used in Table A.2 are as follows. 1. The first approach (columns 1 ) is based on individual bond data grouped by batches. Each set consists of approximately 12 data points depending on the number of joints successfully tested from each batch The second approach (columns 8) is based on individual bond data grouped by walls. The number of data points corresponds to the number of joints tested from each wall, which ranged between 9 and 83. Further statistical tests are conducted on the pooled data sets in Section.3.1, including probability distribution fitting. 3. The third approach (columns 9 11) is based on batch mean values grouped by walls. Hence, in this approach, each constituent batch is given the same 1 Batches 4.6 and 6.1 have additional data points, because extra test specimens were constructed by mistake.
10 a.2 flexural tensile strength f mt.6 f mt Batch Id. Batch Id. (a) Wall s1 (b) Wall s f mt.6 f mt Batch Id. Batch Id. (c) Wall s3 (d) Wall s4 Figure A.: Measured f mt data (in MPa) for perforated full-sized unit specimens used in the quasistatic test study. Results are shown for the individual mortar batches used in the construction of each wall. Blue crosses ( ) show individual joint data; black circles ( ) show mean values for each batch; solid gray line ( ) shows the average f mt for the wall, calculated as the mean of the batch averages; and dashed black line ( ) shows the average f mt for the wall, calculated as the mean of the individual bond data.
11 338 material testing f mt.6 f mt Batch Id. Batch Id. (e) Wall s (f) Wall s f mt.6 f mt / /7. Batch Id. Batch Id. (g) Wall s7 (h) Wall s8 Figure A.: (cont d).
12 a.2 flexural tensile strength 339 Table A.2: Results of bond wrench tests on full-sized perforated brick units used in the quasistatic test study. Batch Sample consisting of bond data within batch n mean f mt [MPa] CoV t-test P-value Wall Sample consisting of pooled bond data n mean f mt [MPa] Sample consisting of batch averages CoV n mean f mt [MPa] s s s s s s s / s / CoV
13 34 material testing weighting toward the mean f mt value for the wall, regardless of the number of joints tested. The number of data points corresponds to the number of batches used in a particular wall, which ranged between and 7. The mean values of f mt for each wall determined using this method are reported in Chapter 2 (Table 2.3) and are further used in the analytical studies reported in Section 4.. It is worth noting that the difference between the mean values of f mt calculated using this method and the second approach is minor (less than 1%). Student s t-test (two-sample with assumed equal variance) was performed to assess whether the data for individual batches of mortar (first data grouping approach) could be considered to have the same underlying distribution as the data when it was pooled for the parent wall (second data grouping approach). The calculated P-values are listed in the th column of Table A.2. These represent the probability that the batch data follows the same distribution as the pooled data. By adopting a fairly conservative P-value of.2 as the limit of statistical significance, the results indicate that the difference between the distribution of the batch data and the pooled wall data is statistically significant (P-value <.2) in approximately % of the batches. This suggests that the bond data for the individual batches should not be pooled together into a single data set for the overall wall, because the mean values of the batches are statistically different. However, it can likewise be argued that since inter-batch variability would naturally occur in practice, and calculation of the strength of a wall tends to be based on a single value of f mt, pooling of the individual batch data sets in order to calculate a mean value of f mt to use for analysis, is also valid. On the basis of the mean-of-batch-average approach, the mean bond strength for the different walls ranges between.496 and.721 MPa. The CoV in the different walls ranges between.19 and.28 based on the pooled bond data. These values are considered to be typical of the 1:2:9 (cement, lime, sand) mortar mix used. a.2.4 Results for Solid Half-Sized Brick Specimens Bond failure of solid half-sized brick couplet specimens consistently occurred such that the failure plane cut between the mortar and one unit in the couplet, leaving the mortar adhered entirely to the second unit. This observation is in contrast to the type of failure observed for the perforated unit specimens (Figure A.4), where, due to the interlock between the mortar and the brick unit, the failure surface had a tendency to cut through the mortar itself. Because of the lack of interlock between the solid units and the adjoining mortar, the bond strength is expected to be lower
14 a.2 flexural tensile strength f mt Batch Id. Figure A.6: Measured f mt data in (in MPa) for solid half-sized unit specimens used in the dynamic test study. Data is shown for the 4 batches of mortar which were used to construct all of the five walls. Red crosses ( ) show individual joint data; black circles ( ) show mean values for each batch; solid gray line ( ) shows the average f mt for the wall, calculated as the mean of the batch averages; and dashed black line ( ) shows the average f mt for the wall, calculated as the mean of the individual bond data. Table A.3: Results of bond wrench tests on the half-sized solid brick units used from the dynamic test study. Batch Sample consisting of bond data within batch n mean f mt [MPa] CoV t-test P-value Sample consisting of pooled bond data n mean f mt [MPa] Sample consisting of batch averages CoV n mean f mt [MPa] CoV than for the perforated units. Indeed, the results show this to be the case. Figure A.6 graphs the data for the four batches of mortar tested. The associated results are provided in Table A.3 for each of the three methods of data grouping discussed in Section A.2.3. The mean values of f mt for the four batches all range between.411 and.421 MPa. The t-test was used to assess whether the four batches can be considered to all originate from the same batch. The resulting P-values of the t-test are provided in the th column of Table A.3. That the P- values for all four batches are greater than.9 suggests that they can be treated as originating from the same batch. Pooling the data from the individual batches
15 342 material testing together gives a single data set consisting of 43 data points, with a mean f mt of.41 MPa and a CoV of.3. Therefore, not only is the bond strength of these units lower than for the perforated units (Section A.2.3), but it also has higher variability. a.3 lateral modulus of rupture a.3.1 Test Method The lateral modulus of rupture of the brick units, f ut, was determined using a four point bending test as illustrated by Figure A.7. A single test specimen consisted of three units glue bonded together end-to-end to form a beam. With the specimen resting on simple supports at either end, two point loads of equal magnitude were applied onto the central unit, generating a region of constant bending moment and zero shear force along the central unit. The applied load was increased until failure. A total of 12 beam specimens were tested using the perforated brick units from the quasistatic test study. a.3.2 Calculation of f ut Based on the assumptions that the section exhibits a linear elastic profile at the instance of failure and that failure occurs when the tensile stress in the extreme fibre reaches the tensile capacity, the lateral modulus of rupture is calculated as f ut = M Z, (A.2) where Z is the elastic section modulus of the beam (equal to h u t 2 u/6), and M is the applied moment at failure. Using statics, M is calculated from the applied point load P at failure (Figure A.7) as M = P L x 2, (A.3) where is L x is the horizontal distance between the support and loading point on the beam (1 mm in these tests). a.3.3 Results for Perforated Full-Sized Bricks In each of the 12 beam specimens, failure occurred somewhere within the maximum moment region in the central unit, such that the failure plane cut across the perforations in the brick unit. An example of typical failure is shown in Figure A.7.


16 a.3 lateral modulus of rupture 343 Point load P Simple support P 2 1 mm 1 mm 1 mm P 2 Figure A.7: Four point bending test used to determine the lateral modulus of rupture, including typical failure of the specimens. The measured f ut data for the 12 specimens (Figure A.8) has a mean value of 3. MPa and a CoV of.27.
17 344 material testing 6 4 f ut [MPa] Figure A.8: Measured f ut data (in MPa) for the perforated full-sized bricks units. Blue crosses ( ) show individual data points; black circle ( ) indicates the mean value. a.4 compression tests Compression tests were performed to determine several properties, including the compressive strength of the masonry ( f mc ); and the Young s modulus of elasticity of the brick units (E u ), mortar joints (E j ), and overall masonry (E m ). a.4.1 Test Method The test arrangements used for the full-sized and half-sized brick specimens were slightly different; hence, they will be discussed separately. Arrangement Used on Full-Sized Brick Specimens For the full-sized brickwork from the quasistatic tests, the specimens were identical to the -brick prisms used in the bond wrench tests (Figure A.3a). A single specimen was built and tested for each batch of mortar. The compression test arrangement is illustrated in Figure A.9. For the purpose of quantifying the Young s modulus of elasticity, deflections were measured using Demec gauges at two locations along the specimen: an 8-inch gauge, used to measure deformations across a combination of bricks and mortar joints on one side of the specimen (spanning across two mortar joints); and a 2-inch gauge, positioned on the opposite side of the prism and used directly to measure the deformation along on the central brick. Note that since the Demec points for the 8-inch gauge could not be positioned precisely at the centre
18 a.4 compression tests 34 Applied load P Top plate of compression machine Layer of dental paste Demec point 8 inch (23.2 mm) gauge 2 inch (.8 mm) gauge on reverse side Bottom plate of compression machine Timber plate Figure A.9: Compression test arrangement used for full-sized brick specimens. points of the bricks, the gauge did not span a representative proportion of bricks and mortar joints; however, this was corrected in the subsequent calculation of the Young s moduli using the procedure outlined in Section A.4.3. The specimens were tested using a mechanical compression rig capable of imposing loads up to 1 kn. A thin timber plate was placed between the test specimen and the bottom plate of the compression machine. Prior to the application of a load, a moderate quantity of dental paste was spread between the top loading face of the specimen and the top plate of the compression machine, which was left to harden to ensure a uniform distribution of the compressive load. Before taking any deformation measurements, the specimen was subjected to a compressive load of 1 kn (approximately 4% of the ultimate compressive strength) and unloaded back to zero load in order to allow it to settle. The test was performed by applying a compressive load to the specimen at increments of 2 kn up to a maximum load of 1 kn. At each level of compression, the deformations were measured across the 2-inch and 8-inch gauges. The load was then dropped back to zero and the process repeated three times for each test prism. The specimen was then subjected to an increasing compressive load until failure. Arrangement Used on Half-Sized Brick Specimens Due to complications with the results obtained from the original compression test arrangement used on the full-sized brick specimens, which are discussed in greater detail in Section A.4.4, a revised arrangement was implemented for tests on the
19 346 material testing Applied load P Top plate of compression machine Layer of dental paste LVDT gauge across bricks + joints (front and back) Strain gauges on brick unit (front and back) Bottom plate of compression machine Layer of dental paste Figure A.1: Compression test arrangement used for half-sized brick specimens. half-sized brick specimens used in the dynamic test study. The revised arrangement is shown by Figure A.1. Its main improvements over the original setup (Figure A.9) were as follows. Deformation along the masonry gauge (bricks + mortar joints) was measured using a linear variable differential transformer (LVDT) displacement transducer and deformation along the brick as measured using a strain gauge. In addition to this instrumentation being far more accurate than the Demec gauges used in the original setup, because the data was recorded automatically by a data acquisition system it meant that tests could be performed much quicker. A further advantage of using LVDTs was that the length of masonry over which deformation was measured was designed to span precisely between the centres of the (second and seventh) bricks, in contrast to the predefined distance of the 8-inch Demec gauge used in the original tests. Deformation measurements were made on both sides of the specimen using separate LVDTs and strain gauges. Subsequent averaging of the deformation measurements on the two opposite sides was performed to remove any effects of undesired bending within the specimen. It is believed that bending may have significantly affected the results obtained using the original test setup, as discussed in Section A.4.4.
20 a.4 compression tests 347 As the half-sized brick specimens comprised eight-brick prisms, the gauge measuring deformation spanned across five bricks and five mortar joints. This is in contrast to the original setup, where the gauge spanned across only two bricks and two joints. Another minor aspect of the revised test arrangement was that dental paste was applied above and below the specimen and the compression machine in order to facilitate a uniform distribution of the applied pressure. The test was conducted by slowly applying a compressive force to the specimen up to 3 kn (approximately 2% of the failure load), during which data was recorded by a data acquisition system. The load was slowly released and reapplied for a total of four repetitions. Of these, only the last three were used in calculating the Young s moduli. Finally the specimen was subjected to an increasing load until failure. a.4.2 Calculation of f mc The unconfined compressive strength of the masonry, f mc, was determined in accordance with as 37 as ( ) Fsp f mc = k a, (A.4) A d where k a is a factor obtained from the code, F sp is the applied compressive force at failure, and A d is the bedded area of the specimen. The factor k a is dependent on the height/thickness aspect ratio of the specimen and accounts for the effects of horizontal confinement of the specimen due to platen restraint. Based on the code, k a was taken as.911 for the full-sized -brick prisms and 1. for the half-sized eight-brick prisms. a.4.3 Calculation of E u, E j and E m The steps to calculate the Young s modulus for the brick units (E u ), mortar joints (E j ), and the masonry consisting of bricks and mortar joints (E m ), are outlined as follows: 1. The recorded data was converted from its original format to stress versus strain (σ-ε). 2. For both gauges within a specimen, a linear regression was fitted to the σ-ε data during each push to determine the respective Young s moduli. The
21 348 material testing Young s modulus for each gauge was then taken as the average of the three pushes. For the i th specimen, let us denote the value measured across the brick gauge as (E u ) i, and the value measured across the masonry gauge as (E mg ) i. From the resulting data, the mean value of the Young s modulus for the brick units, Ê u, was calculated as the average value of (E u ) i for the tested specimens: Ê u = 1 n n i=1 (E u ) i. (A.) Similarly, this data set was used to calculate other statistical properties for E u, including the CoV. Calculation of the mean Young s modulus of the masonry, Ê m, however, was not as straightforward as simply averaging the measured (E mg ) i for all specimens, for two reasons: Firstly, the stiffness of the brick (E u ) i measured in the i th specimen may have varied significantly from the mean value Ê u due to the random variability in E u, which will influence the stiffness (E mg ) i recorded across the masonry gauge. Secondly, in the case of the full-sized brick specimens, the Demec gauge measuring the deformation across the masonry was not able to span between the centres of the bricks; 2 therefore, the relative proportions of brick and mortar captured by the masonry gauge were not representative of the true relative proportions of these constituents within the masonry. To correct for these effects, a back-calculation process was firstly used to calculate the Young s modulus of the mortar joints, (E j ) i, for the i th specimen (according to Step 3). Then, a forward-calculation process was used to determine the Young s modulus of the masonry, (E m ) i, corresponding to the i th specimen (as per Step 4). It can be shown that for a member composed of multiple elements a, b, c,... joined in series, the relationship between the overall member s apparent Young s modulus E tot and the Young s moduli E a, E b, E c,... of the components is 1 E tot = r a E a + r b E b + r c E c +..., (A.6) where r a, r b, r c,... are the respective proportions of each component element within the overall member. These must all add up to unity, such that 1 = r a + r b + r c (A.7) 2 This was not an issue for the half-sized brickwork due to the different test arrangement used.
22 a.4 compression tests 349 Use measured value of stiffness (E mg) i across masonry gauge Mortar joint stiffness (E j) i being calculated Brick stiffness not measured; assume mean value of E u Use measured value of brick stiffness (E u) i Brick stiffness not measured; assume mean value of E u Figure A.11: Information used in back-calculation of the Young s modulus of the mortar joints (E j ) i for the i th specimen. Shown for the full-size brick specimen test arrangement. Use calculated value of joint stiffness (E j) i Stiffness (E m) i of representative masonry section being calculated Assume mean value of brick stiffness E u Figure A.12: Information used in forward-calculation of the representative Young s modulus of the masonry, (E m ) i, for the i th specimen. Equations (A.6) and (A.7) form the basis for remaining steps in the calculation procedure, outlined as follows: 3. The Young s modulus of the mortar joints (E j ) i in each specimen was then back-calculated. Figure A.11 shows the information assumed during this process. The calculation assumed that the brick along which deformation was measured had the measured value of stiffness (E u ) i, and that the remaining bricks had the mean value Ê u. Substituting these into the general relationship, Eq. (A.6), and rearranging in terms of (E j ) i gives ( 1 (E j ) i = r j r u known r ) 1 u unknown, (A.8) (E mg ) i (E u ) i Ê u where r j, r u known and r u unknown are the relative span proportions of the mortar joints, the brick along which deformation was measured, and the bricks for
23 3 material testing which deformation was not measured, respectively, within the sample. These must add up to unity: r j + r u known + r u unknown = 1. (A.9) 4. Finally, a forward-calculation was used to determine a representative Young s modulus of the masonry, (E m ) i, for each specimen. Figure A.12 shows the information used in this calculation. It was assumed that for each specimen, all bricks had the mean Young s modulus Ê u and that the mortar joints had the Young s modulus (E j ) i for the i th specimen, as calculated using Step 3. Substituting these into Eq. (A.6) and rearranging in terms of (E m ) i gives (E m ) i = ( ru Ê u + r j (E j ) i ) 1, (A.1) where r u and r j are the relative proportions of brick and mortar within the masonry, whose sum is unity: r j + r u = 1. (A.11) These are calculated as r u = h u h u + t j, and r j = t j h u + t j, (A.12) where h u is the height of the brick and t j is the thickness of the mortar joint. For example, for the full-sized masonry with brick height h u = 76 mm and joint thickness t j = 1 mm, we get r j = 1/(76 + 1) =.12 and r u = 76/(76 + 1) =.88. Once the Young s moduli of the masonry, (E m ) i, and mortar joints, (E m ) i, were calculated for each specimen using Steps 3 and 4, the mean values and CoVs were determined for both E m and E j. a.4.4 Results for Perforated Full-Sized Brick Specimens Horizontal tensile splitting was the most commonly observed mode of compressive failure, as shown by Figure A.13a. In most instances of splitting failure, the onset of the failure was preceded by a gradual decline in the load resisted by the specimen following the peak load capacity. Less commonly observed was an explosive mode of failure, whereby the specimen failed almost immediately after attaining its ultimate load capacity. This type of failure was typically accompanied by a loud

, with the mean values for each wall presented in Table A.. The data points for each individual test are also displayed graphically by Figure A.")


24 a.4 compression tests 31 (a) Splitting failure (b) Explosive failure Figure A.13: Typical compressive failure of perforated full-sized brick specimens. explosion sound from the specimen, due to the sudden release of energy. The remains after such failure are shown by Figure A.13b. The results for the various properties including E u, E j, E m and f mc are presented in Table A.4 for each batch (specimen), with the mean values for each wall presented in Table A.. The data points for each individual test are also displayed graphically by Figure A.14. Student s t-test was used to compare the data for each wall to a global pooled data set, in order to establish whether there was a statistically significant difference between the data for the different walls. The resulting P-values from the t-tests are provided in Table A.. By adopting a typical statistical significance limit value of.2, approximately three out of eight P-values fall below this value for each of the parameters investigated. This indicates that there is a significant difference between the batches from the different walls. A peculiar result of the t-test is that there appears to be a significant difference between the measured Young s modulus of the bricks (E u ) for specimens originating from the different walls. This should not be the case, since E u is independent of the mortar surrounding the brick units, and furthermore, all brick units originated from the same batch at manufacture. A second peculiarity can be seen by comparing the mean values of E u and E j in Figures A.14a and A.14b, which show a general trend whereby when one of these values is high, the other is low, and vice versa. This is likely to be due to internal
25 32 material testing Table A.4: Material properties determined from compression tests on perforated brick units, with the results organised according to each batch. Batch E u E j E m f mc [MPa] [MPa] [MPa] [MPa] , , , , , , , , , , , , , 187 1, , , , , , 233 1, , 29 2, , 429 3, , , (r) 38, , , , , , , 3 662, , , , , , , , , , , , , , , , 1 1, 9 8, (r) 38, 661, , , , 8 9 4, , 212 1, , , , , , 6 4 4, , , , , , , , , , , , , , , , , , , , 7 769, , , /8. 3, 42 3, , , , , , , , , /7. 3, 42 3, Mean 2, , CoV notes: Extra specimens were mistakenly built for batches 3.1 and 4.6. The calculated mean and CoV values do not double count batch 7./8., which was shared between walls s7 and s8.
26 a.4 compression tests 33 Table A.: Material properties determined from compression tests on perforated brick units, with the results organised according to each wall. The mean and CoV values are calculated from the individual mortar batches used in each wall. Results are also provided for a t-test examining whether there is a statistically significant difference between the batches in a particular wall and a pooled batch data set. The P-value represents the probability that the two data sets have the same distribution. Wall Eu E j Em fmc Mean CoV t-test Mean CoV t-test Mean CoV t-test Mean CoV t-test [MPa] P-value [MPa] P-value [MPa] P-value [MPa] P-value s1 4, , s2 61, , s3 49, , s4 37, , s 61, , s6 2, , s7 62, , s8 63, , Mean 3, , CoV notes: Extra specimens were mistakenly built for batches 3.1 and 4.6. Their results are also included in the statistical analyses. The calculated mean and CoV values, as well as the pooled sample in the t-test, do not double count batch 7./8., which was shared between walls s7 and s8.
27 34 material testing E u [MPa] Wall (a) Young s modulus of elasticity of the brick units, E u E j [MPa] Wall (b) Young s modulus of elasticity of the mortar joints, E j. Figure A.14: Material property data determined from compression tests on full-sized perforated unit specimens. Blue crosses ( ) indicate data points for the different batches; black circles ( ) show the mean values for each wall; solid gray line ( ) shows the average value for all walls calculated as the mean of the wall averages; and dashed black line ( ) shows the average value for all walls calculated as the mean of the individual batch data.
28 a.4 compression tests E m [MPa] Wall (c) Young s modulus of elasticity of the masonry, E m. 2 2 f sp [MPa] Wall (d) Unconfined compressive strength of the masonry, f mc. Figure A.14: (cont d).
29 36 material testing 1 8 Measured E2" [MPa] Measured E 8" [MPa] Figure A.1: Relationship between the measured Young s moduli for the 8 inch and 2 inch gauges, located on opposite sides of the specimen. Blue crosses ( ) indicate data for individual batches; black circles ( ) show the average values for each wall. bending within the specimens combined with a design flaw in the test arrangement, in that deformations across the 2-inch masonry gauge and the 8-inch brick unit gauge were measured on opposite sides of the specimen (Figure A.9). If the top and bottom surfaces of the specimen are not parallel, then the specimen can undergo bending due to eccentric application of the axial force. On the basis of the results, it is likely that such effects occurred, even though care was taken in the design of the test arrangement to ensure that the pressure exerted onto the specimens was evenly distributed. This conclusion is further supported by Figure A.1, which plots the value of the Young s modulus measured across the 2-inch brick gauge versus the value measured across the 8-inch gauge (for the masonry). Whilst the data points are highly scattered, there appears to be an inverse relationship between the two moduli. A simple improvement to the test arrangement would be to position both types of gauges on each side of the specimen, as this would enable any influence of bending to be eliminated by averaging the deformations measured along the two sides. This modification was implemented in the test arrangement subsequently used for the small-sized brick specimens (Figure A.1). Because of the aforementioned faults in the test arrangement, it is suggested that the E j and E m results provided in Table A. should be treated with caution, as there

30 a.4 compression tests 37 Figure A.16: Typical compressive failure of solid half-sized brick specimens. appears to be significant variation in the values from wall to wall. As an attempt to minimise the error, it is recommended that the overall average results should be used, as given at the bottom of Table A.4. On this basis, the brickwork had the mean material properties: E u = 2,7 MPa, E j = 442 MPa, E m = 3,4 MPa, and f mc = 16. MPa. a.4. Results for Solid Half-Sized Brick Specimens All four specimens underwent splitting failure as shown by Figure A.16. The onset of failure was gentle and could be anticipated due to a reduction in the resisted load. The stress strain curves for the masonry and brick components of the four specimens are shown by Figure A.17. It is seen that the curves are consistent for each of the four specimens. An exception is the specimen from batch 3, which had one of its mortar joints broken during transportation and is shown to have a much softer response than the other three. As a result, this specimen was omitted from the calculation of the Young s modulus of the masonry, E m. Results for each specimen are given in Table A.6. The mean material properties of the brickwork include: E u = 32,1 MPa, E j = 1,41 MPa, E m = 9,18 MPa, and f mc = 2.9 MPa.
31 38 material testing 3 Brick unit Masonry (bricks + joints) 2 2 σ [MPa] ε Figure A.17: Compressive stress versus strain for half-sized brick specimens. All four tests conducted are superimposed. The solid lines show tests used to calculate the Young s moduli and dashed line shows the push to failure. The rightmost curve represents the response of specimen 3 which was broken prior to testing and was omitted from the calculation of the mean Young s modulus of the masonry. Curves are only shown up to ultimate load, as the deformation measurements became inaccurate beyond this point. Table A.6: Results of compression tests on the half-sized solid brick units used in the dynamic test study. Batch E m E u E j f mc [MPa] [MPa] [MPa] [MPa] 1 7, 72 37, 9 1, , 36 33, 6 1, , , 2, 7 1, Mean 9, 18 32, 1 1, CoV
32 a. coefficient of friction 39 a. coefficient of friction a..1 Test Method The test apparatus used to determine the coefficient of friction, µ m, along the broken joint interface is shown by Figure A.18. The specimens used in these tests were put together from the broken couplets used in the bond wrench tests (described in Section A.2.1). Each specimen consisted of three bricks, each with its originally adhered mortar, stacked on top of each other. A vertical load was applied to the top brick using either a 2, 4, 6 or 8 kg weight. These weights were chosen in order to generate similar levels of vertical stress to those used in the main test walls in the shaketable test study. The test was conducted by applying a horizontal load to the central brick using a hand operated hydraulic ram, while the top and bottom units were restrained from moving horizontally. The load exerted by the ram onto the central brick, together with the displacement of the central brick, were conveyed to a data acquisition system. The test was stopped once the central brick displaced by approximately 16 mm. A total of eight sets of specimens were tested at each level of axial compression. a..2 Calculation of µ m The forces applied to the specimen are shown by Figure A.18. Since the specimen is subjected to the fixed vertical force F v, at the point of slip, the horizontal forces across the two joints must be µ 1 F v and µ 2 F v, where µ 1 and µ 2 are their respective friction coefficients. Therefore, from horizontal force equilibrium, the average friction coefficient for the two joints is µ m = µ 1 + µ 2 2 where F h is the applied horizontal load. = F h 2F v, (A.13) a..3 Results for Solid Half-Sized Brick Specimens Figure A.19 shows the typical measured response in terms of the friction coefficient µ m [calculated from the resisted horizontal force F h using Eq. (A.13)] versus the horizontal displacement of the central brick,. The graphs demonstrate the response to be highly ductile and approximately elastoplastic in shape. The friction coefficient for each specimen was calculated as the average value or µ m over the displacement range of 2 to 1 mm.
33 36 material testing Weights applying axial stress to the test specimen Hydraulic ram used to displace the central brick Horizontal restraint for the top and bottom bricks LVDT measuring the displacement of the central brick LVDT measuring the displacement of the central brick Fv µ1 Fv Joint 1 with µ1 Fh µ2 Fv Joint 2 with µ2 Figure A.18: Friction test arrangement (top) and forces applied to the test specimen at the instance of slip (bottom). Table A.7: Coefficient of friction µ m at different levels of axial stress σ v, for half-sized solid brick specimens. σ v [MPa] n mean µ m CoV t-test P-value Pooled
34 a. coefficient of friction σ v =.37 MPa σ v =.73 MPa µ m σ v =.18 MPa σ v =.144 MPa µ m [mm] [mm] Figure A.19: Typical response of frictional resistance (as µ m ) at varied displacement. These results correspond to a single specimen under different levels axial stress σ v. Dashed red line ( ) shows the mean value calculated over the displacement range 2 1 mm.
35 362 material testing µ m σ v [MPa] Figure A.2: Measured friction coefficient data for solid half-sized brick units at different levels of axial stress. Red crosses ( ) indicate individual data points; black circles ( ) show the mean values at each level of axial stress; and dashed black line ( ) shows the overall mean value. The measured µ m data is plotted in Figure A.2 at different levels of the axial stress σ v. The associated mean values and CoVs are summarised in Table A.7. Whilst the coefficient of friction is typically assumed to be independent of the acting normal stress, a Student s t-test was conducted to assess whether there was a significant difference between the measured values of µ m at different levels of σ v in these specimens. The large P-values produced by the t-test indicate that indeed, σ v had negligible influence on µ m and that all data may be assumed to come from the same distribution. Pooling the entire data set gives a mean µ m value of.76.
36 AppendixB Q U A S I S TAT I C C Y C L I C T E S T I N G Abstract This appendix contains additional detail related to Chapter 2. b.1 miscellaneous technical details This section contains miscellaneous technical information regarding the test arrangement. Figure B.1 shows the plan view of the arrangement used to impose vertical precompression onto the test walls, consisting of a series of weights suspended from horizontal bars cantilevered over the wall. An elevation view of this arrangement is also shown in Figure 2.7. The layout of the airbags used for each of the three different wall geometries is shown in Figure B.2. The airbags were mounted on a stiffened backing board positioned between the test wall and the reaction frame (refer to Figures 2.8a and 2.8b). These airbag layouts were arranged to provide the best possible coverage with the airbags available. Figure B.3 shows the positions of the load cells which were used to measure the horizontal load transferred between the airbag backing board and the reaction frame (refer to Figures 2.8a and 2.8b). The criteria used for positioning the load cells was to produce similar reaction forces in each cell, whilst minimising the expected deformation of the airbag backing frame to promote uniform airbag coverage over the face of the wall. The number of load cells used (either four or six) was selected based on preliminary predictions of the walls load capacities. 363
37 364 quasistatic cyclic testing Figure B.4 shows the displacement transducer layout used during the initial push on each wall (i.e. the ultimate strength test). This layout monitored displacements at 1 different locations (14 in walls containing an opening) including the main wall face and wall boundaries. The displacement transducers comprised a series of linear variable differential transformers (LVDTs) accurate to ±.1 mm and string potentiometers accurate to ±.1 mm. During the cyclic test phase, displacement transducers were only used at key positions along the wall due to the impracticalities with measuring the deformations when airbags were present on both sides of the wall. These locations, corresponding to the position where the maximum displacement was measured during the initial push, are shown by Figure B. for each wall. The displacements were monitored using the string potentiometers accurate to ±.1 mm, which were connected to the wall and encased in protective tubing to prevent contact between the airbags and the string (refer to Figure 2.8b). In walls s3 s8, the central displacements were measured on both sides of the wall as a redundancy measure. In walls s7 and s8, the main displacement was measured at the central point of the opening, using an aluminium bar spanning horizontally across the window.
38 b.1 miscellaneous technical details 36 2 N 17 N 17 N 17 N 17 N 17 N 2 N 19 mm 64 mm 4 mm mm (a) Walls s1 and s3 (σ vo =.1 MPa) 96 N 784 N 784 N 784 N 784 N 784 N 96 N 19 mm 64 mm 4 mm mm (b) Wall s4 (σ vo =. MPa) 2 N 172 N 172 N 172 N 2 N 19 mm 64 mm 4 mm mm (c) Wall s7 (σ vo =.1 MPa) Figure B.1: Plan view of the vertical precompression loading arrangement.
39 366 quasistatic cyclic testing (a) 4 2 mm solid walls (b) 4 2 mm walls with openings (c) 2 2 mm walls with openings. Figure B.2: Airbag layouts, designed to provide maximum possible coverage along the face of each wall. Dimensions shown in millimetres.
40 b.1 miscellaneous technical details (a) Walls s1 s (b) Wall s7 (ultimate strength test only) (c) Remaining wall s7 and s8 tests. Figure B.3: Load cell positioning along the airbag backing frame. Dimensions shown in millimetres.
41 368 quasistatic cyclic testing (a) Walls s1 s6. (Opening is illustrated despite being absent from walls s1 and s2.) (b) Walls s7 and s8 Figure B.4: Displacement transducer layout during ultimate load capacity tests. Dimensions shown in millimetres.
42 b.1 miscellaneous technical details 369 DT1 DT2 DT1 Exterior Face Interior Face Exterior Face Interior Face (a) Walls s1 s3 (b) Walls s4 s DT1 DT3 DT2 Exterior Face Interior Face (c) Wall s6 DT4 DT2 DT1 DT3 Exterior Face Interior Face (d) Walls s7 s8 Figure B.: Displacement transducer positioning during cyclic tests. Note that the openings are not shown for walls s3 s6
43 37 quasistatic cyclic testing b.2 analysis of response during initial push Figures B.6 B.13 demonstrate the load-displacement response for each wall during the initial push. The location of the displacement measurement is shown by Figures for the respective walls. Shown on each graph are the key parameters derived from the respective tests, which are also summarised in Table 2.6 and include the following: ultimate strength The wall s ultimate strength F ult was taken as the maximum load resisted during the test, based on the force recorded by the load cells. Inspection of the response in the subsequent cyclic tests shows that the maximum load resisted occurred during the initial push for each wall, as intended. initial uncracked stiffness The initial uncracked stiffness of the wall, K ini, was taken as the slope of the F/ loading branch up to 4% of the ultimate load capacity. The value of the slope was calculated by first condensing the number of data points within this region (due to the different rates of loading at the start of each test), and subsequently fitting a linear regression to the condensed data. percentage of recovered displacement recovered upon unloading was calculated as The proportion of displacement displacement recovery ratio = max final max, where max was the maximum displacement imposed on the wall and final was the final displacement upon unloading. Since the maximum displacement to which the walls were subjected is somewhat arbitrary, these values are intended to be only indicative of the walls self-centring characteristics.
44 b.2 analysis of response during initial push 371 F ult = 47. kn 4 K ini = 42.1 kn/mm F [kn] F ult 1 66% recovery [mm] Figure B.6: F- response of wall s1 during the initial push. 3 3 F ult = 3. kn 2 K ini = 6.71 kn/mm F [kn] F ult 62% recovery [mm] Figure B.7: F- response of wall s2 during the initial push.
45 372 quasistatic cyclic testing F ult = 44.2 kn 4 K ini = 4.1 kn/mm F [kn] F ult 1 83% recovery [mm] Figure B.8: F- response of wall s3 during the initial push. 3 F ult = 34.2 kn 3 2 K ini = 3.2 kn/mm F [kn] F ult 77% recovery [mm] Figure B.9: F- response of wall s4 during the initial push.
46 b.2 analysis of response during initial push F ult = 31.4 kn 2 K ini = 16.6 kn/mm F [kn] F ult 1 2% recovery [mm] Figure B.1: F- response of wall s during the initial push. 2 F ult = 17.2 kn 1 K ini = 3.8 kn/mm F [kn] 1.4 F ult 7% recovery [mm] Figure B.11: F- response of wall s6 during the initial push.
47 374 quasistatic cyclic testing F ult = 42.2 kn 4 K ini = 28.7 kn/mm F [kn] F ult 1 6% recovery [mm] Figure B.12: F- response of wall s7 during the initial push. 4 F ult = 41.3 kn F [kn] 3 2 K ini = 24.6 kn/mm.4 F ult 1 7% recovery [mm] Figure B.13: F- response of wall s8 during the initial push.
48 b.3 analysis of cyclic response 37 b.3 analysis of cyclic response b.3.1 Properties from Individual Cycles For each half-cycle run performed during the course of testing, several properties were determined from the measured F- response. These include: peak displacement, cyclic displacement and force amplitudes, effective secant stiffness, equivalent viscous damping, and envelope point coordinates. The results of these properties are summarised in Tables B.1 B.8, including for each test run during the cyclic test phase, as well as the initial push to ultimate strength which can be considered as the first half-cycle of the wall s overall response. The results are also graphed throughout Figures B.16 B.23. The methods used to determine each of these properties will now be described. peak displacement imposed displacement during the cycle. The peak displacement peak was taken as the largest displacement cycle amplitude The method used to determine the displacement amplitude amp was dependent on whether the half-cycle under consideration was in the reverse direction or reload direction (Figure B.14). For reverse direction cycles, amp was taken directly as the peak imposed displacement (Figure B.14a). For reload direction cycles, amp was taken as the difference between the peak imposed displacement and the initial displacement at the beginning of the cycle (Figure B.14b). force cycle amplitude resisted by the wall during the half-cycle. The force amplitude F amp was taken as the peak force effective stiffness as The effective secant stiffness of a half-cycle was calculated K = F amp amp. equivalent viscous damping The equivalent viscous damping based on hysteresis, ξ hyst, was calculated using the area-based method according to the equation ξ hyst = 1 π U 1/2cyc F amp amp,
49 ...,,, 376 quasistatic cyclic testing. = F 7? O?, = F, F A = (a) Reverse direction half-cycle.. = F, = F 7? O?, F A = (b) Reload direction half-cycle. Figure B.14: Properties determined from individual half-cycles in cyclic testing. Shown assuming loading in the positive direction., A L. A L. = F, F A = Figure B.1: Envelope point coordinates for half-cycle.
50 b.3 analysis of cyclic response 377 where U 1/2cyc is the energy dissipated during the half-cycle (as shown in Figure B.14). In general terms, the energy dissipated during hysteresis is given by the integral U = F d. To obtain U 1/2cyc, this integral was evaluated from the measured F and data vectors using the summation U 1/2cyc = n 1. (F k + F k+1 ) ( k+1 k ), k=1 where k is the data point index and n in the number of data points recorded during the test run. envelope point coordinates For each half-cycle run, the coordinates F env and env at a representative envelope point were determined for the purpose of subsequently using these points to define the overall envelope curve for each wall (refer to Figures B.16 B.23). In most half-cycle runs, the point of peak force generally coincided with the point of peak displacement. However, in certain halfcycles, these points did not coincide due to a reduction in strength with increasing displacement, as shown in Figure B.1. Therefore, as shown by the figure, the envelope point was taken as the intersection of the measured F- curve with the line defined by the effective secant stiffness of the half-cycle (i.e. line joining the origin and the point peak and F amp ). b.3.2 Properties for Each Wall After quantifying the various properties based on each half-cycle run (as outlined in Section B.3.1), several properties indicative of the overall response of each wall were determined by collectively considering all individual test runs. These include: the ultimate strength, the displacement range encompassing 8% of the ultimate strength, the residual strength and effective stiffness at δ =., and the equivalent viscous damping in the range.2 δ.7. The resulting values of these properties are summarised in Table 2.7 and also plotted throughout Figures B.16 B.23. Note that each of the properties were determined separately in the positive and negative directions, as denoted by superscripts + and. The methods used to determine them will now be described. ultimate strength Ultimate load capacities were determined in each direction, as denoted by F + ult and F ult in Table 2.7. In each of the eight walls tested,
51 378 quasistatic cyclic testing the highest strength was measured during the initial push in the positive loading direction as intended, and this value was adopted as the overall ultimate strength of the wall (F ult ). displacement range encompassing 8% of F ult As an indicative measure of the wall s ability to maintain its load resistance with increasing deformation, the displacement range encompassing the zone where the wall s strength exceeded 8% of the ultimate strength, was quantified. Values of this range were determined in both directions, by using the respective value of F + ult or F ult as the reference strength. The results are shown graphically in Figures B.16 B.23 (right, top graph) and summarised in Table 2.7, as +.8Fu and.8fu. residual strength and effective stiffness at δ =. As an alternative measure of the wall s ability to maintain its strength at large displacement, its strength and stiffness were quantified at δ =. (displacement equal to half the wall s thickness, i.e. mm). These properties were determined as follows: Firstly, the effective secant stiffness K for each half-cycle was plotted against the cycle s displacement amplitude amp, as shown in Figures B.16 B.23 (right, middle graph). Next, a second order exponential regression was fitted to the K amp data in each direction. For consistency, only data points within.2 δ.7 were used in the data fitting process. Based on the trendlines (indicated in the respective graphs), values of the secant stiffness at δ = ±. were determined, as denoted by K + ht and K ht in Table 2.7. The corresponding values of the force resistance at δ = ±. were calculated using the relationship F ht = (.t u )K ht, and are denoted by F + ht and F ht in Table 2.7. equivalent viscous damping at.2 δ.7 Average values of ξ hyst were determined for cycles whose displacement amplitude was within the range.2 δ.7. The results are shown graphically in Figures B.16 B.23 (right, bottom graph), and are summarised in Table 2.7 in both the positive and negative directions as denoted by ξ + hyst and ξ hyst. b.3.3 Results Tables B.1 B.8 provide the results of properties that were described in Section B.3.1 for each half-cycle performed, including the initial push on the wall and the subsequent cyclic tests. The 1st column gives the test index, and the 2nd column states whether the test was the initial push to ultimate strength ( ult ) or a cyclic
52 b.3 analysis of cyclic response 379 test ( cyc ). The 3rd column gives the target displacement rounded to the nearest 1 mm (except for the initial ultimate strength test, which is rounded to the nearest mm). The 4th column states the number of repetitions performed at the particular target displacement by taking into account the previous cyclic loading history but ignoring the initial ultimate strength test. The numeral i means that it was the first excursion at the given target displacement, whilst higher numerals denote the repetition number; for example, ii means that the test was the second excursion at the given target displacement. The th column denotes whether the half-cycle was in the same or opposite direction to the previous half-cycle. Half-cycles in the same direction are denoted as reload, whilst half-cycles in the opposite direction are denoted as reverse. The remaining columns in each table provide results for the properties discussed in Section B.3.1 and include: peak displacement peak ; displacement amplitude amp ; force amplitude F amp ; effective stiffness K; equivalent viscous damping ratio ξ hyst ; and the envelope point coordinates env and F env. Figures B.16 B.23 provide several different graphs for each wall tested. On the left-hand side of each figure (from top to bottom) are plots of the peak displacement peak versus test index; force amplitude F amp versus test index; effective stiffness K versus test index; and equivalent viscous damping ratio ξ hyst versus test index. On the right-hand side (from top to bottom) are plots of the force F versus displacement ; effective stiffness K versus displacement amplitude amp ; and equivalent viscous damping ratio ξ hyst versus displacement amplitude amp. Values of key results for each wall, as described in Section B.3.2, are also annotated.
53 38 quasistatic cyclic testing 1 [mm] -1 F [kn] - 4 K [kn/mm] 2.4 ξ.2 Ultimate load test Initial cycles (reverse) Repeat cycles (reverse) + F ult = 47. kn 3.1 mm 38.2 mm +.8 F ult F ht + = 26. kn Test Index F δ = -. [kn] δ =. - F ht = kn -.8 F ult -39. mm - F ult -3.9 mm = -34. kn Test Index [mm] 4 K = exp( ) K = exp( ) K [kn/mm] Test Index amp [mm] δ = -.7 δ = -.2 δ =.2 δ =.7.4 ξ Test Index amp [mm] Figure B.16: Cycle analysis results for wall s1.
54 b.3 analysis of cyclic response 381 Table B.1: Results of individual cycles for wall s1. Test Index Test Type Target [mm] Cycle Type Measured Cycle Properties Envelope Point Rep. no Dir. peak amp Famp K ξ env Fenv [mm] [mm] [kn] [kn/mm] [mm] [kn] 1 ult cyc 1 i reverse cyc +1 i reverse cyc 1 ii reverse cyc +2 i reverse cyc 2 i reverse cyc +2 ii reverse cyc 2 ii reverse cyc +3 i reverse cyc 3 i reverse cyc +3 ii reverse cyc 3 ii reverse cyc +4 i reverse cyc 4 i reverse cyc +4 ii reverse cyc 4 ii reverse cyc + i reverse cyc i reverse cyc + ii reverse cyc ii reverse cyc +6 i reverse cyc 6 i reverse cyc +7 i reverse (*) indicates that amp is same as peak, which is the case for reverse cycles.
55 382 quasistatic cyclic testing 1 [mm] F [kn] K [kn/mm] 1.4 ξ.2 Ultimate load test Initial cycles (reverse) Repeat cycles (reverse) F ult = 3. kn 3.8 mm 31.3 mm Test Index F ult F δ = -. [kn] δ =. F ht + = 12.3 kn F ht = -1.4 kn -41. mm -7.3 mm -.8 F ult - F ult = kn Test Index [mm] 2 K = exp( ) K = exp( ) K [kn/mm] Test Index amp [mm] δ = -.7 δ = -.2 δ =.2 δ =.7.4 ξ Test Index amp [mm] Figure B.17: Cycle analysis results for wall s2.
56 b.3 analysis of cyclic response 383 Table B.2: Results of individual cycles for wall s2. Test Index Test Type Target [mm] Cycle Type Measured Cycle Properties Envelope Point Rep. no Dir. peak amp Famp K ξ env Fenv [mm] [mm] [kn] [kn/mm] [mm] [kn] 1 ult cyc 1 i reverse cyc +1 i reverse cyc 1 ii reverse cyc +1 ii reverse cyc 2 i reverse cyc +2 i reverse cyc 2 ii reverse cyc +2 ii reverse cyc 3 i reverse cyc +3 i reverse cyc 3 ii reverse cyc +3 ii reverse cyc 4 i reverse cyc +4 i reverse cyc 4 ii reverse cyc +4 ii reverse cyc i reverse cyc + i reverse cyc ii reverse cyc + ii reverse cyc 6 i reverse cyc +6 i reverse cyc 6 ii reverse cyc +6 ii reverse cyc 7 i reverse cyc +7 i reverse cyc 7 ii reverse cyc +7 ii reverse cyc 8 i reverse cyc +8 i reverse cyc 9 i reverse cyc +9 i reverse (*) indicates that amp is same as peak, which is the case for reverse cycles.
57 384 quasistatic cyclic testing 1 [mm] -1 F [kn] - 3 K [kn/mm] ξ.2 Ultimate load test Initial cycles (reverse) Repeat cycles (reverse) + F ult = 44.2 kn 2.4 mm 3.2 mm +.8 F ult F ht + = 27.4 kn Test Index F δ = -. [kn] δ =. - F ht = -2.6 kn -.3 mm - F ult -.9 mm -.8 F ult = -32. kn Test Index [mm] 3 K = exp( ) K = exp( ) K [kn/mm] Test Index amp [mm] δ = -.7 δ = -.2 δ =.2 δ =.7.4 ξ Test Index amp [mm] Figure B.18: Cycle analysis results for wall s3.
58 b.3 analysis of cyclic response 38 Table B.3: Results of individual cycles for wall s3. Test Index Test Type Target [mm] Cycle Type Measured Cycle Properties Envelope Point Rep. no Dir. peak amp Famp K ξ env Fenv [mm] [mm] [kn] [kn/mm] [mm] [kn] 1 ult cyc 1 i reverse cyc +1 i reverse cyc 1 ii reverse cyc +1 ii reverse cyc 2 i reverse cyc +2 i reverse cyc 2 ii reverse cyc +2 ii reverse cyc 3 i reverse cyc +3 i reverse cyc 3 ii reverse cyc +3 ii reverse cyc 4 i reverse cyc +4 i reverse cyc 4 ii reverse cyc +4 ii reverse cyc i reverse cyc + i reverse cyc ii reverse cyc + ii reverse cyc 6 i reverse cyc +6 i reverse cyc 6 ii reverse cyc +6 ii reverse cyc 7 i reverse cyc +7 i reverse cyc 7 ii reverse cyc +7 ii reverse cyc 8 i reverse cyc +8 i reverse cyc 9 i reverse cyc +9 i reverse cyc 1 i reverse cyc +1 i reverse (*) indicates that amp is same as peak, which is the case for reverse cycles.
59 386 quasistatic cyclic testing 1 [mm] F [kn] K [kn/mm] ξ.2 Ultimate load test Initial cycles (reverse) Repeat cycles (reverse) Initial cycles (reload) F ult = 34.2 kn +.8 F ult 3.1 mm 38.6 mm F ht + = 21.7 kn Test Index 1 F δ = -. [kn] δ = F ht = -22. kn -48. mm - F ult -8. mm -.8 F ult = kn Test Index [mm] 3 K = exp( ) K = exp( ) K [kn/mm] Test Index amp [mm] δ = -.7 δ = -.2 δ =.2 δ =.7.4 ξ Test Index amp [mm] Figure B.19: Cycle analysis results for wall s4.
60 b.3 analysis of cyclic response 387 Table B.4: Results of individual cycles for wall s4. Test Index Test Type Target [mm] Cycle Type Measured Cycle Properties Envelope Point Rep. no Dir. peak amp Famp K ξ env Fenv [mm] [mm] [kn] [kn/mm] [mm] [kn] 1 ult cyc 1 i reverse cyc +1 i reverse cyc 1 ii reverse cyc +1 ii reverse cyc +2 i reload cyc 2 i reverse cyc +2 ii reverse cyc 2 ii reverse cyc 3 i reload cyc +3 i reverse cyc 3 ii reverse cyc +3 ii reverse cyc +4 i reload cyc 4 i reverse cyc +4 ii reverse cyc 4 ii reverse cyc i reload cyc + i reverse cyc ii reverse cyc + ii reverse cyc +6 i reload cyc 6 i reverse cyc +6 ii reverse cyc 6 ii reverse cyc 7 i reload cyc +7 i reverse cyc 7 ii reverse cyc +7 ii reverse cyc +8 i reload cyc 8 i reverse cyc +8 ii reverse cyc 8 ii reverse cyc +9 i reverse cyc 9 i reverse cyc +1 i reverse cyc 1 i reverse (*) indicates that amp is same as peak, which is the case for reverse cycles.
61 388 quasistatic cyclic testing 1 [mm] F [kn] K [kn/mm] 1.4 ξ.2 Ultimate load test Initial cycles (reverse) Repeat cycles (reverse) Initial cycles (reload) F ult = 31.4 kn +.8 F ult 14.9 mm 2.8 mm Test Index + F 1 ht = 9.8 kn F δ = -. [kn] δ = F ht = -7.4 kn -3.2 mm -2. mm -.8 F ult - F ult = -18. kn Test Index [mm] 2 K = exp( ) K = exp( ) K [kn/mm] Test Index amp [mm] δ = -.7 δ = -.2 δ =.2 δ =.7.4 ξ Test Index amp [mm] Figure B.2: Cycle analysis results for wall s.
62 b.3 analysis of cyclic response 389 Table B.: Results of individual cycles for wall s. Test Index Test Type Target [mm] Cycle Type Measured Cycle Properties Envelope Point Rep. no Dir. peak amp Famp K ξ env Fenv [mm] [mm] [kn] [kn/mm] [mm] [kn] 1 ult cyc 1 i reverse cyc +1 i reverse cyc 1 ii reverse cyc +1 ii reverse cyc +2 i reload cyc 2 i reverse cyc +2 ii reverse cyc 2 ii reverse cyc 3 i reload cyc +3 i reverse cyc 3 ii reverse cyc +3 ii reverse cyc +4 i reload cyc 4 i reverse cyc +4 ii reverse cyc 4 ii reverse cyc i reload cyc + i reverse cyc ii reverse cyc + ii reverse cyc +6 i reload cyc 6 i reverse cyc +6 ii reverse cyc 6 ii reverse cyc 7 i reload cyc +7 i reverse cyc 7 ii reverse cyc +7 ii reverse cyc +8 i reload cyc 8 i reverse cyc +8 ii reverse cyc 8 ii reverse cyc +9 i reverse cyc 9 i reverse cyc +1 i reverse cyc 1 i reverse (*) indicates that amp is same as peak, which is the case for reverse cycles.
63 39 quasistatic cyclic testing [mm] F [kn] K [kn/mm] ξ.2 Ultimate load test Initial cycles (reverse) Repeat cycles (reverse) Initial cycles (reload) F ult = 17.2 kn +.8 F ult 23.8 mm 6.1 mm F ht + = 14.2 kn Test Index F δ = -. [kn] δ = F ht = kn -9.9 mm mm -.8 F ult - F ult = -1.1 kn Test Index [mm] 1 K = exp( ) K = exp( ) K [kn/mm] Test Index amp [mm] δ = -.7 δ = -.2 δ =.2 δ =.7.4 ξ Test Index amp [mm] Figure B.21: Cycle analysis results for wall s6.
64 b.3 analysis of cyclic response 391 Table B.6: Results of individual cycles for wall s6. Test Index Test Type Target [mm] Cycle Type Measured Cycle Properties Envelope Point Rep. no Dir. peak amp Famp K ξ env Fenv [mm] [mm] [kn] [kn/mm] [mm] [kn] 1 ult cyc +2 i reverse cyc 2 i reverse cyc 3 i reload cyc +3 i reverse cyc 3 ii reverse cyc +3 ii reverse cyc +4 i reload cyc 4 i reverse cyc +4 ii reverse cyc 4 ii reverse cyc i reload cyc + i reverse cyc ii reverse cyc + ii reverse cyc +6 i reload cyc 6 i reverse cyc +6 ii reverse cyc 6 ii reverse cyc 7 i reload cyc +7 i reverse cyc 7 ii reverse cyc +8 i reverse cyc 8 i reverse cyc +8 ii reverse cyc 8 ii reverse cyc +9 i reverse cyc 8 iii reverse cyc +9 ii reverse cyc 9 i reverse cyc +1 i reverse cyc 1 i reverse cyc +11 i reverse cyc 11 i reverse cyc +12 i reverse cyc 12 i reverse (*) indicates that amp is same as peak, which is the case for reverse cycles.
65 392 quasistatic cyclic testing 1 [mm] -1 F [kn] - 3 K [kn/mm] ξ.2 Ultimate load test Initial cycles (reverse) Repeat cycles (reverse) Initial cycles (reload) Repeat cycles (reload) + F ult = 42.2 kn 2. mm 4.4 mm +.8 F ult F ht + = 28.9 kn Test Index F [kn] δ = mm -27. mm -.8 F ult - F ult = kn Test Index [mm] 3 K = exp( ) K [kn/mm] Test Index amp [mm] δ =.2 δ =.7.4 ξ Test Index amp [mm] Figure B.22: Cycle analysis results for wall s7.
66 b.3 analysis of cyclic response 393 Table B.7: Results of individual cycles for wall s7. Test Index Test Type Target [mm] Cycle Type Measured Cycle Properties Envelope Point Rep. no Dir. peak amp Famp K ξ env Fenv [mm] [mm] [kn] [kn/mm] [mm] [kn] 1 ult cyc 1 i reverse cyc +1 i reverse cyc +2 i reload cyc 2 i reverse cyc +2 ii reverse cyc 2 ii reverse cyc 3 i reload cyc +3 i reverse cyc 2 iv reverse cyc +3 ii reverse cyc +4 i reload cyc 3 ii reverse cyc +4 ii reverse cyc 3 iii reverse cyc 3 iv reload cyc + i reverse cyc 3 v reverse cyc + ii reverse cyc +6 i reload cyc 4 i reverse cyc +6 ii reverse cyc 3 vii reverse cyc 4 ii reload cyc +7 i reverse cyc 4 iii reverse cyc +7 ii reverse cyc +8 i reload cyc +8 ii reload (*) indicates that amp is same as peak, which is the case for reverse cycles.
67 394 quasistatic cyclic testing 1 [mm] -1 F [kn] - 3 K [kn/mm] ξ.2 Ultimate load test Initial cycles (reverse) Repeat cycles (reverse) Initial cycles (reload) Repeat cycles (reload) + F ult = 41.3 kn.3 mm 2. mm +.8 F ult F ht + = 11. kn Test Index F δ = -. [kn] δ =. - F ht = -8.4 kn -3.2 mm -4. mm -.8 F ult - F ult = kn Test Index [mm] 3 K = exp( ) K = exp( ) K [kn/mm] Test Index amp [mm] δ = -.7 δ = -.2 δ =.2 δ =.7.4 ξ Test Index amp [mm] Figure B.23: Cycle analysis results for wall s8.
68 b.3 analysis of cyclic response 39 Table B.8: Results of individual cycles for wall s8. Test Index Test Type Target [mm] Cycle Type Measured Cycle Properties Envelope Point Rep. no Dir. peak amp Famp K ξ env Fenv [mm] [mm] [kn] [kn/mm] [mm] [kn] 1 ult cyc 1 i reverse cyc +1 i reverse cyc 1 ii reverse cyc +1 ii reverse cyc +2 i reload cyc 2 i reverse cyc +2 ii reverse cyc 2 ii reverse cyc 3 i reload cyc +4 i reverse cyc 3 ii reverse cyc +3 ii reverse cyc +4 ii reload cyc 4 i reverse cyc +4 iii reverse cyc 4 ii reverse cyc +4 iv reverse cyc 4 iii reverse cyc i reload cyc + i reverse cyc ii reverse cyc + ii reverse cyc +6 i reload cyc 6 i reverse cyc +6 ii reverse cyc 6 ii reverse cyc 7 i reload cyc +7 i reverse cyc 7 ii reverse cyc +7 ii reverse cyc +8 i reload cyc 8 i reverse cyc +8 ii reverse cyc 8 ii reverse cyc 9 i reload cyc +8 iii reverse (*) indicates that amp is same as peak, which is the case for reverse cycles.
69 396 quasistatic cyclic testing b.4 wall deformation profiles Figures B.24 B.31 provide plots of each wall s deformation profile during the initial push test. The data used to generate these graphs was measured using the displacement transducer layouts shown in Figure B.4. The graphs plot the deformations at the vertical slices a a, b b and c c, located at the quarter- and mid-span positions along the wall. These deformations have been calculated as the displacement at each point along the wall relative to the supports. Each graph has two horizontal axes to denote the displacement: The top axis refers to the actual displacement, while the bottom axis shows the displacement normalised by the maximum value along the wall. 1 For each wall, two graphs are provided: The first one shows the profile at the instance that the wall reached its maximum strength, and the second one shows the profile at the maximum imposed displacement during the initial push test. For comparison, the displacement shapes based on the idealised failure mechanisms which are assumed by the virtual work analytical method (Chapter 4) for computing the strength of the wall, are also shown. A discussion of the observed trends is provided in Section Note that the normalised displacement plotted on these graphs is distinct from the definition of the normalised displacement δ as used in other parts of this thesis and defined by Eq. (2.2).
70 b.4 wall deformation profiles 397 Relative Displacement (mm) Relative Displacement (mm) 248 A B C A B C Vertical Distance (mm) Normalised Displacement A B C Idealised A-A and C-C Idealised B-B Experimental A-A Experimental B-B Experimental C-C Vertical Distance (mm) Normalised Displacement A B C Idealised A-A and C-C Idealised B-B Experimental A-A Experimental B-B Experimental C-C (a) During point of ultimate strength. (b) At maximum imposed displacement. Figure B.24: Displacement profile for wall s1. Relative Displacement (mm) Relative Displacement (mm) A B C A B C Vertical Distance (mm) Normalised Displacement A B C Idealised A-A and C-C Idealised B-B Experimental A-A Experimental B-B Experimental C-C Vertical Distance (mm) Normalised Displacement A B C Idealised A-A and C-C Idealised B-B Experimental A-A Experimental B-B Experimental C-C (a) During point of ultimate strength. (b) At maximum imposed displacement. Figure B.2: Displacement profile for wall s2. Relative Displacement (mm) Relative Displacement (mm) A B C A B C Vertical Distance (mm) A B C Idealised A-A and C-C Idealised B-B Experimental A-A Experimental B-B Experimental C-C Vertical Distance (mm) A B C Idealised A-A and C-C Idealised B-B Experimental A-A Experimental B-B Experimental C-C Normalised Displacement Normalised Displacement (a) During point of ultimate strength. (b) At maximum imposed displacement. Figure B.26: Displacement profile for wall s3.
71 398 quasistatic cyclic testing Relative Displacement (mm) Relative Displacement (mm) A B C A B C Vertical Distance (mm) Normalised Displacement A B C Idealised A-A and C-C Idealised B-B Experimental A-A Experimental B-B Experimental C-C Vertical Distance (mm) Normalised Displacement A B C Idealised A-A and C-C Idealised B-B Experimental A-A Experimental B-B Experimental C-C (a) During point of ultimate strength. (b) At maximum imposed displacement. Figure B.27: Displacement profile for wall s4. Relative Displacement (mm) Relative Displacement (mm) A B C A B C Vertical Distance (mm) Normalised Displacement A B C Idealised A-A and C-C Idealised B-B Experimental A-A Experimental B-B Experimental C-C Vertical Distance (mm) Normalised Displacement A B C Idealised A-A and C-C Idealised B-B Experimental A-A Experimental B-B Experimental C-C (a) During point of ultimate strength. (b) At maximum imposed displacement. Figure B.28: Displacement profile for wall s. 248 Relative Displacement (mm) 1 2 A B C 248 Relative Displacement (mm) A B C Vertical Distance (mm) Normalised Displacement A B C Idealised A-A and C-C Idealised B-B Experimental A-A Experimental B-B Experimental C-C Vertical Distance (mm) Normalised Displacement A B C Idealised A-A and C-C Idealised B-B Experimental A-A Experimental B-B Experimental C-C (a) During point of ultimate strength. (b) At maximum imposed displacement. Figure B.29: Displacement profile for wall s6.
72 b.4 wall deformation profiles 399 Relative Displacement (mm) Relative Displacement (mm) A B C A B C Vertical Distance (mm) Normalised Displacement A B C Idealised A-A and C-C Idealised B-B Experimental A-A Experimental B-B Experimental C-C Vertical Distance (mm) Normalised Displacement A B C Idealised A-A and C-C Idealised B-B Experimental A-A Experimental B-B Experimental C-C (a) During point of ultimate strength. (b) At maximum imposed displacement. Figure B.3: Displacement profile for wall s7. Relative Displacement (mm) Relative Displacement (mm) A B C A B C Vertical Distance (mm) Normalised Displacement A B C Idealised A-A and C-C Idealised B-B Experimental A-A Experimental B-B Experimental C-C Vertical Distance (mm) Normalised Displacement A B C Idealised A-A and C-C Idealised B-B Experimental A-A Experimental B-B Experimental C-C (a) During point of ultimate strength. (b) At maximum imposed displacement. Figure B.31: Displacement profile for wall s8.
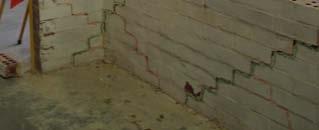
73 4 quasistatic cyclic testing b. crack pattern photographs Figures B.32 B.39 show photographs of the walls crack patterns at the conclusion of the cyclic tests. Each of these depict the interior face of the respective walls. Due to spatial limitations in the laboratory, it was not possible in some cases to capture the entire wall face in a single photo, so the patterns are demonstrated by multiple photos. Illustrations of these crack patterns are also provided by Figure 2.24 based on close visual inspection of the walls.


74 b. crack pattern photographs 41 Figure B.32: Photograph of wall s1 crack pattern at the conclusion of cyclic testing. Figure B.33: Photograph of wall s2 crack pattern at the conclusion of cyclic testing.


75 42 quasistatic cyclic testing Figure B.34: Photograph of wall s3 crack pattern at the conclusion of cyclic testing. Figure B.3: Photograph of wall s4 crack pattern at the conclusion of cyclic testing.


76 b. crack pattern photographs 43 Figure B.36: Photograph of wall s crack pattern at the conclusion of cyclic testing. Figure B.37: Photograph of wall s6 crack pattern at the conclusion of cyclic testing.


77 44 quasistatic cyclic testing Figure B.38: Photograph of wall s7 crack pattern at the conclusion of cyclic testing. Figure B.39: Photograph of wall s8 crack pattern at the conclusion of cyclic testing.
78 AppendixC S H A K E TA B L E T E S T I N G Abstract This appendix contains additional detail related to Chapter 3. c.1 test run nomenclature For brevity, a standardised convention is used for naming individual test runs. It uses several arguments separated by underscores to provide a description of the tests. The first three arguments are standard 1 and provide the following information: 1. Name of the wall; for example d1, d2, d3, Index of the test run for the particular wall. 3. Type of test; whereby R = pulse test, H = harmonic test, and EQ = earthquake motion test. For example, the first three arguments of test d2_6_r_8mm_1ms imply that it was the sixth test performed on wall d2 and used a pulse input motion. The remaining arguments contain specific information relating to the different types of tests (described in Section 3.2.), as follows: 1 Exceptions include test runs 1 6, 8 1 and for wall d1, which also provide a value of the non-standard axial stress applied at the top of the wall as one of the first four arguments. 4
79 46 shaketable testing pulse tests (r) In these tests, the table underwent a simple displacement step function, as shown by Figure 3.6. The first argument after R denotes the displacement step, and the second argument denotes the time step (defined respectively by x o and dt in Figure 3.6). For example, in test d2_6_r_8mm_1ms the table was subjected to a displacement step of 8 millimetres over 1 milliseconds. harmonic tests (h) These tests used a sinusoidal harmonic input motion, as shown by Figure 3.7. The first argument after R denotes the excitation frequency, and the second argument denotes the table displacement amplitude (defined respectively by f o and x o in Figure 3.7). For example, in test d2_29_h_12hz_.3mm the table was subjected to a harmonic motion at a frequency of 12 Hz with a targeted amplitude of.3 mm. It should be noted, however, that the target PGD was not always accurately reproduced by the table and hence the actual PGD was measured using instrumentation. earthquake motion tests (eq) These tests used earthquake motions defined using a digitised displacement record. The first argument after EQ refers to the name of the earthquake motion; for example, Taft or one of the synthetic motions denoted by Synthx. Details of these input motions are presented in Section C.2. The second argument refers to the input peak displacement (PGD) together with either + or to denote the motion s direction (as defined in Figure C.). For example, test d2_39_eq_taft_+8mm used the Taft earthquake motion with a PGD of 8 mm in the positive direction. c.2 earthquake input motions Time and frequency domain representations of the Taft earthquake motion, which served as the main input motion during these tests, are shown by Figure C.1. In addition, eight synthetic motions were generated, referred to as Synth1 Synth8. The procedure used to generate each motion consisted of the following steps: 1. Digitised Gaussian noise was randomly generated in the time domain. 2. A lowpass filter was applied to the noise in the frequency domain, using the cutoff frequencies given in Table C A shape function was applied to the waveform in the time domain, consisting of three regions: linear ramp-up, constant amplitude, and linear ramp-down.
80 c.2 earthquake input motions 47 Table C.1: Synthetic earthquake motion cutoff frequencies. Quake Cutoff Frequency [Hz] Synth1 6 Synth2 6 Synth3 8 Synth4 8 Synth 12 Synth6 12 Synth7 16 Synth The resulting waveform was used as the synthetic motion s velocity vector.. The velocity was integrated to determine the displacement vector, and differentiated to determine the acceleration vector. 6. During the tests, the motion was scaled to achieve a required PGD. Of the eight synthetic motions generated, all were used in the diagnostic tests performed on the shaketable test setup as described in Appendix D; however, only motions Synth1, Synth3 and Synth were used during the wall tests. These are shown by Figures C.2, C.3 and C.4.
81 48 shaketable testing 1 Displacement [mm] -1 2 Freq. [cyc/s] Velocity [mm/s] 1 FFT Amp - 2 Freq. [cyc/s] Acceleration [mm/s^2] FFT Amp - 2 Freq. [cyc/s] Time [s] 2 4 FFT Amp Figure C.1: Taft input motion in the time and frequency domains. (Scaled such that PGD = +1 mm)
82 c.2 earthquake input motions 49 1 Displacement [mm] -1 2 Freq. [cyc/s] Velocity [mm/s] 2 4 FFT Amp -1 2 Freq. [cyc/s] Acceleration [mm/s^2] 1 FFT Amp -1 2 Freq. [cyc/s] Time [s] FFT Amp Figure C.2: Synth1 input motion in the time and frequency domains. (Scaled such that PGD = +1 mm)
83 41 shaketable testing 1 Displacement [mm] -1 2 Freq. [cyc/s] Velocity [mm/s] FFT Amp - 2 Freq. [cyc/s] Acceleration [mm/s^2] 2 4 FFT Amp -1 2 Freq. [cyc/s] Time [s] FFT Amp Figure C.3: Synth3 input motion in the time and frequency domains. (Scaled such that PGD = +1 mm)
84 c.2 earthquake input motions Displacement [mm] -1 2 Freq. [cyc/s] Velocity [mm/s] FFT Amp -1 2 Freq. [cyc/s] Acceleration [mm/s^2] 2 4 FFT Amp -2 2 Freq. [cyc/s] Time [s] FFT Amp Figure C.4: Synth input motion in the time and frequency domains. (Scaled such that PGD = +1 mm)
85 412 shaketable testing c.3 standard data processing This section details the process conducted on the raw test data to determine the time domain response of variables of interest. Section C.3.1 describes the calculations used, whilst Section C.3.2 reports peak results of selected response variables for each test run performed. c.3.1 Calculation of Time Domain Response Vectors The raw data acquired consisted of output from ten accelerometers and six displacement transducers, sampled at a rate of 2 Hz (Figure C.). A computer routine was implemented to process the test data and derive time domain response vectors for variables of interest. 2 The associated calculations are discussed herein. Positions and Displacements Variables corresponding to positions and displacements are listed below. 3 vector x tab and x sup.bot x sup.top x sup.avg description Position of the table and position of the wall s bottom support, respectively, as measured by displacement transducer dt4 (Figure C.). These are assumed to be effectively equal, since there was shown to be negligible slip between the table and slab. Position of the wall s top support member, as measured by displacement transducer dt3 (Figure C.). Average position of the wall s supports, taken as the average of the top and bottom supports, such that x sup.avg = x sup.bot + x sup.top. (C.1) 2 slab-tab w.bot-slab Displacement (or slip) between the concrete slab and the table, measured using displacement transducer dt (Figure C.). Displacement (or slip) between the wall s bottom edge and the concrete slab, as measured by displacement transducer dt (Figure C.). The displacement transducer was located on the second course of bricks from the bottom of the wall. 2 For clarity, vector variables are denoted using bold symbols (e.g. x or a), and scalar variables using italicised symbols (e.g. x or a). 3 Note the subtle difference between these two parameters: Positions (x) are measured with respect to the absolute reference frame, whilst displacements ( ) measure the relative difference between the positions of two objects.
86 c.3 standard data processing 413 vector sup.top-tab description Relative displacement between the top and bottom supports of the wall. Calculated as sup.top-tab = x sup.top x sup.bot. (C.2) w.cent The wall s central displacement, defined as the position of the centre of the wall relative to its supports. Calculated by first determining the wall s central position x w.cent as the average of the two displacement transducers dt1 and dt2 (Figure C.). The averaging was performed in order to minimise data noise. The central displacement was then taken as w.cent = x w.cent x sup.avg. (C.3) w.cent The wall s central displacement w.cent, zeroed at the start of each test run. Accelerations The following accelerations were determined: vector a w.tl.corner a w.t.edge a w.tr.corner a w.tl.quad a w.tr.quad a w.cent a w.bl.quad a w.br.quad description Acceleration at the top left corner of the wall, as measured by accelerometer ac1 (Figure C.) which was located at the top course of the return wall. Acceleration at the top edge of the wall, as measured by accelerometer ac2 (Figure C.). The accelerometer was located on the second topmost course of bricks, just below the top edge restraint member. Acceleration at the top right corner of the wall, as measured by accelerometer ac3 (Figure C.) which was located at the top course of the return wall. Acceleration at the centre of the top left quadrant of the wall, as measured by accelerometer ac4 (Figure C.). Acceleration at the centre of the top right quadrant of the wall, as measured by accelerometer ac (Figure C.). Acceleration at the centre of the wall, as measured by accelerometer ac6 (Figure C.). Acceleration at the centre of the bottom left quadrant of the wall, as measured by accelerometer ac7 (Figure C.). Acceleration at the centre of the bottom right quadrant of the wall, as measured by accelerometer ac8 (Figure C.).
87 414 shaketable testing vector a slab a tab a sup.avg description Acceleration at the centre of the slab supporting the wall, as measured by accelerometer ac9 (Figure C.). Acceleration at the centre of the table, as measured by accelerometer ac1 (Figure C.). Average acceleration of the wall s supports. Calculated as a weighted average of the slab (% contribution) and the top left and right corners of the wall (2% contribution each), such that a sup.avg =. a slab +.2 a w.tl.corner +.2 a w.tr.corner. (C.4) a w.avg Average acceleration of the wall, calculated as a weighted average of the contributions of the 1 accelerometers according to the summation a w.avg = 1 r k a k, k=1 (C.) where k refers to the index of each accelerometer, with a k being its acceleration and r k its weighting factor. The weighting factor for each accelerometer was taken as its percentage of the tributary area along the wall. The factors are given in Figure C.6. The resulting vector a w.avg was used for computing the wall s resisting force and pressure. a w.cent-sup.avg Relative acceleration between the wall s centre and its top and bottom supports, calculated as a w.cent-sup.avg = a w.cent a sup.avg. (C.6) The primary purpose of this response variable was for use in a subsequent spectral analysis for determining the wall s vibrational frequency, since it best captures the wall s fundamental mode of vibration. For comparison, this relative acceleration was also calculated by double differentiating the wall s central displacement w.cent. The response vector resulting from this latter approach exhibited greater levels of data noise than that calculated using the above equation. However, at larger levels of shaking the resulting vectors were very similar in their peak response, waveform and spectral content. Pressure and Force Finally, the pressure and force resisted by the wall were calculated using the wall s average acceleration a w.avg. These calculations are based on the equation of motion and the assumption of negligible viscous (velocity-proportional) forces.
88 c.3 standard data processing 41 Top edge support AC1 O X DT3 (displacement relative to floor) O AC3 O AC2 Return wall O AC4 O AC DT1, DT2 X O (displacement relative to floor) AC6 O AC7 O AC8 X DT6 (displacement relative to slab) Slab O AC9 X DT (displacement relative to table) Table AC1 O X DT4 (displacement relative to floor) Concrete Base Floor O - location of accelerometer X - location of displacement transducer FRONT VIEW OF THE WALL'S OUTER FACE Top edge supports DT3 Return wall Frame used to mount instrumentation DT2 DT1 Positive direction for measurement of displacement, velocity and acceleration x(+) DT6 Slab Table DT DT4 Concrete Base Floor SIDE VIEW Figure C.: Map of the instrumentation used for shaketable tests, comprising of 1 accelerometers (labelled ac1 ac1) and 6 displacement transducers (labelled dt1 dt6). Diagram is applicable to walls both with and without openings.
89 416 shaketable testing AC1 8.6% AC2 9.6% AC3 8.6% AC1 1.% AC2 11.1% AC3 1.% AC4 7.9% AC 7.9% AC4 4.1% AC 9.1% AC6 12.1% AC6 8.4% AC7 8.8% AC8 8.8% AC7.% AC8 1.2% AC9 27.8% AC9 32.2% (a) Solid walls. (b) Walls with window. Figure C.6: Accelerometer tributary area percentages, used as weighting factors in calculation of the wall s average acceleration. vector q w description Uniformly distributed face pressure resisted by the wall, calculated as q w = γ t u g a w.avg, (C.7) F w where γ is the unit weight of the masonry, t u is the thickness of the wall and g is acceleration due to gravity. Out-of-plane force resisted by the wall, calculated as F w = M w a w.avg. (C.8) In this expression, M w is the mass of the wall, such that where A w is the wall s net area. M w = γ t u A w, (C.9) g c.3.2 Results Table C.6 summarises the peak values for key variables in each test run performed, and also provides miscellaneous notes relating to individual test runs. P Table C.: Legend for the notes column in Table C.6. New cracking occurred during the test. No new cracking occurred during the test. This is only shown for tests between initial and full cracking of the wall. Shaketable underwent unexpected impacts which generated spikes in its acceleration response (refer to Appendix D). Test was recorded using video camera. Cracking pattern was photographed after the test.
90 c.3 standard data processing 417 Table C.6: Peak response of key variables during individual test runs. The tests are listed in the order in which they were performed. Table C. provides an explanation of the symbols used in the notes column. Test Name Notes Table and Supports Wall Response x tab xsup.avg sup.top-tab a tab asup.avg w.cent w.cent aw.cent aw.avg qw Fw [mm] [mm] [mm] [mm] [mm] [kpa] [N] d_1_h_14hz_.mm d_2_h_14hz_.1mm d_3_h_14hz_.1mm d_4_h_14hz_.2mm P d R_2mm_2ms d_6_r_4mm_2ms d_7_r_4mm_1ms d_8_h_14hz_.2mm d_9_h_14hz_.2mm P d_1_r_2mm_2ms d_11_r_4mm_2ms d_12_r_4mm_1ms d_13_h_14hz_.3mm d_14_r_2mm_2ms d_1_r_4mm_2ms d_16_r_4mm_1ms d_17_eq_taft_-6mm d_18_eq_taft_+6mm d_19_eq_taft_+11mm d_2_eq_taft_-11mm d_21_eq_taft_-17mm d_22_eq_taft_+17mm d_23_eq_taft_+22mm d_24_eq_taft_-22mm d_2_eq_taft_-28mm d_26_eq_taft_+28mm d_27_eq_taft_+33mm d_28_eq_taft_-33mm d_29_eq_taft_-39mm continued on next page 4 These three free vibration tests ( 7) showed the wall s frequency to be approximately 1-2 Hz. However, a preliminary free vibration test performed prior to test no. 1 by impacting the wall with a rubber mallet showed a strong signal at approximately 3 Hz. It is likely that the reduction in frequency from 3 Hz to 1-2 Hz was a result of the initial cracking of the wall. Wall became fully cracked.
91 418 shaketable testing Table C.6: (cont d). Test Name Notes Table and Supports Wall Response x tab xsup.avg sup.top-tab a tab asup.avg w.cent w.cent aw.cent aw.avg qw Fw [mm] [mm] [mm] [mm] [mm] [kpa] [N] d_3_eq_taft_+39mm d_31_eq_taft_+4mm d_32_eq_taft_-4mm d_33_eq_taft_-mm d_34_eq_taft_+mm P d_3_eq_taft_+6mm d_36_eq_taft_-6mm d_37_eq_taft_-67mm d_38_eq_taft_+67mm d_39_r_2mm_2ms d_4_r_4mm_2ms d_41_r_4mm_1ms d_42_eq_taft_+73mm d_43_eq_taft_-73mm d_44_eq_taft_-78mm d_4_eq_taft_+78mm d_46_r_2mm_2ms d_47_r_4mm_2ms d_48_r_4mm_1ms d_49_eq_taft_+22mm d EQ_Taft_-22mm d_1_eq_taft_-4mm d_2_eq_taft_+4mm d_3_eq_taft_+67mm d_4_eq_taft_-67mm d EQ_Taft_-84mm d_6_eq_taft_+84mm d_7_eq_taft_+89mm d_8_eq_taft_-89mm d_9_eq_taft_-9mm d_6_eq_taft_+9mm P d_61_eq_taft_+1mm d_62_eq_taft_-1mm 6 P d3_1_r_2mm_2ms d3_2_r_4mm_2ms continued on next page 6 Lintel fell out due to a loss of connection with the wall at one of its ends.
92 c.3 standard data processing 419 Table C.6: (cont d). Test Name Notes Table and Supports Wall Response x tab xsup.avg sup.top-tab a tab asup.avg w.cent w.cent aw.cent aw.avg qw Fw [mm] [mm] [mm] [mm] [mm] [kpa] [N] d3_3_r_4mm_1ms d3_4_r_8mm_1ms d3 H_13Hz_.mm d3_6_h_13hz_.1mm d3_7_h_13hz_.1mm d3_8_h_13hz_.2mm d3_9_h_13hz_.2mm d3_1_h_13hz_.3mm 7 P d3_11_h_13hz_.3mm d3_12_r_4mm_2ms d3_13_r_4mm_1ms d3_14_r_8mm_1ms d3_1_h_13hz_.3mm d3_16_h_13hz_.4mm P d3_17_r_4mm_2ms d3_18_r_4mm_1ms d3_19_r_8mm_1ms d3_2_h_12hz_.4mm 9 P d3_21_r_4mm_2ms d3_22_r_4mm_1ms d3_23_r_8mm_1ms d3_24_eq_taft_-mm d3_2_eq_taft_+mm d3_26_eq_taft_+1mm d3_27_eq_taft_-1mm d3_28_eq_taft_-2mm d3_29_eq_taft_+2mm d3_3_eq_taft_+3mm d3_31_eq_taft_-3mm d3_32_eq_taft_-4mm d3_33_eq_taft_+4mm d3_34_eq_taft_+mm d3_3_eq_taft_-mm continued on next page 7 Precompression springs underwent severe horizontal vibration during test 1. 8 Precompression springs were restrained prior to conducting this test. The revised test setup was retained for all subsequent tests with precompression. 9 Wall became fully cracked.
93 42 shaketable testing Table C.6: (cont d). Test Name Notes Table and Supports Wall Response x tab xsup.avg sup.top-tab a tab asup.avg w.cent w.cent aw.cent aw.avg qw Fw [mm] [mm] [mm] [mm] [mm] [kpa] [N] d3_36_eq_taft_-6mm d3_37_eq_taft_+6mm d3_38_eq_taft_+7mm d3_39_eq_taft_-7mm d3_4_eq_taft_-8mm d3_41_eq_taft_+8mm d3_42_r_4mm_2ms d3_43_r_4mm_1ms d3_44_r_8mm_1ms d3_4_eq_taft_+9mm d3_46_eq_taft_-9mm d3_47_r_4mm_2ms d3_48_r_4mm_1ms d3_49_r_8mm_1ms d3 EQ_Taft_-1mm d3_1_eq_taft_+1mm d3_2_eq_taft_+11mm P d3_3_eq_taft_-11mm d3_4_eq_taft_-12mm d3 EQ_Taft_+12mm d3_6_eq_taft_+6mm d3_7_eq_taft_-6mm d3_8_h_12hz_.1mm d3_9_h_12hz_.2mm d3_6_h_12hz_.4mm P d4_1_r_4mm_2ms d4_2_r_4mm_1ms d4_3_r_8mm_1ms d4_4_h_13hz_.mm d4 H_13Hz_.1mm d4_6_eq_taft_-4mm d4_7_eq_taft_+4mm d4_8_eq_taft_+8mm, continued on next page 1 These Taft earthquake runs (6 9) were conducted early in the test sequence in order to observe the response of an uncracked wall subjected to an earthquake motion. Previously, earthquake runs were only performed once the wall was fully cracked.
94 c.3 standard data processing 421 Table C.6: (cont d). Test Name Notes Table and Supports Wall Response x tab xsup.avg sup.top-tab a tab asup.avg w.cent w.cent aw.cent aw.avg qw Fw [mm] [mm] [mm] [mm] [mm] [kpa] [N] d4_9_eq_taft_-8mm, d4_1_r_4mm_2ms d4_11_r_4mm_1ms d4_12_r_8mm_1ms d4_13_h_13hz_.1mm d4_14_h_13hz_.2mm d4_1_h_13hz_.2mm d4_16_h_13hz_.3mm d4_17_h_13hz_.3mm d4_18_h_13hz_.4mm d4_19_r_4mm_2ms d4_2_r_4mm_1ms d4_21_r_8mm_1ms d4_22_h_13hz_.4mm d4_23_h_13hz_.mm d4_24_r_4mm_2ms d4_2_r_4mm_1ms d4_26_r_8mm_1ms d4_27_h_6hz_.1mm d4_28_h_6hz_.2mm d4_29_h_6hz_.3mm d4_3_h_6hz_.4mm d4_31_h_6hz_.mm d4_32_h_6hz_.7mm d4_33_h_6hz_1.mm d4_34_h_6hz_1.mm d4_3_r_4mm_2ms d4_36_r_4mm_1ms d4_37_r_8mm_1ms d4_38_h_13hz_.1mm d4_39_h_13hz_.2mm d4_4_h_13hz_.3mm d4_41_h_13hz_.4mm d4_42_r_4mm_2ms d4_43_r_4mm_1ms continued on next page 11 Wall became fully cracked.
95 422 shaketable testing Table C.6: (cont d). Test Name Notes Table and Supports Wall Response x tab xsup.avg sup.top-tab a tab asup.avg w.cent w.cent aw.cent aw.avg qw Fw [mm] [mm] [mm] [mm] [mm] [kpa] [N] d4_44_r_8mm_1ms d4_4_eq_taft_-1mm d4_46_eq_taft_+1mm d4_47_eq_taft_+2mm d4_48_eq_taft_-2mm d4_49_eq_taft_-3mm d4 EQ_Taft_+3mm d4_1_eq_taft_+4mm d4_2_eq_taft_-4mm d4_3_eq_taft_-mm d4_4_eq_taft_+mm d4 EQ_Taft_+6mm d4_6_eq_taft_-6mm d4_7_r_4mm_2ms d4_8_r_4mm_1ms d4_9_r_8mm_1ms d4_6_eq_taft_+6mm d4_61_eq_taft_-6mm d4_62_eq_taft_-7mm d4_63_eq_taft_+7mm d4_64_eq_taft_+7mm d4_6_eq_taft_-7mm d4_66_r_4mm_2ms d4_67_r_4mm_1ms d4_68_r_8mm_1ms continued on next page 12 Tests 6 61 were repeats of tests 6 in that both used the same PGD; however, the PID setting of the controller was reduced from 36 db to 3 db in the latter tests. This was to investigate whether shaketable impacts (Appendix D) could be stopped from occurring by lowering the PID setting. However, whilst this caused the PGA generated to reduce, the impacts still occurred for the +6 mm PGD run as before. The reduced PID setting of 3 db was also retained in tests The influence of the PID is discussed in Appendix D In tests 64 6, the PID was further reduced to 2 db, but the impacts still continued to occur, even though there was a reduction in the generated PGA relative to tests which were carried out at the same PGD. 14 In test 66 and onwards, the PID was restored to 36 db after it was concluded that reducing the PID setting of the controller was an unviable method of limiting the influence of the shaketable impacts.
96 c.3 standard data processing 423 Table C.6: (cont d). Test Name Notes Table and Supports Wall Response x tab xsup.avg sup.top-tab a tab asup.avg w.cent w.cent aw.cent aw.avg qw Fw [mm] [mm] [mm] [mm] [mm] [kpa] [N] d4_69_eq_taft_+7mm d4_7_eq_taft_-7mm d4_71_eq_taftbf_-7mm d4_72_eq_taftbf_+7mm d4_73_eq_taftbf1_+7mm d4_74_eq_taftbf1_-7mm d4_7_eq_taftbf2_-7mm d4_76_eq_taftbf2_+7mm d4_77_eq_taftbf3_+7mm d4_78_eq_taftbf3_-7mm d4_79_eq_taftbf_-7mm d4_8_eq_taftbf_+7mm d4_81_eq_taftbf7_+7mm d4_82_eq_taftbf7_-7mm d4_83_eq_taftbf1_-7mm d4_84_eq_taftbf1_+7mm d4_8_r_4mm_2ms d4_86_r_4mm_1ms d4_87_r_8mm_1ms d4_88_h_13hz_.2mm d4_89_h_13hz_.4mm d4_9_h_13hz_.6mm d4_91_r_4mm_2ms d4_92_r_4mm_1ms d4_93_r_8mm_1ms d4_94_eq_taft_+7mm d4_9_eq_taft_-7mm d4_96_eq_taft_-8mm d4_97_eq_taft_+8mm d4_98_eq_taft_+9mm continued on next page 1 In a further attempt to prevent the shaketable impacts, tests trialled alternate versions of the Taft motion. Runs 69 7 used the standard Taft motion as a control reference, whilst runs used Taft motions which had been filtered using a binomial filter in the time domain. The period of the filter (number of data points used for weighted averaging) are indicated in the test name. For example, Taftbf means that the binomial filter averaged five adjacent data points in the original motion. Even though the PGA reduced as the severity of filtration was increased, the impacts still continued to occur. Hence, the original Taft motion was restored in subsequent tests.
97 424 shaketable testing Table C.6: (cont d). Test Name Notes Table and Supports Wall Response x tab xsup.avg sup.top-tab a tab asup.avg w.cent w.cent aw.cent aw.avg qw Fw [mm] [mm] [mm] [mm] [mm] [kpa] [N] d4_99_eq_taft_-9mm d4_1_eq_taft_-1mm d4_11_eq_taft_+1mm d4_12_eq_taft_+11mm d4_13_eq_taft_-11mm d4_14_eq_taft_-12mm d4_1_eq_taft_+12mm d4_16_r_4mm_2ms d4_17_r_4mm_1ms d4_18_r_8mm_1ms d4_19_h_13hz_.1mm d4_11_h_13hz_.2mm d4_111_h_13hz_.3mm d4_112_h_13hz_.4mm d4_113_h_13hz_.mm d4_114_r_4mm_2ms d4_11_r_4mm_1ms d4_116_r_8mm_1ms P d2_1_r_4mm_2ms d2_2_r_4mm_1ms d2_3_r_8mm_1ms d2_4_r_4mm_2ms d2 R_4mm_1ms d2_6_r_8mm_1ms d2_7_h_12hz_.mm d2_8_h_12hz_.1mm d2_9_h_12hz_.2mm d2_1_r_4mm_2ms d2_11_r_4mm_1ms d2_12_r_8mm_1ms d2_13_h_12hz_.2mm d2_14_h_12hz_.2mm d2_1_z d2_16_r_4mm_2ms d2_17_r_4mm_1ms continued on next page 16 Unusually, first cracking occurred during a pulse test. All other walls tested were able to withstand the initial pulse tests without cracking.
98 c.3 standard data processing 42 Table C.6: (cont d). Test Name Notes Table and Supports Wall Response x tab xsup.avg sup.top-tab a tab asup.avg w.cent w.cent aw.cent aw.avg qw Fw [mm] [mm] [mm] [mm] [mm] [kpa] [N] d2_18_r_8mm_1ms d2_19_z d2_2_h_12hz_.1mm d2_21_h_12hz_.2mm d2_22_z d2_23_h_12hz_.1mm d2_24_h_12hz_.2mm d2_2_r_4mm_2ms d2_26_r_4mm_1ms d2_27_r_8mm_1ms d2_28_h_12hz_.2mm d2_29_h_12hz_.3mm d2_3_r_4mm_2ms d2_31_r_4mm_1ms d2_32_r_8mm_1ms d2_33_eq_taft_-2mm d2_34_eq_taft_+2mm d2_3_eq_taft_+4mm d2_36_eq_taft_-4mm d2_37_eq_taft_-6mm d2_38_eq_taft_+6mm d2_39_eq_taft_+8mm d2_4_eq_taft_-8mm d2_41_eq_taft_-1mm d2_42_eq_taft_+1mm d2_43_r_4mm_2ms d2_44_r_4mm_1ms d2_4_r_8mm_1ms d2_46_eq_taft_+6mm d2_47_eq_taft_-6mm continued on next page 17 After test 18, the vertical edges were restrained using timber members to prevent rocking of the wall away from the returns. The revised arrangement is shown in Figures 3.3 and After test 21, the new vertical edge restraint was further stiffened using timber wedges. This setup was retained for the remainder of tests, including the current wall, d2, and the final wall tested, d1. 19 Wall became fully cracked.
99 426 shaketable testing Table C.6: (cont d). Test Name Notes Table and Supports Wall Response x tab xsup.avg sup.top-tab a tab asup.avg w.cent w.cent aw.cent aw.avg qw Fw [mm] [mm] [mm] [mm] [mm] [kpa] [N] d2_48_eq_taft_-12mm d2_49_eq_taft_+12mm d2 R_4mm_2ms d2_1_r_4mm_1ms d2_2_r_8mm_1ms d2_3_eq_synth1_+2mm d2_4_eq_synth1_-2mm d2 EQ_Synth1_-4mm d2_6_eq_synth1_+4mm d2_7_eq_synth1_+6mm d2_8_eq_synth1_-6mm d2_9_eq_synth1_-8mm, 2 P d2_6_r_4mm_2ms d2_61_r_4mm_1ms d2_62_r_8mm_1ms P d1_1_mpa_r_4mm_2ms d1_2_mpa_r_4mm_1ms d1_3_mpa_r_8mm_1ms d1_4_.mpa_r_4mm_2ms d1.mpa_r_4mm_1ms d1_6_.mpa_r_8mm_1ms d1_7_.1mpa_z d1_8_.1mpa_r_4mm_2ms d1_9_.1mpa_r_4mm_1ms d1_1_.1mpa_r_8mm_1ms d1_11_h_13hz_.2mm d1_12_h_13hz_.mm d1_13_h_13hz_.7mm continued on next page 2 During test 9, the sub-plates forming the mechanism underwent severe sliding along diagonal cracks. They were pushed back together prior to conducting the final free vibration tests 6 62, due to a risk of collapse. 21 To observe the free vibration response for the same wall at different levels of axial stress, pulse tests were firstly conducted without any precompression in tests 1 3. The precompression was then increased to an intermediate value of. MPa in tests 4 6 and finally to the full value of.1 MPa prior to test Wall was subjected to. MPa precompression. 23 The wall was subjected to the full precompression of.1 MPa in test 8 and onwards.
100 c.3 standard data processing 427 Table C.6: (cont d). Test Name Notes Table and Supports Wall Response x tab xsup.avg sup.top-tab a tab asup.avg w.cent w.cent aw.cent aw.avg qw Fw [mm] [mm] [mm] [mm] [mm] [kpa] [N] d1_14_h_13hz_1mm d1_1_eq_taft_-4mm d1_16_eq_taft_+4mm d1_17_eq_taft_+6mm d1_18_eq_taft_-6mm d1_19_eq_taft_-8mm, d1_2_eq_taft_+8mm, d1_21_eq_taft_+1mm, d1_22_eq_taft_-1mm, d1_23_eq_taft_-12mm, d1_24_eq_taft_+12mm, P d1_2_r_4mm_2ms d1_26_r_4mm_1ms d1_27_r_8mm_1ms d1_28_h_13hz_.1mm d1_29_h_13hz_.2mm d1_3_h_13hz_.4mm d1_31_r_4mm_2ms d1_32_r_4mm_1ms d1_33_r_8mm_1ms d1_34_eq_taft_+4mm d1_3_eq_taft_-4mm d1_36_eq_taft_-6mm d1_37_eq_taft_+6mm d1_38_eq_taft_+8mm d1_39_eq_taft_-8mm d1_4_eq_taft_-1mm d1_41_eq_taft_+1mm d1_42_r_4mm_2ms d1_43_r_4mm_1ms d1_44_r_8mm_1ms d1_4_eq_taft_+12mm d1_46_eq_taft_-12mm continued on next page 24 Wall became fully cracked. 2 Severe sliding became evident along diagonal cracks between sub-plates of the mechanism after test 46. This state was left unaltered during tests 47 1, after which the wall was repaired.
101 428 shaketable testing Table C.6: (cont d). Test Name Notes Table and Supports Wall Response x tab xsup.avg sup.top-tab a tab asup.avg w.cent w.cent aw.cent aw.avg qw Fw [mm] [mm] [mm] [mm] [mm] [kpa] [N] d1_47_r_4mm_2ms d1_48_r_4mm_1ms d1_49_r_8mm_1ms P d1 H_12Hz_.1mm d1_1_h_12hz_.2mm d1_2_r_4mm_2ms d1_3_r_4mm_1ms d1_4_r_8mm_1ms d1 Z d1_6_eq_synth1_+2mm d1_7_eq_synth1_-2mm d1_8_eq_synth1_-4mm d1_9_eq_synth1_+4mm d1_6_eq_synth1_+6mm d1_61_eq_synth1_-6mm d1_62_eq_synth1_-8mm d1_63_eq_synth1_+8mm d1_64_r_4mm_2ms d1_6_r_4mm_1ms d1_66_r_8mm_1ms d1_67_eq_synth3_-2mm d1_68_eq_synth3_+2mm d1_69_eq_synth3_+4mm d1_7_eq_synth3_-4mm d1_71_eq_synth3_-6mm d1_72_eq_synth3_+6mm d1_73_eq_synth3_+8mm d1_74_eq_synth3_-8mm d1_7_eq_synth3_-1mm d1_76_eq_synth3_+1mm d1_77_r_4mm_2ms d1_78_r_4mm_1ms d1_79_r_8mm_1ms d1_8_eq_synth_-2mm d1_81_eq_synth_+2mm continued on next page 26 The wall was repaired by pushing the sub-plates back together prior to test 2.
102 c.3 standard data processing 429 Table C.6: (cont d). Test Name Notes Table and Supports Wall Response x tab xsup.avg sup.top-tab a tab asup.avg w.cent w.cent aw.cent aw.avg qw Fw [mm] [mm] [mm] [mm] [mm] [kpa] [N] d1_82_eq_synth_+4mm d1_83_eq_synth_-4mm d1_84_eq_synth_-6mm d1_8_eq_synth_+6mm d1_86_r_4mm_2ms d1_87_r_4mm_1ms d1_88_r_8mm_1ms d1_89_mpa_r_4mm_2ms d1_9_mpa_r_4mm_1ms d1_91_mpa_r_8mm_1ms P Vertical precompression was removed from the wall and a final pulse test was conducted in runs
103 43 shaketable testing c.4 cyclic response analysis This section describes a developed data analysis procedure that was implemented on the wall s load-displacement data vectors in the time domain (obtained by methods outlined in Section C.3), to quantify key properties relating to the wall s cyclic response such as the effective stiffness and equivalent viscous damping ratio. A significant aspect of the procedure was its applicability to all types of tests performed, regardless of whether the input motion was periodic (i.e. harmonic sinusoidal motion tests) or non-periodic (e.g. pulse and earthquake motion tests). The basis of the analysis was to firstly employ a time domain search algorithm to find and isolate individual cycles in the wall s displacement response in a particular test run. This process is described in Section C.4.1. For every valid cycle isolated, the cyclic properties of interest were then calculated using the process described in Section C.4.2. Average values of the properties were then determined by grouping cycles within a specific range of displacement (including near the maximum response, and at small displacements). Examples of the computer program output are shown in Section C.4.3. Detailed results of the analysis are presented in Section C.4.4. It is noted that prior to implementation of the data analysis procedure, the data was filtered (using the techniques described in Section C.) in order to aid the cycle detection algorithm. c.4.1 Cycle Isolation Algorithm The developed cycle isolation algorithm utilised a single time domain vector, which is denoted throughout this section as x. In application of the algorithm, the response vector used for this purpose was the initially zeroed central displacement of the wall, w.cent. Step 1: Division of the Waveform into Segments The first step of the procedure was to identify points in the waveform x corresponding to reversals of direction. These points are referred to as vertices. The regions between vertices are referred to as segments. This process is illustrated by Figure C.7, which shows that neighbouring segments always alternate between ascending and descending. As shown by Figure C.8, a segment (denoted by the index i) is considered ascending if the values at its vertices, x i and x i+1, are such that x i < x i+1, or descending if x i > x i+1. The cycle amplitude x amp of a segment is taken as half of
104 N N F N F c.4 cyclic response analysis Figure C.7: Division of a generic waveform into segments for the purpose of isolating individual cycles. The segments correspond to regions of alternating positive and negative directions of movement, as indicated by the + and signs. I A C A J E I A C A J E N E N E N = N = N E N E (a) Ascending segment (x i < x i+1 ). (b) Descending segment (x i > x i+1 ). Figure C.8: Definition of segment direction and amplitude. the absolute difference between its two vertices, such that x amp =. x i+1 x i. (C.1) The remaining steps 2 4 were performed on every segment in the waveform, with the exception of the first and last segments. Step 2: Classification of Cycle as Either Open or Closed Once the waveform x has been divided into segments, it becomes possible for any segment (denoted by the index i) together with its two neighbouring segments (denoted by the indices i 1 and i + 1) to be classified as either a closed or open cycle. As illustrated by Figure C.9, the type of cycle formed depends on whether there is any overlap between the outer segments i 1 and i + 1. A closed cycle is defined as having an overlapping region, whilst an open cycle is defined as having no overlap (or negative overlap). To quantify the amount of overlap, the upper and lower bounds of the overlap-
105 432 shaketable testing A C A J E E E A C A J E E E N E N E N E N K N E N F I E J E L A L A H = F N? L A H = F? A J H A N E N E N N K A C = J E L A L A H = F? O? A > = H E A I N E (a) Closed cycle.? O? A > = H E A I N E (b) Open cycle. Figure C.9: Definition of closed and open cycles, and their boundaries. Shown for the case of a descending middle segment. Any segment i together with its two neighbouring segments i 1 and i + 1 can be classified as one of these cycle types. Closed cycles have overlap across the i 1 and i + 1 segments, whilst open cycles do not. For closed cycles the boundaries are taken at the central value of the overlapping region in the outside segments, whilst for open cycles the boundaries are taken at the exterior limits of the outside segments. ping region are determined. The overlap upper bound is calculated as min(x i, x i+2 ), if segment i is descending (x i > x i+1 ); x ou = min(x i 1, x i+1 ), if segment i is ascending (x i < x i+1 ). The overlap lower bound is calculated as max(x i 1, x i+1 ), if segment i is descending (x i > x i+1 ); x ol = max(x i, x i+2 ), if segment i is ascending (x i < x i+1 ). The total overlap x o is then taken as the difference, such that x o = x ou x ol. (C.11) It is possible for the resulting value of x o to be either positive or negative. This leads to the definition of closed and open cycles, such that if x o, then the cycle is classified as closed, and conversely if x o <, then it is classified as open. It is worth noting that closed cycles were found to be far more common that open cycles in the test data analysed. Step 3: Omission of Invalid Cycles Cycles which did not meet certain criteria, in particular a minimum centrality and overlap, were omitted from subsequent calculation of hysteretic properties
106 N N c.4 cyclic response analysis 433 = N E # " = N E N = N E = N E " $ = N E N E (a) R C = 1. (b) R C =.3. (c) R C =. Figure C.1: Demonstration of the cycle centrality parameter R C. The cycle amplitude is denoted as a. (described in Section C.4.2). minimum centrality condition The first requirement for a cycle to be considered valid was to be sufficiently centred about x = (i.e. zero displacement). This condition was implemented to ensure that the cycle was not biased toward a particular displacement direction. It also served to eliminate cycles which could potentially be in the plastic range of the load-displacement response, as such cycles were likely to have a reduced stiffness unrepresentative of the wall s effective stiffness. Generally, it was also noticed that non-centred cycles tended to exhibit a large fluctuation in values of their equivalent viscous damping ratio, which were considered to be inaccurate of actual behaviour. The degree of centrality for a cycle was quantified using the parameter R C, calculated as x i /x i+1, if x i x i+1 ; R C = (C.12) x i+1 /x i, if x i > x i+1. Possible values of R C can range between the limits 1 < R C 1. Several cases are shown by Figure C.1. A perfectly centred cycle, in which the values at the two vertices are equal and opposite, results in R C = 1. A positive value of R C corresponds to a cycle that crosses the line x =, whilst a negative value corresponds to a cycle that does not. A value of R C = results when one of the vertices touches the line x =. In the analysis of the wall test data, a minimum centrality condition of R C >.3 was enforced for admissible cycles. The corresponding limiting case is illustrated by Figure C.1b. minimum overlap condition The second requirement for a cycle to be considered valid was to be sufficiently closed. This required the cycle s outer segments (with indices i 1 and i + 1, as shown by Figure C.9) to have sufficient overlap.
107 = = = = 434 shaketable testing A C A J E E N E E N E N K A C A J E E N E E N E N K = N E N E N N E N E N (a) R O = 1. (b) R O =.6. A C A J E E E A C A J E E E N E N E N E N E N N K N E N E N N K & = N E N E (c) R O =. (d) R O =.4. Figure C.11: Demonstration of the cycle overlap parameter R O. The cycle amplitude is denoted as a. The reason for implementing this condition was that closed cycles were deemed to be more likely to yield a representative value of the equivalent viscous damping ratio, which was calculated based on the area enclosed within the hysteresis loop. The parameter used to quantify the degree of overlap for a cycle was the overlap ratio R O, calculated as R O = x o 2 x amp, (C.13) where x o is the length of the overlap calculated using Eq. (C.11) and x amp is the cycle amplitude as given by Eq. (C.1). It is possible for the value of R O to range between the limits 1 < R O 1. Several cases of different overlap ratio are shown in Figure C.11. In the analysis of the wall test data, a minimum overlap condition of R O >.4 was enforced. The limiting case is illustrated by Figure C.11d. In other words, only cycles with a negative overlap greater than.8 x amp were rejected on the basis of this condition. Step 4: Determination of the Cycle s Boundaries and Data Once a cycle was declared valid by satisfying the conditions outlined in step 3, the next step was to extract its load and displacement data vectors from the overall data. In order to do this, however, it was first necessary to define the cycle s boundaries
108 c.4 cyclic response analysis 43 in the time domain (i.e. its first and last data points) The method implemented for defining these boundaries was dependent on whether the cycle was closed or open. The approach used for closed cycles was to firstly calculate the central overlap value x oc, as the average of the upper and lower bounds of the overlap, such that x oc =. (x ou + x ol ). (C.14) The points defining the cycle s boundaries were then taken at the intersections of the waveform with the value x oc inside the outer segments, as shown by Figure C.9a. As these boundary points did not generally coincide with discrete points in the data, the corresponding values of the wall s load and displacement were determined by interpolation. For open cycles, the cycle boundaries were simply taken at the boundaries of the outer segments, as shown by Figure C.9b. Once the cycle s boundary points were defined, data vectors for its displacement and force (or acceleration) were extracted from the full data vectors. This included data points within the cycle boundaries and at the boundaries themselves. The vectors of interest that were used in the subsequent evaluation of cyclic properties included the zeroed central wall displacement w.cent, central wall acceleration a w.cent and average wall acceleration a w.avg. This process is described in Section C.4.2. It is also noted that in subsequent calculations, loops of open cycles had to be closed manually a requirement for the calculation of the energy dissipated within the loop. This was done by replicating the first data point at the end of each of the cycle s data vectors. Remarks Although the developed cycle isolation algorithm was fairly versatile, in that it could be applied to the test data regardless of whether the motion was periodic (i.e. harmonic excitation tests) or non-periodic (i.e. pulse or earthquake motion tests), a certain degree of care had to be exercised during its application. For instance, in certain scenarios the algorithm failed to isolate the true cycles of interest in the wall s response. An example of such a case is shown by Figure C.12, which illustrates the wall s displacement response during a harmonic excitation test with an excitation period T o. While the most significant periodic component of the response also occurs at the period T o, the presence of higher frequency interference can cause additional minor peaks and troughs in the resulting waveform (as shown
109 N 436 shaketable testing = E L A H J E? A I 1 J A H E = J A L A H J E? A I 6 E A J 6 Figure C.12: Example of scenario where the cycle detection algorithm fails to detect the main response cycles in the waveform. in this example). Even though it is obvious that the true cycles of interest must have a period equal to the excitation period, the developed algorithm would fail to detect them due to the presence of the intermediate vertices. This type of behaviour was observed in a small number of harmonic excitation tests, which contained high frequency interference believed to be due to higher vibrational modes in the wall s response. The problem was overcome by firstly filtering the wall s response vectors in the frequency domain to eliminate the contributions from the higher order harmonics, before applying the cycle detection routine. This removed the intermediate vertices from the wall s response and enabled the cycle detection algorithm to function properly. The filters used are described in Section C.. c.4.2 Evaluation of Key Cyclic Properties Calculation of Properties from Each Cycle For each valid cycle isolated using the procedure described in Section C.4.1, several key properties were calculated based on its displacement and acceleration data vectors (Figure C.13). These included: displacement and force amplitudes, effective stiffness, equivalent viscous damping, and period. The methods used to calculate these properties are as follows: displacement cycle amplitude Since the displacement response of a cycle may not have been necessarily symmetrical about zero displacement ( = ), the displacement amplitude amp was taken as half of the difference between the maximum and minimum displacement points occurring in the cycle, such that amp = max min, (C.1) 2
110 6 J. F F, c.4 cyclic response analysis 437, E I F =? A A J,, = N. = N J 6 E A J 7 > N, E 1 I = J + O? A, E, = N. H? A.. = N 7 F. = 6 E A J. E. E, = Figure C.13: Isolated hysteresis loop and the properties derived. where max and min are the maximum and minimum displacements occurring in the loop. Alternatively, amp could be obtained directly as x amp in the cycle isolation process, given by Eq. (C.1), since the vector x was assigned the initially zeroed central wall displacement ( w.cent ). force or acceleration cycle amplitude Due to the direct proportionality between the wall s restoring force F w and its average acceleration a w.avg [through Eq. (C.8)], these variables are effectively interchangeable (with the relevant proportionality factors). Since the acceleration in a given cycle was not necessarily centred about zero acceleration (a = ), the acceleration amplitude a amp was taken as a amp = a max a min, (C.16) 2 where a max and a min are the maximum and minimum accelerations occurring in the loop. Similarly, for force: F amp = F max F min. (C.17) 2 effective stiffness The cycle s effective secant stiffness K was defined as the slope of the line passing through the cycle s force-displacement curve. Two alternative methods were used to calculate its value: In the first method, the stiffness was determined by fitting a linear regression to the individual data points comprising the loop. In the second method, the stiffness was calculated as the slope of the line passing through the corner points of the loop s bounding box, as
111 438 shaketable testing shown by Figure C.13, or using the expression K = F amp amp. (C.18) It was found that both methods produced very similar values; therefore, the second approach [based on Eq. (C.18)] was adopted, since it was less computationally intensive than the first approach. equivalent viscous damping The equivalent viscous damping ξ hyst was calculated using the area-based method, according to the equation ξ hyst = 2 π U loop U box, (C.19) where U loop is area enclosed within the hysteresis loop, and U box is the area inside the loop s bounding box. From Figure C.13 it can be seen that U box = 4 F amp amp. (C.2) The energy U loop dissipated during a cycle is evaluated by the integral U loop = t2 t=t 1 F d, (C.21) in which t 1 is the time at the start of the cycle and t 2 the time at the end of the cycle. This integral was evaluated numerically using the and F vectors for the cycle. It should be noted that in the calculation of ξ hyst [based on Eq. (C.19)], the energies U loop and U box were determined based on the wall s central acceleration (a w.cent ), as opposed to its average acceleration (a w.avg ) (upon which the wall force F w is based). Comparison of typical hysteresis loops obtained using these two approaches is shown by Figure C.14. The reason for using a w.cent is that it is believed to have provided a more accurate representation of the wall s fundamental mode of vibration due to flexural response. By contrast, it is believed that a w.avg [calculated as a weighted average of the 1 accelerometers mounted on the wall as per Eq. (C.)] received some interference from higher vibrational modes (possibly twisting of the specimens), resulting in an alteration of the apparent phase relationship between the force and displacement and ultimately generating fatter and more ragged hysteresis loops. The values of ξ hyst calculated on the basis of a w.avg (generally ranging between.1 and.4) are believed to be uncharacteristically high and deemed to be unconservative. By contrast, the hysteresis loops determined using a w.cent tended to be significantly cleaner. The computed values of ξ hyst are reported
112 c.4 cyclic response analysis a w.avg -2 2 a w.cent [mm] w.cent [mm] w.cent (a) Earthquake test run d1_76_eq_synth3_+1mm a w.avg -2 2 a w.cent [mm] w.cent [mm] w.cent (b) Pulse test run d2_4_r_8mm_1ms. Figure C.14: Typical examples demonstrating the difference between hysteresis loops based on the average wall acceleration, a w.avg (left) and the central wall acceleration, a w.cent (right).
113 6 44 shaketable testing A C A J E E E A C A J E E E N E N E N E N K N E N N E N? N N E N K N E N E (a) Closed cycle. # 6 (b) Open cycle. Figure C.1: Method used for estimating the cycle period T in closed and open cycles. in Section C.4.4. period and frequency As shown by Figure C.1, the method used to evaluate the period T of the cycle depended on whether the cycle was closed or open. 28 For closed cycles, the period was taken as the duration between the start and end boundary points of the cycle (Figure C.1a). These boundary points were determined using the procedure described in Section C.4.1, as illustrated by Figure C.9a. For open cycles, the period was taken as twice the duration between the cycle s peak and trough vertices (Figure C.1b). These results are generally reported as a frequency f, where f = 1/T. Calculation of Average Values in Each Test Run Once the aforementioned properties have been calculated for all valid cycles within a test run, their average values were computed over two ranges of displacement response: short displacement range This included cycles whose displacement amplitude was inside the range. mm amp 3 mm, which was intended to capture response along the initial loading branch of the load-displacement curve. In order to ensure a good spread of response within this range, average values were only 28 A significant amount of effort was invested into attempting to derive values of vibrational frequency for the walls using a Fourier-based analysis of the walls displacement and acceleration response. However, these efforts were ultimately abandoned due the finding that additional signals were present in the measured response vectors, which were evidently interfering with that of the wall s vibrational response. This interference were likely to have come from some aspect of the test arrangement such as the wall restraint frame and the shaketable rig itself. The method ultimately adopted for calculating the cyclic frequency of the walls is believed to also provide the advantage of being able to examine cycles individually.
114 c.4 cyclic response analysis 441 calculated for test runs in which the maximum displacement amplitude exceeded 9% of the upper limit value of 3 mm (i.e. max amp > 2.8 mm). Note that for this range, average values of the effective stiffness K, equivalent viscous damping ξ hyst and period T, were calculated as the interquartile mean. This was done to reduce the influence of outlying values on the resulting average, as there tended to be a high level of scatter in these properties at small displacements, which could be attributed to a larger relative error in the sampling method for displacement. peak response range This range included all cycles whose displacement amplitude was at least 7% of maximum value occurring in the test run, or amp.7 max( amp ), and was intended to capture the behaviour near the maximum displacement response in the test run. Average values of properties within this range were calculated as the conventional mean. c.4.3 Examples Examples of the graphical output from the developed computer routine used to perform the cyclic analysis are shown by Figures C.16, C.17 and C.18 for a pulse test, harmonic test and earthquake motion test, respectively. c.4.4 Results Results of the cyclic analysis are presented in Table C.7 for all test runs performed in the experimental study. The hysteresis graphs corresponding to the data used within these analyses is also presented is Section C.6. Column 1 of the table lists the test run name, as per the convention outlined in Section C.1. Column 2 gives the cutoff frequency f c of a lowpass Butterworth filter of order n = 1, used to filter the results prior to performing the cyclic analysis. A value of default refers to the filter for harmonic tests, corresponding to a Butterworth comb filter passing the first three harmonics of the excitation frequency with a normalised bandwidth of.2 (refer to Section C..1). Columns 3 provide values of the peak cycle amplitudes for the respective properties occurring in the test run, where amp is the central displacement, a c amp is the central wall acceleration and a a amp is the average wall acceleration. These may not necessarily have occurred during the same cycle. Columns 7 12 give the average results for cycles whose displacement amplitude amp was at least 7% of the peak displacement amplitude in the test run, where n is the number of cycles used for averaging, K is the effective stiffness, ξ hyst is the
115 442 shaketable testing Test: d1_66_r_8mm_1ms Filter: butter_n=1_fcut=4hz [mm] amp. [mm] Time [sec] a - Central Acceleration Average Acceleration [mm] a amp. mincentrality:.3, minoverlap: -.4 smalldisplims: [.,3]mm, largedispfactor: amp. [mm] a amp m box [g/mm] m fit [g/mm] m box [g/mm] amp. [mm] ξ amp. [mm] ξ 3 3 f [Hz] f [Hz] f [Hz] small disp range, [.,3] mm... no. calc cyc: 8 (8 closed, open), P. calc max response range, [1.3,1.9] mm... no. calc cyc: 6 (6 closed, open), P. calc cyc: amp. [mm] m box [g/mm] Figure C.16: Example of graphical output from the cyclic analysis of a pulse test (d1_66_r_8mm_1ms).
116 c.4 cyclic response analysis 443 Test: d1_3_h_13hz_.4mm Filter: bwcomb_fo=13hz_bw=.2_n=_harms=[1,2,3] Time [sec] [mm] amp. [mm] a - Central Acceleration Average Acceleration [mm] a amp. mincentrality:.3, minoverlap: -.4 smalldisplims: [.,3]mm, largedispfactor: amp. [mm] a amp m box [g/mm] m fit [g/mm] - -. m box [g/mm] amp. [mm] ξ amp. [mm] ξ f [Hz] 2 f [Hz] 2 f [Hz] small disp range, [.,3] mm... no. calc cyc: 8 (8 closed, open), P. calc max response range, [.2,7.4] mm... no. calc cyc: 142 (142 closed, open), P. calc cyc: amp. [mm] m box [g/mm] Figure C.17: Example of graphical output from the cyclic analysis of a harmonic test (d1_3_h_13hz_.4mm).
117 444 shaketable testing Test: d1_76_eq_synth3_+1mm Filter: butter_n=1_fcut=4hz [mm] amp. [mm] Time [sec] a - Central Acceleration Average Acceleration [mm] a amp. mincentrality:.3, minoverlap: -.4 smalldisplims: [.,3]mm, largedispfactor: amp. [mm] a amp m box [g/mm] m fit [g/mm] m box [g/mm] amp. [mm] ξ amp. [mm] ξ 3 3 f [Hz] [Hz] f [Hz] small disp range, [.,3] mm... no. calc cyc: 122 (12 closed, 2 open), P. calc max response range, [7.6,1.9] mm... no. calc cyc: 8 (8 closed, open), P. calc cyc: amp. [mm] m box [g/mm] Figure C.18: Example of graphical output from the cyclic analysis of an earthquake motion test (d1_76_eq_synth3_+1mm). f
118 c.4 cyclic response analysis 44 equivalent viscous damping ratio, f is the cycle frequency, and other properties as defined previously. Note that f is not provided for harmonic test runs, since the measured cycle frequency in these tests is equal to the excitation frequency and not the vibrational frequency of the wall. Columns give the average results for cycles whose displacement amplitude was between. mm and 3 mm. Whilst this table does not provide the cycle amplitude of the wall s restoring force F amp, this value can be calculated directly from the average wall acceleration amplitude a a amp using the relationship a a amp F amp = W w, (C.22) g where W w is the weight of the wall, as given in Table 3.3. The weight of the solid walls (d1 and d2) was 24 N and the weight of the walls with a window (d3, d4 and d) was 279 N. For example, in run d1_3_mpa_r_8mm_1ms, where the peak average wall acceleration was 1.18 g, the corresponding peak wall force was 24 N 1.18 = 283 N.
119 446 shaketable testing Table C.7: Cyclic analysis results for individual test runs. Filter Peak response cycles Avg. results for cycles with amp.7 max( amp) Avg. results for cycles with. mm amp 3 mm Test Name fc amp ac amp aa amp n amp aa amp K ξ hyst f n amp aa amp K ξ hyst f [Hz] [mm] [mm] [N/mm] [Hz] [mm] [N/mm] [Hz] d1_1_mpa_r_4mm_2ms 4 d1_2_mpa_r_4mm_1ms 4 d1_3_mpa_r_8mm_1ms d1_4_.mpa_r_4mm_2ms 4 d1.mpa_r_4mm_1ms 4 d1_6_.mpa_r_8mm_1ms 4 d1_8_.1mpa_r_4mm_2ms 4 d1_9_.1mpa_r_4mm_1ms 4 d1_1_.1mpa_r_8mm_1ms 4 d1_11_h_13hz_.2mm default d1_12_h_13hz_.mm default d1_13_h_13hz_.7mm default d1_14_h_13hz_1mm default d1_1_eq_taft_-4mm 4 d1_16_eq_taft_+4mm 4 d1_17_eq_taft_+6mm 4 d1_18_eq_taft_-6mm d1_19_eq_taft_-8mm d1_2_eq_taft_+8mm d1_21_eq_taft_+1mm d1_22_eq_taft_-1mm d1_23_eq_taft_-12mm d1_24_eq_taft_+12mm d1_2_r_4mm_2ms 4 d1_26_r_4mm_1ms d1_27_r_8mm_1ms d1_28_h_13hz_.1mm default d1_29_h_13hz_.2mm default d1_3_h_13hz_.4mm default d1_31_r_4mm_2ms 4 d1_32_r_4mm_1ms d1_33_r_8mm_1ms d1_34_eq_taft_+4mm d1_3_eq_taft_-4mm d1_36_eq_taft_-6mm d1_37_eq_taft_+6mm d1_38_eq_taft_+8mm continued on next page
120 c.4 cyclic response analysis 447 Table C.7: (cont d). Filter Peak response cycles Avg. results for cycles with amp.7 max( amp) Avg. results for cycles with. mm amp 3 mm Test Name fc amp ac amp aa amp n amp aa amp K ξ hyst f n amp aa amp K ξ hyst f [Hz] [mm] [mm] [N/mm] [Hz] [mm] [N/mm] [Hz] d1_39_eq_taft_-8mm d1_4_eq_taft_-1mm d1_41_eq_taft_+1mm d1_42_r_4mm_2ms d1_43_r_4mm_1ms d1_44_r_8mm_1ms d1_4_eq_taft_+12mm d1_46_eq_taft_-12mm d1_47_r_4mm_2ms 4 d1_48_r_4mm_1ms d1_49_r_8mm_1ms d1 H_12Hz_.1mm default d1_1_h_12hz_.2mm default d1_2_r_4mm_2ms 4 d1_3_r_4mm_1ms d1_4_r_8mm_1ms d1_6_eq_synth1_+2mm 4 d1_7_eq_synth1_-2mm 4 d1_8_eq_synth1_-4mm d1_9_eq_synth1_+4mm d1_6_eq_synth1_+6mm d1_61_eq_synth1_-6mm d1_62_eq_synth1_-8mm d1_63_eq_synth1_+8mm d1_64_r_4mm_2ms d1_6_r_4mm_1ms d1_66_r_8mm_1ms d1_67_eq_synth3_-2mm 4 d1_68_eq_synth3_+2mm 4 d1_69_eq_synth3_+4mm d1_7_eq_synth3_-4mm d1_71_eq_synth3_-6mm d1_72_eq_synth3_+6mm d1_73_eq_synth3_+8mm d1_74_eq_synth3_-8mm d1_7_eq_synth3_-1mm d1_76_eq_synth3_+1mm d1_77_r_4mm_2ms continued on next page
121 448 shaketable testing Table C.7: (cont d). Filter Peak response cycles Avg. results for cycles with amp.7 max( amp) Avg. results for cycles with. mm amp 3 mm Test Name fc amp ac amp aa amp n amp aa amp K ξ hyst f n amp aa amp K ξ hyst f [Hz] [mm] [mm] [N/mm] [Hz] [mm] [N/mm] [Hz] d1_78_r_4mm_1ms d1_79_r_8mm_1ms d1_8_eq_synth_-2mm d1_81_eq_synth_+2mm d1_82_eq_synth_+4mm d1_83_eq_synth_-4mm d1_84_eq_synth_-6mm d1_8_eq_synth_+6mm d1_86_r_4mm_2ms d1_87_r_4mm_1ms d1_88_r_8mm_1ms d1_89_mpa_r_4mm_2ms d1_9_mpa_r_4mm_1ms d1_91_mpa_r_8mm_1ms d2_1_r_4mm_2ms 4 d2_2_r_4mm_1ms 4 d2_3_r_8mm_1ms 4 d2_4_r_4mm_2ms 4 d2 R_4mm_1ms 4 d2_6_r_8mm_1ms d2_7_h_12hz_.mm default d2_8_h_12hz_.1mm default d2_9_h_12hz_.2mm default d2_1_r_4mm_2ms 4 d2_11_r_4mm_1ms 4 d2_12_r_8mm_1ms d2_13_h_12hz_.2mm default d2_14_h_12hz_.2mm default d2_16_r_4mm_2ms 4 d2_17_r_4mm_1ms d2_18_r_8mm_1ms d2_2_h_12hz_.1mm default d2_21_h_12hz_.2mm default d2_23_h_12hz_.1mm default d2_24_h_12hz_.2mm default d2_2_r_4mm_2ms d2_26_r_4mm_1ms continued on next page
122 c.4 cyclic response analysis 449 Table C.7: (cont d). Filter Peak response cycles Avg. results for cycles with amp.7 max( amp) Avg. results for cycles with. mm amp 3 mm Test Name fc amp ac amp aa amp n amp aa amp K ξ hyst f n amp aa amp K ξ hyst f [Hz] [mm] [mm] [N/mm] [Hz] [mm] [N/mm] [Hz] d2_27_r_8mm_1ms d2_28_h_12hz_.2mm default d2_29_h_12hz_.3mm default d2_3_r_4mm_2ms d2_31_r_4mm_1ms d2_32_r_8mm_1ms d2_33_eq_taft_-2mm d2_34_eq_taft_+2mm d2_3_eq_taft_+4mm d2_36_eq_taft_-4mm d2_37_eq_taft_-6mm d2_38_eq_taft_+6mm d2_39_eq_taft_+8mm d2_4_eq_taft_-8mm d2_41_eq_taft_-1mm d2_42_eq_taft_+1mm d2_43_r_4mm_2ms d2_44_r_4mm_1ms d2_4_r_8mm_1ms d2_46_eq_taft_+6mm d2_47_eq_taft_-6mm d2_48_eq_taft_-12mm d2_49_eq_taft_+12mm d2 R_4mm_2ms d2_1_r_4mm_1ms d2_2_r_8mm_1ms d2_3_eq_synth1_+2mm d2_4_eq_synth1_-2mm d2 EQ_Synth1_-4mm d2_6_eq_synth1_+4mm d2_7_eq_synth1_+6mm d2_8_eq_synth1_-6mm d2_9_eq_synth1_-8mm d2_6_r_4mm_2ms d2_61_r_4mm_1ms d2_62_r_8mm_1ms d3_1_r_2mm_2ms 4 continued on next page
123 4 shaketable testing Table C.7: (cont d). Filter Peak response cycles Avg. results for cycles with amp.7 max( amp) Avg. results for cycles with. mm amp 3 mm Test Name fc amp ac amp aa amp n amp aa amp K ξ hyst f n amp aa amp K ξ hyst f [Hz] [mm] [mm] [N/mm] [Hz] [mm] [N/mm] [Hz] d3_2_r_4mm_2ms 4 d3_3_r_4mm_1ms 4 d3_4_r_8mm_1ms d3 H_13Hz_.mm default d3_6_h_13hz_.1mm default d3_7_h_13hz_.1mm default d3_8_h_13hz_.2mm default d3_9_h_13hz_.2mm default d3_1_h_13hz_.3mm default d3_11_h_13hz_.3mm default d3_12_r_4mm_2ms 4 d3_13_r_4mm_1ms d3_14_r_8mm_1ms d3_1_h_13hz_.3mm default d3_16_h_13hz_.4mm default d3_17_r_4mm_2ms d3_18_r_4mm_1ms d3_19_r_8mm_1ms d3_2_h_12hz_.4mm default d3_21_r_4mm_2ms d3_22_r_4mm_1ms d3_23_r_8mm_1ms d3_24_eq_taft_-mm 3 d3_2_eq_taft_+mm 3 d3_26_eq_taft_+1mm 3 d3_27_eq_taft_-1mm 3 d3_28_eq_taft_-2mm d3_29_eq_taft_+2mm d3_3_eq_taft_+3mm d3_31_eq_taft_-3mm d3_32_eq_taft_-4mm d3_33_eq_taft_+4mm d3_34_eq_taft_+mm d3_3_eq_taft_-mm d3_36_eq_taft_-6mm d3_37_eq_taft_+6mm d3_38_eq_taft_+7mm d3_39_eq_taft_-7mm continued on next page
124 c.4 cyclic response analysis 41 Table C.7: (cont d). Filter Peak response cycles Avg. results for cycles with amp.7 max( amp) Avg. results for cycles with. mm amp 3 mm Test Name fc amp ac amp aa amp n amp aa amp K ξ hyst f n amp aa amp K ξ hyst f [Hz] [mm] [mm] [N/mm] [Hz] [mm] [N/mm] [Hz] d3_4_eq_taft_-8mm d3_41_eq_taft_+8mm d3_42_r_4mm_2ms d3_43_r_4mm_1ms d3_44_r_8mm_1ms d3_4_eq_taft_+9mm d3_46_eq_taft_-9mm d3_47_r_4mm_2ms d3_48_r_4mm_1ms d3_49_r_8mm_1ms d3 EQ_Taft_-1mm d3_1_eq_taft_+1mm d3_2_eq_taft_+11mm d3_3_eq_taft_-11mm d3_4_eq_taft_-12mm d3 EQ_Taft_+12mm d3_6_eq_taft_+6mm d3_7_eq_taft_-6mm d3_8_h_12hz_.1mm default d3_9_h_12hz_.2mm default d3_6_h_12hz_.4mm default d4_1_r_4mm_2ms 4 d4_2_r_4mm_1ms 4 d4_3_r_8mm_1ms d4_4_h_13hz_.mm default d4 H_13Hz_.1mm default d4_6_eq_taft_-4mm 4 d4_7_eq_taft_+4mm 4 d4_8_eq_taft_+8mm d4_9_eq_taft_-8mm d4_1_r_4mm_2ms 4 d4_11_r_4mm_1ms d4_12_r_8mm_1ms d4_13_h_13hz_.1mm default d4_14_h_13hz_.2mm default d4_1_h_13hz_.2mm default d4_16_h_13hz_.3mm default continued on next page
125 42 shaketable testing Table C.7: (cont d). Filter Peak response cycles Avg. results for cycles with amp.7 max( amp) Avg. results for cycles with. mm amp 3 mm Test Name fc amp ac amp aa amp n amp aa amp K ξ hyst f n amp aa amp K ξ hyst f [Hz] [mm] [mm] [N/mm] [Hz] [mm] [N/mm] [Hz] d4_17_h_13hz_.3mm default d4_18_h_13hz_.4mm default d4_19_r_4mm_2ms 4 d4_2_r_4mm_1ms d4_21_r_8mm_1ms d4_22_h_13hz_.4mm default d4_23_h_13hz_.mm default d4_24_r_4mm_2ms 4 d4_2_r_4mm_1ms d4_26_r_8mm_1ms d4_27_h_6hz_.1mm default d4_28_h_6hz_.2mm default d4_29_h_6hz_.3mm default d4_3_h_6hz_.4mm default d4_31_h_6hz_.mm default d4_32_h_6hz_.7mm default d4_33_h_6hz_1.mm default d4_34_h_6hz_1.mm default d4_3_r_4mm_2ms 4 d4_36_r_4mm_1ms d4_37_r_8mm_1ms d4_38_h_13hz_.1mm default d4_39_h_13hz_.2mm default d4_4_h_13hz_.3mm default d4_41_h_13hz_.4mm default d4_42_r_4mm_2ms d4_43_r_4mm_1ms d4_44_r_8mm_1ms d4_4_eq_taft_-1mm 3 d4_46_eq_taft_+1mm 3 d4_47_eq_taft_+2mm d4_48_eq_taft_-2mm 3 d4_49_eq_taft_-3mm d4 EQ_Taft_+3mm d4_1_eq_taft_+4mm d4_2_eq_taft_-4mm d4_3_eq_taft_-mm d4_4_eq_taft_+mm continued on next page
126 c.4 cyclic response analysis 43 Table C.7: (cont d). Filter Peak response cycles Avg. results for cycles with amp.7 max( amp) Avg. results for cycles with. mm amp 3 mm Test Name fc amp ac amp aa amp n amp aa amp K ξ hyst f n amp aa amp K ξ hyst f [Hz] [mm] [mm] [N/mm] [Hz] [mm] [N/mm] [Hz] d4 EQ_Taft_+6mm d4_6_eq_taft_-6mm d4_7_r_4mm_2ms 4 d4_8_r_4mm_1ms d4_9_r_8mm_1ms d4_6_eq_taft_+6mm d4_61_eq_taft_-6mm d4_62_eq_taft_-7mm d4_63_eq_taft_+7mm d4_64_eq_taft_+7mm d4_6_eq_taft_-7mm d4_66_r_4mm_2ms d4_67_r_4mm_1ms d4_68_r_8mm_1ms d4_69_eq_taft_+7mm d4_7_eq_taft_-7mm d4_71_eq_taftbf_-7mm d4_72_eq_taftbf_+7mm d4_73_eq_taftbf1_+7mm d4_74_eq_taftbf1_-7mm d4_7_eq_taftbf2_-7mm d4_76_eq_taftbf2_+7mm d4_77_eq_taftbf3_+7mm d4_78_eq_taftbf3_-7mm d4_79_eq_taftbf_-7mm d4_8_eq_taftbf_+7mm d4_81_eq_taftbf7_+7mm d4_82_eq_taftbf7_-7mm d4_83_eq_taftbf1_-7mm d4_84_eq_taftbf1_+7mm d4_8_r_4mm_2ms d4_86_r_4mm_1ms d4_87_r_8mm_1ms d4_88_h_13hz_.2mm default d4_89_h_13hz_.4mm default d4_9_h_13hz_.6mm default d4_91_r_4mm_2ms d4_92_r_4mm_1ms continued on next page
127 44 shaketable testing Table C.7: (cont d). Filter Peak response cycles Avg. results for cycles with amp.7 max( amp) Avg. results for cycles with. mm amp 3 mm Test Name fc amp ac amp aa amp n amp aa amp K ξ hyst f n amp aa amp K ξ hyst f [Hz] [mm] [mm] [N/mm] [Hz] [mm] [N/mm] [Hz] d4_93_r_8mm_1ms d4_94_eq_taft_+7mm d4_9_eq_taft_-7mm d4_96_eq_taft_-8mm d4_97_eq_taft_+8mm d4_98_eq_taft_+9mm d4_99_eq_taft_-9mm d4_1_eq_taft_-1mm d4_11_eq_taft_+1mm d4_12_eq_taft_+11mm d4_13_eq_taft_-11mm d4_14_eq_taft_-12mm d4_1_eq_taft_+12mm d4_16_r_4mm_2ms d4_17_r_4mm_1ms d4_18_r_8mm_1ms d4_19_h_13hz_.1mm default d4_11_h_13hz_.2mm default d4_111_h_13hz_.3mm default d4_112_h_13hz_.4mm default d4_113_h_13hz_.mm default d4_114_r_4mm_2ms d4_11_r_4mm_1ms d4_116_r_8mm_1ms d_1_h_14hz_.mm default d_2_h_14hz_.1mm default d_3_h_14hz_.1mm default d_4_h_14hz_.2mm default d R_2mm_2ms 4 d_6_r_4mm_2ms d_7_r_4mm_1ms d_8_h_14hz_.2mm default d_9_h_14hz_.2mm default d_1_r_2mm_2ms d_11_r_4mm_2ms d_12_r_4mm_1ms d_13_h_14hz_.3mm default continued on next page
128 c.4 cyclic response analysis 4 Table C.7: (cont d). Filter Peak response cycles Avg. results for cycles with amp.7 max( amp) Avg. results for cycles with. mm amp 3 mm Test Name fc amp ac amp aa amp n amp aa amp K ξ hyst f n amp aa amp K ξ hyst f [Hz] [mm] [mm] [N/mm] [Hz] [mm] [N/mm] [Hz] d_14_r_2mm_2ms d_1_r_4mm_2ms d_16_r_4mm_1ms d_17_eq_taft_-6mm 2 d_18_eq_taft_+6mm 2 d_19_eq_taft_+11mm d_2_eq_taft_-11mm 2 d_21_eq_taft_-17mm d_22_eq_taft_+17mm d_23_eq_taft_+22mm d_24_eq_taft_-22mm d_2_eq_taft_-28mm d_26_eq_taft_+28mm d_27_eq_taft_+33mm d_28_eq_taft_-33mm d_29_eq_taft_-39mm d_3_eq_taft_+39mm d_31_eq_taft_+4mm d_32_eq_taft_-4mm d_33_eq_taft_-mm d_34_eq_taft_+mm d_3_eq_taft_+6mm d_36_eq_taft_-6mm d_37_eq_taft_-67mm d_38_eq_taft_+67mm d_39_r_2mm_2ms d_4_r_4mm_2ms d_41_r_4mm_1ms d_42_eq_taft_+73mm d_43_eq_taft_-73mm d_44_eq_taft_-78mm d_4_eq_taft_+78mm d_46_r_2mm_2ms d_47_r_4mm_2ms d_48_r_4mm_1ms d_49_eq_taft_+22mm d EQ_Taft_-22mm d_1_eq_taft_-4mm continued on next page
129 46 shaketable testing Table C.7: (cont d). Filter Peak response cycles Avg. results for cycles with amp.7 max( amp) Avg. results for cycles with. mm amp 3 mm Test Name fc amp ac amp aa amp n amp aa amp K ξ hyst f n amp aa amp K ξ hyst f [Hz] [mm] [mm] [N/mm] [Hz] [mm] [N/mm] [Hz] d_2_eq_taft_+4mm d_3_eq_taft_+67mm d_4_eq_taft_-67mm d EQ_Taft_-84mm d_6_eq_taft_+84mm d_7_eq_taft_+89mm d_8_eq_taft_-89mm d_9_eq_taft_-9mm d_6_eq_taft_+9mm d_61_eq_taft_+1mm d_62_eq_taft_-1mm
130 c. data filtering 47 c. data filtering Despite an analogue frequency domain filter being incorporated into the data acquisition system throughout the tests, 29 the data obtained inherently exhibited some degree of high frequency noise. Consequently, frequency domain filtering was performed on the digitised data in order to remove high frequency noise content, thereby smoothing the appearance of the hysteresis loops for the subsequent use of the data in the cyclic response analysis (presented in Section C.4). The type of filter applied depended on the type of test run under consideration: in particular, whether the loading and wall response was periodic (i.e. harmonic tests) or non-periodic (i.e. pulse and earthquake tests). c..1 Periodic Tests Because of the periodic nature of excitation in the harmonic tests, the Fourier spectra of the associated data vectors (displacement or acceleration) inherently contained peaks at integer multiples of the fundamental excitation frequency f o. This is demonstrated by Figure C.19 which shows a typical example of unfiltered wall response during a harmonic test. Whilst it can be seen that most of the spectral content is in the first harmonic, the number of peaks included in the overall response after filtering affected the amount of detail retained in the shape of the hysteresis loops. For example, inclusion of only the fundamental frequency resulted in hysteresis loops that were elliptical in shape, whilst the inclusion of the higher order harmonics was necessary for the generation of details such as loop pinching. Because of these considerations, several different types of frequency filters were trialled to assess their suitability. The filters considered included the following, as illustrated by Figure C.2: 1. A bandpass filter retaining only spectral content at f o. The filter tested was a Butterworth filter of order n = with a cutoff frequency bandwidth of ±1 Hz centred around f o. For example, if the fundamental frequency was f o = 12 Hz, then the filter had a cutoff band of [11, 13] Hz. 2. A bandpass filter retaining spectral content across the first and second harmonics of f o. The trialled filter was a Butterworth filter of order n = 7, with a cutoff frequency bandwidth between. f o and 2. f o. For example, if the fundamental frequency was f o = 12 Hz, then the filter used a cutoff band of [6, 3] Hz. 29 Lowpass Butterworth filter with a cutoff frequency of Hz.
131 48 shaketable testing -2-1 a w.cent w.cent [mm] 2 1 a w.cent t [sec].6. fft amp (a w.cent ) f [Hz] Figure C.19: Example of unfiltered response from harmonic test, including hysteresis plot (top), time domain response (middle) and frequency domain response (bottom). Shown for test run d2_13_h_12hz_.2mm.
132 c. data filtering 49 Butterworth (bandpass): n=, fcut=[11-13]hz Butterworth (bandpass): n=7, fcut=[6-3]hz Butterworth comb: fo=12hz, bw=.2, n=, harms=[1,2] 1f o 2f o 3f o 4f o f o 6f o Filter response Frequency [Hz] Figure C.2: Types of filters trialled for harmonic test data. For the filters shown, the fundamental frequency is taken as f o = 12 Hz. 3. A comb filter passing only spectral content at the first and second harmonics of f o (i.e. f o and 2 f o ). The filter used was an original filter design based on the Butterworth filter equations. The cutoff frequency bandwidth for each peak was 2% of f o centred around the harmonic frequency, with a filter order of n =. For example, if the fundamental frequency was f o = 12 Hz, then the first harmonic at 12 Hz had a cutoff band of [1.8, 13.2] Hz and the second harmonic at 24 Hz had a cutoff band of [22.8, 2.2] Hz. An example of the hysteresis loop shapes produced by the different filters is shown by Figure C.21. As shown by Figure C.21b, the bandpass filter retaining content only across f o (filter option 1) had the inherent effect of producing hysteresis loops which were elliptical in shape. Whilst such loops become cleaner in appearance in comparison to those for unfiltered data, they lose certain shape characteristics such as pinching, due to the removal of the spectral content at the higher harmonics (2 f o, 3 f o...). This is a natural result of including only a single harmonic frequency in the response spectrum, thus causing the signal to become approximately sinusoidal in shape. By contrast, filter options 2 and 3 were chosen so as to retain the spectral content at the second harmonic (2 f o ) and in doing so, preserve some of the shape detail. To provide a quantitative measure of the filter performance, a series of analyses were performed in which the parameters amp, a amp, K and ξ hyst were calculated during a 2 second time window in the middle of the test run. 3 This analysis 3 Note that the calculation of these parameters used the wall s average acceleration a w.avg, whereas in the final results reported (in Section C.4) the wall s central acceleration a w.cent was used to calculate
133 46 shaketable testing λ w.avg λ w.avg w.cent [mm] [mm] w.cent (a) No filter. (b) Bandpass filter across f o λ w.avg λ w.avg [mm] w.cent [mm] w.cent (c) Bandpass filter across f o and 2 f o. (d) Comb filter across f o and 2 f o. Figure C.21: Example comparing the hysteresis loop shape for data filtered using different types of filter. Shown for test run d2_21_h_12hz_.2mm. was conducted for all harmonic test runs, using data filtered using the three aforementioned filters as well as for unfiltered data. The criteria used to evaluate the suitability of the candidate filters were as follows: To ensure that the mean parameter values calculated from filtered data were not significantly altered from those based on unfiltered data. This criterion was intended to ensure that the strength of the signal was not excessively diminished due to over-filtering. To reduce the amount of noise in the data, thereby generating cleaner hysteresis loops. This condition was assessed quantitatively by comparing the variability of the parameter values determined during the 2 second time window. Of the three filters considered (Figure C.2), the comb filter retaining spectral content at f o and 2 f o had the best performance with respect to the above evaluation the hysteretic damping ratio ξ hyst.
134 c. data filtering 461 criteria. In general, the resulting mean values of parameters obtained using this filter were very comparable to those obtained from the unfiltered data, whilst the variability had been considerably reduced. This can be seen from Figure C.22 which graphs the filtered versus unfiltered results for each of the five parameters. By comparison, the bandpass filter retaining only the content at f o produced loops that were inherently elliptical in shape (as shown by the example in Figure C.21b). This filter was quite successful in minimising scatter in the results; however, due to the elliptical shape of the loops, it had a tendency to produce higher apparent values of equivalent damping ξ hyst and effective stiffness K relative to the unfiltered data. As a result, this filter was deemed to be unconservative for derivation of these values. The mean values of parameters derived from the data filtered using the bandpass filter retaining the content between. f o and 2. f o had better accuracy than the bandpass filter retaining only the content at f o. The scatter in the results, however, tended to be higher and similar in magnitude to the results from unfiltered data. An example of the resulting hysteresis loops is shown by Figure C.21c. On the basis of this study, the comb filter was deemed to be the most appropriate for application to the harmonic test data and was adopted in subsequent analyses whose results are reported in Section C.4.4. The final choice of filter used for harmonic tests was a comb filter passing the spectral content at the first three harmonics, with a normalised bandwidth of.2 (2% of the fundamental frequency). Figure C.23 shows an example of response obtained using this filter, which can be compared to the original unfiltered response in Figure C.19.
135 462 shaketable testing 8 Mean Value of amp [mm].2 CoV of amp 6.1 Filtered 4 Filtered Unfiltered Unfiltered (a) Displacement cycle amplitude amp. 3 Mean Value of λ amp.2 CoV of λ amp.2 Filtered 2 1 Filtered Unfiltered Unfiltered (b) Acceleration cycle amplitude a amp. Figure C.22: Comparison of key parameters derived from filtered and unfiltered harmonic test data. In the case of filtered data, a comb filter was applied capturing the response at the first and second harmonics of the excitation frequency. Each parameter was calculated over a time window of 2 seconds in the middle of the test run, with the mean value and level of variability (as CoV or StD) over this duration being plotted in these graphs. Results are plotted for all harmonic test runs performed, except for runs where the mean displacement amplitude was small (<.3 mm), which are omitted.
136 c. data filtering 463 Mean Value of k box [g/mm].3 StD of k box [g/mm] 4.2 Filtered 3 2 Filtered Unfiltered Unfiltered (c) Effective secant stiffness K (as a/ )..6 Mean Value of ξ hyst.6 CoV of ξ hyst Filtered.3 Filtered Unfiltered Unfiltered (d) Hysteretic damping ratio ξ hyst. Figure C.22: (cont d).
137 464 shaketable testing -2-1 a w.cent w.cent [mm] 2 1 a w.cent t [sec].6. fft amp (a w.cent ) f [Hz] Figure C.23: Example of filtered response from harmonic test, including hysteresis plot (top), time domain response (middle) and frequency domain response (bottom). Shown for test run d2_13_h_12hz_.2mm combined with comb filter passing the spectral content at the first three harmonics (i.e. f o, 2 f o and 3 f o ).
138 c. data filtering 46 c..2 Non-Periodic Tests Due to the non-periodic nature of the pulse and earthquake tests performed in this study, the Fourier spectra of the associated data vectors were markedly different to those from the periodic harmonic tests and therefore required a different filtering approach. Typical examples of unfiltered response from earthquake and pulse tests are shown by Figures C.24 and C.26, respectively, where it is seen that the associated Fourier spectra possessed a broad frequency content, as opposed to the harmonic tests where the peaks were concentrated at integer multiples of the fundamental frequency (Figure C.19). This made it possible to utilise a lowpass filter in order to eliminate the high frequency noise content from the data. Examples of the filtered response for earthquake and pulse test runs are shown by Figures C.2 and C.27, which can be compared to the unfiltered versions of the response shown by Figures C.24 and C.26. Prior to conducting the cyclic response analysis reported in Section C.4, data from all earthquake and pulse test runs was filtered using a lowpass Butterworth filter with order n = 1. The cutoff frequency f c of the filter was manually chosen on a case-by-case basis for each individual test run. The criteria used to select an appropriate value of f c was to make f c as low as possible without significantly reducing the maximum response of key variables, including the wall s central displacement w.cent, central acceleration a w.cent, table acceleration a tab, support acceleration a sup.avg, and relative acceleration between the centre of the wall and the supports, a w.cent-sup.avg. The cutoff frequency used for each test run is summarised in the main results table for the cyclic response analysis, Table C.7.
139 466 shaketable testing -3-2 a w.cent w.cent [mm] 3 2 a w.cent t [sec].1 fft amp (a w.cent ) f [Hz] Figure C.24: Example of unfiltered response from earthquake test, including hysteresis plot (top), time domain response (middle) and frequency domain response (bottom). Shown for test run d2_41_eq_taft_-1mm.
140 c. data filtering a w.cent w.cent [mm] 3 2 a w.cent t [sec].1 fft amp (a w.cent ) f [Hz] Figure C.2: Example of filtered response from earthquake test, including hysteresis plot (top), time domain response (middle) and frequency domain response (bottom). Shown for test run d2_41_eq_taft_-1mm combined with lowpass Butterworth filter with order n = 1 and cutoff frequency f c = 2 Hz.
141 468 shaketable testing -2-1 a w.cent w.cent [mm] 2 1 a w.cent t [sec].2 fft amp (a w.cent ) f [Hz] Figure C.26: Example of unfiltered response from pulse test, including hysteresis plot (top), time domain response (middle) and frequency domain response (bottom). Shown for test run d2_32_r_8mm_1ms.
142 c. data filtering a w.cent w.cent [mm] 2 1 a w.cent t [sec].2 fft amp (a w.cent ) f [Hz] Figure C.27: Example of filtered response from pulse test, including hysteresis plot (top), time domain response (middle) and frequency domain response (bottom). Shown for test run d2_32_r_8mm_1ms combined with lowpass Butterworth filter with order n = 1 and cutoff frequency f c = 2 Hz.
143 47 shaketable testing c.6 load-displacement graphs This section provides load-displacement response plots from all individual test runs performed. The data plotted was filtered using the techniques described in Section C. and corresponds to the same data used for the cyclic response analysis (Section C.4). Two sets of axes are provided for each test run: The left axes plot the wall s central acceleration a w.cent versus the normalised central displacement δ w.cent (i.e. w.cent divided by the wall thickness of mm). The right axes plot the wall s average acceleration a w.avg versus δ w.cent. The largest displacement cycle occurring in each test run is also highlighted, but only for cycles whose displacement amplitude exceeded.3 mm. c.6.1 Wall d1 d1_1_mpa_r_4mm_2ms d1_2_mpa_r_4mm_1ms d1_3_mpa_r_8mm_1ms d1_4_.mpa_r_4mm_2ms d1.mpa_r_4mm_1ms d1_6_.mpa_r_8mm_1ms
144 c.6 load-displacement graphs 471 d1_8_.1mpa_r_4mm_2ms d1_9_.1mpa_r_4mm_1ms d1_1_.1mpa_r_8mm_1ms d1_11_h_13hz_.2mm d1_12_h_13hz_.mm d1_13_h_13hz_.7mm d1_14_h_13hz_1mm d1_1_eq_taft_-4mm d1_16_eq_taft_+4mm d1_17_eq_taft_+6mm
145 472 shaketable testing d1_18_eq_taft_-6mm d1_19_eq_taft_-8mm d1_2_eq_taft_+8mm d1_21_eq_taft_+1mm d1_22_eq_taft_-1mm d1_23_eq_taft_-12mm d1_24_eq_taft_+12mm d1_2_r_4mm_2ms d1_26_r_4mm_1ms d1_27_r_8mm_1ms
146 c.6 load-displacement graphs 473 d1_28_h_13hz_.1mm d1_29_h_13hz_.2mm d1_3_h_13hz_.4mm d1_31_r_4mm_2ms d1_32_r_4mm_1ms d1_33_r_8mm_1ms d1_34_eq_taft_+4mm d1_3_eq_taft_-4mm d1_36_eq_taft_-6mm d1_37_eq_taft_+6mm
147 474 shaketable testing d1_38_eq_taft_+8mm d1_39_eq_taft_-8mm d1_4_eq_taft_-1mm d1_41_eq_taft_+1mm d1_42_r_4mm_2ms d1_43_r_4mm_1ms d1_44_r_8mm_1ms d1_4_eq_taft_+12mm d1_46_eq_taft_-12mm d1_47_r_4mm_2ms
148 c.6 load-displacement graphs 47 d1_48_r_4mm_1ms d1_49_r_8mm_1ms d1 H_12Hz_.1mm d1_1_h_12hz_.2mm d1_2_r_4mm_2ms d1_3_r_4mm_1ms d1_4_r_8mm_1ms d1_6_eq_synth1_+2mm d1_7_eq_synth1_-2mm d1_8_eq_synth1_-4mm
149 476 shaketable testing d1_9_eq_synth1_+4mm d1_6_eq_synth1_+6mm d1_61_eq_synth1_-6mm d1_62_eq_synth1_-8mm d1_63_eq_synth1_+8mm d1_64_r_4mm_2ms d1_6_r_4mm_1ms d1_66_r_8mm_1ms d1_67_eq_synth3_-2mm d1_68_eq_synth3_+2mm
150 c.6 load-displacement graphs 477 d1_69_eq_synth3_+4mm d1_7_eq_synth3_-4mm d1_71_eq_synth3_-6mm d1_72_eq_synth3_+6mm d1_73_eq_synth3_+8mm d1_74_eq_synth3_-8mm d1_7_eq_synth3_-1mm d1_76_eq_synth3_+1mm d1_77_r_4mm_2ms d1_78_r_4mm_1ms
151 478 shaketable testing d1_79_r_8mm_1ms d1_8_eq_synth_-2mm d1_81_eq_synth_+2mm d1_82_eq_synth_+4mm d1_83_eq_synth_-4mm d1_84_eq_synth_-6mm d1_8_eq_synth_+6mm d1_86_r_4mm_2ms d1_87_r_4mm_1ms d1_88_r_8mm_1ms
152 c.6 load-displacement graphs 479 d1_89_mpa_r_4mm_2ms d1_9_mpa_r_4mm_1ms d1_91_mpa_r_8mm_1ms c.6.2 Wall d2 d2_1_r_4mm_2ms d2_2_r_4mm_1ms d2_3_r_8mm_1ms d2_4_r_4mm_2ms
153 48 shaketable testing d2 R_4mm_1ms d2_6_r_8mm_1ms d2_7_h_12hz_.mm d2_8_h_12hz_.1mm d2_9_h_12hz_.2mm d2_1_r_4mm_2ms d2_11_r_4mm_1ms d2_12_r_8mm_1ms d2_13_h_12hz_.2mm d2_14_h_12hz_.2mm
154 c.6 load-displacement graphs 481 d2_16_r_4mm_2ms d2_17_r_4mm_1ms d2_18_r_8mm_1ms d2_2_h_12hz_.1mm d2_21_h_12hz_.2mm d2_23_h_12hz_.1mm d2_24_h_12hz_.2mm d2_2_r_4mm_2ms d2_26_r_4mm_1ms d2_27_r_8mm_1ms
155 482 shaketable testing d2_28_h_12hz_.2mm d2_29_h_12hz_.3mm d2_3_r_4mm_2ms d2_31_r_4mm_1ms d2_32_r_8mm_1ms d2_33_eq_taft_-2mm d2_34_eq_taft_+2mm d2_3_eq_taft_+4mm d2_36_eq_taft_-4mm d2_37_eq_taft_-6mm
156 c.6 load-displacement graphs 483 d2_38_eq_taft_+6mm d2_39_eq_taft_+8mm d2_4_eq_taft_-8mm d2_41_eq_taft_-1mm d2_42_eq_taft_+1mm d2_43_r_4mm_2ms d2_44_r_4mm_1ms d2_4_r_8mm_1ms d2_46_eq_taft_+6mm d2_47_eq_taft_-6mm
157 484 shaketable testing d2_48_eq_taft_-12mm d2_49_eq_taft_+12mm d2 R_4mm_2ms d2_1_r_4mm_1ms d2_2_r_8mm_1ms d2_3_eq_synth1_+2mm d2_4_eq_synth1_-2mm d2 EQ_Synth1_-4mm d2_6_eq_synth1_+4mm d2_7_eq_synth1_+6mm
158 c.6 load-displacement graphs 48 d2_8_eq_synth1_-6mm d2_9_eq_synth1_-8mm d2_6_r_4mm_2ms d2_61_r_4mm_1ms d2_62_r_8mm_1ms c.6.3 Wall d3 d3_1_r_2mm_2ms d3_2_r_4mm_2ms
159 486 shaketable testing d3_3_r_4mm_1ms d3_4_r_8mm_1ms d3 H_13Hz_.mm d3_6_h_13hz_.1mm d3_7_h_13hz_.1mm d3_8_h_13hz_.2mm d3_9_h_13hz_.2mm d3_1_h_13hz_.3mm d3_11_h_13hz_.3mm d3_12_r_4mm_2ms
160 c.6 load-displacement graphs 487 d3_13_r_4mm_1ms d3_14_r_8mm_1ms d3_1_h_13hz_.3mm d3_16_h_13hz_.4mm d3_17_r_4mm_2ms d3_18_r_4mm_1ms d3_19_r_8mm_1ms d3_2_h_12hz_.4mm d3_21_r_4mm_2ms d3_22_r_4mm_1ms
161 488 shaketable testing d3_23_r_8mm_1ms d3_24_eq_taft_-mm d3_2_eq_taft_+mm d3_26_eq_taft_+1mm d3_27_eq_taft_-1mm d3_28_eq_taft_-2mm d3_29_eq_taft_+2mm d3_3_eq_taft_+3mm d3_31_eq_taft_-3mm d3_32_eq_taft_-4mm
162 c.6 load-displacement graphs 489 d3_33_eq_taft_+4mm d3_34_eq_taft_+mm d3_3_eq_taft_-mm d3_36_eq_taft_-6mm d3_37_eq_taft_+6mm d3_38_eq_taft_+7mm d3_39_eq_taft_-7mm d3_4_eq_taft_-8mm d3_41_eq_taft_+8mm d3_42_r_4mm_2ms
163 49 shaketable testing d3_43_r_4mm_1ms d3_44_r_8mm_1ms d3_4_eq_taft_+9mm d3_46_eq_taft_-9mm d3_47_r_4mm_2ms d3_48_r_4mm_1ms d3_49_r_8mm_1ms d3 EQ_Taft_-1mm d3_1_eq_taft_+1mm d3_2_eq_taft_+11mm
164 c.6 load-displacement graphs 491 d3_3_eq_taft_-11mm d3_4_eq_taft_-12mm d3 EQ_Taft_+12mm d3_6_eq_taft_+6mm d3_7_eq_taft_-6mm d3_8_h_12hz_.1mm
165 492 shaketable testing d3_9_h_12hz_.2mm d3_6_h_12hz_.4mm c.6.4 Wall d4 d4_1_r_4mm_2ms d4_2_r_4mm_1ms d4_3_r_8mm_1ms d4_4_h_13hz_.mm d4 H_13Hz_.1mm d4_6_eq_taft_-4mm
166 c.6 load-displacement graphs 493 d4_7_eq_taft_+4mm d4_8_eq_taft_+8mm d4_9_eq_taft_-8mm d4_1_r_4mm_2ms d4_11_r_4mm_1ms d4_12_r_8mm_1ms d4_13_h_13hz_.1mm d4_14_h_13hz_.2mm d4_1_h_13hz_.2mm d4_16_h_13hz_.3mm
167 494 shaketable testing d4_17_h_13hz_.3mm d4_18_h_13hz_.4mm d4_19_r_4mm_2ms d4_2_r_4mm_1ms d4_21_r_8mm_1ms d4_22_h_13hz_.4mm d4_23_h_13hz_.mm d4_24_r_4mm_2ms d4_2_r_4mm_1ms d4_26_r_8mm_1ms
168 c.6 load-displacement graphs 49 d4_27_h_6hz_.1mm d4_28_h_6hz_.2mm d4_29_h_6hz_.3mm d4_3_h_6hz_.4mm d4_31_h_6hz_.mm d4_32_h_6hz_.7mm d4_33_h_6hz_1.mm d4_34_h_6hz_1.mm d4_3_r_4mm_2ms d4_36_r_4mm_1ms
169 496 shaketable testing d4_37_r_8mm_1ms d4_38_h_13hz_.1mm d4_39_h_13hz_.2mm d4_4_h_13hz_.3mm d4_41_h_13hz_.4mm d4_42_r_4mm_2ms d4_43_r_4mm_1ms d4_44_r_8mm_1ms d4_4_eq_taft_-1mm d4_46_eq_taft_+1mm
170 c.6 load-displacement graphs 497 d4_47_eq_taft_+2mm d4_48_eq_taft_-2mm d4_49_eq_taft_-3mm d4 EQ_Taft_+3mm d4_1_eq_taft_+4mm d4_2_eq_taft_-4mm d4_3_eq_taft_-mm d4_4_eq_taft_+mm d4 EQ_Taft_+6mm d4_6_eq_taft_-6mm
171 498 shaketable testing d4_7_r_4mm_2ms d4_8_r_4mm_1ms d4_9_r_8mm_1ms d4_6_eq_taft_+6mm d4_61_eq_taft_-6mm d4_62_eq_taft_-7mm d4_63_eq_taft_+7mm d4_64_eq_taft_+7mm d4_6_eq_taft_-7mm d4_66_r_4mm_2ms
172 c.6 load-displacement graphs 499 d4_67_r_4mm_1ms d4_68_r_8mm_1ms d4_69_eq_taft_+7mm d4_7_eq_taft_-7mm d4_71_eq_taftbf_-7mm d4_72_eq_taftbf_+7mm d4_73_eq_taftbf1_+7mm d4_74_eq_taftbf1_-7mm d4_7_eq_taftbf2_-7mm d4_76_eq_taftbf2_+7mm
173 shaketable testing d4_77_eq_taftbf3_+7mm d4_78_eq_taftbf3_-7mm d4_79_eq_taftbf_-7mm d4_8_eq_taftbf_+7mm d4_81_eq_taftbf7_+7mm d4_82_eq_taftbf7_-7mm d4_83_eq_taftbf1_-7mm d4_84_eq_taftbf1_+7mm d4_8_r_4mm_2ms d4_86_r_4mm_1ms
174 c.6 load-displacement graphs 1 d4_87_r_8mm_1ms d4_88_h_13hz_.2mm d4_89_h_13hz_.4mm d4_9_h_13hz_.6mm d4_91_r_4mm_2ms d4_92_r_4mm_1ms d4_93_r_8mm_1ms d4_94_eq_taft_+7mm d4_9_eq_taft_-7mm d4_96_eq_taft_-8mm
175 2 shaketable testing d4_97_eq_taft_+8mm d4_98_eq_taft_+9mm d4_99_eq_taft_-9mm d4_1_eq_taft_-1mm d4_11_eq_taft_+1mm d4_12_eq_taft_+11mm d4_13_eq_taft_-11mm d4_14_eq_taft_-12mm d4_1_eq_taft_+12mm d4_16_r_4mm_2ms
176 c.6 load-displacement graphs 3 d4_17_r_4mm_1ms d4_18_r_8mm_1ms d4_19_h_13hz_.1mm d4_11_h_13hz_.2mm d4_111_h_13hz_.3mm d4_112_h_13hz_.4mm d4_113_h_13hz_.mm d4_114_r_4mm_2ms
177 4 shaketable testing d4_11_r_4mm_1ms d4_116_r_8mm_1ms c.6. Wall d d_1_h_14hz_.mm d_2_h_14hz_.1mm d_3_h_14hz_.1mm d_4_h_14hz_.2mm d R_2mm_2ms d_6_r_4mm_2ms
178 c.6 load-displacement graphs d_7_r_4mm_1ms d_8_h_14hz_.2mm d_9_h_14hz_.2mm d_1_r_2mm_2ms d_11_r_4mm_2ms d_12_r_4mm_1ms d_13_h_14hz_.3mm d_14_r_2mm_2ms d_1_r_4mm_2ms d_16_r_4mm_1ms
179 6 shaketable testing d_17_eq_taft_-6mm d_18_eq_taft_+6mm d_19_eq_taft_+11mm d_2_eq_taft_-11mm d_21_eq_taft_-17mm d_22_eq_taft_+17mm d_23_eq_taft_+22mm d_24_eq_taft_-22mm d_2_eq_taft_-28mm d_26_eq_taft_+28mm
180 c.6 load-displacement graphs 7 d_27_eq_taft_+33mm d_28_eq_taft_-33mm d_29_eq_taft_-39mm d_3_eq_taft_+39mm d_31_eq_taft_+4mm d_32_eq_taft_-4mm d_33_eq_taft_-mm d_34_eq_taft_+mm d_3_eq_taft_+6mm d_36_eq_taft_-6mm
181 8 shaketable testing d_37_eq_taft_-67mm d_38_eq_taft_+67mm d_39_r_2mm_2ms d_4_r_4mm_2ms d_41_r_4mm_1ms d_42_eq_taft_+73mm d_43_eq_taft_-73mm d_44_eq_taft_-78mm d_4_eq_taft_+78mm d_46_r_2mm_2ms
182 c.6 load-displacement graphs 9 d_47_r_4mm_2ms d_48_r_4mm_1ms d_49_eq_taft_+22mm d EQ_Taft_-22mm d_1_eq_taft_-4mm d_2_eq_taft_+4mm d_3_eq_taft_+67mm d_4_eq_taft_-67mm d EQ_Taft_-84mm d_6_eq_taft_+84mm
183 1 shaketable testing d_7_eq_taft_+89mm d_8_eq_taft_-89mm d_9_eq_taft_-9mm d_6_eq_taft_+9mm d_61_eq_taft_+1mm d_62_eq_taft_-1mm
184 AppendixD D I A G N O S I S O F S H A K E TA B L E I M PA C T S Abstract This appendix contains a diagnostic study performed to identify the causes of impacts underwent by the shaketable when run at higher levels of motion intensity, as part of the work reported in Chapter 3. These impacts causes a marked difference to the walls F- loops, as demonstrated by examples. The study discovered that the impacts were generated by a velocity limitation of the hydraulic ram used to move the shaketable. In the opinion of the author, the impacts could not be avoided with the shaketable hardware available. However, it is proposed that the influence of the impacts may be alleviated using frequency domain filtering, as part of post-processing of the data. d.1 introduction Throughout the course of the dynamic test study reported in Chapter 3, the shaketable underwent unexpected impacts during tests in which earthquake motions were run at stronger levels of intensity. These impacts were characterised by disproportionally large acceleration spikes in the table s response, as well as a distinctive banging noise enabling them to be easily recognised during testing. The resulting effects can be seen by comparing the input motion for the Taft earthquake (Figure D.1) to typical motion generated by the table at progressively increasing levels of intensity, as shown by Figures D.2, D.3 and D.4. In these examples, the impacts begin to take place at a peak displacement (PGD) 1 of 6 1 Throughout this appendix, the abbreviations PGA, PGV and PGD refer to the peak acceleration, velocity and displacement, respectively, of the shaketable or the hydraulic ram itself. 11
185 12 diagnosis of shaketable impacts Displacement [mm] Velocity [mm/s] Acceleration [mm/s 2 ] PGD(+) = 1 t =.9s PGD(-) = -77. t = 2.7s PGV(+) = 349 t = 3.s PGV(-) = -241 t =.1s PGA(+) = 39 mm/s t =.1s PGA(-) = -444 mm/s t = 3.1s Time [sec] Figure D.1: Taft earthquake input motion. Scaled such that PGD = +1 mm. mm in the negative direction and +8 mm in the positive direction and then persist at all higher intensities. 2 The impacts were deemed to be an undesirable with respect to wall testing, for the following reasons. The waveform generated (Figures D.2, D.3 and D.4) in the presence of the impacts deviated from the original input motion (Figure D.1). Furthermore, the peak acceleration (PGA) generated during such test runs greatly exceeded the intended value. The wall load-displacement hysteresis loops produced during the impacts (Figure D.) had a distinctively different shape in comparison to loops generated in the absence of the impacts and also when compared to typical loops 2 The (+ or ) sign convention in reference to the PGD refers to the direction in which the earthquake was run. As defined in Figure C., movement in the positive direction corresponds to the hydraulic actuator retracting inwards. For example, a +1mm PGD means that the maximum table displacement corresponded to the actuator being retracted 1 mm inward from its resting position.
186 d.1 introduction 13 Acceleration, Table d3_32_eq_taft_-4mm t=7.s) d3_33_eq_taft_+4mm t=3.2s) 2 d3_36_eq_taft_-6mm (max: t=3.2s) d3_37_eq_taft_+6mm t=6.1s) Acceleration, Table Acceleration, Table d3_4_eq_taft_-8mm (max: t=3.2s) d3_41_eq_taft_+8mm (max: t=3.2s) Acceleration, Table 2-2 d3 EQ_Taft_-1mm (max: t=.2s) d3_1_eq_taft_+1mm (max: t=.2s) 4 d3_4_eq_taft_-12mm (max: t=.2s) d3 EQ_Taft_+12mm (max: t=.2s) Acceleration, Table Time [sec] Time [sec] Figure D.2: Table acceleration response for Taft earthquake runs on wall d3. The vertical axis for each graph has been scaled by the shaking intensity based on the input PGD.
187 14 diagnosis of shaketable impacts Velocity, Table [mm/sec] Velocity, Table [mm/sec] Velocity, Table [mm/sec] Velocity, Table [mm/sec] Velocity, Table [mm/sec] d3_32_eq_taft_-4mm (max: t=3.s) d3_36_eq_taft_-6mm (max: t=.3s) d3_4_eq_taft_-8mm (max: t=.1s) d3 EQ_Taft_-1mm (max: t=7.s) d3_4_eq_taft_-12mm (max: t=.2s) Time [sec] d3_33_eq_taft_+4mm (max: t=3.s) d3_37_eq_taft_+6mm (max: t=3.1s) d3_41_eq_taft_+8mm (max: t=3.2s) d3_1_eq_taft_+1mm (max: t=.2s) d3 EQ_Taft_+12mm (max: t=.2s) Time [sec] Figure D.3: Table velocity response for Taft earthquake runs on wall d3.
188 d.1 introduction d3_32_eq_taft_-4mm d3_33_eq_taft_+4mm Position, Table [mm] 2-2 Position, Table [mm] Position, Table [mm] d3_36_eq_taft_-6mm d3_4_eq_taft_-8mm d3_37_eq_taft_+6mm d3_41_eq_taft_+8mm 1 d3 EQ_Taft_-1mm d3_1_eq_taft_+1mm Position, Table [mm] - Position, Table [mm] -1 1 d3_4_eq_taft_-12mm Time [sec] d3 EQ_Taft_+12mm Time [sec] Figure D.4: Table position for Taft earthquake runs on wall d3. The vertical axis for each graph has been scaled by the shaking intensity based on the input PGD.
189 16 diagnosis of shaketable impacts Acceleration, Wall avg. Acceleration, Wall avg. Acceleration, Wall avg. Acceleration, Wall avg. Acceleration, Wall avg d3_32_eq_taft_-4mm d3_33_eq_taft_+4mm d3_36_eq_taft_-6mm d3_4_eq_taft_-8mm d3 EQ_Taft_-1mm d3_4_eq_taft_-12mm Displacement, Wall centre [mm] d3_37_eq_taft_+6mm d3_41_eq_taft_+8mm d3_1_eq_taft_+1mm d3 EQ_Taft_+12mm Displacement, Wall centre [mm] Figure D.: Hysteresis plots of the average wall acceleration versus the wall displacement for Taft earthquake runs on wall d3.
190 d.2 diagnosed cause of the impacts 17 observed during quasistatic testing (refer to Figures ). Table C.6 specifies whether or not the impacts occurred during individual test runs conducted in the main wall test programme. In testing the first two walls, d and d3, the impacts were observed for Taft runs at strong intensity; however, they were ignored. During testing of wall d4, efforts were made to stop the impacts from occurring, including runs 6 66 which experimented with different PID settings for the controller (refer to Section D.6.2); and runs which trialled filtered versions of the Taft input motion. However, neither of these attempts were successful in preventing the impacts. After testing wall d4, the main test programme was temporarily suspended and a series of diagnostic tests were performed to investigate the cause of the impacts and assess whether the test setup or procedure could be modified to prevent them from occurring. These included: Testing of various aspects of the experimental arrangement such as the wall restraint frame and the table itself, Modifying the settings of the hydraulic actuator controller, Testing of a second hydraulic actuator (identical to the shaketable actuator), and Trial runs using alternative earthquake input motions. This appendix presents the findings of investigations relating to the shaketable impacts. The diagnosed causes of the impacts are presented in Section D.2. The trends in the experimental behaviour are discussed in Section D.3. A developed numerical simulation for predicting the time history of the shaketable s motion is presented in Section D.4 and a simplified procedure for predicting the input motion intensities at which the first onset of the impacts is expected to take place is presented in Section D.. The aforementioned diagnostic experimental tests are reported in Section D.6, and finally, conclusions of the investigations and recommendations for future use of the shaketable are given in Section D.7. d.2 diagnosed cause of the impacts The diagnoses made herein are based on the judgement of the author with support of various evidence presented throughout this appendix, including experimental data from the main test programme, special diagnostic tests on the apparatus and a numerical simulation developed to simulate the ram s motion.
191 18 diagnosis of shaketable impacts 4 3 Velocity, Table [mm/sec] Time [sec] Figure D.6: Superimposed plots of the table velocity response for Taft earthquake runs on wall d3, with PGD ranging between ±4 and ±12 mm. The graph demonstrates the existence of a maximum velocity at which the ram can travel, equal to approximately +2 mm/s and 16 mm/s in the positive and negative directions, respectively. The underlying cause of the impacts is an upper limit of the velocity at which the shaketable actuator (hydraulic ram) can travel in both the positive and negative directions. Existence of these limits is evident from plots of the table s velocity, including for tests from the main programme shown by Figure D.3, which are superimposed together in Figure D.6, and also for tests where the hydraulic ram was disconnected from the table (refer to Figure D.13). Diagnosing the mechanical causes responsible for these limits is beyond the scope of this study; however, they are likely to be due to a maximum rate at which hydraulic fluid can flow in and out of the actuator, which in turn is likely to be governed by the capacity of the pump driving the hydraulics. The values of the velocity limits are obtained graphically. Based on the figures, the limit is approximately u + lim = +2 mm/s in the positive direction (ram retracting inwards), and u lim = 16 mm/s in the negative direction (ram extending outwards). The existence of the velocity limits alone, however, is insufficient to explain the acceleration spikes generated. The secondary cause of the spikes is that once the velocity limit is reached, a lag develops between the displacement of the actuator and the input (target) displacement which the actuator attempts to track. As long as the displacement lag is in the same direction as the ram s travel, the ram will continue moving smoothly toward the target displacement at the limiting velocity. However, once the target displacement switches to the opposite direction relative to the ram s travel, the ram must undergo an abrupt change in direction in order to follow the target displacement. This sudden reversal in direction is believed to generate the apparent impact and cause a spike in the acceleration response.
192 d.3 experimental behaviour 19 4 Measured response Input motion (.2) 3 (.2) (.2) (3.2) (3.2) PGA 2 1 (.2) (3.2) (.2) (.7) (3.2) (3.2) (3.2) (.2) (3.1) (3.1) (6.1) Input PGD [mm] Figure D.7: Measured PGA response plot for Taft earthquake runs performed on wall d3. The bracketed values show the time (in seconds) at which the PGA occurred during the shaking. d.3 experimental behaviour The Taft earthquake runs performed on wall d3 are used as the main experimental data set referred to throughout these discussions. These series of tests have been chosen as the associated results are representative of all the tests performed in this experimental study, whilst incorporating the most extensive range of shaking intensities considered. Several figures are provided based on these test runs. Response plots of the table s acceleration (Figure D.2), velocity (Figure D.3) and displacement (Figure D.4) are shown for selected runs at PGDs of ±4, ±6, ±8, ±1 and ±12 mm. Figure D.7 graphs the associated PGA response for the different PGD intensities used. It should be noted that for all results presented in this appendix, the acceleration and displacement data was obtained through direct measurement, using accelerometers and displacement transducers, respectively. By contrast, velocity data was derived by numerically differentiating the measured displacement data. d.3.1 PGA Response The trend in the measured PGA for different intensities of the input motion is illustrated by Figure D.7. The figure plots the measured PGA of the table against
193 2 diagnosis of shaketable impacts the input PGD for the full range of input PGDs for which tests were carried out, ranging between ± and ±12 mm. For comparison, the relationship between the PGA and PGD in the input motion itself, which would be produced if the shaketable perfectly tracked the input motion, is also plotted. It is seen that at low shaking intensities when the magnitude of the PGD is mm or less, the measured PGA is approximately linear with respect to the PGD and in good agreement with the idealised input motion. The data points inside this linear range correlate directly to the test runs where the impacts do not occur. However, as the shaking intensity is increased to a PGD magnitude beyond approximately 6 mm, the impacts begin to occur, which causes the PGA to become highly nonlinear with respect to the PGD and up to 3 to 7 times higher than the theoretical value. d.3.2 Time History Waveforms Close inspection of the acceleration, velocity and displacement waveforms, provided as Figures D.2, D.3 and D.4 supports the hypothesised reasons for the impacts provided in Section D.3. For example, consider the initial spike in the Taft motion at approximately t = 3.2 sec (Figure D.2). This spike first occurs at 6 mm and +7 mm PGD in the negative and positive directions respectively, but interestingly, becomes attenuated at higher input motion intensities (Figure D.7). This trend can be explained by the hypothesis as follows. In the original input motion shown in Figure D.1 there is a kink in the displacement trace at approximately t = 3.2 sec, which requires a slight reversal in the movement direction. Incidentally, this point also coincides with the PGA of the input motion. The kink at t = 3.2 sec is well captured by the ram at low shaking intensities where the velocity threshold is not reached, as can be seen for the 4 mm, +4 mm, +6 mm PGD runs in Figures D.2, D.3 and D.4. Consequently impacts do not occur at these low input intensities. At intermediate intensities, corresponding to PGD = 6 mm, 8 mm +4 mm and +6 mm, the velocity begins to reach its limit at approximately t = 2.9 sec (Figure D.3). These shaking intensities also correlate well with the intensity at which the impacts begin to occur in the t = 3.2 sec region, as can be seen through comparison of Figures D.3 and D.2. The impacts occur at these intermediate intensities because the attainment of the threshold velocity at t = 2.9 sec causes a lag to develop between the ram s actual displacement and its target displacement. Consequently, by the time the ram arrives in the kink region at t = 3.2 sec it needs to suddenly reverse its direction in order to track the target displacement, which causes the associated acceleration spike.
194 d.4 numerical simulation of the ram s motion 21 That the acceleration spikes in this region disappear for high shaking intensities, including PGD = 1 mm, 12 mm and +12 mm in the runs is also consistent with the hypothesis. It can be seen from Figure D.3, that for these test runs the ram simply travels at its threshold velocity in this region and does not reproduce the kink at t = 3.2 sec. The reason for this is that when the motion is run at these high intensities, the lag between the ram s actual displacement and its target displacement becomes so large that by the time the actuator arrives at the kink region, the target displacement is already further ahead in the input motion. This causes the ram to simply continue travelling toward the target at its threshold velocity, thus causing the kink to be ignored in the reproduced motion. As a result, the PGA occurs at a later point, at approximately t =.2 sec. d.4 numerical simulation of the ram s motion In order to test the hypothesised reasons for the impacts discussed in Section D.2, a numerical simulation of the ram s motion was developed. The basis of the simulation is to step forward in the time domain and calculate the position of the ram at each time point by enforcing limits on the maximum velocity at which the ram can travel. The velocity limits used in the simulation were those determined graphically from the wall s response (Figure D.6). d.4.1 Algorithm The basic steps in the simulation algorithm are as follows. 1. Start with a digitised input displacement record u targ. This represents the target motion which is used as input for defining the motion to the shaketable controller. 2. Numerically differentiate the displacement record to obtain the target velocity record u targ, and differentiate for a second time to obtain the target acceleration record ü targ. The remaining steps are used to calculate the predicted motion of the ram, including its displacement u ram, velocity u ram and acceleration ü ram. 3. At the first time point, assign the ram displacement, velocity and acceleration using the first entry of the target motion, such that u i=1 ram = u i=1 targ, u i=1 ram = u i=1 targ, ü i=1 ram = ü i=1 targ.
195 22 diagnosis of shaketable impacts In the motions considered in these tests, the above initial quantities were all equal to zero. At every subsequent point, the ram displacement is calculated using a step-by-step process by repeating steps 4 and until the end of the record. 4. At the current (i th ) point, calculate the ram velocity needed at the step between the previous and current time points in order to reach the target displacement at the current time point. The required velocity is where t is the time step. ( u req = u i targ u i 1 ram ) / t,. If the required ram velocity u req lies within the velocity threshold bounds u lim and u+ lim, then the ram is able to track the target motion properly at the i th point and the ram displacement at that point is assigned as the target displacement, u i ram = u i targ. Otherwise, if the required ram velocity exceeds one of the threshold bounds, then the ram s velocity assumes the value of the threshold that is exceeded. Consequently the ram loses track of the target motion, causing a displacement lag to develop. The corresponding displacement at the i th point becomes u i ram = u i 1 ram + u lim t, where u lim is the critical velocity threshold that was exceeded (either u lim or u + lim ). Steps 4 and are repeated until the ram displacement u ram is calculated for the entire duration of the motion. Finally the following step is performed. 6. Numerically differentiate the calculated ram displacement record u ram to obtain the ram velocity u ram, and differentiate for a second time to obtain the ram acceleration ü ram. At the end of the process described by steps 1 to 6, the user will end up with histories for the displacement, velocity and acceleration of the target motion (u targ, u targ, ü targ ) and the predicted motion of the ram (u ram, u ram, ü ram ).
196 d.4 numerical simulation of the ram s motion Input Motion Predicted Ram Motion 1.2 (.2) PGA (.2) (.2) (.1) (.1) (3.2) (3.2) (3.1) (3.1) (3.1)(3.1) (3.1) (3.1)(3.1) (3.1) (3.1)(3.1) (3.1) (3.1) Input PGD [mm] (3.1) (3.2) (.2) (3.2) (.2) Figure D.8: Predicted PGA response plot for the Taft earthquake based on numerical simulation. The predicted motion was obtained by implementing velocity threshold limits of 16 and +2 mm/s. Bracketed values show the time (in seconds) at which the PGA occurs during the motion. Grey shaded regions show PGDs at which synchronisation is lost between the ram and target displacement. d.4.2 Results The proposed numerical analysis was conducted using the Taft motion at different PGD intensities, using the velocity threshold limits u + lim = +2 mm/s and u lim = 16 mm/s. A full PGA response plot for the Taft earthquake predicted by the simulation is shown by Figure D.8. Examples of the ram s motion for the associated simulated runs are also provided by Figure D.9, which plots the ram s predicted displacement, velocity and acceleration time histories for PGDs of 6 mm, 8 mm, 1 mm and 12 mm. d.4.3 Comparison of Predicted PGA Response with Experiment Comparison of the PGA response plot obtained computationally (Figure D.8) and experimentally (Figure D.7) shows favourable correlation between several characteristics. Both curves show that the impacts do not occur for PGDs equal to or less severe than mm in the negative direction and +6 mm in the positive direction. Conversely, the numerical analysis predicts the impacts to occur for all intensities greater than 6 mm in the negative direction and +7 mm in the positive direction,
197 24 diagnosis of shaketable impacts Displacement [mm] Velocity [mm/s] Acceleration Input Motion Predicted Ram Motion PGA =.9g, (t = 3.1s) Time [sec] (a) PGD = 6 mm. Input Motion Predicted Ram Motion Displacement [mm] Velocity [mm/s] Acceleration PGA =.62g, (t = 3.2s) Time [sec] (b) PGD = 8 mm. Figure D.9: Examples of simulated ram motion for the Taft earthquake. The motion was calculated by implementing velocity threshold limits of 16 and +2 mm/s. Grey shaded regions show lost synchronisation between the ram and target displacement.
198 d.4 numerical simulation of the ram s motion 2 Displacement [mm] Velocity [mm/s] Acceleration Input Motion Predicted Ram Motion PGA = -.62g, (t =.1s) Time [sec] (c) PGD = 1 mm. Displacement [mm] Velocity [mm/s] Acceleration Input Motion Predicted Ram Motion PGA = -.89g, (t =.2s) Time [sec] (d) PGD = 12 mm. Figure D.9: (cont d).
199 26 diagnosis of shaketable impacts which is validated by the experimental results. Furthermore, the analysis predicts with good accuracy the time at which the PGA is expected to occur. At low levels of intensity and in the absence of impacts, both the analysis and experiment demonstrate the PGA to occur at t = 3.1 sec. 3 At intermediate levels of shaking intensity, corresponding to PGD between +7 mm and +9 mm on the positive side and between 6 mm and 8 mm on the negative side, both the analysis and experiment exhibit impacts which result in the PGA at approximately t = 3.2 sec. At high intensity shaking, corresponding to PGD between +1 mm and +12 mm on the positive side and between 9 mm and 12 mm on the negative side, the critical impacts causing the PGA are shown by both the analysis and experiment to occur at approximately t =.2 sec. The resulting shift in the time at which the PGA occurs to a later point in the motion is due to the smoothing of the displacement trace at the t = 3.2 sec region, as discussed previously in Section D.3.2, which is also captured in the simulation (Figure D.9). There is also good correlation between the overall shapes of the PGA response curves obtained experimentally (Figure D.7) and computationally (Figure D.8). For example, on the positive displacement side, the PGA increases as the PGD is increased from +6 mm to +8 mm, but then begins to reduce slightly at +9 mm. The PGA then increases again once the critical impacts begin to occur at t =.2 sec, as the PGD is increased from +1 mm to +12 mm. Similarly, on the negative displacement side, the PGA increases as the PGD is increased from mm to 7 mm. The PGA then reduces slightly at approximately a PGD of 9 mm and then continues to increase further as the critical impacts move to t =.2 sec, as the PGD is increased from 1 mm to 12 mm. These trend is reflected by both the experimental and computational results. In addition, both sets of curves show that the PGA generated is slightly greater in the positive PGD direction as opposed to the negative PGD direction. d.4.4 Comparison of Predicted Waveforms with Experiment Another aspect where the simulation correlates favourably with experimental data is by comparing the time history waveforms themselves. Comparisons can be made between the selected analytical runs for PGDs of 6 mm, 8 mm, 1 mm and 12 mm, as shown by Figure D.9, with the respective experimental runs given in Figures D.2, D.3 and D.4. 3 With the exception of PGD = +6 mm, whereby the largest measured acceleration was at t = 6.1 sec, which was marginally larger than the second largest acceleration which occurred at the predicted time of t = 3.1 sec
200 d.4 numerical simulation of the ram s motion 27 For the run at PGD = 6 mm, as shown by Figure D.9a, the simulation predicts that synchronisation between the ram and the target motion is lost on two occasions, firstly at around t = 3. sec and secondly at t =.2 sec. However, the acceleration trace shows that only the first instance causes an impact, at approximately t = 3.2 sec. Indeed, the corresponding plot of the experimental response in Figure D.2 confirms this, exhibiting a single spike at the same location. For the run at PGD = 8 mm, as shown by Figure D.9b, again two losses of synchronisation are predicted at the same points in the response as for the run at PGD = 6 mm. Similarly, only a single acceleration spike is predicted at t = 3.2 sec, which is once again confirmed by the corresponding experimental plot in Figure D.2. For the run at PGD = 1 mm, as shown by Figure D.9c, the behaviour becomes slightly different. Loss of synchronisation is predicted at numerous points in the response; however, two of these zones these appear to be most significant. The first zone is between 2.8 sec and 3.6 sec, even though it is not predicted to generate any acceleration spikes. The second zone is between.2 sec and 6. sec, which generates two spikes, one at each of the zone s boundaries. Again the corresponding experimental plot in Figure D.2 compares favourably, showing clear spikes at the same locations in the second zone, as well as an absence of spikes in the first zone. The final run at PGD = 12 mm, as shown by Figure D.9d, is somewhat similar to the run at PGD = 1 mm, however, loss of synchronisation is predicted at numerous additional zones. Similarly though, the first zone between 2.8 sec and 3.6 sec, and the second zone between.2 sec and 6. sec are again the most significant. There is no impact at the start of the first zone; however, a moderate spike is predicted to occur at the end of the zone at 3.6 sec. The second zone again corresponds to the most significant spikes in the response with the largest one occurring at.2 sec and the other at 6. sec. In addition, four additional moderate spikes are predicted to occur at 6.1 sec, 7. sec, 7.3 sec and 7. sec. Remarkably, these spikes are all exhibited by the experimental response as shown by the corresponding plot in Figure D.2. d.4. Limitations Despite being able to predict certain characteristics of the ram s motion with reasonable accuracy, the simulation is unable to accurately predict the actual value of the PGA. It generally underpredicts the value of the PGA quite significantly when compared to the experimental results (Figure D.7).
201 28 diagnosis of shaketable impacts This error could be due to numerous sources. For example, the actual physical system experiences inertial loading due to the presence of actual mass, which is not accounted for in the simulation. Such effects are demonstrated in Section D.6.1 where it is demonstrated that when the ram is disconnected from the rest of the shaketable test arrangement, the resulting PGAs become significantly lower. Further inaccuracies could also result from numerical error in the simulation. For example, given that the numerical differentiation of the ram s motion relies on division by the time step t to obtain the acceleration record, a small change in t can have a significant influence on the computed PGA. By contrast, the value of t used in the analysis is based solely on the digitised input motion used and hence cannot be adjusted. d.4.6 Summary The simulation has been shown to predict numerous characteristics of the response with good accuracy, including The shaking intensity, as a PGD, at which the impacts are expected to begin to occur, The general shape of the PGA response curve as a function of the PGD, The time at which the PGA is expected to occur, and Detailed aspects of the time history waveform such as the occurrence of secondary impacts. Consequently the simulation is believed to provide a good model for predicting the motion of the ram, as well as strong support for the hypothesised causes of the impacts as discussed in Section D.2. d. predicting the onset of the impacts A computational model was presented in Section D.4 for simulating the motion of the ram when subjected to maximum velocity limits, which exhibited good correlation with various aspects of the experimentally observed motion. A significant outcome of the model was that it was able to predict, with good accuracy, the PGD intensity at which the impacts are expected to occur, by generating a response curve for the predicted PGA for different levels of input intensity, such as that shown by Figure D.8 for the Taft motion. That the numerical model performed
202 d. predicting the onset of the impacts 29 Displacement [mm] Velocity [mm/s] Acceleration Input Motion Predicted Ram Motion - -. PGA =.23g, (t = 3.1s) Time [sec] Figure D.1: Simulated ram motion for the Taft earthquake at PGD = mm, calculated by implementing the velocity threshold limits of 16 and +2 mm/s. Grey shaded regions show lost synchronisation between the ram and target displacement. with such good accuracy provided strong evidence for the hypothesised reason of the impacts, which is that the impacts are caused by a loss of synchronisation between the ram displacement and the target displacement that occurs when the peak velocity (PGV) of the input motion exceeds the ram s threshold velocity. The numerical model can also be used to demonstrate, however, that loss of synchronisation between the ram and the target displacement is a necessary, but not sufficient, condition for the generation of the acceleration spikes. An example of this is shown by Figure D.1, which shows the predicted motion of the ram for the Taft earthquake at PGD = mm. It is seen that although the ram loses track of the target displacement at approximately t = 3. sec, the loss of synchronisation does not generate an acceleration spike in this instance. The likely reason for this behaviour is that when the ram catches up with the target displacement after the loss of synchronisation, the target displacement is still travelling in the same direction and therefore the ram does not need to undergo a direction reversal. Consequently, a simple yet conservative estimate of the intensity at which the impacts first begin to occur for a particular input motion can be provided by calculating the lowest PGD at which the threshold velocity of the ram is first exceeded. In order to calculate these PGD limits, it is necessary to know the PGV
203 3 diagnosis of shaketable impacts Table D.1: The PGD, PGV and PGA of the various shaketable input motions, in both the positive and negative directions. The motions have been scaled such that the PGD occurs in the positive direction and is equal to +1 mm. Quake PGD [mm] PGV [mm/s] PGA (+) ( ) (+) ( ) (+) ( ) (abs) Taft Synth Synth Synth Synth Synth Synth Synth Synth Table D.2: Calculated PGDs in the negative and positive directions at which the ram loses synchronisation with the target motion. The calculations are based on the input motion velocity exceeding one of the velocity limits of the ram, either +2 mm/s or 16 mm/s. In most cases the 16 mm/s limit is critical, except where indicated by an asterisk ( ) Quake PGD [mm] ( ) (+) Taft Synth Synth Synth Synth Synth Synth Synth Synth of the input motion in both the positive and negative displacement directions. These values can be derived from a digitised velocity record for the particular input motion, which may be obtained by numerically differentiating its digitised displacement record. The resulting information is given in Table D.1 for the different seismic motions used in this experimental study. Table D.2 provides the calculated PGD limits in the positive and negative directions at which the threshold velocity of the ram is first exceeded. The associated calculations assumed the ram velocity threshold limits to be u + lim = +2 mm/s and u lim = 16 mm/s. Comparison of the calculated limits for the Taft motion with Figure D.7 show that as expected, they provide an accurate, yet slightly conservative prediction of the shaking intensities at which the impacts begin to occur. In Section D.6.3 it is shown that the predictions are also accurate for the synthetically generated motions Synth1 Synth8. Furthermore, the predictions show good correlation with results from the main test programme (Table C.6).
204 d.6 diagnostic experimental tests 31 d.6 diagnostic experimental tests During the process of attempting to diagnose the cause of the shaketable impacts, a series of experimental tests were conducted focusing on various aspects of the test setup and method. The general approach used in these tests was to run the earthquake motions on the shaketable at varying levels of intensity and measure the resulting displacement and acceleration response. Although the actual cause of the impacts (discussed in Section D.2) was found to be none of those that were directly investigated in these diagnostic tests, the results of the tests are nonetheless reported as they also support the final conclusions reached. d.6.1 Tests on the Shaketable and Wall Restraint System The first phase of diagnostic tests aimed to determine if the impacts were caused by the presence of a particular part of the overall test arrangement such as the wall, restraint frame, or the shaketable itself. Starting with the original test setup used for wall tests (refer to Figure 3.4), these diagnostic tests involved gradual removal of these components from the test arrangement and conducting trial runs of the Taft earthquake motion. The various configurations that were considered included: The hydraulic ram connected to the shaketable, together with the restraint frame mounted on the table, but without a wall, Hydraulic ram connected to only the bare shaketable, and The hydraulic ram by itself. In addition to the above tests, data had already been acquired for the full test arrangement during the original wall tests. In all of these trial runs, the actuator controller proportional-integral-derivative (PID) was set to 36 db (the influence of this parameter is discussed in greater detail Section D.6.2). Results Table D.3 provides the measured PGA data at varied input PGD intensity. Qualitative assessment of whether the impacts were deemed to have occurred based on the recorded acceleration time history, is also provided. The table also indicates the shaking intensities at which the ram is expected to lose synchronisation with the target motion and the impacts are predicted to occur (based on Table D.2). The results demonstrate that the test arrangement had no bearing on whether or not the impacts occurred. Significantly, the impacts occurred even when the
205 32 diagnosis of shaketable impacts Table D.3: Results from tests on various test arrangements. The Taft earthquake motion was used in all tests and the controller PID was set to 36 db. Gray shading indicates the PGDs at which synchronisation is expected to be lost, based on Table D.2. Config: Table + Frame + Wall (d3) Table + Frame Table (no Frame) Ram only PGD PGA Note PGA Note PGA Note PGA Note [mm] Notes: = Impacts occurred during run; = Run was clean from impacts.
206 d.6 diagnostic experimental tests 33 Table+Frame+Wall (d3) Table (no Frame) Input motion Table+Frame Ram only 4 PGA Input PGD [mm] Figure D.11: Peak acceleration measured during tests on various test arrangements. hydraulic ram was detached from any additional mass, meaning that the impacts were not due to the shaketable, the wall restraint frame, or the wall. Generally, the impacts began to occur for PGD greater than or equal to +6 mm on the positive side and 6 mm on the negative side. The results exhibit good correlation between the shaking intensity at which the impacts occurred and the intensity at which they are expected to occur based on the predictions in Table D.2. The PGA response for the different test arrangements is also shown graphically on Figure D.11. The graph indicates that regardless of the test arrangement used, the PGA was slightly greater in the positive PGD direction as opposed to the negative direction. This trend is consistent with the results for tests on wall d3, and also with the predicted response based on the computational simulation performed (refer to Table D.8). Whilst the PGD intensity at which the impacts occurred was independent of the test arrangement, the value of the measured PGA for the different arrangements varied depending on the configuration, as seen from Figure D.11. For runs at which the impacts took place, the measured PGA was consistently highest for the configuration involving only the bare shaketable, second highest for the configuration involving the table and frame, and lowest for the configuration involving the table, frame and wall. In other words, the measured PGA reduced as the mass of the system was increased. The apparent inverse relationship between the mass
207 34 diagnosis of shaketable impacts and resulting acceleration suggests that the force limit of the ram may have been reached in these scenarios. Curiously though, this trend is not consistent with the tests using only the hydraulic ram, whereby the generated accelerations are consistently lower compared to the other three configurations having additional mass. A possible explanation for this is that the force limit of the ram may not have been reached when it was detached from the table, due to the absence of the additional mass. Conclusions The observation that the impacts occurred regardless of the test arrangement used, and most significantly, even in the case when no additional mass was connected to the hydraulic ram, had shown that the cause of the impacts was not due to the presence of any of these components of the test arrangement. Instead, these results indicate that the impacts must be due to an inability of the actual hydraulic ram to track the motion at higher levels of shaking intensity. This finding indeed agrees with the underlying cause diagnosed, as discussed in Section D.2. d.6.2 Tests Using an Alternate Hydraulic Ram and Different PID Settings Having previously established that the impacts were not caused by any particular part of the overall shaketable test arrangement (Section D.6.1), the second phase of diagnostic tests studied the motion of the hydraulic ram itself when disconnected from the rest of the shaketable test setup. The aims of the second phase of experimental diagnostic tests were twofold: The first aim was to determine whether the impacts may have been caused by a particular defect of the ram which had been used to drive the shaketable. This was achieved by testing an alternate reserve ram using the same Taft input motion at the levels of intensity used previously. The reserve ram had identical specifications to the shaketable ram and was operated using the same controller computer and software. The second aim was to investigate the influence of the proportional-integralderivative (PID) setting 4 of the controller computer on the generation of the impacts 4 The PID setting of the controller computer which drives the hydraulic ram indirectly determines the impetus with which the ram is forced toward its target displacement under displacementcontrolled loading. At any instance in time during the tracking process, there is some, albeit small, difference between the physical position of the ram and the target position at which it is meant to be. The PID setting relates to the energy with which the controller tries to correct this difference at any point in time a higher PID value means that the actuator is driven with greater impetus to correct the error, with the converse being true for a smaller PID value.
208 d.6 diagnostic experimental tests 3 Table D.4: Results from tests on the shaketable ram and reserve ram at different PID settings. All tests used the Taft earthquake motion. Gray shading indicates the PGDs at which synchronisation is expected to be lost, based on Table D.2. Ram: Shaketable Reserve Shaketable Reserve PID: 36 db 36 db 26 db 26 db PGD PGA Note PGA Note PGA Note PGA Note [mm] Notes: = Impacts occurred during run; = Run was clean from impacts. and to determine whether the setting could be altered in order to prevent the impacts from occurring. A PID setting of 36 db had been previously used in all tests conducted prior to those reported in this section, including the first three walls tested (d, d3 and d4) and diagnostic tests investigating the influence of the test arrangement (Section D.6.1). In these tests, the original PID setting of 36 db is compared to a reduced setting of 26 db, for both the shaketable ram and reserve ram. All runs performed used the original Taft earthquake input motion. Results Table D.4 shows the measured PGA for the different scenarios considered, including a qualitative assessment of whether the impacts were deemed to occur based on the recorded acceleration time history. The table also highlights the PGD intensities at which the impacts were expected to occur based on the loss of synchronisation between the ram and the target motion (as per Table D.2). The measured PGA response is also shown graphically on Figure D.13. When run at 36 db PID, both hydraulic rams generated acceleration spikes which are characteristic of the impacts, although the PGAs were slightly larger for Whilst the value of the PID setting needs to be sufficiently high in order for the input motion record to be reproduced with an acceptable accuracy, if it is too high, the system can potentially become unstable through feedback effects due to continual overcorrection of the displacement error. At the time that these tests were being conducted, it was hypothesised that the impacts generated could be a result of such effects.
209 36 diagnosis of shaketable impacts 4 Table+Frame+Wall (d3) Shaketable ram: PID=36dB Shaketable ram: PID=26dB Input motion Reserve ram: PID=36dB Reserve ram: PID=26dB 3 PGA Input PGD [mm] Figure D.12: Peak acceleration measured during tests on the shaketable ram and reserve ram at different PID settings. In these tests the ram was not connected to the shaketable. the shaketable ram than for the reserve ram (Figure D.12). The impacts for both rams occurred at the same levels of shaking intensity. For the intensities considered in these tests, impacts first occurred at 6 mm PGD in the negative direction and +8 mm PGD in the positive direction and persisted at stronger levels of shaking. These results are consistent with the PGD predicted to result in impacts due to a loss of synchronisation between the ram and target motion. Figure D.13 demonstrates that both rams possess peak velocity limits, which were reached at stronger PGD intensities. These velocity limits appear to be equal for both rams, approximately 16 mm/s in the negative direction and +2 mm/s in the positive direction. It is therefore concluded that neither of these rams has any particular malfunction which generates the impacts, but rather that tracking the Taft motion at higher levels of intensity is beyond the capability of both rams. Comparing the response for the two PID levels considered in these tests reveals that the magnitude of the acceleration generated during the impacts can be alleviated by reducing the PID to the lower value of 26 db. As shown by Figure D.12, the PGA generated for a 26 db PID is much more comparable to the PGA expected based on the input motion, as opposed to a 36 db PID. This is the case for both rams. Close inspection of the 26 db PID response of the two rams (Figure D.12), however, shows a trend which is consistent with tests where the impacts were
210 d.6 diagnostic experimental tests 37 Velocity [mm/s] Velocity [mm/s] Velocity [mm/s] Velocity [mm/s] Time [sec] (a) Shaketable ram, PID = 36 db (PGD = ±4, ±6, ±8, ±1 mm) Time [sec] (b) Shaketable ram, PID = 26 db (PGD = ±4, ±6, ±8, ±1, ±12 mm) Time [sec] (c) Reserve ram, PID = 36 db (PGD = ±6, ±8, ±1 mm) Time [sec] (d) Reserve ram, PID = 26 db (PGD = ±4, ±6, ±8, ±1 mm) Figure D.13: Velocity response of the shaketable ram and reserve ram for varied PID settings during the Taft earthquake motion. Several runs with different PGD intensities are plotted on each graph as indicated.
211 38 diagnosis of shaketable impacts observed to occur. In particular, there is an increase in the PGA from ±6 mm PGD to ±8 mm PGD, a slight reduction at ±1 mm PGD, followed by another rise at ±12 mm PGD. Whilst the magnitude of the measured PGA for the 26 db PID response is significantly lower, this general trend is consistent with that observed previously in tests where the impacts caused significant acceleration spikes. This includes, for example, tests on wall d3 (shown in Figure D.12 for comparison) and also the predicted PGA response based on the simulation of the ram s motion as a result of the impacts (Figure D.8). Furthermore, the velocity threshold is shown to be reached irrespective of the PID setting (Figure D.13), despite the acceleration spikes being far more prominent at a PID setting of 36 db as opposed to 26 db. These results suggest that reducing the PID does not completely prevent the impacts for occurring, but rather that it reduces the PGA which is generated. Conclusions Since both hydraulic rams possessed equal peak velocity limits and exhibited impacts at the same levels of input motion intensity, it was concluded that the reserve ram would provide no benefit over the original ram. Reducing the controller PID from 36 db to 26 db was found to attenuate the accelerations generated for runs where the ram was disconnected from the shaketable. However, this was found not to be the case in runs where the full test arrangement was present, as indicated by test runs 6 66 on wall d4, where the impacts were demonstrated to occur even for a reduced PID setting (Table C.6). d.6.3 Trial Runs Using Different Seismic Input Motions The third phase of diagnostic tests involved trial runs using different seismic motions on the shaketable. The eight seismic motions trialled in this phase of testing were synthetically generated motions Synth1 Synth8, which are described in Appendix C.2. The associated peak responses of the motions in both the positive and negative directions including the PGD, PGV and PGA are given in Table D.1. The test arrangement during these tests consisted of the ram being connected to the shaketable and the wall restraint frame, but without the presence of a wall. These conditions were intended to recreate as close as possible the conditions used during actual wall tests, by including as much weight as possible.
212 d.6 diagnostic experimental tests 39 Table D.: Results of tests on various synthetic earthquake motions. The test arrangement included the table and the restraint frame and the controller PID was set to 36 db. Gray shading indicates the PGDs at which synchronisation is expected to be lost, based on Table D.2. Quake: Synth1 Synth2 Synth3 Synth4 Synth Synth6 Synth7 Synth8 PGD PGA Note PGA Note PGA Note PGA Note PGA Note PGA Note PGA Note PGA Note [mm] Notes: = Impacts occurred during run; = Run was clean from impacts.
213 4 diagnosis of shaketable impacts Results Table D. provides the PGA data at varied input PGD intensity, including an assessment of whether the impacts were deemed to have occurred. The table also indicates the shaking intensities for each seismic motion at which the impacts are expected to occur, based on loss of synchronisation between the ram and input motion, as per Table D.2. For each of the seismic motions considered, the impacts began to occur once the PGD intensity was sufficiently high. Comparison of the experimental results and analytical predictions shows that the impacts only occurred in cases where they were predicted to occur based on the simplified procedure, as described in Section D.. Although the PGD was increased at the fairly large increments of 2 mm and in certain cases only a small number of tests were carried out, the results indicate that for the different shaking motions the simplified procedure (Table D.2) provides conservative estimates of the PGD intensities at which the impacts first begin to occur. The results are also displayed graphically on Figure D.14, which compares the measured PGA response to the predicted response for each of the seismic motions considered. The predicted response curve is based on simulating the ram s motion using the procedure presented in Section D.4. Whilst the amount of experimental data obtained is not sufficient to compare the shape of these curves in great detail, the graphs indicate that when the impacts are predicted not to occur (the unshaded area of the graphs), the measured and expected PGAs are relatively close. By contrast, when the impacts are predicted to occur (shaded area), the measured accelerations become much larger than those expected in the absence of the impacts, which would occur if the input motion was tracked correctly. Furthermore, when the impacts did occur, the PGA generated is also significantly larger than that predicted by the numerical simulation. Possible reasons for this discrepancy were discussed in Section D.4.. Conclusions For each of the shaking motions considered, the impacts occurred when the shaking intensity was sufficiently high. This intensity can be predicted using the simplified procedure presented in Section D. as a PGD. The finding that the impacts are caused by the velocity threshold of the hydraulic ram could be used for selecting or generating new shaking motions for future use This is because at the time these tests were conducted, the aim was to simply determine whether the impacts would take place and not to provide detailed data.
214 d.6 diagnostic experimental tests 41 4 Input Predicted Measured 3 PGA Input PGD [mm] (a) Taft 6 Input Predicted Measured 6 Input Predicted Measured PGA PGA Input PGD [mm] (b) Synth Input PGD [mm] (c) Synth2 Input Predicted Measured 6 Input Predicted Measured 4 PGA PGA Input PGD [mm] (d) Synth Input PGD [mm] (e) Synth4 Figure D.14: Comparison of predicted and experimentally measured PGA response for the different seismic motions. The predicted ram motion was calculated by implementing velocity threshold limits of 16 and +2 mm/s. Grey regions show PGDs at which synchronisation is lost between the ram and target displacement.
215 42 diagnosis of shaketable impacts 6 Input Predicted Measured 8 Input Predicted Measured PGA PGA Input PGD [mm] (f) Synth Input PGD [mm] (g) Synth6 Input Predicted Measured 6 Input Predicted Measured 4 PGA PGA Input PGD [mm] (h) Synth Input PGD [mm] (i) Synth8 Figure D.14: (cont d).
216 d.7 conclusions and recommendations 43 of the shaketable. However, because of the innate relationship between a signal s frequency and amplitudes of acceleration, velocity and displacement, seismic motions designed to satisfy the prevention of the impacts will typically need to have a low frequency content. d.7 conclusions and recommendations The underlying cause of the shaketable impacts was identified as a velocity limiting condition of the hydraulic ram used to drive the table. These velocity limits have been experimentally measured to be 16 mm/s in the negative direction (ram extending outwards) and +2 mm/s in the positive direction (ram retracting inwards). The impacts occur in test runs where the peak velocity of the input motion exceeds the maximum capacity of the hydraulic ram, which causes a loss of synchronisation between the ram and the target displacement. The actual instance at which an impact occurs is when the hydraulic ram travels at its threshold velocity and abruptly experiences a change in the direction of travel A numerical simulation of the ram s motion has been developed based on implementing the maximum velocity condition. The simulation strongly supports the aforementioned reasons for the impacts, by not only predicting with good accuracy the motion intensity at which the impacts are expected to occur, but also the specific points in the motion at which they occur. The predicted response also exhibits good correlation with experimental results in terms of the trend in the generated PGA for different shaking intensities. A simplified procedure was also proposed for predicting the motion intensity at which the impacts are expected to occur. The premise of the method is to calculate the PGD at which the PGV in the input motion begins to exceed the velocity limits of the ram. This approach gives good correlation with the motion intensities at which the impacts were observed experimentally. In the opinion of the author, the only way in which the impacts can be prevented whilst preserving the spectral content of the input motion would be through an upgrade of the shaketable hardware, in particular, replacing the hydraulic ram with one capable of reaching higher velocities. Nonetheless, the findings made in this study may be of benefit during future use of the shaketable; for example, as an aid in the selection of suitable input earthquake motions.
217 44
218 AppendixE M O M E N T C A PA C I T I E S Abstract This appendix contains additional detail related to moment capacity expressions, as dealt with in Chapter 4. e.1 as 37 expressions for ultimate moment capacities This section reproduces expressions for the ultimate moment capacities in vertical, horizontal and diagonal bending provided in the Australian masonry code as 37 [Standards Australia, 21] for ultimate strength design. 1 e.1.1 Vertical Bending as 37 prescribes the vertical moment capacity as M v = ( φ k mt f mt + f d ) Z d, (E.1) where φ is the capacity reduction factor (stipulated as.6), k mt is a bending moment capacity factor dependent on the type of masonry material (1. for standard clay brick masonry), f mt is the characteristic flexural tensile strength of masonry, Z d is the elastic section modulus of the bedded area per unit length, and f d is the minimum design vertical compressive stress. Equation (E.1) is based on simple linear elastic response, with the moment being taken as the product of the necessary 1 Since these expressions are used for design, they contain capacity reduction factors and characteristic values of material properties. 4
219 46 moment capacities flexural stress to cause cracking ( f mt + f d ) and the elastic section modulus ( Z d ). The code also provides a second equation that limits the usable axial stress to f d 2. φ k mt f mt. e.1.2 Horizontal Bending as 37 specifies the horizontal moment capacity as ( 2.φ k p f mt M 1 + f ) d Z h = lesser of f mt d for stepped failure, (E.2a) φ (.44 f ut Z u +.6 f mt Z ) p for line failure, (E.2b) where φ is the capacity reduction factor; k p is a perpend spacing factor taken as the lesser of s p /t u and s p /h u, but no greater than 1.; s p is the minimum overlap of masonry units in successive courses; t u is width of the masonry unit; h u is the height of the masonry unit; f mt is the characteristic flexural tensile strength of the masonry in MPa; f ut is the characteristic lateral modulus of rupture of the masonry units; f d is the minimum design vertical compressive stress; Z d is the elastic section modulus of the bedded area; Z u is the lateral section modulus of the masonry units; and Z p is the lateral section modulus of the mortar contact area of perpend joints. The section moduli per unit length of the crack may all be calculated from elastic beam theory as where t u is the width of the brick unit. Z d, Z u, Z p = t 2 u/6, (E.3) Equation (E.2a) is an empirical expression representing the moment capacity against stepped failure (refer to Figure 4.4a), similar to a relationship derived by Lawrence [197] using a regression analysis on brickwork panel flexural strength test data. The code also provides an additional expression, which enforces an upper limit on the maximum usable compressive stress f d within equation (E.2a), so that f d f mt. This limitation implies that in the absence of bond strength ( f mt = ), the masonry will possess zero moment capacity. Such a treatment is likely to be overly conservative for walls with low axial stress, since unreinforced masonry (URM) attains some moment resistance from friction along the bed joints. A further problem of equation (E.2a) is that it is dimensionally incorrect due to the presence of the f mt term, which can introduce unit inconsistency (thus requiring f mt to be in MPa).
220 e.1 as 37 expressions for ultimate moment capacities 47 The resistance to line failure (refer to Figure 4.4b), represented by equation (E.2b), is based on elastic sectional capacity of the vertical crack. The equation includes strength contributions from rupture of the brick units in addition to flexural capacity of the perpend joints, whilst making the approximation that 44% of the failure plane cuts through brick units and 6% through a combination of perpend and bed mortar joints. 2 e.1.3 Diagonal Bending as 37 specifies the diagonal bending capacity per unit length according to the equation M d = φ f t Z t, (E.4) where φ is the capacity reduction factor, f t is an equivalent characteristic torsional strength and Z t is the equivalent torsional section modulus per unit length along the axis of the diagonal crack line. This approach to calculating the diagonal moment capacity was developed by Lawrence and Marshall [1996] based on the assumption that the diagonal crack behaves as a rectangular shaft subjected to pure torsion. The effective rectangular section is assumed to have the dimensions B t u, where t u is the width of the masonry unit and the length B is given by B = h u + t j 1 + Gn 2, (E.) where h u is the height of the masonry unit, t j is the thickness of mortar joint, l u is the length of the masonry unit, and G n is the natural slope of the diagonal crack line [calculated using equation (4.13)]. The provided expressions for Z t are based on elastic theory [e.g. Timoshenko and Goodier, 1934] and cater for two possibilities regarding the location of the maximum shear stress along the section, depending on the relative size of B and t u. For solid 2 These are values representative of standard Australian brickwork, corresponding to 76 mm brick unit height and 1 mm mortar joint thickness.
221 48 moment capacities rectangular sections, the torsional modulus is given as 2 B 2 t 2 u 3 B t ( ) u for B t u, lu + t j 1 + Gn 2 Z t = (E.6) 2 B 2 t 2 u 1.8 B + 3 t u ( ) lu + t j 1 + Gn 2 for B t u. The equivalent torsional stress term f t within expression (E.4) was calibrated by Lawrence and Marshall [1996] using experimental data for 49 test walls, to achieve good fit between the wall ultimate load capacities measured experimentally and predictions made using the virtual work method. This resulted in the empirically derived expression f t = 2.2 f mt. (E.7) Lawrence and Marshall reasoned that any deviations in behaviour from the theoretical idealisation should be compensated for by the empirical nature of this term. The primary shortcoming of this model is that it contains dimensional inconsistency due to the f mt term within equation (E.7) [similarly to (E.2a) for horizontal bending stepped failure]. Furthermore, the equations do not account for the strengthening influence due to vertical compressive stress and imply that in the absence of mortar bond cohesion a wall will have zero moment capacity in diagonal bending. This is contrary to the generally accepted view that the masonry undergoes some degree of rocking behaviour along diagonal crack lines and must therefore possess some moment resistance even after cracking. Consequently, neglecting this contribution is likely to be overly conservative, particularly for masonry with low bond strength or moderate vertical compressive stress. e.2 torsional capacity of a mortar-bonded section This section presents an analytical expression for calculating the ultimate torsional capacity in horizontal bending with respect to the stepped failure mode (refer to Figure 4.4a), which makes a slight alteration to an expression developed by Willis. e.2.1 Original Equation by Willis In his doctoral thesis, Willis [24] (also published in Willis et al., 24) proposed that the ultimate moment capacity of an individual bed joint subjected to torsion
222 > = e.2 torsional capacity of a mortar-bonded section 49? = J E I B J D A = N E K I D A = H I J H A I I M D A > = Figure E.1: Rectangular section subjected to elastic torsion about the centre. can be calculated using the equation ( ) lu + t j t 2 m h = u k b2 τ um, (E.8) 2 where m h is the ultimate moment in horizontal bending over a single element (refer to Figure 4.2), l u is the length of brick unit, t j is the mortar joint thickness, t u is the brick unit width, τ um is the ultimate shear stress capacity of the masonry [calculated using Eq. (4.24)], and k b2 is a dimensionless factor based purely on the geometry of the bed joint. The expression was derived from elastic theory and assumes that failure occurs when the maximum torsional shear stress developed along the section reaches the ultimate shear stress capacity. The factor k b2 may be calculated using the Timoshenko and Goodier [1934] formula [ ( nπr ) ] 3 π k b2 = r n=1,3,,... n tanh 2 1 8, (E.9) π 1 2 n=1,3,,... n 2 cosh ( ) nπr 2 where r is the ratio of longer side to the shorter side lengths of the section (or b/a as shown in Figure E.1), which accounts for the fact that the maximum shear stress occurs at the midpoint of the longer edge. Since Willis equation does not make any distinction between which is the longer and shorter side, it has the minor shortcoming that it is only applicable when the bed joint has good overlap, or s b t u (refer to Figure 4.2). Willis does state however, that k b2 can be conservatively assumed to be.28, which is the value corresponding to a square bed joint.
223 moment capacities e.2.2 Revised Equation As an alternative expression to that of Willis [equation (E.8)], the author proposes the slightly modified equation m h = k be τ um t 3 u, (E.1) which becomes applicable to any value of bed joint overlap, due to the method used to calculate the coefficient k be. From the definition of the bed joint overlap ratio as r o = s b /t u [equation (4.26)], the value r that must be used in the calculation of k b2 using equation (E.9) is ) r = max (r o, 1ro, (E.11) which accounts for the location of the maximum elastic shear stress along the rectangular section (Figure E.1). From this, the coefficient k be becomes k b2 ro, 2 for r o < 1; k be = (E.12) k b2 r o, for r o 1. Figure 4.6 plots the resulting coefficient for varying overlap ratio r o. e.3 torsional friction capacity of a dry masonry section This section provides a developed analytical expression for calculating the residual moment capacity in horizontal bending due to frictional torsion along the bed joint. Previous models for calculating the frictional torsion capacity are presented in Section E.3.1. The author believes the new approach to be more robust than the previous ones for reasons outlined therein. Derivation of the model is presented in Section E.3.2. e.3.1 Previous Models Willis [24] (also published in Willis et al., 24) proposed that the post-cracked frictional torque capacity over a single bed joint can be calculated using the expression ( ) lu + t j tu m h = ξ f σ v, (E.13) 2 in which ξ f is an empirical index of frictional torque resistance and other symbols as defined previously (refer to Figure 4.2). The equation is based on the following
224 e.3 torsional friction capacity of a dry masonry section 1 assumed relationship between the torque resistance T and applied axial force P: T = ξ f P. (E.14) The coefficient ξ f, which has dimensions of length, was empirically calibrated by Willis through torsional tests on bed joints and found to be approximately 4 mm for the standard Australian brickwork on which these tests were conducted ( mm units with 1 mm mortar joints). The inherent shortcoming of this expression is that it is only applicable to masonry units having the same dimensions as those to which the value of ξ f was calibrated for each new type of masonry it would be necessary to empirically derive a new value of ξ f. This is evident from equation (E.14), which implies that for a fixed axial load P and coefficient ξ f the resulting frictional torque capacity T will be constant, irrespective of scale effects. This clearly cannot hold, since the scale of the masonry units influences the size of the internal lever arm and therefore the torque capacity. The applicability of Willis equation is further limited by not being expressed in terms of the friction coefficient, and can therefore only be applied to the particular type of masonry used in the calibration data set, both in terms of scale and frictional characteristics. As an alternative approach for calculating the frictional torque capacity along a bed joint that does take into account geometric scale effects and the friction coefficient along the interface, the author proposed the following equation in previous research [Vaculik et al., 23]: m h = µ σ v t 3 u 2.614, (E.1) where µ is the friction coefficient, σ v is the axial stress acting on the bed joint, and t u is the width of the bed joint. This expression is based on the assumptions of a uniform stress distribution along the section, with rotation occurring about the centre of the bed joint (same assumptions and principles used to develop the new model in Section E.3.2). Since equation (E.1) is formulated in terms of the friction coefficient and directly accounts for scale effects, the author considers it to be more versatile than equation (E.13). By setting equal the moment capacities predicted by equations (E.13) and (E.1), it can be shown that masonry used by Willis to obtain the value ξ f = 4 mm has an equivalent friction coefficient of µ = 1.4. Nonetheless, equation (E.1) is limited in that it is only applicable to a square bed joint. To overcome this, a more general form of the equation applicable to a generic rectangular section is derived in the following section.
225 2 moment capacities s t Figure E.2: Uniform shear stress field generated from torsion about the centre of the section. e.3.2 New Model Derivation of an analytical expression for calculating the moment capacity of a rectangular bed joint subjected to rotation friction will now be presented. For a list of the assumptions made in the development of the model, the reader is referred to Section (p. 133). It is worth noting that the model described here is very similar to a torsional friction model developed by Orduña and Lourenço [2a], which also has the ability to deal with different (non centred) positions of the rotation point along the rectangular section. 3 The identical equations developed in both cases can be considered a verification for the derivation process used. General Consider a rectangular cross section having the dimensions t and s (representing the width t u and overlap s b of the bed joint respectively), subjected to torsion about its centre as shown in Figure E.2. The strategy of the derivation is to divide the rectangle into two types of triangles: A and B, as shown by Figure E.3. An expression is first derived for the torque about the acute vertex of a right triangle. The contributions of the constituent triangles are subsequently combined to obtain the torque acting about the overall rectangle (as per Figure E.3). 3 This work was belatedly discovered by the author during the course of this research.
226 I ) ) = 4 G * * J * ) ) e.3 torsional friction capacity of a dry masonry section 3 * * Figure E.3: Rectangular section divided into two types of right G Figure E.4: A right triangle section subjected to plastic torsion about one of its acute vertices (bottom left corner in diagram shown). Torsion About the Acute Vertex of a Right Triangle The torsion along a generic right triangle cross section having the base B and height H as shown by Figure E.4 will now be derived. The total torque along the triangle may be obtained by integrating the torque contributions of the radial elements from which it is comprised. Consider a single radial element with length R and angle dθ (Figure E.4). At the limit dθ, the element becomes triangular and therefore its area becomes da = 1 2 R2 dθ. (E.16)
227 4 moment capacities The shear force developed along the element by resisting the uniform shear stress τ is df = τ da = 1 2 τr2 dθ. (E.17) As the element is triangular, its centroid is located at a distance 2 3 R from the pivot of rotation. Hence, the torsion generated by the element is dt = 2 3 R df = 1 3 τr3 dθ. (E.18) The radius R of the element is related to the angle θ by the expression R = B sec θ. (E.19) The torsion T along the overall right triangle (Figure E.4) is obtained by integrating dt between the angles θ = and θ = α, such that T = α θ= 1 3 τb3 (sec θ) 3 dθ. (E.2) Or alternatively, where k evaluates to T = k τb 3, (E.21) k = α θ= 1 3 (sec θ)3 dθ = 1 [sec α tan α + ln sec α + tan α ]. (E.22) 6 This can be further simplified using the associated trigonometric identities [see for example Abramowitz and Stegun, 1964] tan α = m and sec α = 1 + m 2, to give k = 1 6 [ m 1 + m 2 + ln (m + )] 1 + m 2, (E.23) where m represents the triangle s height to base ratio, m = H/B. (E.24)
228 e.3 torsional friction capacity of a dry masonry section Torsion About the Centre of a Rectangle The previously derived equation (E.23) is applicable a right triangle cross section 4 with rotation about the acute vertex at its base (Figure E.4). To derive a similar expression for rotation about the centre of a rectangular cross section, we divide the rectangle into two types of right triangles: A and B (Figure E.3), and use the previous result. Since, in the generic case where s = t, these triangles have non-identical dimensions when considered with respect to the point of rotation, they will generate different amounts of torsion and hence their contributions need to be considered separately. Define r as the aspect ratio of the rectangular section [analogous to the overlap ratio as per equation (4.26)], such that r = s/t. (E.2) Triangle A has the base B = 1 2t and aspect ratio m = r, whilst triangle B has the base B = 1 2 s = 1 2 rt and aspect ratio m = r 1. By substituting these into equations (E.21) and (E.23), the respective torques of triangles A and B become T A = 1 [ 48 τt3 r 1 + r 2 + ln (r + )] 1 + r 2 (E.26) and T B = 1 [ 48 τr3 t 3 r r 2 + ln (r 1 + )] 1 + r 2. (E.27) In the overall rectangular section, there are four instances of each type of triangle A and B. Therefore, the total torsion about the centre of the rectangle is obtained as T = 4 ( T A + T B ). (E.28) Substituting T A and T B into the above equation gives the generalised expression T = k τt 3, (E.29) where k = 1 12 [ 2r 1 + r 2 + ln (r + ) 1 + r 2 + r 3 ln (r 1 + )] 1 + r 2. (E.3) 4 Associated variables denoted using the subscript. Associated variables denoted using the subscript.
229 6 moment capacities Capacity of a Masonry Bed Joint The residual horizontal bending moment capacity of a single masonry bed joint due to frictional torsion is obtained by substituting the relevant variables into equations (E.29) and (E.3). The frictional shear stress parallel to the bed joint s surface is τ = µσ v, where µ is the coefficient of friction and σ v is the vertical axial stress acting normal to the joint. Hence, for a masonry bed joint whose dimensions are t u by s b, where t u is the brick width and s b is the joint overlap, the horizontal bending moment capacity m h for a single joint becomes m h = k bp µ σ v t 3 u. (E.31) The parameter k bp, referred to as the plastic torsion coefficient, is calculated using equation (E.3) by taking r as the bed joint s overlap ratio r o [refer to equation (4.26)]. Figure 4.6 plots the coefficient for varying values of the overlap ratio. e.4 biaxial failure criterion model for ultimate moment capacity This section provides the derivation of an expression for the ultimate moment capacity in diagonal bending, based on a biaxial failure criterion model. e.4.1 Biaxial Failure Envelope Suppose that a masonry wall subjected to flexural actions develops a combination of the vertical and horizontal moments M v and M h at some arbitrary location. Let us define the corresponding slope κ and angle θ κ of the applied moment, such that κ = tan θ κ = M h M v, (E.32) which represents the loading line at the particular point in the wall, as shown by Figure E.. Now, let us denote the uniaxial moment capacities with respect to vertical and horizontal bending by M vc and M hc, which may be calculated using the analytical expressions presented in Sections and From this, the orthogonal strength ratio is defined as η = M hc M vc. (E.33) The proposed model developed in this section is based on the assumption
230 D e.4 biaxial failure criterion model for ultimate moment capacity 7 D L? H D? - E F J E? = A L A F A E J A H =? J E = N E K I J H A I I? H E J A H E E C E A H E J = A J D G E A = H A L A F A L? 8 A H J E? = A J L D H D. = E K H A A L A F A E C E A G ) I E G ). = E K H A F E J )? I G H L Figure E.: Biaxial bending failure criterion, in the M h vs. M v format (top), and ηr h vs. r v format (bottom). that failure occurs when the loading line intersects the biaxial failure envelope, as shown by Figure E.. The overall role of the envelope is to provide a transition between the orthogonal moment capacities, as well as to account for interaction (a strengthening or weakening effect) between the flexure and torsion along the failure surface. The typical approach used to define a failure envelope [e.g. Baker,
231 8 moment capacities 1979; Sinha et al., 1997] is through an empirical relationship between the parameters r v = M v M vc (E.34) and r h = M h M hc, (E.3) which represent the respective ratios of the applied moments at failure and their uniaxial moment capacities. By combining equations (E.32), (E.33), (E.34) and (E.3), it becomes evident that the loading line (in Figure E.) can be represented as r h r v = κ η. (E.36) At the present state of research, there is still uncertainty regarding the appropriate form of a failure envelope to describe the failure criterion of unreinforced masonry subjected to the biaxial bending, largely due to a lack of available experimental data. For example, Baker [1979] proposed the elliptical relationship r 2 v + r 2 h = 1, which implies a mutually weakening influence between the orthogonal moment capacities at the point of failure. Similarly, the work by Willis [24] on diagonal bending also suggested a mutually weakening influence. By contrast, Sinha et al. [1997] proposed the relationship r 2 v.7 r h r 2 v.2 r h r v + r 2 h = 1, which instead implies a strengthening effect between the two failure modes. Since all of these failure envelope relationships are empirical in nature, there is no reason why the exponents of r v and r h need to necessarily adhere to integer values. As such, in the proposed approach we will assume the generalised symmetric failure envelope r 1/n v + r 1/n h = 1, (E.37) where n may assume any value greater than zero. As shown by Figure E., setting n = 1 represents a linear envelope and n = 1/2 gives an elliptical envelope. In general, as n becomes smaller, the weakening effect between the two orthogonal failure modes also becomes less significant. Therefore, the limit n represents the boundary case of no interaction between the failure modes, where failure occurs once either moment M v or M h reaches its respective unfactored capacity.
232 e.4 biaxial failure criterion model for ultimate moment capacity 9 e.4.2 Ultimate Moment Capacity Along an Inclined Axis The basic formula to resolve a combined vertical and horizontal moment along an inclined axis can be written in the moment per length ( M) form as M d = M v cos 2 ϕ + M h sin 2 ϕ, (E.38) where M v, M h and M d are the vertical, horizontal and diagonal (inclined) moments per length, and ϕ is the angle of the inclined axis with respect to the horizontal. By substituting equations (E.34) and (E.3) into (E.38), we obtain the moment capacity M dc along the inclined axis, as M dc = M vc r v cos 2 ϕ + M hc r h sin 2 ϕ, = M vc [ rv cos 2 ϕ + η r h sin 2 ϕ ]. (E.39) A generic formulation of the coefficients r v and r h can be obtained by treating the envelope diagram using polar coordinates. From Figure E. it is seen that at the failure point, we have r v = A cos θ κ (E.4) and r h = Aη 1 sin θ κ, (E.41) with A as defined in the diagram. If we assume the symmetrical failure envelope defined by equation (E.37) and substitute in equations (E.4) and (E.41), we get A = [ ( ) ] 1/n n (cos θ κ ) 1/n + η 1 sin θ κ. (E.42) Substituting these back into equation (E.39) yields the general inclined moment capacity formula M dc = M vc cos θ κ (cos ϕ) 2 + sin θ κ (sin ϕ) 2 [(cos θ κ ) 1/n + (η 1 sin θ κ ) 1/n] n. (E.43) In order to utilise this equation for calculating the moment resistance along an inclined crack line as part of a virtual work analysis, it seems reasonable to assume that the angle of moment inclination is approximately equal to the angle of the crack: θ κ ϕ. (E.44)
233 6 moment capacities Implementing this approximation reduces equation (E.43) to M dc = M vc (cos ϕ) 3 + (sin ϕ) 3 [(cos ϕ) 1/n + (η 1 sin ϕ) 1/n] n, (E.4) where the diagonal moment capacity angle ϕ (since M vc, η and n are constants). M dc becomes a function of only the crack e.4.3 Model Calibration Using Equation by Willis In the development of his diagonal moment capacity model, Willis [24] used the results of four experimental tests on wallette specimens to calibrate his analytical expression [equation (4.32)]. The brickwork used comprised standard clay brick masonry ( mm units with 1 mm mortar joints) with no applied axial load (σ v = ) and were subjected to bending along the natural diagonal slope (hence κ = G n ). These conditions can therefore be used to calibrate the interaction exponent n in the developed model, so that both models produce identical moment predictions for the given set of parameters. The diagonal moment capacity by Willis [equation (4.32)] can be written in the M form as ] M dc = M vc [cos 4 ϕ + η sin 4 ϕ. (E.46) Combining equations (E.46) and (E.39) shows that at the calibration state, the required coefficients r v and r h in the proposed model become r v = cos4 ϕ + η sin 4 ϕ cos 2 ϕ + G n sin 2 ϕ and r h = r v G n η. Evaluating the strength orthotropy for the aforementioned set of parameters from the wallette tests using equation (4.34) gives η = Similarly, the diagonal crack angle and slope evaluated using equation (4.13) are G n =.717 and ϕ = ϕ n =.622 rad. Entering these values into the above equations gives the required coefficients as r v =.847 and r h =.212, which when substituted into the symmetrical interaction envelope equation, (E.37), produces equality between the two models at n =.88. This corresponds to a failure envelope that lies between elliptical and linear interaction (Figure E.). Implementing this result into equation (E.4) yields the calibrated moment
234 e.4 biaxial failure criterion model for ultimate moment capacity 61 capacity expression M dc = M vc (cos ϕ) 3 + (sin ϕ) 3 [(cos ϕ) (η 1 sin ϕ) 1.14].88. (E.47) Alternatively, a slightly conservative and simplified version of the moment capacity equation can be obtained by assuming a linear failure envelope (n = 1), which gives M dc = M vc (cos ϕ) 3 + (sin ϕ) 3 cos ϕ + η 1 sin ϕ. (E.48) For the particular set of calibration parameters, equation (E.48) predicts a moment capacity which is only 6% smaller than the calibrated equation, (E.47). By contrast, assuming an elliptical interaction (n = 1/2) would result in a moment capacity only 14% larger than that given by the calibrated equation. The apparent low sensitivity of the predicted moment capacity on the type of interaction relationship chosen is because at the given strength orthotropy and crack inclination parameters used for calibration, failure is governed primarily by the vertical moment capacity M vc, and therefore interaction does not have a significant effect. This, however, also highlights the need for additional experimental data to enable calibration of the model at different diagonal crack inclinations.
235 62
236 AppendixF P R O B A B I L I S T I C M E T H O D O L O G Y F O R H O R I Z O N TA L B E N D I N G Abstract This appendix contains additional detail related to Chapter. f.1 distribution fitting to material properties Figures F.1 F.8 demonstrate fits of the normal, lognormal and Weibull distributions to the experimental flexural tensile strength ( f mt ) data for test walls s1 s8 (based on material tests reported in Appendix A). Similar graphs are provided for the pooled f mt data for walls s1 s8 in Figure.2; pooled f mt data for walls d1 d in Figure.3; and f ut data for walls s1 s8 in Figure.4. f.2 comparison of analytical results to test data Table F.1 provides a summary of experimental results on small scale wallettes conducted by Willis [24], as well as detailed results of the stochastic methodology in Chapter applied to these specimens. Table F.2 presents detailed experimental and analytical results for walls s1 s8 (Chapter 2) relating to the observed and predicted likelihood of stepped failure. 63
237 64 probabilistic methodology for horizontal bending CDF N = 66 Mean =.721 MPa CoV =.199 KS test stats: Normal D n =.64 Lognormal D n =.89 Weibull D n =.7 % conf. limit cutoff D n =.164 Empirical Data Normal Dist. Lognormal Dist. Weibull Dist f mt [MPa] Figure F.1: Distribution of f mt for panel s1. CDF N = 66 Mean =.24 MPa CoV =.266 KS test stats: Normal D n =.14 Lognormal D n =.94 Weibull D n =.17 % conf. limit cutoff D n =.164 Empirical Data Normal Dist. Lognormal Dist. Weibull Dist f mt [MPa] Figure F.2: Distribution of f mt for panel s2. CDF N = 68 Mean =.2 MPa CoV =.28 KS test stats: Normal D n =.78 Lognormal D n =.67 Weibull D n =.89 % conf. limit cutoff D n =.162 Empirical Data Normal Dist. Lognormal Dist. Weibull Dist f mt [MPa] Figure F.3: Distribution of f mt for panel s3.
238 f.2 comparison of analytical results to test data 6 CDF N = 82 Mean =.636 MPa CoV =.212 KS test stats: Normal D n =.6 Lognormal D n =.78 Weibull D n =.83 % conf. limit cutoff D n =.148 Empirical Data Normal Dist. Lognormal Dist. Weibull Dist f mt [MPa] Figure F.4: Distribution of f mt for panel s4. CDF N = 83 Mean =.66 MPa CoV =.212 KS test stats: Normal D n =.43 Lognormal D n =.81 Weibull D n =.38 % conf. limit cutoff D n =.147 Empirical Data Normal Dist. Lognormal Dist. Weibull Dist f mt [MPa] Figure F.: Distribution of f mt for panel s. CDF N = 74 Mean =.494 MPa CoV =.217 KS test stats: Normal D n =.98 Lognormal D n =.61 Weibull D n =.121 % conf. limit cutoff D n =.1 Empirical Data Normal Dist. Lognormal Dist. Weibull Dist f mt [MPa] Figure F.6: Distribution of f mt for panel s6.
239 66 probabilistic methodology for horizontal bending CDF N = 6 Mean =.682 MPa CoV =.226 KS test stats: Normal D n =.77 Lognormal D n =.113 Weibull D n =.8 % conf. limit cutoff D n =.172 Empirical Data Normal Dist. Lognormal Dist. Weibull Dist f mt [MPa] Figure F.7: Distribution of f mt for panel s7. CDF N = 9 Mean =.713 MPa CoV =.194 KS test stats: Normal D n =.77 Lognormal D n =.93 Weibull D n =.68 % conf. limit cutoff D n =.174 Empirical Data Normal Dist. Lognormal Dist. Weibull Dist f mt [MPa] Figure F.8: Distribution of f mt for panel s8.
240 f.2 comparison of analytical results to test data 67 Table F.1: Analytical and experimental results for wallettes tested by Willis [24]. Test Id. Analysis input parameters Analysis results Experimental Comparison σv Pos. Rep. fmt C fmt Fut Σv ηstep η line ηmin ηmix φmean Pstep η Pstep ηmin ηmix (Pstep) calc [MPa] [MPa] ηtest ηtest (Pstep)test H V V V V Mean: StD: CoV:.1.1 notes: Brick units comprised extruded clay brick pavers with nominal dimensions of mm and 1 mm mortar joints. Modulus of rupture had a mean value of fut =. MPa, and CoV of C fut =.26. The self-weight of the specimens was considered negligible relative to the applied axial stress. Denotes the position of the specimen during test. Specimens marked H were tested horizontally and specimens marked V were tested vertically. Represents the direct minimum of the predicted values for stepped and line failure, i.e. η min = min ( ηstep, η line ). Strength reduction factor for mean capacity, taken as φ mean = ηmix/ηmin. Observed P step taken as n b /, where n b is the number of failed bed joints and is the total number of bed joints that could fail.
241 68 probabilistic methodology for horizontal bending Table F.2: Predicted and observed proportion of stepped failure along the vertical edge cracks of quasistatic test panels. Wall Analysis parameters and results Experimental test results Error in Pstep fmt C fmt σv Fut Σv Pstep Left edge Right edge (calc test) [MPa] [MPa] n b nu uncr Pstep n b nu uncr Pstep L edge R edge s s s s s s s s Mean: +.1 StD:.14 notes: Modulus of rupture had a mean value of fut = 3. MPa, and CoV of C fut =.267. Vertical compressive stress σv used to calculate Σv was taken as the average value along the two vertical edges of the panel. Vertical edges referred to as left or right when viewed from the exterior face of each wall, as shown by diagrams on right-hand side of Figure nu = number of units undergoing line failure; n b = number of bed joints undergoing stepped failure. uncr indicates number of courses remaining uncracked (undergoing neither stepped nor line failure). As each panel consisted of 29 courses, by ignoring the base joint the observed proportion of stepped failure was taken as Pstep = n b /(29 1).
242 AppendixG C O L L A P S E L O A D P R E D I C T I O N I N D RY M A S O N RY WA L L S Abstract This appendix contains additional detail related to Chapter 6. g.1 internal work for an in-plane shear panel This section presents the derivation of a model for calculating the internal work of a dry-stack masonry (DSM) in-plane panel subjected to shear deformation, as shown in Figure The need for such a model arises due to in-plane deformation present in the hybrid mechanisms J and B (refer to Figure 6.14). The total resistance of the in-plane panel when connected to an adjacent out-of-plane panel consists of three sources: 1. Frictional resistance to the internal shear deformation within the mobilised panel itself, 2. Frictional resistance to shear sliding along the diagonal crack, and 3. Vertical bending at the interface between the sliding in-plane panel and the adjacent out-of-plane panel. The expression derived in this section accounts for the resistance due to the sum of the first two components above, which are based on translational friction. 69
243 O L 7 collapse load prediction in dry masonry walls, I K O G Figure G.1: Triangular panel undergoing in-plane shear deformation. The solid outline indicates its original position and the dashed outline its deformed position. g.1.1 Assumptions The following assumptions are made: 1. The mobilised panel is assumed to have a triangular shape. 2. Shear deformation within the in-plane panel has a linear profile. This condition is necessary in order to provide displacement compatibility between the in-plane and out-of-plane panels in mechanisms J and B (refer to Figure 6.14). As a result du dy = constant, where y is the vertical position along the panel and u is the displacement. 3. Displacements are assumed to be sufficiently small, such that any reduction in the bedded area along the diagonal crack can be neglected. g.1.2 General Consider the triangular panel subjected to linear in-plane shear deformation along its height as shown in Figure G.1. The panel has the height H, thickness t, and the slope of the shear crack measured with respect to the vertical is ϖ. The reference virtual displacement at the top of the panel is and the corresponding virtual
244 g.1 internal work for an in-plane shear panel 71 rotation is equal to θ = H. The panel is also subjected to vertical precompression σ vo along its top edge. Vertical position is measured from the bottom of the panel and is denoted by y. Variables that are a function of y, include the vertical compressive stress: σ v = σ vo + γ (H y), the horizontal span: and the virtual displacement: l = ϖy, u = θ y. g.1.3 Internal Shear Deformation Within the Panel At a given vertical position y, the axial force within the triangular panel is N = σ v t l = [σ vo + γ (H y)] tϖy. The resulting frictional force resisting the shear deformation is V = µ m N, where µ m is the coefficient of friction along the masonry s bed joints. For a horizontal strip with the width dy as shown by Figure G.1, the increment of virtual work due to internal shear deformation within the triangular panel is equal to du s panel = du V = dy H µ m [σ vo + γ (H y)] tϖy. (G.1) g.1.4 Shear Sliding Across the Crack Regardless of whether certain portions of the crack are stepped or toothed, as long as the slope ϖ of the inclined shear crack is within the limits ϖ 1 G n,
245 72 collapse load prediction in dry masonry walls then the overlapping bedded area along the crack per unit height, independent from the crack slope and equal to Ā = t ( ) 1 2 lu + t j = t, h u + t j G n Ā, will stay where l u is the brick length, h u is the brick height, t j is the mortar joint thickness, and G n is the natural slope of the masonry [refer to equation (4.13)]. Therefore, the bedded area across the rectangular strip with the width dy, as shown by Figure G.1, is da = Ā dy. The corresponding increment of axial force acting across the bedded area da is dn = σ v da, and the resulting increment of shear force resisting sliding across the crack is dv = µ m dn. The increment of virtual work across the rectangular strip due to sliding along the crack becomes du s crack = u dv = H yµ m [σ vo + γ (H y)] t 1 G n dy. (G.2) g.1. Total Internal Work The total increment of virtual work is the combined work from internal deformation within the panel and sliding across the crack. For a horizontal strip with width dy (Figure G.1), this is obtained by summing equations (G.1) and (G.2): du s tot = du s panel + du s crack = H µ mty [σ vo + γ (H y)] ( ) 1 + ϖ dy. G n (G.3) To obtain an expression for the virtual work for the entire panel, U s tot, the above expression must be integrated between y = and y = H. This becomes U s tot = H du s tot y=
246 g.2 formulations for type G, J, B, K1 and K2 mechanisms 73 ( ) = 1 H H µ mt + ϖ y [σ vo + γ (H y)] dy G n y= ( ) [ 1 1 = µ m t + ϖ G n 2 σ voh + 1 ] 6 γh2. (G.4) An alternative form of this equation, expressed in terms of the stress capacity function f for dry-stack masonry [equation (6.22)], is ( ) 1 U s tot = 1 2 µ m th + ϖ f 1 G 3 H. (G.) n It should be noted that the reference virtual displacement in these expressions is taken at the top edge of the panel, as shown in Figure G.1. When applying these expressions as part of a virtual work analysis for an overall collapse mechanism, it is important to account for the ratio between this displacement and the mechanism s reference displacement. g.2 formulations for type G, J, B, K1 and K2 mechanisms This appendix contains derivations of analytical expressions for calculating the collapse load multiplier λ o for mechanisms G x, G y, J, B, K1 x, K1 y, K2 x and K2 y (refer to Figure 6.3). Sections G.2.1 G.2.8 provide expressions for the total internal virtual work U tot, and the total external virtual work premultiplied by the reciprocal of the lateral load multiplier, λ 1 E tot, for each of the mechanisms. From this, the collapse multiplier λ o is evaluated as U tot λ o = λ 1 E tot. (G.6) Section G.2.9 gives the derivation of the additional internal or external work generated in type-1 mechanisms as a result of a restrained/unrestrained overburden load (OBL). Finally, Section G.2.1 provides the derivation of the top edge rotational restraint factor R ts, to account for the rotational restraint provided by an OBL. g.2.1 Mechanism J Mechanism J, whose basic deflected shape is shown in Figure 6.14a, is a proposed hybrid mechanism that incorporates deformations in orthogonal out-of-plane panels with in-plane shear deformation in adjacent return walls. An important feature of the mechanism is its ability to span across multiple out-of-plane and in-plane panels, depending on the configuration of the masonry specimen. In this section, we derive equations of work for individual out-of-plane and inplane modules. We then consider a simple form of the mechanism in which
247 74 collapse load prediction in dry masonry walls >? 4 >? *? H =? " >? = A B B J J H =?? H =?! A B B? H =? Figure G.2: Individual out-of-plane module involved in mechanism J. all participating out-of-plane and in-plane modules are assumed to be identical, and formulate the equations of work for a mechanism comprising of a generic number of each type of module. The resulting simplified approach is applicable to simple masonry configurations, including the basic variants shown by Figure 6.3, where the aforementioned assumption will hold due to symmetry. For such configurations, the simplified approach is guaranteed to find optimal solutions. For configurations in which the participating out-of-plane and in-plane modules are not guaranteed to be identical, such as the complex variants shown in Figure 6.3, the simplified approach becomes either inapplicable, or is not guaranteed to find optimal solutions. A refined analysis capable of dealing with the complex variants is described in Appendix G.3. Independent Geometric Variables Figure G.2 shows the dimensions of a single out-of-plane module involved in the mechanism. Let the independent variables defining the geometry include: the total mechanism height H t, shape parameter a, and the slope of the in-plane shear crack, ϖ (as shown in Figure 6.14a). 1 As shown by the deflected shape (Figure 6.14a), the reference displacement increment d is taken as the largest displacement along the out-of-plane module. 1 As a result, shape parameter r becomes a dependent variable; however, the choice of which parameter is taken as independent (a or r) is arbitrary.
248 g.2 formulations for type G, J, B, K1 and K2 mechanisms 7 Dependent Geometric Variables The out-of-plane component of the mechanism must span the full available length of the wall, and the length of an out-of-plane module is therefore predetermined. In the simplified treatment, we take the effective length L e as L e = L w /n vs, where L w is the length of the out-of-plane wall, and n vs is its number of vertical supports. Other dependent geometric variables (refer to Figure G.2) include: the effective mechanism height H e, which [from equation (6.39) with n hs = 1] is equal to the total height H t, H e = H t ; the horizontal span of block A, defined as L a = al e ; the horizontal span of block B and the diagonal crack, L d = (1 a) L e ; the corresponding vertical span of the diagonal crack, H d = G n L d = (1 r) H t ; and the vertical span of the in-plane block, H r = rh t. Additional dependent variables include β, calculated using equation (6.43); and α, calculated using equation (6.44). The dependent shape parameter r can be calculated from a, using r = 1 α(1 a). As can be seen from Figure 6.14a, the relationship between the displacement d r occurring at the top of the in-plane panel and the maximum displacement d of an adjacent out-of-plane module is d r = r d, or r = r. (G.7)
249 76 collapse load prediction in dry masonry walls Geometric Constraints The independent variables defined previously may assume any values, as long as the following constraints are adhered to. The total mechanism height must not exceed the available height of the wall, so that < H t H w. The shape parameters a and r must be within the limits a 1, r 1. And as discussed in Section 6.4.3, the slope of the in-plane shear crack must be inside the range ϖ 1/G n. Internal Work for a Single Out-of-Plane Module As shown by Figure G.2, an out-of-plane module receives internal work contributions from four flexural cracks, including the bottom horizontal crack (1), diagonal crack (2), internal vertical crack (3), and the top edge pseudo-crack (4). In addition, it may receive the additional work contribution U Om from the presence of a restrained OBL. Hence, its internal virtual work is obtained from the formula U m = U (1) + U (2) + ζ hiu (3) + U (4) + U Om, (G.8) where U (1) U (4) are the contributions from the respective cracks. The factor ζ hi in equation (G.8) is used to account for the activeness of the internal vertical crack (crack 3 in Figure G.2), effectively acting as a rotation reduction factor as illustrated by Figure G.3. When considering a wall supported along both vertical edges (Figure G.3a), the crack must undergo its full required rotation due to the zero slope condition at the midspan of the overall mechanism. Therefore, in this scenario the crack will develop its full rotation, and consequently ζ hi is taken as 1. However, when the wall is supported at only one vertical edge (Figure G.3b), the free edge will tend to exhibit some nonzero slope, which will act to reduce the rotation of the internal vertical crack. It is evident that the activeness of crack must be related to the mechanism s normalised aspect ratio α [equation (6.44)]: For a mechanism with small α, the crack s close proximity to the unsupported vertical edge with which it is parallel will cause it not to develop its full internal work capacity, since the free edge will tend to exhibit a slope about
250 g.2 formulations for type G, J, B, K1 and K2 mechanisms 77 G D G D G D D E G D (a) Rotations as implied by the basic mechanism shape, with zero slope at the free vertical edge and full rotation along the internal vertical crack. This scenario is only applicable only when the wall has both vertical edges supported. (b) Implemented crack rotation factor for the internal vertical crack, for the case when the wall has only one of its vertical edges supported, thus allowing for a nonzero slope at the free vertical edge. Figure G.3: Crack rotation factor for the internal vertical crack undergoing horizontal bending, in mechanisms J and G x (plan view). the vertical axis, and therefore, the crack will rotate to a lesser extent. However, for a wall with a higher α, the crack will be more distant from the unsupported edge and will therefore undergo a larger rotation, thus causing it realise more of its capacity. In the most extreme case where the wall s length tends toward infinity, the vertical crack will need to undergo its full rotation since the free edge will exhibit zero slope, and so the crack will reach its full capacity. Therefore, it follows that when a is equal to, ζ hi must also equal ; and when a is 1, ζ hi must also equal 1. Because the actual relationship between these two extreme cases is not known, a semi-rational approach is adopted, whereby ζ hi is assumed to vary linearly and be equal to the parameter a. Therefore, in the overall implemented approach, ζ hi is taken as a, if one vertical edge is supported, i.e. n vs = 1; ζ hi = (G.9) 1, if two vertical edges are supported, i.e. n vs = 2. As discussed further in Section G.2.4, mechanism G x is a special case of mechanism J in which the parameter r is taken as zero. It is therefore noteworthy that the factor ζ hi acts to ensure continuity in the calculated value of λ o when transitioning between the complimentary pair of mechanisms G x and G y. It does so by making the contribution of the internal vertical crack gradual, rather than sudden, when the aspect ratio α becomes greater than 1. bottom horizontal crack (1), vertical bending: The crack spans the length L a and its centroid is located at a distance H t below the top of the wall.
251 78 collapse load prediction in dry masonry walls From equation (6.24) the moment capacity is together with the virtual rotation M v = f H t L a Z v, θ v = 1 H t, which gives the internal virtual work contribution U (1) = θ vm v = L a H t Z v f H t = βa Z v f H t. (G.1) diagonal crack (2): The crack spans the horizontal projection L d and its centroid is located at a distance H t 1 2 H d below the top of the wall. Hence, from equation (6.29), the moment capacity is which, together with the virtual rotation M d = f H t 1 2 H d Ld Z v cos ϕ, θ d = 1 H t cos ϕ, gives the internal virtual work contribution U (2) = θ d M d = L d Z v f H t 1 H 2 H d t = β (1 a) Z v f ( 1+r 2 ) Ht. (G.11) internal vertical crack (3), horizontal bending: The crack s height is H t and its centroid is located at a distance 1 2 H t from the top of the wall. Therefore, from equation (6.3), the moment capacity is which, together with the virtual rotation M h = f 1 2 H t Ht Z h, θ h = 1 H t /G n,
252 g.2 formulations for type G, J, B, K1 and K2 mechanisms 79 gives the internal virtual work contribution U (3) = θ h M h = G n Z h f 1 2 H t. (G.12) top edge pseudo-crack (4), vertical bending: L e, so its moment capacity according to equation (6.28) is This hinge spans the length M vo = R ts f L e Z v. It has the virtual rotation θ v = 1 H t ; therefore, its contribution to the internal virtual work is U (4) = θ vm vo = R ts β Z v f. (G.13) friction against restrained OBL: This contribution is calculated according to equation (G.126) as U Om = (1 Φ m) µ o e m, (G.14) where [from equations (G.117) and (G.124)] e m is given by e m = 1 2 (1 + a + r ar) L e t u σ vom. (G.1) total: The total internal work for a single out-of-plane module is obtained by substituting equations (G.1) (G.1) into (G.8). This yields the expression U m = Z v β ( f 1 2 (1 + a + r ar)h t + Rts f ) + ζ hi Z h G n f 1 2 H t + (1 Φm ) µ o e m. (G.16) External Work for a Single Out-of-Plane Module The external work of an individual out-of-plane module includes the self-weight contributions of blocks (A) and (B) (Figure G.2), in addition to a possible contribution E Om from an unrestrained OBL. This gives E m = E W (A) + E W (B) + E Om, (G.17) where E W (A) and E W (B) are contributions from the respective blocks.
253 8 collapse load prediction in dry masonry walls self-weight of block (a): block is From Table 6.1, the virtual volume of the wedge V (A) = 1 2 L ah t, which gives the external virtual work E W ( (A) = λγt 1 u 2 L ) ah t = λγt u Ht 2 ( 1 2 aβ). (G.18) self-weight of block (b): triangular pyramid block is From Table 6.1, the virtual volume of the truncated V (B) = 1 H 2 ( t 1 r 3 ), 6 G n resulting in the external virtual work E W (B) = λγt u H 2 t ( 1 6 ( 1 r 3 ) ) G n. (G.19) weight of unrestrained OBL: This contribution is calculated according to equation (G.12) as E Om = Φ mλη m e m, (G.2) where e m is given by equation (G.1). total: The total external work for an out-of-plane module is obtained by substituting equations (G.18) (G.2) into (G.17). Dividing by λ yields the expression λ 1 E m = γt u H 2 t ( ) 1 2 aβ r 3 6 G n + Φ m η m e m. (G.21) Internal Work for a Single In-Plane Module The internal work U r of an in-plane module receives contributions from: internal deformation due to shear and bending, given by the function U r r, H r, ϖ [from equation (6.36)]; and any additional contribution U Or from a restrained OBL [according to equation (G.126)]. Hence, the general expression for the internal work of a single in-plane module becomes U r = U r r, H r, ϖ + (1 Φ r ) µ o e r, (G.22)
254 g.2 formulations for type G, J, B, K1 and K2 mechanisms 81 where [from equations (G.124) and (G.121)] e r is given by e r = rϖh r t u σ vor. (G.23) External Work for a Single In-Plane Module The external work E r for single in-plane module consists of E r = E W (R) + E Or, (G.24) where E W (R) is the work due to self-weight, and E Or is any additional contribution from a restrained OBL. self-weight of block (r): the block is This results in the external virtual work From Table 6.1, the virtual displaced volume of V (R) = [ 1 r 3 H2 r ϖ ]. E W (R) = r [ ( 1 λγtu 3 H2 r ϖ )]. (G.2) weight of unrestrained OBL: This contribution is calculated according to equation (G.12) as E Or = Φ rλη r e r, (G.26) where e r is given by equation (G.23). total: The total external work for a single in-plane module is obtained by substituting equations (G.2) and (G.26) into (G.24). Dividing by λ yields the expression λ 1 E r = r [ ( 1 γtu 3 H2 r ϖ )] + Φ r η r e r. (G.27) Total Internal and External Work in the Simplified Approach In the simplified treatment, it is assumed that the overall mechanism consists of N m identical out-of-plane modules and N r identical in-plane modules. Hence, the total internal virtual work is obtained from the formula U tot = N m U m + N r U r. (G.28)
255 82 collapse load prediction in dry masonry walls Substituting in equations (G.16) and (G.22), whilst also making the replacements H r = rh t and r = r, yields the expression U tot [ = N m Z v β ( f 1 2 (1 + a + r ar)h t + Rts f ) + ζ hi Z h G n f 1 2 H t + (1 Φm )µ o e m ] (G.29) [ + N r U r r, rh t, ϖ + (1 Φ r )µ o e r ]. Similarly, the total external virtual work is obtained using the formula E tot = N m E m + N r E r. (G.3) Substituting in equations (G.21) and (G.27), and making the replacements H r = rh t and r = r, yields the expression ( ) ] λ 1 E tot = N m [γt u Ht aβ r 3 6 G n + Φ m η m e m [ + N r γtu Ht 2 ( 1 3 r3 ϖ ) (G.31) + Φ r η r e r]. g.2.2 Mechanism B Figure 6.14b shows the mechanism s deflected shape, and Figure G.4 shows the dimensions of a single out-of-plane module. The independent variables defining the mechanism s geometry include: the total height H t ; and the in-plane shear crack slope ϖ. The mechanism must span the full available length of the wall, and therefore, the length L e is predetermined as L e = L w /n vs, where L w is the length of the out-of-plane wall, and n vs is its number of vertical supports. As was done for mechanism J in Section G.2.1, a general case of the mechanism is considered here, in which the overall mechanism comprises of N m out-of-plane modules and N r in-plane modules. Dependent Geometric Variables The dependent geometric variables include the effective mechanism height H e, which [from equation (6.39) with n hs = 1] is equal to the total height H t, H e = H t ;
256 g.2 formulations for type G, J, B, K1 and K2 mechanisms 83 >? 4 >? )? H =? A B B J J A B B? H =? Figure G.4: Individual out-of-plane module involved in mechanism B. and β, calculated using equation (6.43). Geometric Constraints The total mechanism height must not exceed the available height of the wall, so that < H t H w ; and the slope of the in-plane shear crack must be inside the range ϖ 1/G n, as discussed in Section Internal Work for a Single Out-of-Plane Module As shown by Figure G.4, two cracks contribute to the internal work for a single out-of-plane module: the bottom horizontal crack (1) and the pseudo-crack along the top edge (2). In addition, it may receive the additional work contribution U Om from the presence of a restrained OBL. Therefore, the contribution for a single out-of-plane module is U m = U (1) + U (2) + U Om, where U (1) and U (2) are the contributions from the respective cracks. (G.32) bottom horizontal crack (1), vertical bending: The crack spans the length L e, with its centroid located at a distance H t below the top of the wall. From
257 84 collapse load prediction in dry masonry walls equation (6.24), its moment capacity is M v = f H t L e Z v, which, together with the virtual rotation θ v = 1 H t, provides the internal virtual work contribution U (1) = θ vm v = L e H t Z v f H t = β Z v f H t. (G.33) top edge pseudo-crack (2), vertical bending: L e ; hence, its moment capacity according to equation (6.28) is This hinge spans the length M vo = R ts f L e Z v. It has the virtual rotation θ v = 1 H t, giving the internal virtual work contribution U (2) = θ vm vo = R ts β Z v f. (G.34) friction against restrained OBL: This contribution is calculated according to equation (G.126) as U Om = (1 Φ m) µ o e m, (G.3) where [from equations (G.118) and (G.124)] e m is given by e m = L e t u σ vom. (G.36) total: The total internal work of the out-of-plane module is obtained by substituting equations (G.33) (G.3) into (G.32). This yields the expression U m = Z v β ( f H t + R ts f ) + (1 Φ m ) µ o e m. (G.37)
258 g.2 formulations for type G, J, B, K1 and K2 mechanisms 8 External Work for a Single Out-of-Plane Module The external work of an individual out-of-plane module includes the self-weight contributions of block (A), E W (A) (Figure G.4), in addition to a possible contribution E Om from an unrestrained OBL. This gives E m = E W (A) + E Om. (G.38) wedge block (a): 6.1) The virtual volume of the wedge block is (based on Table V (A) = 1 2 L eh t, which gives the external virtual work E W ( (A) = λγt 1 u 2 L ) eh t = λγt u Ht 2 ( 1 2 β). (G.39) weight of unrestrained OBL: This contribution is calculated according to equation (G.12) as E Om = Φ mλη m e m, (G.4) where e m is given by equation (G.36). total: The total external work for an out-of-plane module is obtained by substituting equations (G.39) and (G.4) into (G.38). Dividing by λ yields the expression λ 1 E m = γt u H 2 t ( 1 2 β) + Φ m η m e m. (G.41) Internal and External Work for a Single In-Plane Module Expressions for the total internal and external work for a single in-plane module in mechanism B are obtained by setting r = (defined as 1) and H r = H t to the respective equations for mechanism J. From equation (G.27), the internal work becomes U r = U r 1, H t, ϖ + (1 Φ r ) µ o e r, (G.42) whilst from equation (G.22), the external work is λ 1 E r = γt u Ht 2 ( 1 3 ϖ) + Φ r η r e r, (G.43)
259 86 collapse load prediction in dry masonry walls where e r is determined as e r = ϖh t t u σ vor. (G.44) Total Internal and External Work in the Simplified Approach The total internal virtual work for a total of N m out-of-plane modules and N r in-plane modules is obtained from the formula U tot = N m U m + N r U r. (G.4) Substituting in equations (G.37) and (G.42) yields U tot [ = N m Z v β ( f H t + R ts f ) + (1 Φ m ) µ o e m ] [ + N r U r 1, H t, ϖ + (1 Φ r ) µ o e r ] (G.46). Similarly, the total external virtual work is obtained using the formula E tot = N m E m + N r E r. (G.47) Substituting in equations (G.41) and (G.43), yields λ 1 E tot [ = N m γtu Ht 2 ( 1 2 β) + Φ m η m e m] [ + N r γtu Ht 2 ( 1 3 ϖ) (G.48) + Φ r η r e r]. g.2.3 Mechanism G x Figure 6.1a shows the mechanism s deflected shape, and Figure G. shows the dimensions of a single out-of-plane module. Let us treat the effective length L e and total height H t as the independent variables defining the mechanism s geometry. In order to obtain expressions for the total internal and external work for mechanism G x, we can take advantage of the fact that the mechanism represents a specific case of mechanism J (Section G.2.1) where the shape parameter r is set to zero. Dependent Geometric Variables The dependent geometric variables (refer to Figure G.) include: the effective mechanism height H e, which [from equation (6.39) with n hs = 1] is equal to the total height H t, H e = H t ;
260 g.2 formulations for type G, J, B, K1 and K2 mechanisms 87 >? *? H =? " >? = A B B J J? H =?? H =?! A B B? H =? Figure G.: Individual out-of-plane module involved in mechanism G x. as well as β from equation (6.43); and α from equation (6.44). From this, the shape parameter a is obtained as a = 1 1 α. Geometric Constraints The independent variables L e and H t may assume any values, as long as the following constraints are adhered to. The total mechanism height must not exceed the available height of the wall, or < H t H w. The effective mechanism length cannot exceed the available length of the wall, and must stay within the limits < L e L w /n vs, where n vs is the number of vertical supports for the out-of-plane wall. Finally, the normalised aspect ratio α must satisfy the condition α 1. Internal Work Setting r = to equation (G.29) for mechanism J, the total internal work for a single out-of-plane module (N m = 1) in mechanism G x becomes U tot = Z v β [ f 1 2 (1 + a)h t + Rts f ] + ζ hi Z h G n f 1 2 H t + (1 Φm )µ o e m. (G.49)
261 88 collapse load prediction in dry masonry walls >? )? H =? #? H =? "? H =?! A B B J J H =? >? * A B B? H =? Figure G.6: Individual out-of-plane module involved in mechanism G y. Here, ζ hi is the work contribution factor for the vertical crack labelled as (3) in Figure G. and is obtained from equation (G.9). The virtual energy quantity e m is obtained by setting r = to equation (G.1), which gives e m = 1 2 (1 + a) L e t u σ vom. (G.) External Work Setting r = to equation (G.31) for mechanism J, the total external work for a single out-of-plane module (N m = 1) in mechanism G x becomes λ 1 E tot = γt u L e H t ( a) + Φ m η m e m, (G.1) where e m is obtained from equation (G.). g.2.4 Mechanism G y Figure 6.1b shows the mechanism s deflected shape, and Figure G.6 shows the dimensions of a single out-of-plane module. Let us treat the effective length L e and total height H t as the independent variables defining the mechanism s geometry. Dependent Geometric Variables The dependent geometric variables (refer to Figure G.6) include: the effective mechanism height H e, which [from equation (6.39) with n hs = 1] is equal to the total height H t, H e = H t ;
262 g.2 formulations for type G, J, B, K1 and K2 mechanisms 89 the vertical span of block A, defined as H r = rh t ; and the height of the diagonal crack, H d = (1 r) H t. In addition, we need to calculate β using equation (6.43) and α using equation (6.44). From this, the shape parameter r is calculated as r = 1 α. Geometric Constraints The independent variables L e and H t may assume any values, as long as the following constraints are adhered to. The total mechanism height must not exceed the available height of the wall, and the effective mechanism length cannot exceed the available length of the wall. They must therefore be within the limits < H t H w and < L e L w /n vs. In addition, the normalised aspect ratio α must satisfy the condition α 1. Internal Work As shown by Figure G.6, there are four flexural cracks contributing to the internal work of a single out-of-plane module, including the internal horizontal crack (1), diagonal crack (2), vertical edge crack (3), if both vertical edges are supported then the central vertical crack (4), and the top edge pseudo-crack (). In addition, it may receive the additional work contribution U Om from the presence of a restrained OBL. The total internal work for a single out-of-plane module is therefore obtained using the formula U tot = ζ vi U (1) + U (2) + U (3) + ζ hiu (4) + ζ vou () + U Om, (G.2) where U (1) U () are the contributions from the respective cracks. Factor ζ vi in equation (G.2) represents the activeness of the internal horizontal crack (crack 1 as shown in Figure G.6). Effectively it accounts for a reduction in the
263 9 collapse load prediction in dry masonry walls L G L G L L E G L M D A H A L E L G L (a) Rotations as implied by the basic mechanism shape. G L (b) Implemented crack rotation factors allowing for slope at the top edge. Figure G.7: Crack rotation factors in mechanism G y. crack s rotation since the crack is parallel with the unsupported top edge, which, due to its translational as well as rotational degrees of freedom, will tend to exhibit some slope and not have zero slope as implied by the basic mechanism shape. This is illustrated by Figure G.7. Using the same rationalisation as for the factor ζ hi in mechanism J [refer to equation (G.9) and the accompanying discussion in Section G.2.1], the factor ζ vi is taken as ζ vi = r. (G.3) This means that when the height H r (refer to Figure G.6) is small compared to the overall height, the contribution from the crack will also be small, and as H r gets longer, the crack s contribution factor ζ vi will approach 1. Since the rotation reduction factor ζ vi is applied to the internal horizontal crack (1), a rotation enhancement factor ζ vo also needs to be applied to the top edge. As a result of the top edge exhibiting some rotation, we need to account for the moment developed in the case of an overburden load providing rotational restraint to the edge. From basic geometry as shown by Figure G.7b, it follows that the sum of these two factors must equal 1, and hence ζ vo is taken as ζ vo = 1 ζ vi. (G.4) It is important to note that the implemented factors ζ vo and ζ vi also act to ensure continuity in the calculated λ o value when transitioning between the pair of complimentary mechanisms G x and G y. They do this by making the internal work contributions of the horizontal cracks gradual, rather than sudden, across the limiting condition α = 1. Factor ζ hi in equation (G.2) accounts for the activeness of the central vertical
264 g.2 formulations for type G, J, B, K1 and K2 mechanisms 91 crack (4), since the crack only becomes active when both of the wall s vertical edges are supported, and therefore, if one vertical edge is supported, i.e. n vs = 1; ζ hi = 1, if two vertical edges are supported, i.e. n vs = 2. internal horizontal crack (1), vertical bending: The crack spans the length L e, with its centroid located at a depth H r below the top edge of the wall; hence, the moment capacity [from equation (6.24)] is M v = f H r L e Z v. It has the virtual rotation θ v = 1 H d, thus giving the internal virtual work contribution U (1) = θ vm v = f H r L e H d Z v = Z v G n f rh t. (G.) diagonal crack (2): The crack s horizontal projection is L e, with its centroid located at a distance of H t 1 2 H d below the top of the wall. From equation (6.29), this gives the moment capacity M d = f H t 1 2 H d Le Z v cos ϕ, which, combined with the virtual rotation gives the internal virtual work θ d = 1 L e sin ϕ, U (2) = θ d M d = f H t 1 2 H L e cos ϕ d L e sin ϕ Z v = Z v G n f 1 2 (1 + r)h t. (G.6) edge vertical crack (3), horizontal bending: The vertical span of the crack is H r, with its centroid located at a depth of 1 2 H r below the top edge. Its moment capacity is obtained by multiplying equation (6.3) by the vertical edge
265 92 collapse load prediction in dry masonry walls restraint factor R vs [determined using equation (6.8)], which gives Combined with the virtual rotation M h = R vs f 1 2 H r Hr Z h. θ h = 1 L e, this gives the internal virtual work contribution U (3) = θ h M h = R vs f 1 2 H H r r Z L h e = R vs Z h r β f 1 2 rh t. (G.7) internal vertical crack (4), horizontal bending: The crack s height span is H t and its centroid is located 1 2 H t below the top edge of the wall. Its moment capacity from equation (6.3) is therefore M h = f 1 2 H t Ht Z h, whilst its virtual rotation is the same as for crack (3). This gives the internal virtual work contribution U (4) = θ h M h = f 1 2 H H t t Z L h e = Z h β f 1 2 H t. (G.8) top edge pseudo-crack (), vertical bending: This hinge spans the length L e, so its moment capacity according to equation (6.28) is M vo = R ts f L e Z v, which, together with the virtual rotation θ v = 1 H d, gives the internal virtual work contribution U () = θ vm vo = R ts f L e H d Z v
266 g.2 formulations for type G, J, B, K1 and K2 mechanisms 93 = R ts Z v G n f. (G.9) friction against restrained OBL: This contribution is calculated according to equation (G.126) as U Om = (1 Φ m) µ o e m, (G.6) where [from equations (G.12) and (G.124)] e m is given by e m = 1 2 L e t u σ vom. (G.61) total: The total internal work is obtained by substituting equations (G.) (G.6) into (G.2). This yields the expression U tot = Z v [ ζvi f rh t + f 1 G 2 (1 + r)h t + Rts ζ vo f ] n + Z h β [ ζhi f 1 2 H t + Rvs r f 1 2 rh t ] + (1 Φm )µ o e m. (G.62) External Work The external work of an individual out-of-plane module includes the self-weight contributions of blocks (A) and (B) (Figure G.6), in addition to a possible contribution E Om from an unrestrained OBL. This gives E tot = E W (A) + E W (B) + E Om, (G.63) where E W (A) and E W (B) are contributions from the respective blocks. self-weight of block (a): block is From Table 6.1, the virtual volume of the wedge V (A) = 1 2 L eh r, which gives the external virtual work E W (A) = λγt u ( 1 2 H rl e ) = λγt u L e H t ( 1 2 r). (G.64) self-weight of block (b): pyramid block is From Table 6.1, the virtual volume of the triangular V (B) = 1 6 L eh d,
267 94 collapse load prediction in dry masonry walls >? * >? )? H =? " A B B J =? H =?!? H =? A B B? H =? Figure G.8: Individual out-of-plane module involved in mechanism K1 x. which gives the external virtual work E W (B) = λγt u ( 1 6 L eh d ) = λγt u L e H t ( 1 6 (1 r)). (G.6) weight of unrestrained OBL: This contribution is calculated according to equation (G.12) as E Om = Φ mλη m e m, (G.66) where e m is given by equation (G.61). total: The total external work for a single out-of-plane module is obtained by substituting contributions from equations (G.64) (G.66) into (G.63). Dividing by λ yields the expression λ 1 E tot = γt u L e H t ( r) + Φ m η m e m. (G.67) g.2. Mechanism K1 x Figure 6.16a shows the mechanism s deflected shape, and Figure G.8 shows the dimensions of a single out-of-plane module. Let us take the effective length L e and total height H t as independent variables that define the mechanism s geometry. Dependent Geometric Variables The dependent geometric variables (refer to Figure G.8) include: the effective mechanism height H e, which [from equation (6.39) with n hs = 1] is equal to the
268 g.2 formulations for type G, J, B, K1 and K2 mechanisms 9 total height H t, the horizontal span of block A, H e = H t ; L a = al e ; and the horizontal projection of the diagonal crack, L d = (1 a) L e. In addition, we need to calculate β using equation (6.43) and α using equation (6.44). From this, the shape parameter a becomes a = 1 1 α. Geometric Constraints The independent variables L e and H t may assume any values, as long as the following constraints are satisfied. The total mechanism height must not exceed the available height of the wall, and must stay within the limits < H t H w. The effective mechanism length cannot exceed the available length of the wall, and must be within < L e L w /n vs, where n vs is the number of vertical supports for the out-of-plane wall. Finally, the normalised aspect ratio α must satisfy the condition α 1. Internal Work As shown by Figure G.8, there are four flexural cracks contributing to the internal work of an out-of-plane module, including the bottom horizontal crack (1), diagonal crack (2), vertical edge crack (3), and the top edge pseudo-crack (4). In addition, it may receive the additional work contribution U Om from the presence of a restrained OBL. The total internal work for a single out-of-plane module is therefore determined from the formula U tot = U (1) + U (2) + U (3) + U (4) + U Om, (G.68)
269 96 collapse load prediction in dry masonry walls where U (1) U (4) are the contributions from the respective cracks. bottom horizontal crack (1), vertical bending: The crack spans the length L e, with its centroid located at a depth of H t below the top edge of the wall. Hence, its moment capacity [from equation (6.24)] is M v = f H t L e Z v, which, together with the virtual rotation θ v = 1 H t, provides the internal virtual work U (1) = θ vm v = f H t L e H t Z v = Z v β f H t. (G.69) diagonal crack (2): The crack s horizontal projection is L d, with its centroid located at a distance of 1 2 H t below the top of the wall. From equation (6.29), the crack has the moment capacity Combined with the virtual rotation the internal virtual work becomes M d = f 1 2 H t Ld Z v cos ϕ. θ d = 1 H t cos ϕ, U (2) = θ d M d = f 1 2 H L d t H t cos ϕ Z v cos ϕ = Z v G n f 1 2 H t. (G.7) edge vertical crack (3), horizontal bending: The crack s vertical span is H t, with its centroid located at a depth of 1 2 H t below the top edge. The moment capacity is obtained by multiplying equation (6.3) by the vertical edge restraint factor R vs [determined using equation (6.8)], giving M h = R vs f 1 2 H t Ht Z h.
270 g.2 formulations for type G, J, B, K1 and K2 mechanisms 97 Combined with the virtual rotation θ h = 1 L d, the internal virtual work contribution becomes U (3) = θ h M h = R vs f 1 2 H H t t Z L h d = R vs Z h G n f 1 2 H t. (G.71) top edge pseudo-crack (4), vertical bending: span L a, so its moment capacity according to equation (6.28) is The hinge has the length M vo = R ts f L a Z v. Together with the virtual rotation θ v = 1 H t, its internal virtual work is U (4) = θ vm vo = R ts f L a H t Z v = R ts Z v aβ f. (G.72) friction against restrained OBL: This contribution is calculated according to equation (G.126) as U Om = (1 Φ m) µ o e m, (G.73) where [from equations (G.119) and (G.124)] e m is given by e m = 1 2 (1 + a) L e t u σ vom. (G.74) total: The total internal work is obtained by substituting equations (G.69) (G.73) into (G.68). This yields the expression U tot = Z v β [ f H t + R ts a f + (1 a) f 1 2 H ] t + R vs Z h G n f 1 2 H t + (1 Φm )µ o e m. (G.7)
271 98 collapse load prediction in dry masonry walls External Work The external work of an individual out-of-plane module includes the self-weight contributions of blocks (A) and (B) (Figure G.8), in addition to a possible contribution E Om from an unrestrained OBL. This gives E tot = E W (A) + E W (B) + E Om, (G.76) where E W (A) and E W (B) are contributions from the respective blocks. self-weight of block (a): block is From Table 6.1, the virtual volume of the wedge V (A) = 1 2 L ah t, giving the external virtual work E W (A) = λγt u ( 1 2 L ah t ) = λγt u L e H t ( 1 2 a). (G.77) self-weight of block (b): From Table 6.1, the virtual volume of the rectangular pyramid block is V (B) = 1 3 L dh t, which gives the external virtual work E W (B) = λγt u ( 1 3 L dh t ) = λγt u L e H t ( 1 3 (1 a)). (G.78) weight of unrestrained OBL: This contribution is calculated according to equation (G.12) as E Om = Φ mλη m e m, (G.79) where e m is given by equation (G.74). total: The total external work for a single out-of-plane module is obtained by substituting contributions from equations (G.77) (G.79) into (G.76). Dividing by λ yields the expression λ 1 E tot = γt u L e H t ( a) + Φ m η m e m. (G.8)
272 g.2 formulations for type G, J, B, K1 and K2 mechanisms 99 >? )? H =? " A B B J J >? *? H =?!? H =? A B B? H =? Figure G.9: Individual out-of-plane module involved in mechanism K1 y. g.2.6 Mechanism K1 y Figure 6.16b shows the mechanism s deflected shape, and Figure G.9 shows the dimensions of a single out-of-plane module. Let us treat the effective length L e and total height H t as the independent variables defining the mechanism s geometry. Dependent Geometric Variables The dependent geometric variables (refer to Figure G.9) include: the effective mechanism height H e, which [from equation (6.39) with n hs = 1] is equal to the total height H t, H e = H t ; the vertical span of block A, defined as H r = rh t ; and the height of the diagonal crack, H d = (1 r) H t. In addition, we need to calculate β using equation (6.43) and α using equation (6.44). From this, the shape parameter r is calculated as r = 1 α.
273 6 collapse load prediction in dry masonry walls Geometric Constraints The independent variables L e and H t may assume any values, as long as the following constraints are adhered to. The total mechanism height must not exceed the available height of the wall and the effective mechanism length cannot exceed the available length of the wall. They must therefore be within the limits < H t H w and < L e L w /n vs. In addition, the normalised aspect ratio α must satisfy the condition α 1. Internal Work As shown by Figure G.9, there are four flexural cracks contributing to the internal work of an out-of-plane module, including the bottom horizontal crack (1), diagonal crack (2), vertical edge crack (3), and if both vertical edges are supported, then the central vertical crack (4). In addition, it may receive the additional work contribution U Om from the presence of a restrained OBL. The total internal work for a single out-of-plane module is therefore determined using the formula U tot = U (1) + U (2) + U (3) + ζ hiu (4) + U Om, (G.81) where U (1) U (4) are the contributions from the respective cracks. Factor ζ hi in equation (G.81) accounts for the activeness of the central vertical crack (4), since the crack is only active when both of the wall s vertical edges are supported, and therefore, if one vertical edge is supported, i.e. n vs = 1; ζ hi = 1, if two vertical edges are supported, i.e. n vs = 2. bottom horizontal crack (1), vertical bending: The crack spans the length L e, with its centroid located at a depth H t below the top edge of the wall; hence, its moment capacity [from equation (6.24)] is M v = f H t L e Z v.
274 g.2 formulations for type G, J, B, K1 and K2 mechanisms 61 Combined with the virtual rotation θ v = 1 H d, it provides the internal work contribution U (1) = θ vm v = f H t L e H d Z v = Z v G n f H t. (G.82) diagonal crack (2): The internal work contribution of this crack is the same as that of crack (2) in mechanism G y (Figure G.6). Hence, from equation (G.6) we get U (2) = Z v G n f 1 2 (1 + r)h t. (G.83) edge vertical crack (3), horizontal bending: Crack spans the height H t, with its centroid located at a depth of 1 2 H t below the top edge. Its moment capacity is obtained by multiplying equation (6.3) by the vertical edge restraint factor R vs [determined using equation (6.8)], giving which, together with the virtual rotation M h = R vs f 1 2 H t Ht Z h, θ h = 1 L e, provides the internal work contribution U (3) = θ h M h = R vs f 1 2 H H t t Z L h e = R vs Z h β f 1 2 H t. (G.84) internal vertical crack (4), horizontal bending: The crack spans the height H r, with its centroid being located 1 2 H r below the top edge of the wall. Its moment capacity from equation (6.3) is therefore M h = f 1 2 H r Hr Z h,
275 62 collapse load prediction in dry masonry walls whilst its virtual rotation is the same as for crack (3). It hence provides the internal virtual contribution friction against restrained OBL: to equation (G.126) as U (4) = θ h M h = f 1 2 H H r r Z L h e = Z h r β f 1 2 rh t. (G.8) U Om = (1 Φ m) µ o e m, where [from equations (G.12) and (G.124)] e m is given by This contribution is calculated according (G.86) e m = 1 2 L e t u σ vom. (G.87) total: The total internal work is obtained by substituting equations (G.82) (G.86) into (G.81). This yields the expression U tot = 2 Z v G n f ( r) H t + Z h β [ Rvs f 1 2 H t + ζhi r f 1 2 rh t ] + (1 Φm )µ o e m. (G.88) External Work The external work of an individual out-of-plane module includes the self-weight contributions of blocks (A) and (B) (Figure G.9), in addition to a possible contribution E Om from an unrestrained OBL. This gives E tot = E W (A) + E W (B) + E Om, (G.89) where E W (A) and E W (B) are contributions from the respective blocks. self-weight of block (a): The external work of this wedge block is equivalent to that of block (A) in mechanism G y (Section G.2.4). Hence, from equation (G.64), E W ( (A) = λγt u L e H 1 t 2 r). (G.9) self-weight of block (b): From Table 6.1, the virtual volume of the rectangular pyramid block is V (B) = 1 3 L eh d,
276 g.2 formulations for type G, J, B, K1 and K2 mechanisms 63? H =? >?? > * >?? > =? H =? " A B B J J? H =? # A B B? H =?! A B B? H =?? H =? $ Figure G.1: Individual out-of-plane module involved in mechanism K2 x. which gives the external virtual work E W (B) = λγt u ( 1 3 L eh d ) = λγt u L e H t ( 1 3 (1 r)). (G.91) weight of unrestrained OBL: This contribution is calculated according to equation (G.12) as E Om = Φ mλη m e m, (G.92) where e m is given by equation (G.87). total: The total external work for a single out-of-plane module is obtained by substituting contributions from equations (G.9) and (G.91) into (G.89). Dividing by λ yields the expression λ 1 E tot = γt u L e H t ( r) + Φ m η m e m. (G.93) g.2.7 Mechanism K2 x Figure 6.17a shows the mechanism s deflected shape, and Figure G.1 shows the dimensions of a single out-of-plane module. Let us take the effective length L e and total height H t as independent variables that define the mechanism s geometry.
277 64 collapse load prediction in dry masonry walls Dependent Geometric Variables The dependent geometric variables (refer to Figure G.1) include: the effective mechanism height H e, which [from equation (6.39) with n hs = 2] is equal to half of the total height 1 2 H t, H e = 1 2 H t; the horizontal span of block combination A, L a = al e ; and the horizontal projection of the diagonal cracks, L d = (1 a) L e. In addition, we need to calculate β and α according to equations (6.43) and (6.44). From this, the shape parameter a becomes a = 1 1 α. Geometric Constraints The independent variables L e and H t may assume any values, as long as the following constraints are satisfied. The total mechanism height must not exceed the available height of the wall, and must stay within the limits < H t H w. The effective mechanism length cannot exceed the available length of the wall, and must be within < L e L w /n vs, where n vs is the number of vertical supports for the out-of-plane wall. Finally, the normalised aspect ratio α must satisfy the condition α 1. Internal Work As shown by Figure G.1, there are six flexural cracks contributing to the overall strength, including the bottom horizontal crack (1), top edge pseudo-crack (2), diagonal cracks (3) and (4), vertical edge crack (), and the internal horizontal
278 g.2 formulations for type G, J, B, K1 and K2 mechanisms 6 crack (6). The total internal work for a single out-of-plane module is therefore determined from the formula U tot = U (1) + U (2) + U (3) + U (4) + U () + U (6), (G.94) where U (1) U (6) are the contributions from the respective cracks. bottom horizontal crack (1), vertical bending: The crack spans the length L e, with its centroid being located at a depth of 2H e below the top edge of the wall. Hence, from equation (6.24), it has the moment capacity M v = f 2H e L e Z v, which, combined with the virtual rotation θ v = 1 H e, provides the internal virtual work U (1) = θ vm v = f 2H e L e H e Z v = Z v β f 2H e. (G.9) top edge pseudo-crack (2), vertical bending: the hinge is L e ; thus, from equation (6.28) it has the moment capacity The horizontal span of M vo = R ts f L e Z v. Since the hinge has the same rotation as crack (1), its internal virtual work contribution becomes U (2) = θ vm vo = R ts f L e H e Z v = R ts Z v β f. (G.96) diagonal cracks (3) and (4): The combined resistance of the two cracks is equivalent to a single diagonal crack with vertical projection 2H e and whose centroid is located at the midheight of the mechanism or H e below the top edge of the wall. Hence, from equation (6.29), the equivalent crack has the moment capacity M d = f H e 2H e G n Z v cos ϕ.
279 66 collapse load prediction in dry masonry walls The cracks undergo the virtual rotation θ d = 1 H e cos ϕ, so their combined internal virtual work becomes U (3) + U (4) = θ d M d = 2 Z v G n f H e. (G.97) edge vertical crack (), horizontal bending: Crack spans the height 2H e and its centroid is located at a depth of H e below the top edge. Its moment capacity is obtained by multiplying equation (6.3) by the vertical edge restraint factor R vs [determined using equation (6.8)], which gives M h = R vs f H e 2H e Z h. Combined with the virtual rotation θ h = 1 L d, this gives the internal virtual work contribution U (3) = θ h M h = 2R vs Z h G n f H e. (G.98) midheight horizontal crack (6), vertical bending: The crack spans the length L a, with its centroid located at a depth of H e below the top edge of the wall, so it has the moment capacity [from equation (6.24)] M v = f H e L a Z v. Combining with the virtual rotation θ v = 2 H e, gives the internal virtual work U (6) = θ vm v = f H e 2L a H e Z v = 2 Z v aβ f H e. (G.99)
280 g.2 formulations for type G, J, B, K1 and K2 mechanisms 67 total: The total internal work is obtained by substituting equations (G.9) (G.99) into (G.94). By also replacing H e with 1 2 H t, this yields the expression U tot = Z v β [ f H t + R ts f + 2 f 1 2 H ] t + 2R vs Z h G n f 1 2 H (G.1) t. External Work As shown by Figure G.1, the external work for an individual out-of-plane module is the sum of contributions from block combinations (A) and (B), calculated according to the formula E tot = E W (A) + E W (B). (G.11) self-weight of block combination (a): From Table 6.1, the virtual volume of the combined wedge blocks is V (A) = 1 2 L ah t, giving the external virtual work E W (A) = λγt u ( 1 2 L ah t ) = λγt u L e H t ( 1 2 a). (G.12) self-weight of block combination (b): of the combined rectangular pyramid blocks is From Table 6.1, the virtual volume which gives the external virtual work V (B) = 1 3 L dh t, E W (B) = λγt u ( 1 3 L dh t ) = λγt u L e H t ( 1 3 (1 a)). (G.13) total: The total external work for a single out-of-plane module is obtained by substituting contributions from equations (G.12) and (G.13) into (G.11). Dividing by λ yields the expression λ 1 E tot = γt u L e H t ( a). (G.14)
281 68 collapse load prediction in dry masonry walls? H =? >?? > )? H =? "? H =? # J J H A B B >?? > A B B? H =?! A B B? H =?? H =? $ Figure G.11: Individual out-of-plane module involved in mechanism K2 y. g.2.8 Mechanism K2 y Figure 6.17b shows the mechanism s deflected shape, and Figure G.11 shows the dimensions of a single out-of-plane module. Let us treat the effective length L e and total height H t as the independent variables defining the mechanism s geometry. Dependent Geometric Variables The dependent geometric variables (refer to Figure G.11) include: the effective mechanism height H e, which [from equation (6.39) with n hs = 2] is equal to half of the total height 1 2 H t, H e = 1 2 H t; the vertical span H r = rh e ; and the height of the diagonal crack, H d = (1 r) H e. In addition, we need to calculate β using equation (6.43) and α using equation (6.44). From this, the shape parameter r is calculated as r = 1 α.
282 g.2 formulations for type G, J, B, K1 and K2 mechanisms 69 Geometric Constraints The independent variables L e and H t may assume any values, as long as the following constraints are adhered to. The total mechanism height must not exceed the available height of the wall, and the effective mechanism length cannot exceed the available length of the wall. They must therefore be within the limits < H t H w and < L e L w /n vs. In addition, the normalised aspect ratio α must satisfy the condition α 1. Internal Work As shown by Figure G.11, there are six flexural cracks contributing to the overall strength, including the bottom horizontal crack (1), top edge pseudo-crack (2), diagonal cracks (3) and (4), vertical edge crack (), and the internal vertical crack (6). The total internal work for a single out-of-plane module is therefore determined from the formula U tot = U (1) + U (2) + U (3) + U (4) + U () + ζ hiu (6). (G.1) where U (1) U (6) are the contributions from the respective cracks. Factor ζ hi accounts for the activeness of the internal vertical crack (6), since the crack is only active when both of the wall s vertical edges are supported, and therefore, if one vertical edge is supported, i.e. n vs = 1; ζ hi = 1, if two vertical edges are supported, i.e. n vs = 2. bottom horizontal crack (1), vertical bending: The crack spans the length L e and its centroid is located at a depth 2H e below the top edge of the wall. Hence, it has the moment capacity [from equation (6.24)] M v = f 2H e L e Z v, combined with the virtual rotation θ v = 1, H d
283 61 collapse load prediction in dry masonry walls which gives the internal virtual work U (1) = θ vm v = f 2H e L e H d Z v = Z v G n f 2H e. (G.16) top edge pseudo-crack (2), vertical bending: The horizontal span of the hinge is L e, so it has the moment capacity [according to equation (6.28)] M vo = R ts f L e Z v. Since the hinge has the same rotation as crack (1), it provides the internal virtual work contribution U (2) = θ vm vo = R ts f L e H d Z v = R ts Z v G n f. (G.17) diagonal cracks (3) and (4): The combined resistance of the two cracks is equivalent to a single diagonal crack with vertical projection 2H d and whose centroid is located at the midheight of the mechanism or H e below the top edge of the wall. Hence, from equation (6.29) the equivalent crack has the moment capacity Both cracks undergo the virtual rotation M d = f H e 2H d G n Z v cos ϕ. θ d = 1 H d cos ϕ, so their combined internal virtual work becomes U (3) + U (4) = θ d M d = 2 Z v G n f H e. (G.18) edge vertical crack (), horizontal bending: The crack has the vertical span 2H e, with its centroid being located at a depth of H e below the top edge. Its moment capacity is obtained by multiplying equation (6.3) by the vertical edge restraint factor R vs [determined using equation (6.8)], which gives M h = R vs f H e 2H e Z h.
284 g.2 formulations for type G, J, B, K1 and K2 mechanisms 611 Together with the virtual rotation θ h = 1 L e, the internal virtual work becomes U () = θ h M h = 2R vs Z h β f H e. (G.19) internal vertical crack (6), horizontal bending: The crack vertical span is 2H r and its centroid is H e below the top edge of the wall. Its moment capacity from equation (6.3) is therefore M h = f H e 2H r Z h, whilst its virtual rotation is the same as for crack (). This gives the internal virtual work contribution U (6) = θ h M h = f H e 2H r L e Z h = 2r Z h β f H e. (G.11) total: The total internal work is obtained by substituting equations (G.16) (G.11) into (G.1). By also replacing H e with 1 2 H t, this yields the expression U tot = Z v [ f Ht + R ts f + 2 f 1 G 2 H ] t n + 2 Z h β (R vs + ζ hi r) f (G.111) 1 2 H t. External Work As shown by Figure G.11, the external work for an individual out-of-plane module is the sum of contributions from block combinations (A) and (B), calculated according to the formula E tot = E W (A) + E W (B). (G.112) self-weight of block combination (a): From Table 6.1, the virtual volume of the combined rectangular pyramid blocks is V (A) = 1 3 L e (2H d ),
285 612 collapse load prediction in dry masonry walls which gives the external virtual work E W (A) = λγt u L e H t ( 1 3 (1 r)). (G.113) self-weight of block combination (b): of the combined wedge blocks is From Table 6.1, the virtual volume V (B) = 1 2 L e (2H r ), giving the external virtual work E W (B) = λγt u L e H t ( 1 2 r). (G.114) total: The total external work for a single out-of-plane module is obtained by substituting contributions from equations (G.113) and (G.114) into (G.112). Dividing by λ yields the expression λ 1 E tot = γt u L e H t ( r). (G.11) g.2.9 Effects of OBL Restraint in Type-1 Mechanisms As discussed in Section 6.3, the presence of an OBL at the top of the wall has the following influences on the internal and external work terms when considering type-1 mechanisms in which the top edge is considered laterally unrestrained: 1. Additional internal work is done by translational friction between the wall and the OBL. This comes into effect only when the OBL is restrained against lateral movement. 2. Additional external work is done on the wall by the horizontal component of the OBL, if the OBL is not restrained against lateral movement. 3. An increase occurs in the internal crack energies due to a higher internal vertical stress throughout the wall. This is already accounted for by the precompression stress σ vo in the stress capacity function f [equation (6.22)] used within the moment capacity expressions for the various types of bending. Therefore, we need expressions for calculating the additional energies resulting from points 1 and 2 above.
286 g.2 formulations for type G, J, B, K1 and K2 mechanisms 613 A B B A B B = A B B A B B = A B @, (a) Mechanism J out-of-plane module. (b) Mechanism B out-of-plane module. (c) Mechanism G x and K1 x outof-plane module. A B H L (d) Mechanism G y and K1 y outof-plane module. (e) Mechanism J and B inplane module. Figure G.12: Increments of displaced area at the top of the wall for the various mechanisms. Virtual Displaced Areas We start by deriving expressions for the increment of displaced area at the top edge of each mechanism. We can denote the displaced area in either the incremental notation as da, or as A in Lagrange notation [refer to equation (6.9)], where A = da d. We define the virtual displaced area as the virtual displacement u x at the top of the wall, integrated over the length of the wall L as A = L x= u x dx, (G.116) in which x is the horizontal position. mechanism J: we have For a single out-of-plane module in mechanism J (Figure G.12a), da = d a L e (r d + d ) (L e al e ), which gives A = 1 2 (1 + a + r ar) L e. (G.117)
287 614 collapse load prediction in dry masonry walls mechanism B: we have For a single out-of-plane module in mechanism B (Figure G.12b), da = d L e, which gives A = L e. (G.118) mechanisms G x and K1 x : (Figure G.12c), we have For a single module in mechanisms G x and K1 x da = d a L e d (L e al e ), which gives A = 1 2 (1 + a) L e. (G.119) mechanisms G y and K1 y : For a single module in mechanisms G y and K1 y (Figure G.12d), we have da = 1 2 d L e, which gives A = 1 2 L e. (G.12) in-plane modules in hybrid mechanisms J and B: module (Figure G.12e), the increment of displaced area is For a single in-plane da = d r ϖh r, which gives A = rϖh r. (G.121) External Work from an Unrestrained OBL The external virtual work performed on the wall by an unrestrained OBL is obtained by integrating the product of the virtual displacement u x and the acting lateral force F h from the OBL over the length of the wall, according to the formula E = L x= ( u x df ) h dx. dx
288 g.2 formulations for type G, J, B, K1 and K2 mechanisms 61 When the axial load is uniformly distributed along the wall, the lateral force per unit length is constant such that df h dx = Φλησ vot, where: Φ is the degree-of-freedom (DOF) factor for the OBL, taken as 1 when the OBL is unrestrained and when it is restrained; λ is the lateral load multiplier; η is the ratio of the component of the overburden weight free to act laterally and that which acts vertically, defined according to equation (6.4); σ vo is the vertical stress acting at the top of the wall due to the OBL; and t is the thickness of the wall. Therefore, we get L E = Φλησ vo t u x dx, x= where the integral term is equivalent to the virtual displaced area A for the mechanism, as per equation (G.116). This results in the expression E = Φλησ vo ta. (G.122) The external work contribution is easily calculated using the above formula, by substituting in A from equations (G.117) (G.121) for the mechanism under consideration. Internal Work from a Restrained OBL The internal virtual work performed due to friction between the wall and a restrained OBL is obtained as the product of the virtual displacement u x and the acting frictional force F f, integrated over the length of the wall according to the formula U = L x= ( u x df ) f dx. dx For an axial load which is uniformly distributed along the wall, the frictional force per unit length is constant and equal to df f dx = (1 Φ) µ oσ vo t, where µ o is the coefficient of friction along the interface between the wall and the OBL. The factor (1 Φ) makes the term only active when the OBL is restrained and therefore Φ =. From this we get L U = (1 Φ) µ o σ vo t u x dx, x=
289 616 collapse load prediction in dry masonry walls where the integral term is equivalent to the virtual displaced area A [as per equation (G.116)], and therefore, we can simplify this to get the expression U = (1 Φ) µ o σ vo ta. (G.123) The internal work contribution for the predefined mechanisms is readily calculated using the above formula, by substituting in A from equations (G.117) (G.121) for the mechanism under consideration. A Minor Simplification By recognising that the external and internal work contributions [equations (G.122) and (G.123)] both contain the terms σ vo ta, we can define this as the reference virtual energy e, such that e = σ vo ta. (G.124) The external work contribution then becomes E = Φληe, (G.12) whilst the internal work contribution becomes U = (1 Φ) µ o e. (G.126) This formulation is used for the equations presented in Section 6.. g.2.1 Top Edge Rotational Restraint Factor R ts Here we derive the equivalent rotational restraint factor R ts used for calculating the moment capacity about the top edge of the wall in the presence of an overburden load. The factor is subsequently used in the developed virtual work (VW) approach for calculating the load capacity of the various mechanisms and is applicable to any part of the top edge belonging to a sub-plate undergoing rotation about the horizontal axis. This includes: type-2 mechanisms, where the top edge also has translational restraint; as well as certain type-1 mechanisms in which the top edge is free to move laterally, but satisfies the aforementioned condition. Of the mechanisms considered here, this moment capacity becomes applicable to type-1 mechanisms G x, J, B and K1 x ; and type-2 mechanisms K2 x and K2 y. It is also applied to mechanism G y, for reasons discussed in Section G.2.4. Hence, only K1 y is unaffected by the OBL eccentricity.
290 g.3 general formulation for mechanism J 617 As can be seen from Figure 6.6, the moment M vo acting about the centroid of the cross section is M vo = W vo l a, where W vo is the precompression force and l a is the lever arm, which is equal to l a = ( 1 2 ɛ) t u, with t u being the thickness of the wall. For a hinge with length L, the acting force W vo is related to the acting vertical stress σ vo according to W vo = σ vo Lt u. This gives the acting moment M vo as M vo = σ vo Lt 2 ( 1 u 2 ɛ). (G.127) We define the rotational restraint factor R ts as M vo = R ts M v, (G.128) where M v is the moment capacity of a crack in vertical bending calculated from equation (6.24). By substituting in M vo from equation (G.127) and M v from equations (6.24) and (6.2), we get the expression R ts = 1 2ɛ. (G.129) Hence, the rotational restraint factor is dependent only on the load eccentricity ɛ. When the load acts upon the upward-deflecting point along the section (ɛ = ), as is the case for a slab connection, the restraint factor achieves its maximum value of 1. When the load acts at the centre of the wall s thickness (ɛ = 1/2), the restraint factor becomes zero and the hinge provides zero net moment. If the load was to act at the downward-deflecting edge (ɛ = 1) then the restraint factor would be 1, since the hinge would provide a negative moment contribution, or in other words, it would exert an overturning moment onto the wall. g.3 general formulation for mechanism J A significant feature of the hybrid mechanism J is its ability to span over multiple consecutive out-of-plane walls separated by in-plane return walls. As discussed in Section 6..2, since the simple treatment of the mechanism derived in Section
291 H 618 collapse load prediction in dry masonry walls - N J A H = M = I E? A I B E F = A M = K A I k k k H k E? A I B K J B F = K A I j j j j! j H " j H! j H j H E? A I B K J B F = A M = I i i i i H i H i H 1 J A H = M = I Figure G.13: Generic configuration of out-of-plane walls connected in series. G.2.1 makes the inherent assumption that all out-of-plane and in-plane modules present in the overall mechanism are equivalent, it can only be applied to simple specimen configurations in which all out-of-plane walls have the same length, such as those shown in Figure Furthermore, from the configurations shown in Figure 6.12, the simple approach is only guaranteed to find optimal solutions for (a), (b) and (c), but not (d). This is because at the optimal state, all non-equivalent modules will tend to adopt different geometries, which the simple treatment is unable to deal with due a insufficient number of shape variables that are treated as independent. A more versatile approach is developed here, which overcomes these limitations and may be applied to any generic configuration consisting of a chain of out-of-plane walls separated by in-plane walls, as shown in Figure G.13. The approach is best suited to implementation using computer software such as Excel or Matlab. g.3.1 Assumptions In addition to assumptions made previously by the simplified approach, the main assumption made by the presented approach is that all participating in-plane and out-of-plane walls undergo an equal unit rotation about the horizontal axis. This assumption is valid as long as torsional deformation of the out-of-plane panels about the horizontal axis remains negligible. We denote the reference increment of rotation as dθ v, which may be assigned any arbitrary value.
292 g.3 general formulation for mechanism J 619 g.3.2 Definition of Specimen Configuration As shown by Figure G.13, a generic specimen may consist of a series of internal out-of-plane walls, and two external out-of-plane walls, one on each end. The configuration of the specimen is specified by the user at the start of the analysis using the following information: The number of in-plane walls/modules present, denoted by N r. This value must be greater than or equal to 1. Whether or not a left-most external wall is present. We denote this by the Boolean variable firstextwall (= either true or false). Whether or not a right-most external wall is present. We denote this by the Boolean variable lastextwall (= either true or false). g.3.3 Indexing Figure G.13 demonstrates the indexing convention used for in-plane walls, out-ofplane walls and out-of-plane modules. In-Plane Walls/Modules In-plane walls are referred to using the index k, which ranges from k = 1 to N r. Out-of-Plane Walls Out-of-plane walls are referred to using the index i. The number of internal out-of-plane walls in the specimen, N iw, is directly calculated from the number of return walls, as N iw = N r 1. (G.13) Hence, the indices of internal out-of-plane walls range from i = 1 to N iw. As shown by Figure G.13, if a left-most external wall is present, then it is assigned the index i =. If a right-most external wall is present, then its index is i = N r. Therefore, the index of the first out-of-plane wall in any configuration is, if firstextwall = true, i start = (G.131) 1, if firstextwall = false.
293 62 collapse load prediction in dry masonry walls Similarly, the index of the last out-of-plane wall is N r 1, if lastextwall = false, i end = N r, if lastextwall = true. (G.132) Out-of-Plane Modules Out-of-plane modules are referred to using the index j. As shown by Figure G.14, these modules can be either left or right. Left modules are defined as those that are coupled to a return wall on their left, and have odd indices j = 1, 3,,.... Right modules are coupled to a return wall on their right, and have even indices j =, 2, 4,.... Indices of left modules within internal out-of-plane walls range from j = 1 to 2N iw 1, whilst indices of right modules within internal out-of-plane walls range from j = 2 to 2N iw. The module that corresponds to the left-most external out-of-plane wall has the index j =. Similarly, the module corresponding to the right-most external out-of-plane wall has the index j = 2N iw + 1. Therefore, the index of the first out-of-plane module in any configuration is j start = i start, and the index of the last out-of-plane module is 2N iw, if lastextwall = false, j end = 2N iw + 1, if lastextwall = true. (G.133) (G.134) g.3.4 Summary of Properties The geometric properties described here are also illustrated by Figure G.14. In-Plane Walls/Modules Properties belonging to individual in-plane walls are denoted using the index k, ranging from k = 1 to N r. The following properties are constants based on the specimen geometry, that need to be defined at the start of the analysis:
294 g.3 general formulation for mechanism J F = K A k A B J K J B F = K A j 4 E C D J K J B F = K A j 1 F = K A j = j = j D H j H k D H j H k J J i A B B j M / / A B B j F i A B B j A B B j M i K J B F = A M = i Figure G.14: Geometry of an internal out-of-plane wall and its associated modules.
295 622 collapse load prediction in dry masonry walls constants σ vor(k) Φ r(k) η r(k) Precompression stress acting on the k th in-plane wall. OBL degree-of-freedom factor for the k th in-plane wall. OBL orthogonal factor for the k th in-plane wall. The following variables are treated as independent: independent variables H r(k) ϖ (k) Height of the mobilised in-plane panel in the k th in-plane module. Slope of the in-plane shear crack in the k th in-plane module. Dependent properties that get assigned during the analysis include: dependent variables d r(k) du r(k) λ 1 de r(k) C 1 C 4 Increment of displacement at the top of the k th in-plane module. Internal work increment for the k th in-plane module. External work increment for the k th in-plane module, premultiplied by λ 1. Optimisation constraints for the k th in-plane module. Out-of-Plane Walls Properties belonging to individual out-of-plane walls are denoted using the index i, ranging from i = i start to i end. The following are constants based on the specimen geometry, that are defined at the start of the analysis: constants L w(i) σ vow(i) Φ w(i) η w(i) R tsw(i) Length of the i th out-of-plane wall. Precompression stress acting on the i th out-of-plane wall. OBL degree-of-freedom factor for the i th out-of-plane wall. OBL orthogonal factor for the i th out-of-plane wall. Top edge rotational restraint factor for the i th out-of-plane wall. The following variables are treated as independent: independent variables L t(i) H t(i) Length of mechanism covering the i th out-of-plane wall. Height of the mechanism covering the i th out-of-plane wall. Dependent properties that become assigned during the analysis include:
296 g.3 general formulation for mechanism J 623 dependent variables d w(i) H p(i) du w(i) C C 8 Increment of displacement at the top of the i th out-of-plane wall. Projected maximum height of the mechanism along the i th out-ofplane wall. Internal work increment for the i th out-of-plane wall. Optimisation constraints for the i th out-of-plane wall. Note that in the simple treatment of mechanism J presented in Section G.2.1, the mechanism length L t was not treated as independent, and was assumed to span the full available length of the wall. In the treatment presented here, we allow for the possibility that the overall mechanism does not span the full available length of the overall specimen, as it is possible for the optimal solution (at which the collapse multiplier is minimised) to correspond to such scenarios. Out-of-Plane Modules Properties which belong to individual out-of-plane mechanism modules are denoted using the index j, ranging from j = j start to j end. All of these properties are dependent variables that become assigned during the analysis, and include: dependent variables L e(j) H e(j) L a(j) L d(j) H d(j) h r(j) ζ hi(j) σ vom(j) Φ m(j) η m(j) R tsm(j) du m(j) λ 1 de m(j) C 9 C 11 Length of the j th out-of-plane module. Height of the j th out-of-plane module. Length of horizontal crack in the j th out-of-plane module. Horizontal projection of diagonal crack in the j th out-of-plane module. Vertical projection of diagonal crack in the j th out-of-plane module. Height of the adjacent in-plane module for the j th out-of-plane module. Work contribution factor for the vertical crack in the j th out-of-plane module. Precompression stress acting on the j th out-of-plane module. OBL degree-of-freedom factor for the j th out-of-plane module. OBL orthogonal factor for the j th out-of-plane module. Top edge rotational restraint factor for the j th out-of-plane module. Internal work increment for the j th out-of-plane module. External work increment for the j th out-of-plane module, premultiplied by λ 1. Optimisation constraints for the j th out-of-plane module.
297 624 collapse load prediction in dry masonry walls g.3. Calculations In-Plane Walls/Modules The calculations presented here are performed for each in-plane wall present, for indices ranging from k = 1 to N r. First, calculate the increment of displacement at the top of the mobilised in-plane panel as d r(k) = dθ v H r(k), (G.13) where dθ v is the reference increment of rotation for the overall mechanism. We define the stress capacity function for the particular in-plane wall under consideration as f r(k) d = σ vor(k) + γd. (G.136) By expanding equation (G.22) using equations (6.36) and (G.23), the increment of internal work for the in-plane wall becomes [ ( ) 1 1 du r(k) = d r(k) 2 µ m t u H r(k) + ϖ G (k) f 1 r(k) 3 H r(k) n + Z v f 1 r(k) G 2 H r(k) n ) ] + (1 Φ r(k) µ o ϖ (k) H r(k) t u σ vor(k). (G.137) Similarly, from equation (G.27), the increment of external work premultiplied by λ 1 is calculated as λ 1 de r(k) = d r(k) [γt u ( 1 3 H r 2 (k) ϖ (k) ) + Φ r(k) η r(k) ϖ (k) H r(k) t u σ vor(k) ]. (G.138) Out-of-Plane Walls For all out-of-plane walls (i = i start to i end ), calculate the increment of displacement at the top of the wall as d w(i) = dθ v H t(i). (G.139) For internal out-of-plane walls only (i = 1 to N iw ), we need to define the boundary between its pair of out-of-plane modules. As shown by Figure G.14, the boundary is taken at the intersection of the diagonal projections made from the bottom of the adjacent in-plane modules. The projected height at the intersection is calculated as H p(i) = 1 2 (H r(k=i) + H r(k=i+1) + G n L t(i) ), (G.14)
298 g.3 general formulation for mechanism J 62 where k = i is the adjacent in-plane wall to the left, and k = i + 1 is the adjacent in-plane wall to the right of the out-of-plane wall under consideration. Out-of-Plane Modules The calculations presented here are performed for each out-of-plane module present, for indices ranging from j = j start to j end. One of the main considerations in formulating the VW equations is ensuring that the formulation is numerically stable and that any potential divisions by zero are avoided for all admissible values of the independent variables. A problem with directly using the equations derived in Section G.2.1 for a single out-ofplane module [equations (G.16) and (G.21)], is the dependence on the parameter β [calculated using equation (6.43)], which contains H e in the denominator and will therefore cause numerical problems when H e. This is because for certain wall configurations, the optimal state corresponds to particular walls becoming effectively inactive, which will cause their H e to approach during the optimisation process. The equations presented here are slight reformulations of the equations presented in Section G.2.1, which will avoid the associated numerical problems. Certain dependent properties of the out-of-plane module take on values directly from its parent out-of-plane wall or adjacent in-plane wall. The index of the parent out-of-plane wall is (j + 1)/2, for left out-of-plane modules (j = 1, 3,,...), i p = j/2, for right out-of-plane modules (j =, 2, 4,...). (G.141) The associated properties include: axial stress at the top of the wall, σ vom(j) = σ vow(i=ip ); (G.142) OBL degree-of-freedom factor, Φ m(j) = Φ w(i=ip ); (G.143) OBL orthogonal factor, η m(j) = η w(i=ip ); (G.144) the top edge rotational restraint factor, R tsm(j) = R tsw(i=ip ); (G.14)
299 626 collapse load prediction in dry masonry walls the displacement increment, d m(j) = d w(i=ip ); (G.146) and the effective module height, H e(j) = H t(i=ip ). The index of the adjacent in-plane wall is (j + 1)/2, for left out-of-plane modules (j = 1, 3,,...), k a = (j + 2)/2, for right out-of-plane modules (j =, 2, 4,...), (G.147) (G.148) which relates to the height of the adjacent in-plane module, h r(j) = H r(k=ka ). The length of the out-of-plane module is L t(i=ip ), if j = or j = 2N iw + 1, L e(j) = ) (H p(i=ip ) h r(j) /G n, otherwise. (G.149) (G.1) The first case above corresponds to the out-of-plane module belonging to an external out-of-plane wall, in which case the length is taken as the full length of mechanism covering the wall. The second case corresponds to the out-of-plane module belonging to an internal out-of-plane wall, whereby L e is taken as the span to the intersection point of the diagonal projections, as illustrated in Figure G.14. The remaining properties are all dependent only on properties of the out-ofplane module itself. They include: the vertical projection of the diagonal crack, H d(j) = H e(j) h r(j) ; (G.11) horizontal projection of the diagonal crack, L d(j) = H d(j) /G n ; (G.12) and the length of the horizontal crack, L a(j) = L e(j) L d(j). (G.13) The work contribution factor for the vertical crack [refer to equation (G.9)] is taken
300 g.3 general formulation for mechanism J 627 as L a(j) /L e(j), if j = or j = 2N iw + 1, ζ hi(j) = 1, otherwise. (G.14) We define the stress capacity function for the particular out-of-plane module under consideration as f m(j) d = σ vom(j) + γd. (G.1) By expanding the internal work for an out-of-plane module from equation (G.8) using equations (G.1) (G.14), expressing it in terms of the various crack spans previously calculated, and premultiplying it by the increment of displacement at the top of the module d m(j), we obtain the following expression for the increment of internal work: du m(j) = dθ v { Z v L a(j) f m(j) H e(j) + Z v L d(j) f m(j) H e(j) 1 2 H d(j) + ζ hi(j) Z h G n H e(j) f 1 m(j) 2 H e(j) + R tsm(j) Z v L e(j) f m(j) ) [ )] } + (1 Φ m(j) µ o σ vom(j) t u L a(j) H e(j) L d(j) (h r(j) + H e(j). (G.16) Similarly, from equation (G.17) with equations (G.18) (G.2), we get the following expression for the increment of external work premultiplied by λ 1 : [ ( ) ] λ 1 de m(j) = dθ v {γt 1 u 2 H2 e (j)l a(j) He 3 (j) h 3 r (j) /G n )] } + Φ m(j) η m(j) σ vom(j) t u [L a(j) H e(j) L d(j) (h r(j) + H e(j). (G.17) Total Internal and External Work, and Collapse Multiplier The total increments of internal and external work for the overall mechanism are calculated by summing the contributions from all participating out-of-plane and in-plane modules. Hence, the total internal work increment is calculated as j end du tot = du m(j) + j=j start N r k=1 du r(k), (G.18)
301 628 collapse load prediction in dry masonry walls and the total external work increment premultiplied by λ 1 is calculated as j end λ 1 de tot = λ 1 de m(j) + j=j start N r k=1 λ 1 de r(k). (G.19) From this, the collapse multiplier becomes λ o = du tot λ 1 de tot. (G.16) g.3.6 Optimisation and Constraints The constraints enforced during the optimisation process used to solve for the critical value of λ o depend on the type of analysis being conducted. Two types of analysis should be considered for any wall specimen, which include: 1. Unrestricted wall participation, whereby all walls/modules are allowed to participate in the overall mechanism; 2. and restricted wall participation, whereby certain walls are selectively denied from participating in the overall mechanism. This analysis is further subdivided into each of the various permutations of active and inactive walls that are possible for a given wall configuration. Analysis Permutations By recognising that an admissible mechanism must have a horizontal span that is continuous over the wall specimen, we can restrict wall participation by declaring in-plane walls that will act as boundaries to the mechanism. These in-plane boundary walls not only prohibit any outside walls/modules from participating, but also become inactive themselves (H r(k) = ). The additional important effect of this is that the out-of-plane wall that is immediately adjacent to a boundary in-plane wall will have relaxed constraints on the length of mechanism (L t(i) ) that it can accommodate. Two boundary in-plane walls may be declared: a left one and a right one. We denote their respective indices (equivalent to k) as B left and B right. For the left boundary, B left may assume integer values in the range B left N r, (G.161)
302 g.3 general formulation for mechanism J 629 A B J > = H O 4 E C D J > = H O * A B J * H E C D J E =? J E L A =? J E L A E =? J E L A " k k k! k " i i i i! i " Figure G.1: Example of an analysis with enforced limited wall participation. whereby B left = corresponds to the left boundary being effectively unrestricted. For the right boundary, B right may assume integer values in the range 1 B right N r + 1, (G.162) such that the case B right = N r + 1 corresponds to the right boundary being effectively unrestricted. Furthermore, any selected values of B left and B right must satisfy B left < B right. (G.163) Figure G.1 shows an example of enforced limited wall participation for a wall specimen with N r = 4 and both external out-of-plane walls. The left boundary in-plane wall is placed at B left = 1 and the right wall at B right = 4. Doing this precludes the external walls from participating in the mechanism, and allows only the internal out-of-plane walls to participate. Furthermore, since the boundary in-plane walls are, by definition, non-participating, this allows the mechanism along internal walls which are immediately inside of the boundaries (i = 1 and i = 3) to not be restricted to the full length of the wall. By contrast, any walls that are not adjacent to the boundary in-plane walls, such as wall i = 2 in this example, must accommodate a mechanism along its full length. The number of analysis permutations that need to be considered depend on the configuration of the specimen. Figure G.16a illustrates the three permutations which exist for a specimen with N r = 1, whilst Figure G.16a shows the six possible permutations for a specimen with N r = 2. In general, the number of permutations, P, that need to be considered is P = 1 2 (N r + 1) (N r + 2). (G.164)
303 collapse load prediction in dry masonry walls * A B J * H E C D J A A =? J E L A =? J E L A k k =? J E L A k (a) Specimen with a single in-plane wall, N r = 1. * A B J * H E C D J! A =? J E L A =? J E L A =? J E L A A k! k! k! =? J E L A =? J E L A k! k! =? J E L A k! (b) Specimen with two in-plane walls, N r = 2. Figure G.16: Possible analysis permutations for specimens with N r = 1 and N r = 2.
304 g.3 general formulation for mechanism J 631 Furthermore, it is seen from Figures G.16a and G.16b that the unrestricted wall participation scenario mentioned earlier effectively corresponds to the particular case of the restricted participation analysis, with B left = and B right = N r + 1. Therefore, it becomes sufficient to consider all of the permutations in the restricted participation analysis. In implementing the method using a programming approach, the optimisation process may be placed two nested loops as follows: for Bleft = 1 to NR for Bright = Bleft+1 to NR+1... perform optimisation... end end Constraints In total, there are 11 different types of constraint that need to be satisfied in the optimisation process. We denote these as C 1, C 2, C 3,..., C 11, and formulate them so that each must satisfy C 1, C 2, C 3,..., C 11. in-plane walls For every in-plane wall with the index k, there are four constraints, C 1(k) C 4(k). These must satisfy } {C 1(k), C 2(k), C 3(k), C 1(k), for k = 1 to N r. (G.16) The first constraint is C 1(k) = H r(k), (G.166) which ensures that H r(k) always stays positive. The second constraint enforces an upper limit on H r(k), and is formulated as C 2(k) = H rmax H r(k), (G.167)
305 632 collapse load prediction in dry masonry walls where H rmax is the maximum allowed height, such that H w, if B left < k < B right, H rmax =, otherwise. (G.168) The two cases above correspond to in-plane walls that are participating and nonparticipating, respectively. The third and fourth constraints C 3(k) = ϖ (k) and C 4(k) = 1/G n ϖ (k) (G.169) act to ensure that the in-plane crack slope stays inside the limits prescribed by equation (6.33). out-of-plane walls For every out-of-plane wall with the index i, there are four constraints: C (i) C 8(i), which must satisfy } {C (i), C 6(i), C 7(i), C 8(i), for i = i start to i end. (G.17) The first constraint C (i) = H t(i) (G.171) is used to ensure that H t(i) stays positive. The second constraint places an upper limit on H t(i), and is formulated as C 6(i) = H t max H t(i), where H t max is the maximum allowed height, and is taken as H w, if B left i B right 1, H t max =, otherwise. (G.172) (G.173) The two cases above correspond to out-of-plane walls that are participating and non-participating, respectively. The third constraint places a lower bound value on the length L t(i), and is formulated as C 7(i) = L t max L t(i), (G.174)
306 g.4 worked examples 633 where L t max is the minimum allowed value, taken as, if i = B left and i =, L t max =, if i = B right 1 and i = N r, L w, otherwise. (G.17) The first two cases above correspond to scenarios where the out-of-plane wall under consideration is a participating internal wall adjacent to one of the boundary in-plane walls. This constraint effectively acts to relax the length restriction for such walls. The third case corresponds to any other wall. The fourth constraint ensures that L t(i) does not exceed the length of the wall, and is taken as C 8(i) = L w L t(i). (G.176) out-of-plane modules For every out-of-plane module having the index j, there are three constraints: C 9(j) C 11(j), which must satisfy } {C 9(j), C 1(j), C 11(j), for j = j start to j end. (G.177) These constraints are C 9(j) = L a(j), C 1(j) = L d(j), C 11(j) = H d(j), (G.178) which act to ensure that the spans L a(j), L d(j) and H d(j) all stay positive. g.4 worked examples This section contains several examples demonstrating calculation of the collapse load multiplier λ o using the DSM mechanisms presented in Section 6.. g.4.1 Example 1: A Non-Loadbearing Wall Problem Using mechanism J, calculate the collapse load multiplier (λ o ) for the non-loadbearing wall shown in Figure G.17. The wall spans 1 bricks in length and 21 courses in height. Both of its vertical edges are supported whilst the top edge is free. Use the brick dimensions and material properties from Restrepo Vélez s tests given in Table 6.2. Whereas normally the independent variables parameters a, ϖ and H t would be optimised to minimise λ o, in
![634 collapse load prediction in dry masonry walls Figure G.17: Non-loadbearing wall used in Example 1. Illustration from Restrepo Vélez and Magenes [29]. (Graphic used with permission from IUSS Press.](/docs-images/90/101578684/images/307-0.jpg ") this example assume that a =.1, ϖ = (i.e. that the in-plane shear crack is oriented vertically) and that the height of the mechanism spans vertically across 12 courses of bricks.")
307 634 collapse load prediction in dry masonry walls Figure G.17: Non-loadbearing wall used in Example 1. Illustration from Restrepo Vélez and Magenes [29]. (Graphic used with permission from IUSS Press.) this example assume that a =.1, ϖ = (i.e. that the in-plane shear crack is oriented vertically) and that the height of the mechanism spans vertically across 12 courses of bricks. Solution Start by calculating the geometric constants for this type of masonry, which include the moment moduli for vertical and horizontal bending, Z v and Z h respectively and the diagonal crack slope G n. These parameters should be calculated first because they are independent of the type of mechanism and its dimensions. The modulus for vertical bending is calculated using equation (6.24) as Z v = t 2 u/2 = (39.7 mm) 2 /2 = 788. mm 3 per mm. For horizontal bending, firstly calculate the bed joint overlap which for DSM is half of the brick length s b = l u /2 = (79.8 mm)/2 = 39.9 mm, from which the bed joint overlap ratio is obtained as r o = s b /t u = 39.9/39.7 = 1.. Substituting r o into equation (4.31) gives k bp =.38. The resulting moment modulus is evaluated using equation (6.31) as Z h = µ m k bp t 3 u/(h u + t j ) = (39.7 mm) 3 /28.2 mm = 67.3 mm 3 per mm. The diagonal crack slope [from equation (4.13)] is G n = mm 79.8 mm =.768. Next, determine the number out-of-plane and in-plane modules involved in the
308 g.4 worked examples 63 mechanism. The scenario considered in this example can be visualised through Figure 6.14a, which depicts a single out-of-plane wall (N w = 1) with both of its vertical edges supported (n vs = 2). The resulting number out-of-plane modules, as per equation (6.4), is N m = 1 2 = 2, which correspond to the two identical halves of the out-of-plane panel mirrored by the vertical line of symmetry as shown in Figure 6.14a. The number of in-plane modules simply equals to the total number of return walls in the specimen; therefore N r = 2. Now determine the dimensions of each of the out-of-plane modules. length of the wall is specified to be 1 bricks across, which equates to L w = mm = 798 mm. For mechanism J, the length of the out-of-plane module is always predetermined, such that the mechanism spans the maximum available length across the wall. Therefore, [from equation (6.42)] the length of a single out-of-plane module is L e = 798 mm/2 = 399 mm. The height of the mechanism is not predetermined; however, in this example it has been assumed to span over 12 courses of bricks. This corresponds to a height of H t = mm = 338 mm. The resulting out-of-plane module aspect ratio [from equation (6.43)] is β = 399 mm/338 mm = Now determine values of the auxiliary variables, including r, ζ hi, e m and e r, using the specific equations for mechanism J, provided in Section Using the assumed value a =.1, from equation (6.46) we get r = 1 βg n (1 a) = (1.1) =.292. Since both vertical edges are supported, the central vertical cracks are able to develop their full internal work and the factor ζ hi is taken as 1 [as per equation (6.47)]. As the wall is non-loadbearing, σ vom = σ vor = and hence e m = e r =, which causes the associated internal and external work contributions to drop out. Furthermore, for a non-loadbearing wall the total internal and external work terms can be simplified by recognising that the stress capacity function [equation (6.22)] reduces to f d = γd. By substituting equation (6.36) into (6.), the total internal work becomes U tot [ = γh t N 1 Z m 2 v β (1 + a + r ar) ζ hi Z ] h G n [ ( ) ] + r 2 γh t N 1 r 6 µ mt u rh 1 t G n + ϖ + 1 Z v 2 G n, whilst the external work term, from equation (6.1) becomes ( ) λ 1 E tot = γht 2 t u [N 1 m 2 aβ + 1 ( 1 r 3 6 G n + N 1 r 3 r3 ϖ )]. The
309 636 collapse load prediction in dry masonry walls That both of these terms are directly proportional to the unit weight γ means that λ o becomes independent of the density of the material and solely dependent on unit geometry and frictional properties. In fact, this is the case for all non-loadbearing DSM walls, regardless of the mechanism used for the analysis. Dividing the above expressions for internal and external work by γh t and evaluating, gives [ (γh t ) 1 U tot = mm ( ) ] + 1/ mm [ + (.292) mm mm (1/ ) ] mm2 /.768 = 1, 93 mm 2, and [ ( (γh t ) 1 λ 1 E tot = 338 mm 39.7 mm ( 1 (.292) 3 ) ) ] / = 8, mm 2. From this, the collapse multiplier is evaluated as λ o = 1, 93 mm2 8, mm 2 =.226. In this example, λ o has been calculated using arbitrarily chosen values of the independent variables a, ϖ and H t. By using the optimisation tool Solver in Excel, the critical solution is shown to be λ o =.224, occurring for a =.16, ϖ = and H t = 36 mm. Although the height H t corresponds to a non-integer value for the number of brick courses (36 mm/28.2 mm = 12.9), accepting such a solution is conservative, in that any deviation from the optimal values of independent variables will result in a higher value of λ o. g.4.2 Example 2: Loadbearing Walls Figure G.18 shows examples of different types of overburden load conditions and the resulting implications toward the parameters used in the analysis. In Figures
310 g.4 worked examples 637 G.18a and G.18b, the wall is subjected to an overburden load using joists supported by the façade panel and return walls, respectively. In both of these cases, the joists are unrestrained from lateral movement and therefore they are able to perform additional external work on the wall. In Figure G.18c, the joists are supported by on the façade panel; however, they are restrained from lateral movement. This example considers the two cases where the joists are supported by the façade panel. Problem Recalculate λ o for the same wall as used in Example 1 (Section G.4.1), if it is subjected to each of the loadbearing conditions described below. In each scenario, the overburden load is applied onto the façade through eight equally spaced joists as shown in Figures G.18a and G.18c, with each joist exerting a vertical reaction of N. Assume that the joists place the load at the midpoint of the wall s cross section. There is no loading on the return walls. Consider the following situations: A. The joists are restrained from horizontal motion (Figure G.18c) and the surface between the joists and wall is smooth enough that any friction should be ignored (µ o = ). B. As in Part A, the joists are restrained (Figure G.18c), but the surface between the joists and wall provides some frictional resistance. Assume a friction coefficient of µ o =.4. C. The joists are not restrained against lateral movement (Figure G.18a) and the ratio of the total overburden weight to the resulting vertical reaction is η m = 1.3. Apply mechanism J and use the same values for a, ϖ and H t as were used in Example 1. Solution Steps Common to All Three Parts Values of certain parameters can be directly retained from Example 1, including: Z v, Z h and G n, since the type of masonry remains unchanged; n vs, N m, N r and L w, since the wall geometry is unchanged and; β and r, since we are assuming the same values for a, ϖ and H t. The main differences between the analysis of a loadbearing wall as opposed to a non-loadbearing wall are that in the case of a loadbearing wall, the full stress capacity function must be used including the σ vo term [equation (6.22)], and furthermore, that the additional terms in the internal and external work due to e m and e r can potentially become active depending on the nature of the overburden load s restraint.
. (b) Wall r36.")
 Wall r41.")

311 638 collapse load prediction in dry masonry walls (a) Wall r3. Joists present on main wall and free to move horizontally; hence Φ m = 1. Due to the position of the weights along the joists, η m = 1.3 (from the lever arm ratio). (b) Wall r36. Joists present on return wall and free to move horizontally; hence Φ r = 1. Weights are evenly distributed between the left and right return walls; therefore, η r = 1.. (c) Wall r41. Joists present on main wall and restrained from moving horizontally; hence Φ m =. Since the overburden load cannot perform work on the wall, the η m factor becomes irrelevant. Figure G.18: Examples of various types of overburden load conditions and the resulting influence on parameters used in the analysis. The shown walls correspond to test walls r3, r36 and r41 tested by Restrepo Vélez and Magenes [29] (Graphics used with permission from IUSS Press.).
APPENDIX G I-BEAM SUMMARIES 0.6-IN. STRAND G-1
 APPENDIX G I-BEAM SUMMARIES.6-IN. STRAND G-1 Concrete Compressive Strength Embedment Length(L e ) Span Failure Mode Maximum Load Maximum Shear Maximum Moment Maximum Deflection attained Rebound after complete
Sabah Shawkat Cabinet of Structural Engineering Walls carrying vertical loads should be designed as columns. Basically walls are designed in
 Sabah Shawkat Cabinet of Structural Engineering 17 3.6 Shear walls Walls carrying vertical loads should be designed as columns. Basically walls are designed in the same manner as columns, but there are
Task 1 - Material Testing of Bionax Pipe and Joints
 Task 1 - Material Testing of Bionax Pipe and Joints Submitted to: Jeff Phillips Western Regional Engineer IPEX Management, Inc. 20460 Duncan Way Langley, BC, Canada V3A 7A3 Ph: 604-534-8631 Fax: 604-534-7616
CHAPTER 3 EXPERIMENTAL STUDY
 Experimental Study 42 CHAPTER 3 EXPERIMENTAL STUDY 3.1. INTRODUCTION The experimental study that has been carried out in this thesis has two main objectives: 1. Characterise the concrete behaviour in mode
Pullout Tests of Geogrids Embedded in Non-cohesive Soil
 Archives of Hydro-Engineering and Environmental Mechanics Vol. 51 (2004), No. 2, pp. 135 147 Pullout Tests of Geogrids Embedded in Non-cohesive Soil Angelika Duszyńska, Adam F. Bolt Gdansk University of
Experiment Two (2) Torsional testing of Circular Shafts
 Torsional testing of Circular Shafts") Experiment Two (2) Torsional testing of Circular Shafts Introduction: Torsion occurs when any shaft is subjected to a torque. This is true whether the shaft is rotating (such as drive shafts on engines,
Experiment Two (2) Torsional testing of Circular Shafts Introduction: Torsion occurs when any shaft is subjected to a torque. This is true whether the shaft is rotating (such as drive shafts on engines,
QUESTION BANK DEPARTMENT: CIVIL SEMESTER: III SUBJECT CODE: CE2201 SUBJECT NAME: MECHANICS OF SOLIDS UNIT 1- STRESS AND STRAIN PART A
 DEPARTMENT: CIVIL SUBJECT CODE: CE2201 QUESTION BANK SEMESTER: III SUBJECT NAME: MECHANICS OF SOLIDS UNIT 1- STRESS AND STRAIN PART A (2 Marks) 1. Define longitudinal strain and lateral strain. 2. State
DETERMINATION OF EI FOR PULTRUDED GFRP SHEET PILE PANELS. Abstract
 DETERMINATION OF EI FOR PULTRUDED GFRP SHEET PILE PANELS Yixin Shao, Cynthia Giroux and Zeid Bdeir McGill University Montreal, Quebec, Canada Abstract The flexural rigidity, EI, plays an especially important
Bending Load & Calibration Module
 Bending Load & Calibration Module Objectives After completing this module, students shall be able to: 1) Conduct laboratory work to validate beam bending stress equations. 2) Develop an understanding of
Structural Analysis Laboratory. Michael Storaker, Sam Davey and Rhys Witt. JEE 332 Structural Analysis. 4 June 2012.
 Structural Analysis Laboratory Michael Storaker, Sam Davey and Rhys Witt JEE 332 Structural Analysis 4 June 2012 Lecturer/Tutor Shinsuke Matsuarbara 1 Contents Statically Indeterminate Structure Objective...
Finite Element Modelling with Plastic Hinges
 01/02/2016 Marco Donà Finite Element Modelling with Plastic Hinges 1 Plastic hinge approach A plastic hinge represents a concentrated post-yield behaviour in one or more degrees of freedom. Hinges only
Mechanical Properties of Materials
 Mechanical Properties of Materials Strains Material Model Stresses Learning objectives Understand the qualitative and quantitative description of mechanical properties of materials. Learn the logic of
ME 243. Mechanics of Solids
 ME 243 Mechanics of Solids Lecture 2: Stress and Strain Ahmad Shahedi Shakil Lecturer, Dept. of Mechanical Engg, BUET E-mail: sshakil@me.buet.ac.bd, shakil6791@gmail.com Website: teacher.buet.ac.bd/sshakil
The University of Melbourne Engineering Mechanics
 The University of Melbourne 436-291 Engineering Mechanics Tutorial Four Poisson s Ratio and Axial Loading Part A (Introductory) 1. (Problem 9-22 from Hibbeler - Statics and Mechanics of Materials) A short
Chapter 4. Test results and discussion. 4.1 Introduction to Experimental Results
 Chapter 4 Test results and discussion This chapter presents a discussion of the results obtained from eighteen beam specimens tested at the Structural Technology Laboratory of the Technical University
Using the Timoshenko Beam Bond Model: Example Problem
 Using the Timoshenko Beam Bond Model: Example Problem Authors: Nick J. BROWN John P. MORRISSEY Jin Y. OOI School of Engineering, University of Edinburgh Jian-Fei CHEN School of Planning, Architecture and
STRENGTH OF MATERIALS-I. Unit-1. Simple stresses and strains
 STRENGTH OF MATERIALS-I Unit-1 Simple stresses and strains 1. What is the Principle of surveying 2. Define Magnetic, True & Arbitrary Meridians. 3. Mention different types of chains 4. Differentiate between
D : SOLID MECHANICS. Q. 1 Q. 9 carry one mark each. Q.1 Find the force (in kn) in the member BH of the truss shown.
 in the member BH of the truss shown.") D : SOLID MECHANICS Q. 1 Q. 9 carry one mark each. Q.1 Find the force (in kn) in the member BH of the truss shown. Q.2 Consider the forces of magnitude F acting on the sides of the regular hexagon having
D : SOLID MECHANICS Q. 1 Q. 9 carry one mark each. Q.1 Find the force (in kn) in the member BH of the truss shown. Q.2 Consider the forces of magnitude F acting on the sides of the regular hexagon having
NDE of wood-based composites with longitudinal stress waves
 NDE of wood-based composites with longitudinal stress waves Robert J. Ross Roy F. Pellerin Abstract The research presented in this paper reveals that stress wave nondestructive testing techniques can be
[5] Stress and Strain
![[5] Stress and Strain](/thumbs/95/123344550.jpg "[5] Stress and Strain") [5] Stress and Strain Page 1 of 34 [5] Stress and Strain [5.1] Internal Stress of Solids [5.2] Design of Simple Connections (will not be covered in class) [5.3] Deformation and Strain [5.4] Hooke s Law
[5] Stress and Strain Page 1 of 34 [5] Stress and Strain [5.1] Internal Stress of Solids [5.2] Design of Simple Connections (will not be covered in class) [5.3] Deformation and Strain [5.4] Hooke s Law
Special edition paper
 Development of New Aseismatic Structure Using Escalators Kazunori Sasaki* Atsushi Hayashi* Hajime Yoshida** Toru Masuda* Aseismatic reinforcement work is often carried out in parallel with improvement
QUESTION BANK SEMESTER: III SUBJECT NAME: MECHANICS OF SOLIDS
 QUESTION BANK SEMESTER: III SUBJECT NAME: MECHANICS OF SOLIDS UNIT 1- STRESS AND STRAIN PART A (2 Marks) 1. Define longitudinal strain and lateral strain. 2. State Hooke s law. 3. Define modular ratio,
CHAPTER 6: ULTIMATE LIMIT STATE
 CHAPTER 6: ULTIMATE LIMIT STATE 6.1 GENERAL It shall be in accordance with JSCE Standard Specification (Design), 6.1. The collapse mechanism in statically indeterminate structures shall not be considered.
FLAC3D analysis on soil moving through piles
 University of Wollongong Research Online Faculty of Engineering - Papers (Archive) Faculty of Engineering and Information Sciences 211 FLAC3D analysis on soil moving through piles E H. Ghee Griffith University
PERIYAR CENTENARY POLYTECHNIC COLLEGE PERIYAR NAGAR - VALLAM THANJAVUR. DEPARTMENT OF MECHANICAL ENGINEERING QUESTION BANK
 PERIYAR CENTENARY POLYTECHNIC COLLEGE PERIYAR NAGAR - VALLAM - 613 403 - THANJAVUR. DEPARTMENT OF MECHANICAL ENGINEERING QUESTION BANK Sub : Strength of Materials Year / Sem: II / III Sub Code : MEB 310
STRAIN ASSESSMENT USFOS
 1 STRAIN ASSESSMENT IN USFOS 2 CONTENTS: 1 Introduction...3 2 Revised strain calculation model...3 3 Strain predictions for various characteristic cases...4 3.1 Beam with concentrated load at mid span...
2012 MECHANICS OF SOLIDS
 R10 SET - 1 II B.Tech II Semester, Regular Examinations, April 2012 MECHANICS OF SOLIDS (Com. to ME, AME, MM) Time: 3 hours Max. Marks: 75 Answer any FIVE Questions All Questions carry Equal Marks ~~~~~~~~~~~~~~~~~~~~~~
March 24, Chapter 4. Deflection and Stiffness. Dr. Mohammad Suliman Abuhaiba, PE
 Chapter 4 Deflection and Stiffness 1 2 Chapter Outline Spring Rates Tension, Compression, and Torsion Deflection Due to Bending Beam Deflection Methods Beam Deflections by Superposition Strain Energy Castigliano
Mechanical Engineering Ph.D. Preliminary Qualifying Examination Solid Mechanics February 25, 2002
 student personal identification (ID) number on each sheet. Do not write your name on any sheet. #1. A homogeneous, isotropic, linear elastic bar has rectangular cross sectional area A, modulus of elasticity
22 Which of the following correctly defines the terms stress, strain and Young modulus? stress strain Young modulus
 PhysicsndMathsTutor.com Which of the following correctly defines the terms stress, strain and Young modulus? 97/1/M/J/ stress strain Young modulus () x (area) (extension) x (original length) (stress) /
ENG1001 Engineering Design 1
 ENG1001 Engineering Design 1 Structure & Loads Determine forces that act on structures causing it to deform, bend, and stretch Forces push/pull on objects Structures are loaded by: > Dead loads permanent
PLATE GIRDERS II. Load. Web plate Welds A Longitudinal elevation. Fig. 1 A typical Plate Girder
 16 PLATE GIRDERS II 1.0 INTRODUCTION This chapter describes the current practice for the design of plate girders adopting meaningful simplifications of the equations derived in the chapter on Plate Girders
Introduction to Engineering Materials ENGR2000. Dr. Coates
 Introduction to Engineering Materials ENGR2 Chapter 6: Mechanical Properties of Metals Dr. Coates 6.2 Concepts of Stress and Strain tension compression shear torsion Tension Tests The specimen is deformed
SHEAR STRENGTH OF SOIL UNCONFINED COMPRESSION TEST
 SHEAR STRENGTH OF SOIL DEFINITION The shear strength of the soil mass is the internal resistance per unit area that the soil mass can offer to resist failure and sliding along any plane inside it. INTRODUCTION
Unit Workbook 1 Level 4 ENG U8 Mechanical Principles 2018 UniCourse Ltd. All Rights Reserved. Sample
 Pearson BTEC Levels 4 Higher Nationals in Engineering (RQF) Unit 8: Mechanical Principles Unit Workbook 1 in a series of 4 for this unit Learning Outcome 1 Static Mechanical Systems Page 1 of 23 1.1 Shafts
Laboratory 4 Bending Test of Materials
 Department of Materials and Metallurgical Engineering Bangladesh University of Engineering Technology, Dhaka MME 222 Materials Testing Sessional.50 Credits Laboratory 4 Bending Test of Materials. Objective
Experimental investigation on monotonic performance of steel curved knee braces for weld-free beam-to-column connections
 Experimental investigation on monotonic performance of steel curved knee braces for weld-free beam-to-column connections *Zeyu Zhou 1) Bo Ye 2) and Yiyi Chen 3) 1), 2), 3) State Key Laboratory of Disaster
Chapter. Materials. 1.1 Notations Used in This Chapter
 Chapter 1 Materials 1.1 Notations Used in This Chapter A Area of concrete cross-section C s Constant depending on the type of curing C t Creep coefficient (C t = ε sp /ε i ) C u Ultimate creep coefficient
Mechanical Response of a Composite Steel, Concrete- Filled Pile
 Mechanical Response of a Composite Steel, Concrete- Filled Pile Joseph Labuz, Principal Investigator Department of Civil, Environmental, and Geo- Engineering University of Minnesota June 2018 Research
Limit analysis of brick masonry shear walls with openings under later loads by rigid block modeling
 Limit analysis of brick masonry shear walls with openings under later loads by rigid block modeling F. Portioli, L. Cascini, R. Landolfo University of Naples Federico II, Italy P. Foraboschi IUAV University,
There are three main types of structure - mass, framed and shells.
 STRUCTURES There are three main types of structure - mass, framed and shells. Mass structures perform due to their own weight. An example would be a dam. Frame structures resist loads due to the arrangement
1.103 CIVIL ENGINEERING MATERIALS LABORATORY (1-2-3) Dr. J.T. Germaine Spring 2004 LABORATORY ASSIGNMENT NUMBER 6
 Dr. J.T. Germaine Spring 2004 LABORATORY ASSIGNMENT NUMBER 6") 1.103 CIVIL ENGINEERING MATERIALS LABORATORY (1-2-3) Dr. J.T. Germaine MIT Spring 2004 LABORATORY ASSIGNMENT NUMBER 6 COMPRESSION TESTING AND ANISOTROPY OF WOOD Purpose: Reading: During this laboratory
1.103 CIVIL ENGINEERING MATERIALS LABORATORY (1-2-3) Dr. J.T. Germaine MIT Spring 2004 LABORATORY ASSIGNMENT NUMBER 6 COMPRESSION TESTING AND ANISOTROPY OF WOOD Purpose: Reading: During this laboratory
Evaluation of Flexural Stiffness for RC Beams During Fire Events
 3 rd International Structural Specialty Conference 3 ième conférence internationale spécialisée sur le génie des structures Edmonton, Alberta June 6-9, 202 / 6 au 9 juin 202 Evaluation of Flexural Stiffness
Calculation for Moment Capacity of Beam-to- Upright Connections of Steel Storage Pallet Racks
 Missouri University of Science and Technology Scholars' Mine International Specialty Conference on Cold- Formed Steel Structures (2014) - 22nd International Specialty Conference on Cold-Formed Steel Structures
9.5 Compression Members
 9.5 Compression Members This section covers the following topics. Introduction Analysis Development of Interaction Diagram Effect of Prestressing Force 9.5.1 Introduction Prestressing is meaningful when
Sean Carey Tafe No Lab Report: Hounsfield Tension Test
 Sean Carey Tafe No. 366851615 Lab Report: Hounsfield Tension Test August 2012 The Hounsfield Tester The Hounsfield Tester can do a variety of tests on a small test-piece. It is mostly used for tensile
Flexure: Behavior and Nominal Strength of Beam Sections
 4 5000 4000 (increased d ) (increased f (increased A s or f y ) c or b) Flexure: Behavior and Nominal Strength of Beam Sections Moment (kip-in.) 3000 2000 1000 0 0 (basic) (A s 0.5A s ) 0.0005 0.001 0.0015
ME 2570 MECHANICS OF MATERIALS
 ME 2570 MECHANICS OF MATERIALS Chapter III. Mechanical Properties of Materials 1 Tension and Compression Test The strength of a material depends on its ability to sustain a load without undue deformation
Mechanics of Materials Primer
 Mechanics of Materials rimer Notation: A = area (net = with holes, bearing = in contact, etc...) b = total width of material at a horizontal section d = diameter of a hole D = symbol for diameter E = modulus
Equilibrium. the linear momentum,, of the center of mass is constant
 Equilibrium is the state of an object where: Equilibrium the linear momentum,, of the center of mass is constant Feb. 19, 2018 the angular momentum,, about the its center of mass, or any other point, is
EFFECT OF SHEAR REINFORCEMENT ON FAILURE MODE OF RC BRIDGE PIERS SUBJECTED TO STRONG EARTHQUAKE MOTIONS
 EFFECT OF SHEAR REINFORCEMENT ON FAILURE MODE OF RC BRIDGE PIERS SUBJECTED TO STRONG EARTHQUAKE MOTIONS Atsuhiko MACHIDA And Khairy H ABDELKAREEM SUMMARY Nonlinear D FEM was utilized to carry out inelastic
Chapter 12. Static Equilibrium and Elasticity
 Chapter 12 Static Equilibrium and Elasticity Static Equilibrium Equilibrium implies that the object moves with both constant velocity and constant angular velocity relative to an observer in an inertial
Strength of Materials (15CV 32)
") Strength of Materials (15CV 32) Module 1 : Simple Stresses and Strains Dr. H. Ananthan, Professor, VVIET,MYSURU 8/21/2017 Introduction, Definition and concept and of stress and strain. Hooke s law, Stress-Strain
Strength of Materials (15CV 32) Module 1 : Simple Stresses and Strains Dr. H. Ananthan, Professor, VVIET,MYSURU 8/21/2017 Introduction, Definition and concept and of stress and strain. Hooke s law, Stress-Strain
Cite this paper as follows:
 Cite this paper as follows: Naughton P.J. and O Kelly B.C. 2001. An overview of the University College Dublin hollow cylinder apparatus. Proceedings of the 14th Young European Geotechnical Engineer s Conference,
FLEXIBILITY METHOD FOR INDETERMINATE FRAMES
 UNIT - I FLEXIBILITY METHOD FOR INDETERMINATE FRAMES 1. What is meant by indeterminate structures? Structures that do not satisfy the conditions of equilibrium are called indeterminate structure. These
Elastic Properties of Solids (One or two weights)
") Elastic properties of solids Page 1 of 8 Elastic Properties of Solids (One or two weights) This is a rare experiment where you will get points for breaking a sample! The recommended textbooks and other
Elastic properties of solids Page 1 of 8 Elastic Properties of Solids (One or two weights) This is a rare experiment where you will get points for breaking a sample! The recommended textbooks and other
Downloaded from Downloaded from / 1
 PURWANCHAL UNIVERSITY III SEMESTER FINAL EXAMINATION-2002 LEVEL : B. E. (Civil) SUBJECT: BEG256CI, Strength of Material Full Marks: 80 TIME: 03:00 hrs Pass marks: 32 Candidates are required to give their
Project PAJ2 Dynamic Performance of Adhesively Bonded Joints. Report No. 3 August Proposed Draft for the Revision of ISO
 NPL Report CMMT(A)81 Project PAJ2 Dynamic Performance of Adhesively Bonded Joints Report No. 3 August 1997 Proposed Draft for the Revision of ISO 11003-2 Adhesives - Determination of Shear Behaviour of
Mechatronics II Laboratory EXPERIMENT #1: FORCE AND TORQUE SENSORS DC Motor Characteristics Dynamometer, Part I
 Mechatronics II Laboratory EXPEIMENT #1: FOCE AND TOQUE SENSOS DC Motor Characteristics Dynamometer, Part I Force Sensors Force and torque are not measured directly. Typically, the deformation or strain
Appendix G Analytical Studies of Columns
 Appendix G Analytical Studies of Columns G.1 Introduction Analytical parametric studies were performed to evaluate a number of issues related to the use of ASTM A103 steel as longitudinal and transverse
Proceedings of the 28th Risø international symposium on materials science, 3-6 Sept 2007.
 Proceedings of the 28th Risø international symposium on materials science, 3-6 Sept 27. INFLUENCE OF TEMPERATURE ON COHESIVE PARAMETERS FOR ADHESIVES Anders Biel 1 and Thomas Carlberger 2 1 University
DEPARTMENT OF MECHANICAL ENIGINEERING, UNIVERSITY OF ENGINEERING & TECHNOLOGY LAHORE (KSK CAMPUS).
.") DEPARTMENT OF MECHANICAL ENIGINEERING, UNIVERSITY OF ENGINEERING & TECHNOLOGY LAHORE (KSK CAMPUS). Lab Director: Coordinating Staff: Mr. Muhammad Farooq (Lecturer) Mr. Liaquat Qureshi (Lab Supervisor)
DEPARTMENT OF MECHANICAL ENIGINEERING, UNIVERSITY OF ENGINEERING & TECHNOLOGY LAHORE (KSK CAMPUS). Lab Director: Coordinating Staff: Mr. Muhammad Farooq (Lecturer) Mr. Liaquat Qureshi (Lab Supervisor)
Experiment Five (5) Principal of Stress and Strain
 Principal of Stress and Strain") Experiment Five (5) Principal of Stress and Strain Introduction Objective: To determine principal stresses and strains in a beam made of aluminum and loaded as a cantilever, and compare them with theoretical
Experiment Five (5) Principal of Stress and Strain Introduction Objective: To determine principal stresses and strains in a beam made of aluminum and loaded as a cantilever, and compare them with theoretical
Influence of residual stresses in the structural behavior of. tubular columns and arches. Nuno Rocha Cima Gomes
 October 2014 Influence of residual stresses in the structural behavior of Abstract tubular columns and arches Nuno Rocha Cima Gomes Instituto Superior Técnico, Universidade de Lisboa, Portugal Contact:
Chapter 7. Highlights:
 Chapter 7 Highlights: 1. Understand the basic concepts of engineering stress and strain, yield strength, tensile strength, Young's(elastic) modulus, ductility, toughness, resilience, true stress and true
FLEXURAL ANALYSIS AND DESIGN METHODS FOR SRC BEAM SECTIONS WITH COMPLETE COMPOSITE ACTION
 Journal of the Chinese Institute of Engineers, Vol. 31, No., pp. 15-9 (8) 15 FLEXURAL ANALYSIS AND DESIGN METHODS FOR SRC BEAM SECTIONS WITH COMPLETE COMPOSITE ACTION Cheng-Cheng Chen* and Chao-Lin Cheng
Strength of Materials II (Mechanics of Materials) (SI Units) Dr. Ashraf Alfeehan
 (SI Units) Dr. Ashraf Alfeehan") Strength of Materials II (Mechanics of Materials) (SI Units) Dr. Ashraf Alfeehan 2017-2018 Mechanics of Material II Text Books Mechanics of Materials, 10th edition (SI version), by: R. C. Hibbeler, 2017
Strength of Materials II (Mechanics of Materials) (SI Units) Dr. Ashraf Alfeehan 2017-2018 Mechanics of Material II Text Books Mechanics of Materials, 10th edition (SI version), by: R. C. Hibbeler, 2017
SERVICEABILITY OF BEAMS AND ONE-WAY SLABS
 CHAPTER REINFORCED CONCRETE Reinforced Concrete Design A Fundamental Approach - Fifth Edition Fifth Edition SERVICEABILITY OF BEAMS AND ONE-WAY SLABS A. J. Clark School of Engineering Department of Civil
Strain Measurement Techniques for Composite Coupon Testing
 Strain Measurement Techniques for Composite Coupon Testing Introduction Characterization of the properties of anisotropic and inhomogeneous composite materials for use in demanding structural applications
Entrance exam Master Course
 - 1 - Guidelines for completion of test: On each page, fill in your name and your application code Each question has four answers while only one answer is correct. o Marked correct answer means 4 points
N = Shear stress / Shear strain
 UNIT - I 1. What is meant by factor of safety? [A/M-15] It is the ratio between ultimate stress to the working stress. Factor of safety = Ultimate stress Permissible stress 2. Define Resilience. [A/M-15]
Seismic Pushover Analysis Using AASHTO Guide Specifications for LRFD Seismic Bridge Design
 Seismic Pushover Analysis Using AASHTO Guide Specifications for LRFD Seismic Bridge Design Elmer E. Marx, Alaska Department of Transportation and Public Facilities Michael Keever, California Department
DEVELOPMENT OF DROP WEIGHT IMPACT TEST MACHINE
 CHAPTER-8 DEVELOPMENT OF DROP WEIGHT IMPACT TEST MACHINE 8.1 Introduction The behavior of materials is different when they are subjected to dynamic loading [9]. The testing of materials under dynamic conditions
MAAE 2202 A. Come to the PASS workshop with your mock exam complete. During the workshop you can work with other students to review your work.
 It is most beneficial to you to write this mock final exam UNDER EXAM CONDITIONS. This means: Complete the exam in 3 hours. Work on your own. Keep your textbook closed. Attempt every question. After the
ISHIK UNIVERSITY DEPARTMENT OF MECHATRONICS ENGINEERING
 ISHIK UNIVERSITY DEPARTMENT OF MECHATRONICS ENGINEERING QUESTION BANK FOR THE MECHANICS OF MATERIALS-I 1. A rod 150 cm long and of diameter 2.0 cm is subjected to an axial pull of 20 kn. If the modulus
Lecture-08 Gravity Load Analysis of RC Structures
 Lecture-08 Gravity Load Analysis of RC Structures By: Prof Dr. Qaisar Ali Civil Engineering Department UET Peshawar www.drqaisarali.com 1 Contents Analysis Approaches Point of Inflection Method Equivalent
Influence of column web stiffening on the seismic behaviour of beam-tocolumn
 Influence of column web stiffening on the seismic behaviour of beam-tocolumn joints A.L. Ciutina & D. Dubina The Politehnica University of Timisoara, Romania ABSTRACT: The present paper summarises the
KINGS COLLEGE OF ENGINEERING DEPARTMENT OF MECHANICAL ENGINEERING QUESTION BANK. Subject code/name: ME2254/STRENGTH OF MATERIALS Year/Sem:II / IV
 KINGS COLLEGE OF ENGINEERING DEPARTMENT OF MECHANICAL ENGINEERING QUESTION BANK Subject code/name: ME2254/STRENGTH OF MATERIALS Year/Sem:II / IV UNIT I STRESS, STRAIN DEFORMATION OF SOLIDS PART A (2 MARKS)
NUMERICAL AND EXPERIMENTAL STUDY OF FAILURE IN STEEL BEAMS UNDER IMPACT CONDITIONS
 Blucher Mechanical Engineering Proceedings May 2014, vol. 1, num. 1 www.proceedings.blucher.com.br/evento/10wccm NUMERICAL AND EXPERIMENTAL STUDY OF FAILURE IN STEEL BEAMS UNDER IMPACT CONDITIONS E. D.
Initial Stress Calculations
 Initial Stress Calculations The following are the initial hand stress calculations conducted during the early stages of the design process. Therefore, some of the material properties as well as dimensions
Which expression gives the elastic energy stored in the stretched wire?
 1 wire of length L and cross-sectional area is stretched a distance e by a tensile force. The Young modulus of the material of the wire is E. Which expression gives the elastic energy stored in the stretched
Prediction of static response of Laced Steel-Concrete Composite beam using effective moment of inertia approach
 Prediction of static response of Laced Steel-Concrete Composite beam using effective moment of inertia approach Thirumalaiselvi A 1, 2, Anandavalli N 1,2, Rajasankar J 1,2, Nagesh R. Iyer 2 1 Academy of
9 MECHANICAL PROPERTIES OF SOLIDS
 9 MECHANICAL PROPERTIES OF SOLIDS Deforming force Deforming force is the force which changes the shape or size of a body. Restoring force Restoring force is the internal force developed inside the body
Quintic beam closed form matrices (revised 2/21, 2/23/12) General elastic beam with an elastic foundation
 General elastic beam with an elastic foundation") General elastic beam with an elastic foundation Figure 1 shows a beam-column on an elastic foundation. The beam is connected to a continuous series of foundation springs. The other end of the foundation
General elastic beam with an elastic foundation Figure 1 shows a beam-column on an elastic foundation. The beam is connected to a continuous series of foundation springs. The other end of the foundation
3. BEAMS: STRAIN, STRESS, DEFLECTIONS
 3. BEAMS: STRAIN, STRESS, DEFLECTIONS The beam, or flexural member, is frequently encountered in structures and machines, and its elementary stress analysis constitutes one of the more interesting facets
University of Sheffield The development of finite elements for 3D structural analysis in fire
 The development of finite elements for 3D structural analysis in fire Chaoming Yu, I. W. Burgess, Z. Huang, R. J. Plank Department of Civil and Structural Engineering StiFF 05/09/2006 3D composite structures
STRENGTH AND STIFFNESS REDUCTION OF LARGE NOTCHED BEAMS
 STRENGTH AND STIFFNESS REDUCTION OF LARGE NOTCHED BEAMS By Joseph F. Murphy 1 ABSTRACT: Four large glulam beams with notches on the tension side were tested for strength and stiffness. Using either bending
Lap splice length and details of column longitudinal reinforcement at plastic hinge region
 Lap length and details of column longitudinal reinforcement at plastic hinge region Hong-Gun Park 1) and Chul-Goo Kim 2) 1), 2 Department of Architecture and Architectural Engineering, Seoul National University,
RODS: THERMAL STRESS AND STRESS CONCENTRATION
 RODS: HERML SRESS ND SRESS CONCENRION Example 5 rod of length L, cross-sectional area, and modulus of elasticity E, has been placed inside a tube of the same length L, but of cross-sectional area and modulus
Christian Linde Olsen Griffith University, Faculty of Engineering and Information Technology, Gold Coast Campus.
 1 Introduction Test on Cyclic Lateral Loaded Piles in Sand Christian Linde Olsen Griffith University, Faculty of Engineering and Information Technology, Gold Coast Campus. Abstract The following paper
STATICALLY INDETERMINATE STRUCTURES
 STATICALLY INDETERMINATE STRUCTURES INTRODUCTION Generally the trusses are supported on (i) a hinged support and (ii) a roller support. The reaction components of a hinged support are two (in horizontal
Mechatronics II Laboratory EXPERIMENT #1 MOTOR CHARACTERISTICS FORCE/TORQUE SENSORS AND DYNAMOMETER PART 1
 Mechatronics II Laboratory EXPEIMENT #1 MOTO CHAACTEISTICS FOCE/TOQUE SENSOS AND DYNAMOMETE PAT 1 Force Sensors Force and torque are not measured directly. Typically, the deformation or strain of some
MECHANICS OF MATERIALS. Prepared by Engr. John Paul Timola
 MECHANICS OF MATERIALS Prepared by Engr. John Paul Timola Mechanics of materials branch of mechanics that studies the internal effects of stress and strain in a solid body. stress is associated with the
CIVIL DEPARTMENT MECHANICS OF STRUCTURES- ASSIGNMENT NO 1. Brach: CE YEAR:
 MECHANICS OF STRUCTURES- ASSIGNMENT NO 1 SEMESTER: V 1) Find the least moment of Inertia about the centroidal axes X-X and Y-Y of an unequal angle section 125 mm 75 mm 10 mm as shown in figure 2) Determine
Purpose of this Guide: To thoroughly prepare students for the exact types of problems that will be on Exam 3.
 ES230 STRENGTH OF MTERILS Exam 3 Study Guide Exam 3: Wednesday, March 8 th in-class Updated 3/3/17 Purpose of this Guide: To thoroughly prepare students for the exact types of problems that will be on
FURTHER RESEARCH ON CHORD LENGTH AND BOUNDARY CONDITIONS OF CHS T- AND X-JOINTS
 Advanced Steel Construction Vol. 6, No. 3, pp. 879-89 (1) 879 FURTHER RESEARCH ON CHORD LENGTH AND BOUNDARY CONDITIONS OF CHS T- AND X-JOINTS G.J. van der Vegte 1, * and Y. Makino 1 Delft University of
Design of AAC wall panel according to EN 12602
 Design of wall panel according to EN 160 Example 3: Wall panel with wind load 1.1 Issue Design of a wall panel at an industrial building Materials with a compressive strength 3,5, density class 500, welded
SIMPLIFIED METHOD FOR PREDICTING DEFORMATIONS OF RC FRAMES DURING FIRE EXPOSURE
 SIMPLIFIED METHOD FOR PREDICTING DEFORMATIONS OF RC FRAMES DURING FIRE EXPOSURE M.A. Youssef a, S.F. El-Fitiany a a Western University, Faculty of Engineering, London, Ontario, Canada Abstract Structural
Chapter 4-b Axially Loaded Members
 CIVL 222 STRENGTH OF MATERIALS Chapter 4-b Axially Loaded Members AXIAL LOADED MEMBERS Today s Objectives: Students will be able to: a) Determine the elastic deformation of axially loaded member b) Apply
High Tech High Top Hat Technicians. An Introduction to Solid Mechanics. Is that supposed to bend there?
 High Tech High Top Hat Technicians An Introduction to Solid Mechanics Or Is that supposed to bend there? Why don't we fall through the floor? The power of any Spring is in the same proportion with the