Mov. H. Bim Bam Mov. H. Westminster Mov. K. Bim Bam Mov. K. Westminster
|
|
|
- Magnus Harrington
- 5 years ago
- Views:
Transcription
 Istrucciones para el uso de relojes de")

1 Istruction manual for Mantel Clock (2) Instructions de service pour pendulettes (14) Istrucciones para el uso de relojes de sobremesa (26) Bedienungsanleitung für Tischuhren (40) Mov. H. Bim Bam Mov. H. Westminster Mov. K. Bim Bam Mov. K. Westminster X
2 2 Thank you very mutch for selecting our Grandfather Clock. We hope that your new clock will bring you many happy hours in years to come. The F.lli Consonni Company has over 40 years of experians in manufacturing clocks. Only the best woods suchas cherry, walnut, oak and many others woods materials are used in your clock. This Owner s manual will assist you to care for your clock. It shows how to make minor adjustments that every clock need from time to time. F.LLI CONSONNI info@flli-consonni.it Please use gloves if you touch the brass parts of the clock. Paragrafo Sommario Pagina A Small Clock Glossary 3 The Clock Melodies 4 Instruction Manual 5 1. Selecting a location 5 2. Unpacking and settino up the clock Mounting the bell assembly Gong rod protection Removing the run block Positioning the Clock Hanging the pendulum 6 3. Winding the Clock 6 4. Setting the Clock Setting the Time Adjusting the Moon Phase dial (Option) Setting the Date (Option) Adjusting the calendar (Option) 8 5. Starting the clock 8 6. Setting the strike/chime mechanism 8 7. Adjusting the running speed Escapement Pendulum The automatic night shut-off (Option) Care and maintenance Relocating the Clock Trouble shooting Repair and service 13 Product identification 13
3 A small clock glossary Automatic beat adjustment The term automatic beat adjustment refers to a automatic adjustement of the ancor position relative to the escape wheel through an overswing of the pendulum. This is achieved with a precisely tolerated friction between ancor and ancor shaft and an additional disc attached to the escape wheel. Because of the automatic beat adjustment a perfectly even tic sound will develop after the overswing period of the pendulum is completed. Automatic chime sequencing When activating the option automatic chime sequencing («AUTOM.») the motion of the hand shaft automatically shifts the melody drum of triple chime movements to the next melody every hour after the hour count is completed. Compensation pendulum Due to temperature fluctuations the different metallic components of normal pendulums expand at different rates. Therefore the lenght of the pendulum changes and triggers fluctuations of the running speed (time keeping). Through a specific arrangement of metals with different expansion coefficients and a corresponding design of the pendulum these differences of expansion rates are compensated. Escapement & Regulator The term "escapement" refers to the combination of the clock components anchor and escapement wheel. The anchor is either made in one piece (solid anchor) or consists of an anchor body with inserted pallets (pallet anchor). The special gearing of the escapement wheel is matched for the type of escapement and the anchor. The escapement regulates the otherwise uncontrolled run of the time drive with the help of the regulator oscillations and at the same time provides the regulator with the necessary drive impulse. Depending on type of movement the regulator can be either a pendulum or a balance wheel. The oscillation rate of the regulator determines the rhythm for the movement of the hands. Movements use a stationary escapement (Graham) or an escapement (Swiss escapement). Lyre pendulum A pendulum style which includes multiple, vertically oriented bars joined by a bridge in the middle and which has a harp shaped structure above the pendulum bob. Maintaining Power The time drive of weight powered clock movements with maintaining power continues to run during winding. This is achived through a counter locking gear with spring, which provides a power reserve for the time drive during winding. Moon phase dial A dial which tracks the moon's phases through the 29½ day lunar month. As the rotating moon dial passes behind representations of the eastern and western hemispheres, the phases of the moon (new moon, full moon, wasing crescent, etc.) are represented as they appear at each stage of the cycle. 3
4 4 Night shut-off When activating the option night shut-off («NIGHT OFF») the chimes or strike are/is automatically turned off between P.M. and 7.15 A.M. (movements with quarter hour chime) or P.M. and 7.00 A.M. (movements with half hour strike). The night shut-off incorporates an additional mechanism and a special time curve to interrupt the release of the chime and/or strike mechanism(s). Pendulum leader Through the pendulum leader, which is attached to the anchor and engages into the pendulum extension, the power is transfered from the movement to the pendulum. Roller burnishing The term refers to a special, traditional process for the surface treatment of the axle journals of pinions and arbors during clock manufacturing. In doing so the surface of a turning component is smoothened and compressed with a rotating ("roller burnishing") hard metal disk. With this process a very high life expectancy and soft running characteristics of the bearings are achieved. Tempus Fugit Latin for "Time flies". Traditionally these words are often insribed on a decorative clock dial. True second With a "true second" feature the second hand moves in precise second steps. This is only possible for movements with a second pendulum, that is, with a pendulum length of nominal 116 cm. For movements with shorter pendulum lengths uses a special second module for a correct second indication. The clock melodies Clock movements with a melody chime feature offer playing "Westminster" (standard) and additional melodies depending on model: Westminster This famous clock melody was written by George Frideric Handel (1685 to 1759). Everybody associates the melody with the chimes of the Victoria Clock Tower of the Houses of Parliament (better known as "Big Ben"). Originally the chimes come from the university church St. Mary's the Great in Cambridge.
5 Instruction manual 5 n the unlikely event of problems during setup or normal operation that cannot be resolved by following the instructions in this brochure, please contact your dealer or service department. When contacting your dealer, please have all product information available. This can be found on page 53 of this manual. Please note: Depending on the model and accessories of your clock, additional information regarding special features could be included with this instruction manual. 1. Selecting a location When selecting a location for your clock the following criteria should be observed: { Select a location where the clock can be set up securely and level. { Locations with direct sun light, close to radiators or other heat sources and/or draught should be avoided. { Please note that the sound and loudness of the clock can be influenced by size of room, other furniture, and sound absorbing materials (floor coverings, drapes, etc.). 2. Setting up the clock Your clock is usually delivered in a solid shipping carton. Other than the clock and depending on model this shipping carton contains various accessories, which should be taken out first: { bell assembly (depending on model) { clock pendulum (depending on model packaged in a separate cardboard box) { winding key { bag for winding key (depending on model) Recommends that you save the packaging material for future use when relocating or moving. Remove the clock from its packaging and place it close to its final location. Remove all silk papers, foils and/or adesive tapes carefully. Access to the clock movement and the chimes or bells is obtained through the back and/or the front door, depending on model. 2.1 Mounting the bell assembly With some models the heavy bell assembly is disconnected for shipping after final inspection. Attach the bell assembly with the two screws remaining on the movement back plate (picture 1 - see page 53). Check the adjustment of each hammer and adjust as needed (see section 11.4). 2.2 Gong rod protection For clocks with gong rods, remove the cardboard sleeve from around the chime rods by pulling it straight down and off the ends of the chime rods.
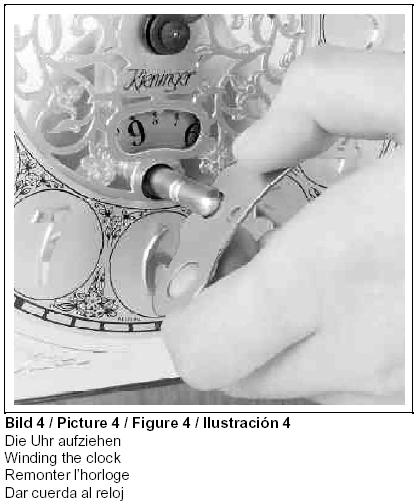
6 6 2.3 Removing the run block Whenever possible clocks with key wind movement are fitted with a plastic run block for shipping. The run block attaches to the right or left winding arbor (melody chime or hour strike) and prevents any forward movement of the minute hand. To remove the run block turn the minute hand counterclockwise (backwards) and pull the run block off the winding arbor. 2.4 Positioning the clock Position the clock into its final location. Make sure that the clock stands level and secure, as it may otherwise tip or not operate properly. 2.5 Hanging the pendulum If your clock is equipped with a pendulum, observe the following instructions. Remove the pendulum from its box. Some pendulums have a colored, easy to pull off protective plastic film covering the pendulum disk. Carefully remove this film before hanging the pendulum. Prior to hanging the pendulum, check that the pendulum extension is correctly positioned. Depending on the model this can be done through the front door or any of the side door(s) or access panels. Make sure that the pendulum extension is attached to the two pins of the suspension spring and that the verge pin locks into the upper guide slot of the pendulum extension (picture 2 - see page 53). Check the suspension spring. If it is damaged or bent, it must be replaced. While holding the pendulum extension with one hand, slip the pendulum through the slot on the pendulum extension, and lower the pendulum until it is hanging securely on the pendulum extension (picture 3 - see page 53). 3. Winding the clock The springs of your clock should be wound regularly and evenly. Leaving the strike mechanisms unwound can lead to jamming of the time mechanism. As a general rule, silencing the chime mechanisms should be done by using the function(s) of the chime selector levers, only (see section 6). With front winding models open the front door and insert the winding key provided into the winding holes located in the dial face as far as possible. For rear winding models procede likewise and push the winding key on the selected winding arbor. All key wind mechanisms are wound clockwise (front winding) or counterclockwise (rear winding) until a noticeable resistance develops (picture 4 - see page 53). When winding the clock, and if possible, use your free hand to stabilize the clock case. 4. Setting the clock 4.1 Setting the time Before setting the time, make sure that the automatic night shut-off, where applicable, is turned off and the respective selector lever is not in the position "NIGHT OFF" (see section 8). Moving the hands while these options are in operation could damage the chime mechanism. For key wind movements the springs have to be wound prior to setting the time (see section 3).

7 7 To set the time, move the minute hand counterclockwise (backwards) until hour and minute hand are at the correct time. When moving the minute hand counterclockwise as described, the clock will not chime. Never move the hour hand when setting the time. The hour hand will move automatically. If after setting the clock on time, it does not chime properly, this is not a defect. Let the clock operate 1 to 2 hours. The movement has a self correcting feature which synchronizes the chimes with the time. The synchronization can be speeded up by moving the minute hand back 2 more hours and then turning it clockwise as described below. Should you elect to move the minute hand clockwise (forward) when setting the time, it is recommended that you let the clock complete each strike cycle (quarter, half, three quarter and full hour depending on model). The strike release will only function if the minute hand is moved slowly past the respective release points. Switching to day light savings time or back to regular time is done by moving the minute hand forward or backward one hour. If your clock gains or loses time after several hours of operation, see section 7 for instructions on how to regulate the timekeeping of your clock. 4.2 Adjusting the moon phase dial (option) If your clock has a moving moon dial feature, observe the following instructions. To set the moon dial, apply slight pressure with your fingers to the front of the moon dial and rotate the moon dial clockwise until the moon is directly below the numeral "15" (picture 5 see page 54). If the moon dial will not easily rotate, this indicates that the gears which automatically advance the moon dial are engaged. Do not force the dial forward! With the factory set-up, the dial is advanced between 10:00 P.M. and 2:00 A.M.! To release the gears rotate the minute hand backwards depending on position up to four (4) hours as described in section 4.1. After setting the moon phase, reset your clock to the correct time. Using an almanac or calendar, determine the date of the last full moon. Count the number of days past the last or before the next full moon. Turn the moon dial clockwise or counterclockwise for every day past or before the full moon. One click of the moon dial equals one day. The moon dial is set now. Please note that the moon dial drive is calculated for an average lunar month of 29½ days. Even if the clock is operating continuously it should therefore be corrected as described from time to time (for example every 6 months with the switch to day light savings time). If the clock stops for more than 24 hours, the moon dial will also stop and, thus, must be reset when the clock is starter again. 4.3 Setting the date (option) If your clock has a dial with integrated date feature, observe the following instructions. Set the date disk with the aid of a pointed tool (pencil or ballpoint pen) engaged in the small holes above its numerals (picture 6 - see page 54).
 If your clock has a dial with integrated date feature, observe the following instructions.")

8 8 If the disk cannot be turned, its shift mechanism is engaged. Please turn the time back by approximately two hours until the disk can be turned. Set the date and then reset the hands to the correct time of day. 4.3 Setting the date (option) If your clock has a dial with integrated date feature, observe the following instructions. Set the date disk with the aid of a pointed tool (pencil or ballpoint pen) engaged in the small holes above its numerals (picture 6 - see page 54). If the disk cannot be turned, its shift mechanism is engaged. Please turn the time back by approximately two hours until the disk can be turned. Set the date and then reset the hands to the correct time of day. 4.4 Adjusting the calendar dial (option) If your clock has been fitted with a calendar dial, observe the following instructions: Before you adjust the calendar dial the correct time of day needs to be set. Should your clock offer an automatic night-off function make sure that the correct day or night phase ist set. Adjusting the calendar dial All calendar and moon phase functions may be changed with a time setting between 3.00 AM and 9.00 PM, only. Between 9.00 PM and 3.00 AM the gears of the calendar mechanism are in function and a manual adjustment could damage the mechanism. The adjustment of the date, day and month function is done manually from the front of the dial by turning the respective hand. The described hands can be moved clockwise as well as counterclockwise. The basic setting of the integrated moon disk is done manually thru the dial opening by gently pressing and turning the disk until the full moon is centered in dial opening (numeral "15"). The final adjustment of the moon disk is described in detail in section 4.2 of this manual. 5. Starting the clock Mantel clocks equipped with a pendulum have to be started. Open the back door of the clock and push the pendulum from the center to the far left or right (picture 7 - see page 54). Due to the built-in automatic beat adjustment, the tic sound of the clock movement will become perfectly even within a couple of minutes. Should this not be the case, please repeat the start procedure moving the pendulum to the other side of the clock case. 6. Setting the strike/chime mechanism Never change (switch, turn on or off) the strike and/or chime selection while the clock is striking/chiming or the minute hand is positioned directly before the release points (quarter, half, three quarter and full hour depending on model). This could severely damage the mechanism. Clocks equipped with J key wind movements have to be switched from «SILENT» to «WHITT.» first and the Whittington chime needs to be completed before selecting another chime. Depending on the movement your clock is equipped with, different chime options are available. To select a chime option, use the selector levers positioned to the right or on
9 9 both sides of the dial. Some clock models are equipped with radial switches with small selectors in the top left and right of the moon phase dial. Please pick the strike and/or chime lever positions of the one or two selector levers, rods or radial selectors that apply to your clock and, thus, the possible chime options from the following table: Left Side right side Mov. APL (Westminster) K. <Strike> <Night Off> <Silent> Hour Strike on Automatic night shut-off on Hour Strike off <Strike> <Silent> <Night Off> <Strike> <Silent> Hour Strike on Hour Strike off Automatic night shut-off on Hour Strike on Hour Strike off <Silent> <Night Off> <Strike> Hour Strike off Automatic night shut-off on Hour Strike on <Silent> <Whitt.> <St.Mich> <Westm.> <Night Off> Hour Strike off Whittington St.Michael Westminster Automatic night shut-off on The hour strike and quarter chime (depending on model) mechanisms of your clock can be operated independently. When switching from «SILENT» to «STRIKE» the chimes/strike of the movement families A and S for technical reasons will take between minimal 1 to maximal 2 hours to synchronize. For movements with a single selector lever for the chime and automatic night shut-off, the night shut-off is activated in the top lever postition («SILENT/NIGHT ON») and deactivated in the bottom lever position («NIGHT OFF»). Depending on the lever position used last, the respective chime and the hour strike will then run with or without the automatic night shut-off. 7. Adjusting the running speed Depending on model the running speed (timekeeping) of your clock can be adjusted through the escapement or the pendulum. Before you make any change, observe and note the timekeeping of your clock over a longer period of time, for example 12 or 24 hours.
10 7.1 Escapement The oscillation speed of the escapement is determined by the effective length of the balance spring. The longer it is, the slower the oscillation speed will be. To change the running speed of the clock shorten (+) or lengthen (-) the effective length of the balance spring by shifting the adjuster (picture 8 see page 54). One half (0,5) millimeter shift of the adjuster result in a change of approximately 1 minute in 24 hours. 7.2 Pendulum The length of the pendulum determines the running speed of your clock. The longer a pendulum the slower is its swinging speed. To change the running speed, move the pendulum bob up or down and, thus, shorten or lengthen the effective length, that is the distance between center of gravity of the pendulum and pendulum hook. The pendulum bob can be moved up and down by turning the adjustment nut. Turning the adjustment nut below the pendulum bob as seen from above counterclockwise will shorten the effective pendulum length and the clock will run faster. Turning the adjustment nut clockwise will lengthen the effective pendulum length and the clock will run slower (picture 9-55). One third (0,33) turn of the adjustment nut will result in a change of approximately 1 minute in 24 hours. Please make sure that the pendulum bob remains fully seated against the adjustment nut and pull it down as needed. Remember to reset the time after adjusting the pendulum bob. 8. The automatic night shut-off (option) Most clock models feature an option which will allow you to activate an automatic silencing of the chime between the hours of 10:00 P.M. and 7:15 A.M. (for quarter hour strike movements) or 10:00 P.M. and 7:00 A.M. (for half hour strike movements). Use the lever as identified in section 6 to select this option. The position of the chime selection lever is marked with «NIGHT OFF». Some models include a so called "permanent night shut-off" which can not be deactivated. If your clock does not strike or chime during the daytime, its movement is in the night cycle. You need to move the clock hands back 12 hours to go into the day cycle. Before doing so the night shut-off has to be turned off or the chime selector lever set on «SILENT». Moving the hands while the night shut-off is in operation could damage the chime mechanism. If after setting the time, the clock does not chime properly, this is not a defect. The movement has a self correcting feature which synchronizes the chimes after 1 to 2 hours. 9. Care and Maintenance Your clock requires very little care and maintenance. Listed below are some steps you can take to maintain the function and appearance of your clock for many years: { Wind your clock regularly (every seven days). { Keep the door(s) closed. { Check periodically to ensure that your clock is standing level and securely. 10
11 non-silicone liquid or paste wax polish can be used when needed. All brass components are tarnish proofed with clear laquer and should be wiped with a soft, dry cotton cloth, only. { Never clean plastic components with cleaning agents containing alcohol as this can result in the development of fine hair fractures in the material. { Recommends that your clock movement be oiled (synthetic oil No. 859 by Etsyntha) every five (5) years by an authorized service center and thoroughly cleaned every ten (10) years. Extreme environmental conditions (air humidity and quality, temperature, etc.) may necessitate more frequent servicing. 10. Relocating the clock When relocating or moving the clock all weights and the pendulum have to be removed from the clock. To avoid unneccessary damage, you should ensure that all accessories like the pendulum and the weights are packed in the original packaging (see section 2). Cable movements have to be wound up completely with weights and the styrofoam blocks inserted. The weights can be removed afterwards. The chains of chain movements should be secured with wire to avoid slipping off the chain wheels during transport. To prevent damage to the case the chain ends should be packed in a plastic bag. At the new location, repeat the setup of the clock as previously described. 11. Trouble shooting 11.1 Clock does not chime at the proper time If the clock chimes more than one minute before or after the proper time, the minute hand should be removed and adjusted. When performing this operation be careful not to scratch the hand nut, hand or dial. { When the clock starts to chime, if applicable stop the pendulum and record the exact time. { Using a special tool or pair of pliers, carefully remove the small nut that holds the minute hand in place by turning the nut counterclockwise while at the same time holding the minute hand with your fingers near the small nut. { Remove the hand from the hand shaft by pulling the hand straight off. The hand should come off easily. Riveted to the back side of the minute hand, directly around the shaft hole, is the hand bushing. Insert a square tool into the bushing or hold the bushing with a pair of pliers and, with your other hand, turn the clock hand forward or backward the distance necessary to correct the time (picture 10 - see page 55). { Re-attach the hand to the shaft and turn the hand nut finger tight. Make sure the hand points to the correct location that you recorded in Step 1 plus any corrections you made in step 3. If the hand does not point to the correct mark, repeat steps 2 and 3. { After the minute hand has been adjusted sufficiently tighten the hand nut again with the special tool or the pair of pliers. { If applicable start the pendulum (see section 5) and reset the time as described in section

12 Clock does not strike the correct hour If after several hours of operation your clock does not strike the correct hour, the hour hand is not positioned correctly. Grasp the hour hand only and move it forward or backward to line up with the correct hour on the dial indicated by the number of times the hour strikes. Rotating this hand independently will not damage the clock Clock will not chime or strike If your clock does not chime or strike, this can have several causes. { If you have just changed the setting of your clock, wait for 1 to 2 hours. The movement will synchronize automatically. { Make sure that the chime selection lever is not in the «SILENT» position or halfway between two chime melody positions. { For models with night shut-off, make sure that the clock is not in the night cycle (see section 8). { Make sure that all the packing material is removed from the movement area. { Assure that all springs are sufficiently wound. { Check the hammer adjustment and correct as necessary Chimes have unsatisfactory tone The chime tone of gong rods or bells may be affected by hammers resting on them, touching insufficiently or striking incorrectly. Although the hammers were set at the factory, it is possible for them to get out of adjustment during transport. There are different procedures for adjustment depending on types of chimes: { Gong rods: Do not bend or try to adjust the gong rods as they break off easily. The volume and sound cannot be adjusted on a gong rod. The hammer arms are made of brass and can be safely adjusted. If necessary, bend the hammer arms so that each hammer rests approximately 1/8" from each rod. Ensure the hammers do not interfere with each other while moving. The hammer heads should touch the center of the gong rods just below the tapering. For adjustment loosen the little screw on the back of the hammer head and slide the hammer head into the desired position. Securely tighten the screw afterwards. { Bells: The same procedure as for gong rods is applicable. The best bell sound is achieved when a hammerhead hits the edge of the bell Clock will not run or stops Although it is not recommended that you repair your own clock, you should check the following items before contacting your dealer. In any case do not attempt any adjustment not described in this manual or you do not feel confident in making. { Has all the packing material been removed from the movement? { Did you try re-starting your clock (pendulum, only)? { Are all springs wound sufficiently? { Is the clock standing level and secure? { Do all the hands operate without interference? { Did you check the suspension spring (pendulum, only)?
13 13 { Is the verge pin properly located in the upper slot of the pendulum guide (pendulum, only)? { If applicable, is the plastic cover of the escapement attached correctly? 12. Repair and service Before pursuing service, ensure that all instructions provided with your clock have been carefully followed. These instructions will provide detailed information to answer most questions. Procedures to obtain repair and/or service In the unlikely event that your clock appears to be malfunctioning or requires repair, please call the dealer you originally purchased your clock from or contact the service department. Most problems can be quickly resolved without returning the clock for service. Have a copy of the original bill of sale or other proof of purchase, the product identification of page 53 and a brief description of the problem available. Return authorization is required from Customer Service prior to the return of any product or component. Your clock will not be accepted otherwise. Warranty exemptions You will be charged for repair services if a bill of sale or other proof of purchase date is not provided, if instructions were not followed, if the product is beyond the warranty period or is otherwise outside the scope of the warranty. In addition the following minor adjustments and service and/or parts to perform these adjustments are not covered under this warranty and are at the consumer's expense. { Set-up of the clock Usually sufficient set-up instructions are provided in this manual. { Mechanical movement oiling and cleaning The movement in your clock is a mechanical mechanism and requires periodic oiling and cleaning depending on environmental conditions (see section 9). Please contact an authorized dealer for this service. { Setting running speed (timekeeping) and time Usually sufficient instructions for these adjustments are provided in this manual. { Freight damage It is the responsibility of the consignee to advise the carrier of any freight loss or damage, directly. If the carton indicates signs of "visible damage", instruct the driver to note the damage on the freight bill. If the carton contains "concealed damage", notify the carrier and request in writing within 6 calendar days of product receipt a carrier inspection and damage report. Failure to notify the carrier within 6 calendar days of product receipt may waive your rights to a damage claim.


14 53


15 54


16 F.lli Consonni 55 Sospensione Cicloide Bild 8 / Picture 8 / Figure 8 / Ilustración 8 Einstellen des Echappements Adjusting the escapement Réglage de l échappement Ajustar el escape


")


17 56 Via 4 Novembre, Lazzate MB (Monza e Brianza) Italy Tel Fax info@flli-consonni.it
River City Cuckoo Clocks, L.L.C.
 River City Cuckoo Clocks, L.L.C. Clock Care and Setup Instructions Congratulations on purchasing a River City Cuckoo Clock! We are confident that this original Black Forest Cuckoo Clock will add character
PARTS LIST / TECHNICAL GUIDE
 PARTS LIST / TECHNICAL GUIDE Automatic [SPECIFICATIONS] Item Cal. No. 6R20/6R21 6R20 6R21 3 hands (hour, minute and second hands) Date/Day indication Power reserve indicator Driving system Time indication
Since Mechanical Clocks Barometers. Owner s Manual
 Since 1897 Mechanical Clocks Barometers Owner s Manual Congratulations You are the proud owner of an exquisite work of art, crafted by the elite master clockmakers of Chelsea Clock. For over a century,
Automatic Level Maintenance Manual SAL-XX W/ AIR DAMPENED COMPENSATOR
 Automatic Level Maintenance Manual SAL-XX W/ AIR DAMPENED COMPENSATOR CST/Berger 2001 SAL 20/24/28/32 PAGE 1 REV. C 071803 Automatic Level Maintenance Manual User Calibration and Testing... 3 Circular
BISHOP S CASTLE TOWN COUNCIL HEALTH AND SAFETY POLICY FOR CLOCK WINDING. Introduction
 BISHOP S CASTLE TOWN COUNCIL HEALTH AND SAFETY POLICY FOR CLOCK WINDING Introduction Local Councils are, like all other employers, under a duty of care to ensure so far as reasonably practicable, the health,
B Left-hand case side (x1) F
 F") MD693/ HD-1688 WOODEN RADIO-CONTROLLED GRANDFATHER CLOCK WITH WESTMINSTER CHIMES INSTRUCTIONS PLEASE READ ALL THE INSTRUCTIONS CAREFULLY BEFORE YOU SET YOUR CLOCK GOING AND ENSURE YOU KEEP HOLD OF THESE
MD693/ HD-1688 WOODEN RADIO-CONTROLLED GRANDFATHER CLOCK WITH WESTMINSTER CHIMES INSTRUCTIONS PLEASE READ ALL THE INSTRUCTIONS CAREFULLY BEFORE YOU SET YOUR CLOCK GOING AND ENSURE YOU KEEP HOLD OF THESE
Hey, that wasn t so hard. INSTRUCTION MANUAL AND WARRANTY
 Hey, that wasn t so hard. INSTRUCTION MANUAL AND WARRANTY THANK YOU FOR CHOOSING AN INVICTA TIMEPIECE Long ago, we set out to continue Invicta s original 1837 mission to offer magnificent Swiss timepieces
2013 Antiquarian Horological Society. Reproduction prohibited without permission.
 2013 Antiquarian Horological Society. Reproduction prohibited without permission. ANTIQUARIAN HOROLOGY Picture Gallery 30-hour iron wall clock dated 1748 The painted dial with the minute hand shorter than
u s e r m a n u a l w w w. v e l a. E U
 u s e r m a n u a l 100 w w w. v e l a. E U content 1.0. introduction...................................................... 3 1.1. safety.............................................................. 3
Issue date: 30. Apr TECHNICAL GUIDE PARTS CATALOGUE. Cal.NH25/26 AUTOMATIC MECHANICAL. SII Products
 Issue date: 30. Apr. 2008 TECHNICAL GUIDE & PARTS CATALOGUE AUTOMATIC MECHANICAL [SPECIFICATION] Item PARTS CATALOGUE / TECHNICAL GUIDE Cal. No. NH25 NH26 Movement Movement size Time indication Basic function
BULOVA MODELS. Selfwinding and. Watches. Specifications 12EBA 12 EBAD 12 ECAD 12 EBACD 12 ECACD. . i -... ~.~.. '. Movement: Self-winding mechanism
 DIAL SIDE TRAIN SIDE BULOVA MODELS Scale 1:1 12EBA 12 EBAD 12 ECAD Selfwinding and Selfwinding Watches 12 EBAC 12 EBACD 12 ECACD Date Specifications Movement: Self-winding mechanism 12'12'" lever escapement.
product manual H-3220A Benkelman Beam
 05.12 product manual H-3220A Benkelman Beam General The H-3220A Benkelman Beam Apparatus is a convenient and accurate device used for measuring the deflection of flexible pavements under moving wheel
MASTER CLOCKS 2407MLN1
 [The following undated document was probably used by IBM instructors in training International Time Recording Company customer engineers, sales representatives and other employees in the principles, operation
C4 PLUS RIFLESCOPES User Guide
 C4 Plus USER GUIDE_Layout 1 7/24/15 2:40 PM Page 1 C4 PLUS RIFLESCOPES User Guide This user guide includes information for the entire C4 Plus riflescope line. Please review thoroughly and pay close attention
VELA Tango 100. VELA Tango 100A. VELA Tango 200 GAS
 UK VELA Tango 100 VELA Tango 100A VELA Tango 200 U S E R G U I D E V E L A T A N G O 1 0 0 / 1 0 0 F B / 1 0 0 A / 2 0 0 GAS CONTENT 1.0. INTRODUCTION... 3 1.1. SAFETY... 3 1.2. WARRENTY... 4 1.3. UNPACKING
INSTALLATION INSTRUCTIONS ATV Plow Blade Part Number: (50 ), (54 ), or (60 ) Application: All Terrain Vehicles
, (54 ), or (60 ) Application: All Terrain Vehicles") INSTALLATION INSTRUCTIONS ATV Plow Blade Part Number: 78950 (50 ), 78954 (54 ), or 78960 (60 ) Application: All Terrain Vehicles Your safety, and the safety of others, is very important. To help you make
INSTALLATION INSTRUCTIONS ATV Plow Blade Part Number: 78950 (50 ), 78954 (54 ), or 78960 (60 ) Application: All Terrain Vehicles Your safety, and the safety of others, is very important. To help you make
 www.vostok-europe.com CONTENTS OF THE BOOKLET I USER'S MANUAL FOR ALL TYPES OF MECHANICAL WATCHES... 03 II WATER RESISTANCE... 06 III WATCHES WITH 2432 MOVEMENT... 08 IV WATCHES WITH 2426 MOVEMENT... 14
Double-foliot Japanese Clock
 How to Assemble and Use the Supplement Double-foliot Japanese Parts in the Kit Assembly time: Approx. 1 hour and 30 minutes Second for speed adjustment hand receiver Front plate Pillar for the foliots
LEAPERS, INC. RED/GREEN DOTS
 LEAPERS, INC. 1 RED/GREEN DOTS range estimating scopes UTG reticle intensified scopes TOTAL SOLUTION TO YOUR NEEDS -COMMITMENT TO BEST QUALITY, BEST VALUE AND BEST SERVICEwww.LEAPERS.com 32700 Capitol
Service Information Letter SIL # 017
 Service Information Letter SIL # 017 Trunnion Adjustment - Double Barrels Only Equipment: Double Barrels With Sloped Trunnions Date Issued: 9-24-03 Additional Reference: SIL # 016 Revised: Revision #:
CBRD30CP3 & BOWRD30CP INSTRUCTION MANUAL
 CBRD30CP3 & BOWRD30CP INSTRUCTION MANUAL PROLOGUE Your BSA Illuminated sight is for use on both compound and standard bows. Each version of the BSA illuminated sight has a specific reticle to help maintain
Owner's Manual NSL100B BUILDERS LEVEL NSL500B TRANSIT LEVEL
 Owner's Manual NSL100B BUILDERS LEVEL NSL500B TRANSIT LEVEL 1 1. CONTENTS 2. Nomenclature page 3 3. Care and Maintenance page 4 4. Using your Instrument 4.1 Setting up your Instrument page 5 4.2 Stadia
Reference Caliber R TO 27 PS QI
 Reference 5207 Caliber R TO 27 PS QI Wristwatch with minute repeater. Tourbillon. Instantaneous perpetual calendar with aperture displays. Manually wound. White gold. With an extraordinarily large number
PARTS CATALOGUE / TECHNICAL GUIDE Cal. 4F32A, 8F32A Cal. 8F33A, 8F35A
 PARTS CATALOGUE / TECHNICAL GUIDE Cal. 4F32A, 8F32A Cal. 8F33A, 8F35A PARTS CA TALOGUE / TECHNICAL GUIDE (p. 1 22) CATÁLOGO DE PARTES / GUÍA TÉCNICA (p. 23 44) [SPECIFICATIONS] (Revised: 2008 Apr.) Item
Instruction Manual. Kite-22 Camera Crane Starter Package (KITE-22-STARTER) Exclusive of Weights
 Exclusive of Weights") Instruction Manual Kite-22 Camera Crane Starter Package (KITE-22-STARTER) Exclusive of Weights All rights reserved No part of this document may be reproduced, stored in a retrieval system, or transmitted
Instruction Manual Kite-22 Camera Crane Starter Package (KITE-22-STARTER) Exclusive of Weights All rights reserved No part of this document may be reproduced, stored in a retrieval system, or transmitted
DOWNLOAD. Experience the magic of Customer Service and download the Zenith Watches - The Experience app!
 DOWNLOAD Experience the magic of Customer Service and download the Zenith Watches - The Experience app! EL PRIMERO > ZENITH THE PIONEER SPIRIT SINCE 1865 > 1. THE EL PRIMERO MOVEMENT > 2. WINDING YOUR
Snow Blade Operator s/assembly Instructions
 Snow Blade Operator s/assembly Instructions TABLE OF CONTENTS Safety Messages...3 Introduction...4 Preparing for Snow Removal...4 Operating Procedure...5 Operating Controls...5 Tire Chains and Wheel Weights...5
LAW WOODEN CLOCK 5 SHT 1 OF 9 SHTS. General Assembly 1 NTS FEB Designed by: BRLAW
 2 43 31 42 4 32 39 14 29 21 2 21 22 40 23 22 20 18 1 17 1 4 8 7 9 15 20 29 40 ITEM NO. QTY. PART NO. 1 1 back 2 1 front 4 1 Pendulum hanger 4 Dial spacer 7 1 Pendulum head 8 1 Pendulum pivot 9 1 Pendulum
Directions for use
 Directions for use 40070 40080 60050 70060 70076 80060 90060 900114 Fig. 1 Fig. 1A Fig. 2 Fig. 3 Fig. 4 Fig. 5 Fig. 6 Fig. 7 english ENGLISH DIRECTIONS FOR USE 1 Tripod Leg 2 Tripod Leg Adjusting Screw
Operating manual for Air Commando automatic watch/ Calibers , , , 2892A2
 Operating manual for Air Commando automatic watch/ Calibers 2893-2, 2836-2, 2824-2, 2892A2 Crown (A) screwed down tightly Crown (A) pulled one click out Crown (A) pulled two clicks out Position 1 Position
Dial removed for clarity
 8 7 4 1 18 19 15 1 9 24 21 24 29 17 14 20 21 29 23 22 3 40 22 25 2 44 41 39 2 32 12 33 13 12 31 43 42 ITEM QTY PART NO. DESCRIPTION 1 1 Back 2 1 Front 3 3 Spacer top 4 1 Pendulum hanger 5 1 Clock dial
Restoration of Bulle Clock Serial Number 24834
 Page 1 20/10/2012 Restored Bulle 24834 Restoration of Bulle Clock Serial Number 24834 Page 2 20/10/2012 Restored Bulle 24834 Photos by kind permission of the owner. The clock as delivered. A tall movement
Reference 5204/1. Caliber CHR PS Q
 Reference 5204/1 Caliber CHR 29-535 PS Q Split-seconds chronograph with perpetual calendar. The Reference 5204/1 Grand Complication wristwatch is the first Patek Philippe split-seconds chronograph with
COMMODORE BRASS TELESCOPE ZHUMELL COMMODORE BRASS TELESCOPE
 3 0 15 15 E OWNER S MANUAL COMMODORE BRASS TELESCOPE ZHUMELL COMMODORE BRASS TELESCOPE 5 W 60 W 30 W 45 W Zhumell customers know that there are plenty of ways to experience the world. They also understand
1 YEAR LIMITED WARRANTY TELESCOPES
 1 YEAR LIMITED WARRANTY TELESCOPES BARSKA Optics, as manufacturer, warrants this new precision optical product to be free of original defects in materials and/or workmanship for the length of time specified
22X Builder s Transit Level Model No Instruction Manual
 2595H 7/29/09 10:15 AM Page 1 22X Builder s Transit Level Model No. 40-6910 Instruction Manual Congratulations on your choice of this 22X Builder s Transit Level. We suggest you read this instruction manual
Installation instructions, accessories. Snow chains
 Instruction No 30664147 Version 1.0 Part. No. Snow chains R7700468 страница 1 / 15 Equipment A0000162 R7700458 страница 2 / 15 R7700448 страница 3 / 15 INTRODUCTION Read through all of the instructions
INSTALLING TRAK SPORT TIRE CHAINS ON 20 MODEL 3 TIRES
 INSTALLING TRAK SPORT TIRE CHAINS ON 20 MODEL 3 TIRES 2018 TESLA, INC. All rights reserved. All information in this document and all MODEL 3 software is subject to copyright and other intellectual property
Sitting height... 6 Back tilt and back height... 6 Armrest... 7 Brakes... 7 Charging VELA Tango 300E... 7
 U K u s e r m a n u a l w w w. v e l a. E U contents 1.0. introduction...................................................... 3 1.1. guarantee......................................................... 4
A.R.M. 52 PLOW With QUICK ATTACH MOUNTING SYSTEM MODEL NUMBER BLACK MODEL NUMBER GRAY. Owner s Manual
 70 8TH AVE W PO BOX 7 SPENCER, IA 0 PHONE: 7-6-9 FAX: 7-6-08 SERVICE: 800-8- E-MAIL: ccac@cyclecountry.com www.cyclecountry.com A.R.M. PLOW With QUICK ATTACH MOUNTING SYSTEM MODEL NUMBER 0-00 BLACK MODEL
OPERATING INSTRUCTIONS
 OPERATING and CHANGING Instructions For Models: 8550, 8555, 8560, 8565 READ THESE INSTRUCTIONS THOROUGHLY BEFORE OPERATING THE LOCK OR ATTEMPTING TO CHANGE THE COMBINATION Note: To assure proper operation,
Sensor Accessories. Rotary Motion Accessory Pack. Pendulum Rod with two masses, Angular Momentum disc set and Linear Rack with mini c-clamp
 Sensor Accessories Rotary Motion Accessory Pack (Product No 3288) Pendulum Rod with two masses, Angular Momentum disc set and Linear Rack with mini c-clamp DATA HARVEST Data Harvest Group Ltd 1 Eden Court,
Coma Correction. Diagram. Introduction
 Starlight Instruments, LLC 2380 E. Cardinal Drive, Columbia City, Indiana 46725 USA t: 260.244.0020 f.260.244.3077 e: sales@starlightinstruments.com web: starlightinstruments.com Introduction Thank you
Dual Red or Green Electronic Dot Sight Instruction Manual
 Dual Red or Green Electronic Dot Sight Instruction Manual 2007 VisionPlus INTRODUCTION: Congratulations on your purchase of a VisionPlus Dual Red/Green Electronic Dot Sight. This is a quality product engineered
C A S S I N I. MODEL : C EQ3 900mm X 135mm COSMO BRANDS INC.
 C A S S I N I MODEL : C-900135EQ3 900mm X 135mm COSMO BRANDS INC. WWW.COSMOSOPTICS.COM 2 C A S S I N I C-900135EQ3 TELESCOPE OPERATING INSTRUCTIONS INTRODUCTION CONGRATULATIONS ON YOUR PURCHASE OF THE
MODEL H3022 MAGNETIC BASE / DIAL INDICATOR / CALIPER COMBO OWNER'S MANUAL
 MODEL H322 MAGNETIC BASE / DIAL INDICATOR / CALIPER COMBO OWNER'S MANUAL COPYRIGHT DECEMBER, 5 BY GRIZZLY INDUSTRIAL, INC. REVISED DECEMBER, 17 (HE) WARNING: NO PORTION OF THIS MANUAL MAY BE REPRODUCED
Restoration of an English Eight-day longcase clock by Charles Robotham, Leicester. Circa 1790
 Restoration of an English Eight-day longcase clock by Charles Robotham, Leicester Circa 1790 Background This Report has been produced in order to summarise the work undertaken on the restoration of an
Ballistic pendulum Operating Instructions Fig. 1: Ballistic pendulum SAFETY PRECAUTIONS
 R Ballistic pendulum 11229.00 PHYWE Systeme GmbH & Co. KG Robert-Bosch-Breite 10 D-37079 Göttingen 6 3.8 3.7 3.6 3.5 Phone +49 (0) 551 604-0 Fax +49 (0) 551 604-107 E-mail info@phywe.de Internet www.phywe.de
Owner's Manual. for AUTOMATIC LEVEL. NBL Series. FOR CUSTOMER SERVICE, PARTS & REPAIR, CALL Toll Free:
 Owner's Manual for AUTOMATIC LEVEL NBL Series FOR CUSTOMER SERVICE, PARTS & REPAIR, CALL Toll Free: 1-888-247-1960 1 1. CONTENTS 2. Nomenclature page 3 3. Care and Maintenance page 4 4. Using your Instrument
C A S S I N I TRACKER
 C A S S I N I TRACKER ASTRONOMICAL REFLECTOR T ELESCOPE SERIES #C-80080TR #C-1100102TR #C-1000120TR #C-1000120TREF #C-900135TR COSMO BRANDS INC. WWW.COSMOSOPTICS.COM 2 CASSINI REFLECTING TELESCOPE OPERATING
product manual H-4204 Proving Ring Penetrometer
 05.09 product manual H-4204 Proving Ring Penetrometer nnmm Handle Proving Ring Extension Rod Coupler Penetration Rod Cone Figure #1 General Information The Proving Ring Penetrometer is a cone type of penetrometer
RP-200 TELESCOPE Instruction Manual
 2070 5th Avenue Ronkonkoma, NY 11779 Phone: 631-963-5000 Fax: 631-427-6749 For information, call toll-free: 1-800-967-8427 info@carson.com / sales@carson.com / www.carson.com RP-200 TELESCOPE Instruction
Flexbar 6.3:1 MANUAL ZOOM STEREO MICROSCOPE. 250 Gibbs Road, Islandia, NY (P) (F)
 (F)") Flexbar 6.3:1 ZOOM STEREO MICROSCOPE MANUAL 250 Gibbs Road, Islandia, NY 11749 631-582-8440 (P) 631-582-8487 (F) www.flexbar.com sales@flexbar.com CONTENTS SAFETY NOTES... 3 CARE AND MAINTENANCE... 3 INTRODUCTION...
Flexbar 6.3:1 ZOOM STEREO MICROSCOPE MANUAL 250 Gibbs Road, Islandia, NY 11749 631-582-8440 (P) 631-582-8487 (F) www.flexbar.com sales@flexbar.com CONTENTS SAFETY NOTES... 3 CARE AND MAINTENANCE... 3 INTRODUCTION...
RT-6 Riflescopes. User Guide
 RT-6 Riflescopes User Guide This user guide includes information for low-magnification RT-6 riflescopes. Please review thoroughly, and pay close attention to the details pertaining to your specific riflescope
NcSTAR SHOOTER II SERIES SCOPE
 NcSTAR SHOOTER II SERIES SCOPE Congratulations on the purchase of your New NcSTAR Shooter II Series Scope! The Shooter II Series of scopes gives you many great options, so you can choose the scope that
iweathar EDGE V Installation Guide Copyright 2012 iweathar. All rights reserved.
 iweathar EDGE V Installation Guide Copyright 2012 iweathar. All rights reserved. Table of contents: 1 Introduction...3 2 Station Components...4 3 STATION INSTALLATION PROCEDURE...5 4 Specifications...11
Electron Microscopy Sciences INSTRUCTION MANUAL. Stereo Microscopes Non-illuminated Stands
 Electron Microscopy Sciences 1 INSTRUCTION MANUAL Stereo Microscopes Non-illuminated Stands Model GL7-207: Binocular, 6.5:1 Zoom Ratio 10X to 65X, smooth ball bearing construction and Model GL7-307: Trinocular,
saxon Instruction Manual saxon Grandeur Brass Telescope High quality optics
 saxon High quality optics Instruction Manual saxon Grandeur Brass Telescope WARNING! Do not use the telescope to look at the sun without an appropriate solar filter. Looking at or near the sun can result
INSTALLATION INSTRUCTIONS PLOW MOUNT KIT Part Number: Application: Honda Foreman 500
 WARN INDUSTRIES, INC. 12900 S.E. Capps Road, Clackamas, OR USA 97015-8903, 1-503-722-1200, FAX: 1-503-722-3000 Customer Service: 1-800-543-9276 Dealer Locator Service: 1-800-910-1122 International Sales/Customer
ER2 Short-head Electric Chain Hoist
 O/M NO.SHER2-0903-CE-00 ER2 Short-head Electric Chain Hoist (250kg to 5t) Operation Manual (SHER2M/SHER2SG/SHER2SP) Introduction The KITO Short-head Electric Chain Hoist is intended for effective use in
A.R.M. 52 POLY PLOW BLACK With QUICK ATTACH MOUNTING SYSTEM MODEL NUMBER Owner s Manual
 70 38TH AVE W PO BOX 57 SPENCER, IA 530 PHONE: 7-6-49 FAX: 7-6-048 SERVICE: 800-84- E-MAIL: ccac@cyclecountry.com www.cyclecountry.com A.R.M. 5 POLY PLOW BLACK With QUICK ATTACH MOUNTING SYSTEM MODEL NUMBER
National Optical & Scientific Instrument Inc Tri-County Parkway Schertz, Texas Phone (210) Fax (210)
 Fax (210)") National Optical & Scientific Instrument Inc. 6508 Tri-County Parkway Schertz, Texas 78154 Phone (210) 590-9010 Fax (210) 590-1104 INSTRUCTIONS FOR SHOP MICROSCOPES MODEL NUMBERS 186 187 188 189 National
National Optical & Scientific Instrument Inc. 6508 Tri-County Parkway Schertz, Texas 78154 Phone (210) 590-9010 Fax (210) 590-1104 INSTRUCTIONS FOR SHOP MICROSCOPES MODEL NUMBERS 186 187 188 189 National
HT600 Dat e Code: 2 - HT MW Purchase Date: PLEASE RETAIN THIS INSTRUCTION MANUAL FOR FUTURE REFERENCE. All Rights Reserved
 We strive to ensure that our products are of the highest quality and free of manufacturing defects or missing parts. However, if you have any problems with your new product, D O NOT RETURN IT TO THE STORE,
Technical Guide TG-19-C-001-E D. Produced by: rendav Date: Modifications: See last page CALIBRE 2500
 Technical Guide TG-19-C-001-E D Produced by: rendav Date: 04.06.2009 3 Modifications: See last page CALIBRE 2500 Version A Version B Version C 111/2 Ø 25,60 mm 1 2 3 Height on movement Power reserve Number
4-14X44 FRONT FOCAL PLANE SCOPE WITH ARC-2 MOA RETICLE
 4-14X44 FRONT FOCAL PLANE SCOPE WITH ARC-2 MOA RETICLE MPN: PA4-14XFFP-ARC2-MOA UPC: 8 18500 01279 5 INTRODUCING THE 4-14X44 FFP ARC-2 MOA The 4-14x44 Front Focal Plane scope is a proven tough rifle optic
Operating Instructions Validation Tool Kit, KT2 For use with USP Apparatus #1 & #2
 Operating Instructions Validation Tool Kit, KT2 For use with USP Apparatus #1 & #2 P/N VALTOL-KT2 Revision 2.0 October 7, 2014 Prepared by: Quality Lab Accessories, LLC 100 Emlen Way, Suite 108 Telford,
AM 500A 500 WATT AM 1A 1 KILOWATT AM BROADCAST TRANSMITTERS. October, 1999 IM No
 AM 500A 500 WATT AM 1A 1 KILOWATT AM BROADCAST TRANSMITTERS October, 1999 IM No. 597 1112 EQUIPMENT LOST OR DAMAGED IN TRANSIT. When delivering the equipment to you, the truck driver or carrier s agent
DOWNLOAD. Experience the magic of Customer Service and download the Zenith Watches - The Experience app!
 DOWNLOAD Experience the magic of Customer Service and download the Zenith Watches - The Experience app! ELITE > ZENITH THE PIONEER SPIRIT SINCE 1865 > 1. ELITE MOVEMENT > 2. WINDING THE WATCH > 3. SETTING
Quick Reference. Daily Cleaning Procedures Pages 3-8 Stopping Conditions & Recovery Steps Pages 9-20
 Quick Reference for Daily Cleaning Procedures Pages 3-8 Stopping Conditions & Recovery Steps Pages 9-20 852 Feehanville Drive Mt. Prospect, IL 60056 Telephone: (847) 299-9550 Fax: (847) 759-3091 2009 CUMMINS-ALLISON
Customer s Operations Manual for the LeCoultre Atmos Clock
 Last updated January 02, 2018. Customer s Operations Manual for the LeCoultre Atmos Clock Copyright 1995-2018 by Michael P. Murray & Mike s Clock Clinic 1 The Atmos clock, I just serviced, is a delicate
HEAVY DUTY SWING-OUT VALVE
 ISO 900 REGISTERED COMPANY Akron Brass Company. 20 All rights reserved. No portion of this can be reproduced without the express written consent of Akron Brass Company. We will not be responsible for:
The Vortex Razor HD Gen II-E 1 6x24 Riflescope
 The Vortex Razor HD Gen II-E 1 6x24 Riflescope At Vortex Optics, the need for high-performance, precision optics is the driving force behind all that we do. We carefully built the Razor HD Gen II-E riflescope
USER MANUAL REFLEX SIGHT. Ultra Shot Plus
 USER MANUAL REFLEX SIGHT Ultra Shot Plus ABOUT SIGHTMARK Sightmark offers a wide range of products that include red dot scopes, reflex sights, rangefinders, riflescopes, laser sights, night vision and
Barograph 1.080x
 THE WORLD OF WEATHER DATA - THE WORLD OF WEATHER DATA - THE WORLD OF WEATHER DATA Instruction for Use 020900/02/98 Barograph 1.080x.10.000 ADOLF THIES GmbH & Co. KG Hauptstraße 76 37083 Göttingen Germany
x Builders Level Service Manual
 40-690 22x Builders Level Service Manual Item Description Pages.0 Overall Instrument Assembly 2. Main Assembly 2.2 Telescope Assembly 3.3 Base Assembly 4.4 Frame Assembly 5 2.0 Calibration 6-8 2. Vial
FOR CAN-AM ATV s P/N ASSEMBLY / OWNERS MANUAL
 MID-MOUNT KIT FOR CAN-AM ATV s P/N 15-7580 ASSEMBLY / OWNERS MANUAL Application PLOW PUSH FRAME NO. 15-0070, 33-0000 or 33-0070 Before you begin, please read these instructions and check to be sure all
ASTRO-PHYSICS, INC. POLAR ALIGNMENT TELESCOPE (PASILL2)
") OBJECTIVE LENS ASTRO-PHYSICS, INC. POLAR ALIGNMENT TELESCOPE (PASILL2) This model shipped from January 2001 through July 2002. It fits all 400, 600, 600E, 800, 900 and 1200 models (except the original
OBJECTIVE LENS ASTRO-PHYSICS, INC. POLAR ALIGNMENT TELESCOPE (PASILL2) This model shipped from January 2001 through July 2002. It fits all 400, 600, 600E, 800, 900 and 1200 models (except the original
FIELD GUIDE FOR HORUS SCOPES
 www.horusvision.com TM FIELD GUIDE FOR HORUS SCOPES Your Horus scope combines fine-quality optics, combat-proven hardware and the patented Horus reticle to deliver speed and accuracy for all shooters.
Richter Optica. Instructions for Model: S850 Stereo Zoom Microscope
 Richter Optica info@richter-optica.com Instructions for Model: S850 Stereo Zoom Microscope Microscope Head Focus Knob Stage Clips Zoom Knob C-Mount Adapter Eyepiece Focusing Holder Focusing Holder Set
HEAVY DUTY SWING-OUT VALVE
 ISO 900 REGISTERED COMPANY HEAVY DUTY SWING-OUT VALVE 52 53 23 5 2 2 3 28 39 NOT USED WITH SZ HANDLE 2 NOT USED WITH SZ HANDLE 5 2 3 7 9 9 Premier Farnell Corporation. 20 All rights reserved. No portion
Kalinka Optics Warehouse User Manual Kobra AK Side Mount Red Dot Sight Manual
 Kalinka Optics Warehouse User Manual www.kalinkaoptics.com Kobra AK Side Mount Red Dot Sight Manual CONTENTS 1. Introduction... 4 2. Purpose... 4 3. Specifications... 4 4. Components and Equipment Provided...
PLOW MOUNT KIT FOR POLARIS RANGER P/N ASSEMBLY / OWNERS MANUAL
 PLOW MOUNT KIT FOR POLARIS RANGER P/N 34-3010 ASSEMBLY / OWNERS MANUAL Application PLOW PUSH FRAME NO. 34-0000 or 34-0070 Before you begin, please read these instructions and check to be sure all parts
EPOCSELFIR LACITCATiX5T TECHNICAL MANUAL
 T5Xi TACTICAL RIFLESCOPE TECHNICAL MANUAL TABLE OF CONTENTS Page Mounting The Scope...2 Eyepiece Focusing...2 Windge / Elevation Adjustment...3 Setting The Zero Stop...4 Turret Cap Replacement...4 Parallax
Z650HR SERIES MANUAL ZOOM STEREO MICROSCOPE. 73 Mall Drive, Commack, NY (P) (F)
 (F)") Z650HR SERIES ZOOM STEREO MICROSCOPE MANUAL 73 Mall Drive, Commack, NY 11725 631-543-2000 (P) 631-589-6975 (F) www.unitronusa.com info@unitronusa.com CONTENTS SAFETY NOTES... 3 CARE AND MAINTENANCE...
Z650HR SERIES ZOOM STEREO MICROSCOPE MANUAL 73 Mall Drive, Commack, NY 11725 631-543-2000 (P) 631-589-6975 (F) www.unitronusa.com info@unitronusa.com CONTENTS SAFETY NOTES... 3 CARE AND MAINTENANCE...
Important Instructions
 Important Instructions Subject Use With Cabinet Hardmount Trunnion Replacement Cabinet Hardmount 8-60 Pound Washer-Extractors and Kits F77000, F7700, F7700, F7700, F7700, F7700, F9P and F9P WARNING This
THE LOSMANDY G-11 MOUNT
 Checking the parts THE LOSMANDY G-11 MOUNT Depending on which accessories you ordered, your G-11 mount was shipped in four or more boxes. The contents of each box are as follows: Equatorial Mount Adjustable
ULTRA SHOT PLUS - DARK EARTH REFLEX SIGHT SM26008DE
 USER MANUAL ULTRA SHOT PLUS - DARK EARTH REFLEX SIGHT SM26008DE ABOUT SIGHTMARK Sightmark offers a wide range of products that include red-dot sights, reflex sights, riflescopes, laser sights, night vision,
Melton Series. Owners Manual. Lab Centrifuge. Model # s A C, A C, B C, B C, C C, C C, D C, D C
 Melton Series Owners Manual Lab Centrifuge Model # s A-4-115-C, A-4-220-C, B-4-115-C, B-4-220-C, C-4-115-C, C-4-220-C, D-4-115-C, D-4-220-C Serial Numbers 85500 & Above NOTICE Wire this centrifuge according
CASSINI CQR-120 OPERATING INSTRUCTIONS
 CASSINI CQR-120 OPERATING INSTRUCTIONS INTRODUCTION CONGRATULATIONS ON YOUR PURCHASE OF THE CASSINI CQR-120 TELESCOPE. THIS TELESCOPE HAS BEEN PRODUCED TO PRECISE SPECIFICATIONS. PRIOR TO USING YOUR NEW
ASTRO-PHYSICS, INC. POLAR ALIGNMENT TELESCOPE
 Polar Alignment Telescope ASTRO-PHYSICS, INC. POLAR ALIGNMENT TELESCOPE This polar axis telescope will help you align your mount with the Celestial Poles. When your mount is properly aligned, your telescope's
/2" Heavy Duty Swing-Out
 Premier Farnell Corporation. 0 All rights reserved. No portion of this can be reproduced without the express written consent of Premier Farnell Corporation. ISO 900 REGISTERED COMPANY We will not be responsible
WS-7047TWC Wireless 433 MHz Weather Station With Rainfall and Temperature. Instruction Manual
 WS-7047TWC Wireless 433 MHz Weather Station With Rainfall and Temperature Instruction Manual TABLE OF CONTENTS Topic Page Inventory of Contents 2 Additional Equipment 2 Quick Setup 3 Detailed Setup Guide
1 11 A3. Designed by: Brian law All dimensions in mm and (inchs) 3rd Angle projection. Not to Scale Unless otherwise stated
 3rd Angle projection. Not to Scale Unless otherwise stated") B 2 11 12 37 17 6 2 44 36 43 1 20 3 35 7 18 22 18 16 30 3 6 5 2 18 41 19 26 25 27 42 17 SECTION B-B SCALE 1 : 2 24 21 31 29 1 23 4 9 14 10 11 33 15 37 40 38 32 39 45 28 ITEM NO. PART NUMBER DESCRIPTION
B 2 11 12 37 17 6 2 44 36 43 1 20 3 35 7 18 22 18 16 30 3 6 5 2 18 41 19 26 25 27 42 17 SECTION B-B SCALE 1 : 2 24 21 31 29 1 23 4 9 14 10 11 33 15 37 40 38 32 39 45 28 ITEM NO. PART NUMBER DESCRIPTION
Restoration of Eureka Clock Serial Number 4793
 Page 1 Restored Eureka 4793 Restoration of Eureka Clock Serial Number 4793 Page 2 Restored Eureka 4793 Photos by kind permission of the owner. A short movement with ceramic skeletonised dial. The dial
Owners manual. Sears PLOW MODEL NO CAUTION: Read Rules for Safe Operation and Instructions Carefully
 Sears Owners manual PLOW MODEL NO. 917.253010 CAUTION: Read Rules for Safe Operation and Instructions Carefully Assembly Operating Maintenance Repair Parts SEARS, ROEBUCK AND CO. U.S.A. SIMPSONS-SEARS
NOVALYNX CORPORATION MODEL 110-WS-16BP BAROMETRIC PRESSURE SENSOR INSTRUCTION MANUAL
 NOVALYNX CORPORATION MODEL 110-WS-16BP BAROMETRIC PRESSURE SENSOR INSTRUCTION MANUAL REVISION DATE: OCT 2005 Receiving and Unpacking Carefully unpack all components and compare to the packing list. Notify
HS515G-M. PARALOW Circle Dot Sight. User's Manual. Holosun Technologies Inc. Phone: (909) Fax: (909)
 Fax: (909)") HS515G-M PARALOW Circle Dot Sight User's Manual Multi Reticle Holosun Technologies Inc. Phone: (909) 594-2888 Fax: (909) 598-4888 E-mail: info@holosun.com COLOR www.holosun.com PARALOW HS515G-M PARALOW
HS515G-M PARALOW Circle Dot Sight User's Manual Multi Reticle Holosun Technologies Inc. Phone: (909) 594-2888 Fax: (909) 598-4888 E-mail: info@holosun.com COLOR www.holosun.com PARALOW HS515G-M PARALOW
22X Builder s Level Model No Instruction Manual
 2594H 7/29/09 10:12 AM Page 1 22X Builder s Level Model No. 40-6900 Instruction Manual Congratulations on your choice of this 22X Builder s Level. We suggest you read this instruction manual thoroughly
CAUTION: BEFORE YOU BEGIN, ALWAYS MAKE SURE THE WEAPON IS UNLOADED AND SAFE TO HANDLE.
 CAUTION: BEFORE YOU BEGIN, ALWAYS MAKE SURE THE WEAPON IS UNLOADED AND SAFE TO HANDLE. ON Press either brightness button ( + or - ) to turn on the sight. The sight is also programmed to turn on when it
Keep Your Own Weather Journal Every meteorologist needs to keep a good weather journal. Remember, good observations make good forecasts.
 Meteorologists study the weather by recording and analyzing data. You can become an amateur meteorologist by building your own weather station and keeping a record of your measurements. After a while,