Melton Series. Owners Manual. Lab Centrifuge. Model # s A C, A C, B C, B C, C C, C C, D C, D C
|
|
|
- Silvester Hodge
- 6 years ago
- Views:
Transcription


1 Melton Series Owners Manual Lab Centrifuge Model # s A C, A C, B C, B C, C C, C C, D C, D C Serial Numbers & Above
2 NOTICE Wire this centrifuge according to the electrical codes and standards conforming to Class 1, Group D, Division 2 Areas PRODUCT WARRANTY L-K Industries, Inc. warrants products manufactured by L-K Industries to be free of defective material and workmanship for one year from the date of shipment by L-K Industries. The liability of L-K Industries for defective equipment during the warranty period shall be limited to the repair of such equipment or replacement thereof without charge for parts or labor provided by L-K Industries. L-K Industries shall be so liable only if L-K Industries is contacted in regard to such defect immediately after its discovery. Buyer should return the defective product under warranty to L-K industries only after receipt of L-K Industries specific permission to do so. This warranty does not extend to any L-K Industries product which has been subject to misuse, neglect, accident, modification or improper installation, or any product which has been repaired or altered by persons not expressly approved by L-K Industries. L-K Industries will not be liable for damages, loss or expense directly or indirectly arising from the use of the products or for any liability from their use either separately or in combination with other equipment or material or for any other cause. All Rights Reserved 2014 L-K Industries, Inc.
3 L-K INDUSTRIES, INC. III Table of Contents 1 Getting Started 1 2 Installation 1 3 Maintenance 2 Trunion Arm & Cup Balance Adjusting Heat Replacement Parts & Repair Services Housekeeping Be Careful! Operation 4 5 Part No s, Assembly Drawings & Wiring Diagram Index 14
4
5 L-K INDUSTRIES, INC. 1 1 Getting Started For best results, the centrifuge should be housed in a controlled environment. Be sure to use the Shock Mounts supplied (Item 45) for vibration control. Because of varying voltage from source to source, a voltage regulator may be worth consideration. Assemble Shock Mounts (Item 45) to the centrifuge base using the 1/4-20 X 1 1/4 bolts supplied. Mount the centrifuge on a sturdy, level stand or counter top using #10 screws (4 per Shock Mount - total of 16, not supplied. Wire the centrifuge according to the electrical codes and standards conforming to Class I, Group D, Division 2 Areas. See the wiring Diagram for your particular model on page 6 & 7 of this manual. Install the Tachometer Driver (Item 40) onto the Tachometer Shaft. Note:Use the Tachometer Driver only while checking rpm s. Remove the Driver for normal operation and store in a convenient place. Drop the cushions (Item 44) into the shields (Item 43). Be sure the orientation of the cushion is correct. 2 Installation For best results, the centrifuge should be housed in a controlled environment. Be sure to use the Shock Mounts supplied (Item 45) for vibration control. Because of varying voltage from source to source, a voltage regulator may be worth consideration. Assemble Shock Mounts (Item 45) to the centrifuge base using the 1/4-20 X 1 1/4 bolts sup-
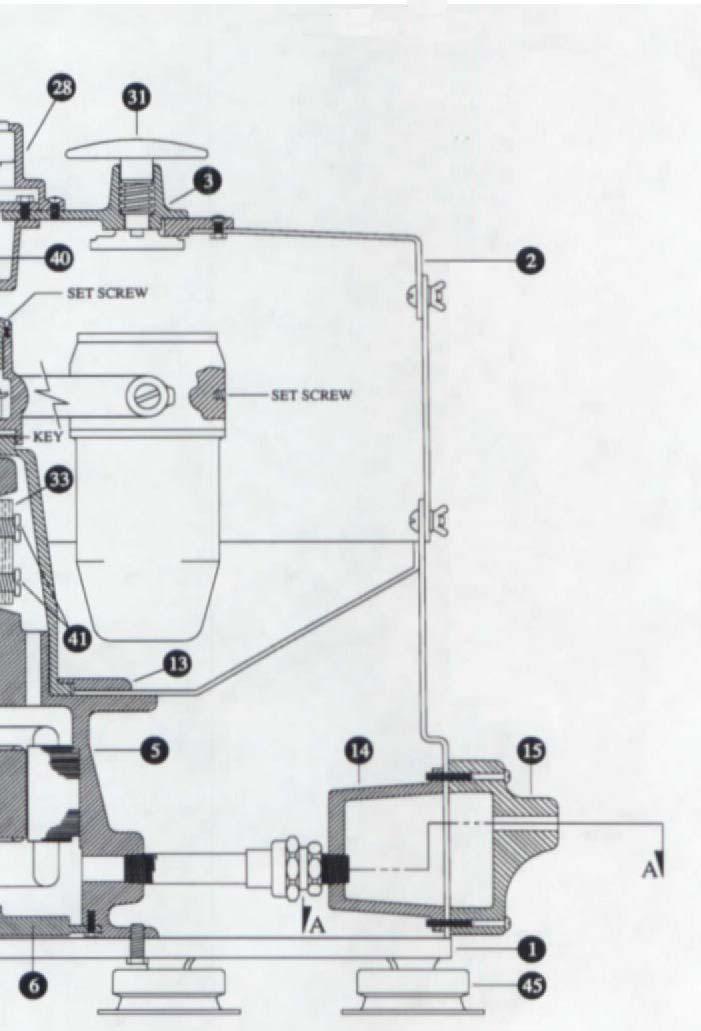
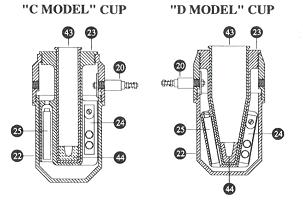
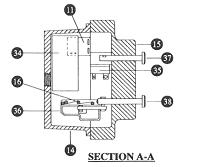
6 2 Melton Centrifuge Owners Manual plied. Mount the centrifuge on a sturdy, level stand or counter top using #10 screws (4 per Shock Mount - total of 16, not supplied. Wire the centrifuge according to the electrical codes and standards conforming to Class I, Group D, Division 2 Areas. See the wiring Diagram for your particular model on page 6 & 7 of this manual. Install the Tachometer Driver (Item 40) onto the Tachometer Shaft. Note:Use the Tachometer Driver only while checking rpm s. Remove the Driver for normal operation and store in a convenient place. Drop the cushions (Item 44) into the shields (Item 43). Be sure the orientation of the cushion is correct. 3 Maintenance Trunnion Arm & Cup Balance Your Melton Centrifuge has been carefully balanced prior to shipment. Balancing in the field is seldom required. When changing out heating elements, thermostats and other parts in the trunnion cup, note the mark on the outer cup housing and replace the housing on the same trunnion cup from which it was removed. This will maintain balance. (Use a drop of oil on the threads when replacing.) Adjusting Heat Your Melton Centrifuge comes factory pre-set at 150 degrees F. However, because voltage can vary from source to source, and normal wear from usage, adjustment may become necessary from time to time. Each cup is individually controlled and heated. TURN POWER OFF! Disconnect power to the centrifuge. To adjust the heat setting, first remove the wing nuts on the outside cover plate located just above the switches. Completely remove the cover plate. This will
7 L-K INDUSTRIES, INC. 3 open a window to the trunnion cups. Rotate the trunnion cup so the set screw of the cup is exposed through the window. See drawing on page 5. Loosen this set screw. Don t forget to note the mark on the outer cup housing prior to removal and to replace the housing on the same trunnion cup from which it was removed. Remove the outer cup housing by unscrewing the housing in a counterclockwise movement. Use an oil filter wrench if the housing cannot be removed by hand. Be careful not to indent or damage the housing. The thermostat and heating cartridge are now exposed. To increase heat, turn the a adjusting screw on the thermostat clockwise with a flat screwdriver. Turn slightly - 1/4 of a turn can increase or decrease heat by as much as 25 degrees. DO NOT turn the adjusting screw all the way in or out as this may short out the thermo-switch. Remove any tools from the centrifuge and restore power. Check temperature and repeat this procedure if necessary. With power off, replace the trunnion cup outer housing on the same trunnion cup from which it was removed. (Use a drop of oil on the threads when replacing.) Tighten the set screws on the cup. Replace the outside cover plate and wing nuts. Replacement Parts & Repair Services Replacement parts for all L-K Centrifuges are available and usually in stock. When ordering replacement parts, please have the model and serial number of your machine available. Part numbers are very helpful. Order by phone: (713) , fax: (713) , or mail: L-K Industries, PO Box , Houston, TX L-K also repairs and rebuilds all centrifuge models. For estimates and repairs, send your centrifuge to L-K Industries, 6952 Lawndale, Houston, TX with a note describing any problems. Be sure to include billing and shipping information as well as contact name and phone number. Call (713) for more information. Housekeeping Clean your unit after each test. Build-up of oil residues can cause problems with operation and efficiency of your centrifuge. Periodically, check the sample tube cushion inside the shields of the trunnion cup. Replace if worn excessively. ALWAYS check moving parts, both mechanical and electrical, for wear and stress. Replace if necessary.
8 4 Melton Centrifuge Owners Manual Be Careful! Your L-K Centrifuge was designed to optimize operator safety. Realizing the limits of any powered mechanical device and carefully following safety guidelines will help assure accident-free use. Observe and follow carefully all instructions and guidelines in this manual as well as OSHA safety standards. Be sure there are no foreign objects in the centrifuge bowl. Keep bowl lid closed while samples are spinning. NEVER try to slow the trunnion arm down with your hands or place your hands or any object inside the bowl while the trunnion arm is spinning. Allow the trunnion arm to come to a complete stop before removing your sample. Use Brake to slow trunnion arm. Turn all switches off when not in use. NEVER leave your centrifuge unattended while the samples are spinning. NEVER leave the centrifuge unattended while unit is on. Disconnect power supply before removing or replacing electrical or mechanical parts. DO NOT leave oily rags or any type of combustible material in or around your centrifuge. DO NOT allow unauthorized visitors access to your centrifuge. STAY ALERT. Watch what you are doing. Use Common Sense. Do not operate this unit when you are tired or while under the influence of medication, alcohol, or drugs. 4 Operation This Unit was designed and fabricated to work in compliance with API & ASTM standards. For op- timum results, we recommend you use L-K Sample Tubes. All L-K Sample tubes are fabricated in
9 L-K INDUSTRIES, INC. 5 compliance with API & ASTM standards. Verified and certified tubes are also available. Open the lid and place the filled tubes into the shields. (For faster performance, use a pre-heater to bring samples up to temperatu re prior to spinning.) In the bottom of the shield there is a cushion for the tube to rest on. Do not remove this cushion and be sure there is no oil residue build-up. Always check to be sure there are no foreign objects inside the bowl. Check temperature until the heat comes up to operating level. Close and latch the lid. Pull the motor switch to its on position. Follow ASTM and API guidelines. Rpm s can be checked by installing the tachometer driver prior to spinning. Keep bowl lid closed while motor is running. After the specified time period for spinning, push the motor and heat switch to the off position. Allow time for the motor to slow down before opening the lid. Use the brake to slow the trunnion arm. See drawing on page 5. DO NOT try to slow the trunnion arm down with your hands or place your hands or any object inside the bowl while the trunnion arm is spinning. Allow the trunnion arm to come to a complete stop before removing your sample. Open the lid. Remove your samples and close the lid. Keep the lid to the bowl closed at all times. This will minimize heat loss and provide greater operator safety. When the centrifuge is not in use, be sure all knobs and switches are turned off. The following pages show wiring diagrams and breakdowns for repair and assembly, including component part numbers. When ordering replacement parts, please have the model and serial number of your machine available.
10 6 Melton Centrifuge Owners Manual ITEM QTY DESCRIPTION "A Model" Part # 115 V 220 V 1 1 Base H-135 H Bowl H-136 H Cover H-137 H Cover Ring H-138 H Motor Housing H-223 H Bottom Bearing Plate H-221 H Motor Shaft with Rotor H-222-A H-222-A 8 1 Stator A-165 A Bearing 203SFF 203SF'F I I 1 Macro Start Switch J-126 J Brush Cover H-126 H Bowl Washer A-096 A Switch Box H-191 H Switch Box Cover H-192 H Resistor (p-36) J-116 J Trunnion Arm H-186 H Trunnion Cap A-102 A Trunnion Plug A-098 A Trunnion Connector Ass'y A-100-L A-100-L 22 4 Trunnion Shield A-I03 A Trunnion Cup with Ring A- 152-A A-152-A 24 4 Thermostat J-078 J Heating Element J-080 J Collector Ring A-109 A Tachometer J-071 J Tachometer Housing A-104 A Brake Handle A-105 A Brake Housing A-106 A Latch Assembly A-I08 A Hinge J-167 J Brush Holder A-264 A Capacitor J-096 J Heat Switch J-145 J Motor Switch J-146 J Heat Switch Knob A-347 A Motor Switch Knob w/link A-346 A Brake Pad J-170 J Tachometer Driver J-072 J Brushes J-152 J Bearing 205SFF 205SFF 43 4 Inner Shield J-063 J Cushion J-053 J Shock Mount J-105 J-105 MISC 1 Trunnion Arm & Cup Ass y. A-326 MISC 1 Complete Motor Assembly A-245 A-245/220 MISC 1 Lid Assembly A-244 A-244
11 L-K INDUSTRIES, INC. 7 B Model Part # C Model Part # D Model Part # 115 V 220 V 115 V 220 V 115 V 220 V H-135 H-135 H-188 H-188 H-135 H-135 H-136 H-136 H-189 H-189 H-136 H-136 A-337 A-337 A-337 A-337 A-337 A-337 A-338 A-338 A-338 A-338 A-338 A-338 H-223 H-223 H-223 H-223 H-223 H-223 H-221 H-221 H-221 H-221 H-221 H-221 H-222-A H-222-A H-222-A H-222-A H-222-A H-222-A A-165 A-165 A-165 A-165 A-165 A SFF 203SFF 203SFF 203SFF 203SFF 203SFF J-126 J-127 J-126 J-127 J-126 J-127 H- 126 H-126 H-126 H-126 H-126 H-126 A-096 A-096 A-096 A-096 A-096 A-096 H- 191 H L91 H-191 H-191 H-191 H-191 H-192 H-192 H-192 H-192 H-192 H-192 J-116 J-116 J- 116 J-116 J-116 J-116 H-186 H-186 H-186 H-186 H-186 H-186 A-I02 A-102 A-I02 A-102 A-102 A-102 A-098 A-098 A-098 A-098 A-098 A-098 A- 100-L A-100-L A- 100-S A-100-S A-100-S A- 100-S A-103 A-103 A- 183 A-183 A-250 A-250 A-099- A A-099-A H-170-A H-170-A A-251-A A-251-A J-078 J-078 J-078 J--078 J-078 J--078 J '119 J-080 J--079 J-080 J--079 A- 109 A-109 A-109 A-109 A-109 A-109 J-071 J-071 J-07 1 J--071 J-071 J--071 A-104 A-104 A-104 A-104 A-104 A-104 A-I05 A-105 A-I05 A-105 A-105 A-105 A- 106 A-106 A-106 A-106 A-106 A-106 A-108 A-108 A-108 A-108 A-108 A-108 J-167 J-167 J-167 J-167 J-167 J-167 A-264 A-264 A-264 A-264 A-264 A-264 J-096 J-096 J-096 J-096 J J-145 J-147 J- 145 J-147 J-145 J-147 J-146 J-146 J- 146 J-146 J-146 J-146 A-347 A-347 A-347 A-347 A-347 A-347 A-346 A-346 A-346 A-346 A-346 A-346 J-170 J-170 J-170 J-170 J- 170 J-170 J-072 J-072 J-072 J--072 J-072 J-072 J- 152 J-152 J- 152 J-152 J-152 J SFF 205SFF 205SFF 20SSFF 205SFF 205SFF J-064 J-064 J J-066 J-066 NONE NONE J-050 J-050 J-051 J-051 J- 105 J-105 J- 105 J-105 J-105 J-105 A-322 A-367 A-324 A-366 A-323 A-358 A-245 A-245/220 A-245 A-245/220 A-245 A-245/220 A-244 A-244 A-244 A-244 A-244 A-244

12 8 Melton Centrifuge Owners Manual
13 L-K INDUSTRIES, INC. 9

14 10 Melton Centrifuge Owners Manual This Diagramed parts list is for centrifuges with serial numbers & above. When ordering parts, please have the model and serial number of your machine available.
15 L-K INDUSTRIES, INC. 11
16 12 Melton Centrifuge Owners Manual
17 L-K INDUSTRIES, INC. 13
18 14 Index Index A API & ASTM standards 6 C Circuit Breaker 7 Cleaning 5 Continuity 7 Crimp tool 4 Current 7 H Heat loss 6 Heat Loss 6 High Temperatures 6 I Installation 4 O Ohm Meter 7 P Parts 5 Power Source 7 R Replacement Parts & Repair Service 5 Returns 8 S Solenoid 4 V Vibration 5 W Warranty Period 8
19 L-K INDUSTRIES, INC. 15

20 L-K Industries, Inc Lawndale Houston TX , fax
PUSH TUBE STANDARD DUTY
 PUSH TUBE STANDARD DUTY ASSEMBLY / OWNER S MANUAL Part No: 15-0070 PUR223 Rev. 00 OPERATING INSTRUCTIONS Congratulations! You ve just purchased the most durable plow component in the industry. Cycle Country
PLOW MOUNT KIT FOR POLARIS RANGER P/N ASSEMBLY / OWNERS MANUAL
 PLOW MOUNT KIT FOR POLARIS RANGER P/N 34-3010 ASSEMBLY / OWNERS MANUAL Application PLOW PUSH FRAME NO. 34-0000 or 34-0070 Before you begin, please read these instructions and check to be sure all parts
product manual H-3220A Benkelman Beam
 05.12 product manual H-3220A Benkelman Beam General The H-3220A Benkelman Beam Apparatus is a convenient and accurate device used for measuring the deflection of flexible pavements under moving wheel
Operating Instructions Validation Tool Kit, KT2 For use with USP Apparatus #1 & #2
 Operating Instructions Validation Tool Kit, KT2 For use with USP Apparatus #1 & #2 P/N VALTOL-KT2 Revision 2.0 October 7, 2014 Prepared by: Quality Lab Accessories, LLC 100 Emlen Way, Suite 108 Telford,
product manual H-4204 Proving Ring Penetrometer
 05.09 product manual H-4204 Proving Ring Penetrometer nnmm Handle Proving Ring Extension Rod Coupler Penetration Rod Cone Figure #1 General Information The Proving Ring Penetrometer is a cone type of penetrometer
FOR CAN-AM ATV s P/N ASSEMBLY / OWNERS MANUAL
 MID-MOUNT KIT FOR CAN-AM ATV s P/N 15-7580 ASSEMBLY / OWNERS MANUAL Application PLOW PUSH FRAME NO. 15-0070, 33-0000 or 33-0070 Before you begin, please read these instructions and check to be sure all
ATV WP2 FRONT MOUNT PUSH TUBE
 ATV WP2 FRONT MOUNT PUSH TUBE ASSEMBLY / OWNER S MANUAL Part No: 16-0000 MAN0352 Rev. 00 OPERATING INSTRUCTIONS Congratulations! You ve just purchased the most durable plow component in the industry. Cycle
FOR POLARIS ATV s P/N ASSEMBLY / OWNERS MANUAL
 MID-MOUNT KIT FOR POLARIS ATV s P/N 15-3591 ASSEMBLY / OWNERS MANUAL Application PLOW PUSH FRAME NO. 15-0070, 33-0000 or 33-0070 Before you begin, please read these instructions and check to be sure all
MODEL H3022 MAGNETIC BASE / DIAL INDICATOR / CALIPER COMBO OWNER'S MANUAL
 MODEL H322 MAGNETIC BASE / DIAL INDICATOR / CALIPER COMBO OWNER'S MANUAL COPYRIGHT DECEMBER, 5 BY GRIZZLY INDUSTRIAL, INC. REVISED DECEMBER, 17 (HE) WARNING: NO PORTION OF THIS MANUAL MAY BE REPRODUCED
A.R.M. 52 PLOW With QUICK ATTACH MOUNTING SYSTEM MODEL NUMBER BLACK MODEL NUMBER GRAY. Owner s Manual
 70 8TH AVE W PO BOX 7 SPENCER, IA 0 PHONE: 7-6-9 FAX: 7-6-08 SERVICE: 800-8- E-MAIL: ccac@cyclecountry.com www.cyclecountry.com A.R.M. PLOW With QUICK ATTACH MOUNTING SYSTEM MODEL NUMBER 0-00 BLACK MODEL
SK Series BOX PLOW INSTALLATION & OWNER S MANUAL TABLE OF CONTENTS
 SK Series BOX PLOW INSTALLATION & OWNER S MANUAL TABLE OF CONTENTS SAFETY... 2 INTRODUCTIONS... 5 TIPS ON PLOWING SNOW... 6 BOX PLOW ASSEMBLY PROCEDURE... 7 BOX PLOW BLADE ASSEMBLY DRAWING AND PARTS LIST...
DRIFTER PLOW-IN-A-BOX
 DRIFTER PLOW-IN-A-BOX ASSEMBLY / OWNER S MANUAL Part No: 10-0550 OPERATING INSTRUCTIONS Congratulations! You ve just purchased one of the industry s top plow systems. The DRIFTER Plow System works great
CAUTION: BEFORE YOU BEGIN, ALWAYS MAKE SURE THE WEAPON IS UNLOADED AND SAFE TO HANDLE.
 CAUTION: BEFORE YOU BEGIN, ALWAYS MAKE SURE THE WEAPON IS UNLOADED AND SAFE TO HANDLE. ON Press either brightness button ( + or - ) to turn on the sight. The sight is also programmed to turn on when it
FOREMAN ASSEMBLY / OWNER S MANUAL
 ATV PLOW MOUNT For HONDA FOREMAN ASSEMBLY / OWNER S MANUAL Part No: 15-1610 MAN0418 Rev. 00 OPERATING INSTRUCTIONS Congratulations! You ve just purchased the most durable plow component in the industry.
PLOW MOUNT KIT FOR YAMAHA VIKING P/N ASSEMBLY / OWNERS MANUAL. Application PLOW PUSH FRAME NO or
 PLOW MOUNT KIT FOR YAMAHA VIKING P/N 34-5020 ASSEMBLY / OWNERS MANUAL Application PLOW PUSH FRAME NO. 34-0000 or 34-0070 Before you begin, please read these instructions and check to be sure all parts
Richter Optica. Instructions for Model: S850 Stereo Zoom Microscope
 Richter Optica info@richter-optica.com Instructions for Model: S850 Stereo Zoom Microscope Microscope Head Focus Knob Stage Clips Zoom Knob C-Mount Adapter Eyepiece Focusing Holder Focusing Holder Set
ASSEMBLY / OWNER S MANUAL
 ATV PLOW MOUNT For Yamaha ATVs ASSEMBLY / OWNER S MANUAL Part No: 15-5590 MAN0050 Rev. 01 OPERATING INSTRUCTIONS Congratulations! You ve just purchased the most durable plow component in the industry.
1 YEAR LIMITED WARRANTY TELESCOPES
 1 YEAR LIMITED WARRANTY TELESCOPES BARSKA Optics, as manufacturer, warrants this new precision optical product to be free of original defects in materials and/or workmanship for the length of time specified
CASSINI CQR-120 OPERATING INSTRUCTIONS
 CASSINI CQR-120 OPERATING INSTRUCTIONS INTRODUCTION CONGRATULATIONS ON YOUR PURCHASE OF THE CASSINI CQR-120 TELESCOPE. THIS TELESCOPE HAS BEEN PRODUCED TO PRECISE SPECIFICATIONS. PRIOR TO USING YOUR NEW
HEAVY DUTY SWING-OUT VALVE
 ISO 900 REGISTERED COMPANY Akron Brass Company. 20 All rights reserved. No portion of this can be reproduced without the express written consent of Akron Brass Company. We will not be responsible for:
OWNER S MANUAL. Daniels Wing Plow. Operating Instructions Illustrated Parts List
 OWNER S MANUAL Daniels Wing Plow Operating Instructions Illustrated Parts List 1 Congratulations! By purchasing this Daniels Wing Plow, you can now benefit by owning the latest in state-of-the-art snow
DWT-10 Instruction Manual
 DWT-10 Instruction Manual For Customer Service Call (781) 848-7702 or Fax (781) 848-8022 Congratulations on your choice of this David White Electronic Digital Transit. We suggest that you read this instruction
Owner's Manual NSL100B BUILDERS LEVEL NSL500B TRANSIT LEVEL
 Owner's Manual NSL100B BUILDERS LEVEL NSL500B TRANSIT LEVEL 1 1. CONTENTS 2. Nomenclature page 3 3. Care and Maintenance page 4 4. Using your Instrument 4.1 Setting up your Instrument page 5 4.2 Stadia
HEAVY DUTY SWING-OUT VALVE
 ISO 900 REGISTERED COMPANY HEAVY DUTY SWING-OUT VALVE 52 53 23 5 2 2 3 28 39 NOT USED WITH SZ HANDLE 2 NOT USED WITH SZ HANDLE 5 2 3 7 9 9 Premier Farnell Corporation. 20 All rights reserved. No portion
Owner's Manual. for AUTOMATIC LEVEL. NBL Series. FOR CUSTOMER SERVICE, PARTS & REPAIR, CALL Toll Free:
 Owner's Manual for AUTOMATIC LEVEL NBL Series FOR CUSTOMER SERVICE, PARTS & REPAIR, CALL Toll Free: 1-888-247-1960 1 1. CONTENTS 2. Nomenclature page 3 3. Care and Maintenance page 4 4. Using your Instrument
Assembly Instructions for the 1-Wire Weather Station V2.0/V3.0
 Assembly Instructions for the 1-Wire Weather Station V2.0/V3.0 Tools and Supplies Required (not included): Phillips screwdriver 3/8" wrench Drill with 5/32" bit "U" type mounting bracket (i.e., part number
LEAPERS, INC. RED/GREEN DOTS
 LEAPERS, INC. 1 RED/GREEN DOTS range estimating scopes UTG reticle intensified scopes TOTAL SOLUTION TO YOUR NEEDS -COMMITMENT TO BEST QUALITY, BEST VALUE AND BEST SERVICEwww.LEAPERS.com 32700 Capitol
nufacturing Company, L.P San Felipe, Suite 500
 REPAIR PARTS AWUF Vertical Mount Air Handlers AWUF18051AA AWUF18051BA AWUF180516AA AWUF18081AA AWUF18081BA AWUF180816AA AWUF24051AA AWUF24051BA AWUF240516AA AWUF24081AA AWUF24081BA AWUF240816AA AWUF201AA
FIELD GUIDE FOR HORUS SCOPES
 www.horusvision.com TM FIELD GUIDE FOR HORUS SCOPES Your Horus scope combines fine-quality optics, combat-proven hardware and the patented Horus reticle to deliver speed and accuracy for all shooters.
Important Instructions
 Important Instructions Subject Use With Cabinet Hardmount Trunnion Replacement Cabinet Hardmount 8-60 Pound Washer-Extractors and Kits F77000, F7700, F7700, F7700, F7700, F7700, F9P and F9P WARNING This
Conversion Kit for: 7620 and 7820 Swing-Out Valves ft-lbs ft-lbs 8835/ ft-lbs
 ISO 900 REGISTERED COMPANY HEAVY DUTY SWING-OUT VALVE 52 53 23 5 2 2 3 28 39 NOT USED WITH SZ HANDLE 2 NOT USED WITH SZ HANDLE 5 2 3 7 9 9 Premier Farnell Corporation. 20 All rights reserved. No portion
MET ONE RAIN GAGE MODELS 380, 385, 380M, 385M
 MODELS 380, 385, 380M, 385M REVISION: 2/96 COPYRIGHT (c) 1993-1996 CAMPBELL SCIENTIFIC, INC. WARRANTY AND ASSISTANCE The MET ONE RAIN GAGE--MODELS 380, 385, 380M, 385M is warranted by CAMPBELL SCIENTIFIC,
/2" Heavy Duty Swing-Out
 Premier Farnell Corporation. 0 All rights reserved. No portion of this can be reproduced without the express written consent of Premier Farnell Corporation. ISO 900 REGISTERED COMPANY We will not be responsible
LDR Series BOX PLOW INSTALLATION & OWNER S MANUAL TABLE OF CONTENTS
 LDR Series BOX PLOW INSTALLATION & OWNER S MANUAL TABLE OF CONTENTS SAFETY... 2 INTRODUCTIONS... 5 TIPS ON PLOWING SNOW... 6 BOX PLOW ASSEMBLY PROCEDURE... 7 BOX PLOW BLADE ASSEMBLY DRAWING AND PARTS LIST...
Installation guide 862 MIT / MIR
 Installation guide 862 MIT / MIR in combination with: 864 MTT or 863 MRT or (dual) spot element November 2005 Part no. 4416.232_Rev3 Enraf BV PO Box 812 2600 AV Delft Netherlands Tel. : +31 15 2701 100
AM 500A 500 WATT AM 1A 1 KILOWATT AM BROADCAST TRANSMITTERS. October, 1999 IM No
 AM 500A 500 WATT AM 1A 1 KILOWATT AM BROADCAST TRANSMITTERS October, 1999 IM No. 597 1112 EQUIPMENT LOST OR DAMAGED IN TRANSIT. When delivering the equipment to you, the truck driver or carrier s agent
 www.vostok-europe.com CONTENTS OF THE BOOKLET I USER'S MANUAL FOR ALL TYPES OF MECHANICAL WATCHES... 03 II WATER RESISTANCE... 06 III WATCHES WITH 2432 MOVEMENT... 08 IV WATCHES WITH 2426 MOVEMENT... 14
Commercial Generator Parts Catalog. PROTEC Series
 Commercial Generator Parts Catalog PROTEC Series YD ÁÁ ÁÁ To avoid errors or delay in filling your parts order, always give the MODEL, SPEC NO. and SERIAL NO. from the Onan nameplate. For handy reference,
U.S.A. inc. WORKMAN 420 II MULTIMIXER
 R U.S.A. inc. Model 1105858 MANUAL INSTRUCTION and PARTS LIST Manual Part. number 3210517 R00-09/2002 Machine serial N Write in the serial n of your machine here Thank-you for purchasing a Workman 420
RP-200 TELESCOPE Instruction Manual
 2070 5th Avenue Ronkonkoma, NY 11779 Phone: 631-963-5000 Fax: 631-427-6749 For information, call toll-free: 1-800-967-8427 info@carson.com / sales@carson.com / www.carson.com RP-200 TELESCOPE Instruction
REPAIR PARTS. AVPTC Air Handler. This manual is to be used by qualified technicians only. This manual replaces RP-775E.
 REPAIR PARTS AVPTC Air Handler AVPTC24B14AA AVPTC24B14AB AVPTC24B14AC AVPTC30C14AA AVPTC30C14AB AVPTC36C14AA AVPTC36C14AB AVPTC42D14AA AVPTC42D14AB AVPTC42D14AC AVPTC48C14AA AVPTC48C14AB AVPTC48D14AA AVPTC48D14AB
Service Information Letter SIL # 017
 Service Information Letter SIL # 017 Trunnion Adjustment - Double Barrels Only Equipment: Double Barrels With Sloped Trunnions Date Issued: 9-24-03 Additional Reference: SIL # 016 Revised: Revision #:
INSTALLATION INSTRUCTIONS PLOW MOUNT KIT Part Number: Application: Honda Foreman 500
 WARN INDUSTRIES, INC. 12900 S.E. Capps Road, Clackamas, OR USA 97015-8903, 1-503-722-1200, FAX: 1-503-722-3000 Customer Service: 1-800-543-9276 Dealer Locator Service: 1-800-910-1122 International Sales/Customer
Automatic Level Maintenance Manual SAL-XX W/ AIR DAMPENED COMPENSATOR
 Automatic Level Maintenance Manual SAL-XX W/ AIR DAMPENED COMPENSATOR CST/Berger 2001 SAL 20/24/28/32 PAGE 1 REV. C 071803 Automatic Level Maintenance Manual User Calibration and Testing... 3 Circular
HS515G-M. PARALOW Circle Dot Sight. User's Manual. Holosun Technologies Inc. Phone: (909) Fax: (909)
 Fax: (909)") HS515G-M PARALOW Circle Dot Sight User's Manual Multi Reticle Holosun Technologies Inc. Phone: (909) 594-2888 Fax: (909) 598-4888 E-mail: info@holosun.com COLOR www.holosun.com PARALOW HS515G-M PARALOW
HS515G-M PARALOW Circle Dot Sight User's Manual Multi Reticle Holosun Technologies Inc. Phone: (909) 594-2888 Fax: (909) 598-4888 E-mail: info@holosun.com COLOR www.holosun.com PARALOW HS515G-M PARALOW
WARNING. INJURY HAZARD Failure to observe these instructions could lead to severe injury or death.
 INSTALLATION INSTRUCTIONS ATV Front Plow Mount Kit Part Number: 80031 Applications: 2007+ Honda Rancher 420 2007+ Honda Rancher ES 420 2009+ Honda Rancher AT 420 *Not compatible with 2.5ci or A2000 winches
HT600 Dat e Code: 2 - HT MW Purchase Date: PLEASE RETAIN THIS INSTRUCTION MANUAL FOR FUTURE REFERENCE. All Rights Reserved
 We strive to ensure that our products are of the highest quality and free of manufacturing defects or missing parts. However, if you have any problems with your new product, D O NOT RETURN IT TO THE STORE,
Driveline Components Catalog Center Bearings
 J300P-9A Driveline Components Catalog Bearings Updated 8-30-2013 Page 17, Style 22, Column B: changed Bearing part number 212135-1x from 2.890 to 2.690 NEW! Spicer ХС Bearing lmproved Performance and Maintenance
IF YOU NEED ANY FURTHER HELP WITH YOUR GALILEO TELESCOPE PLEASE CALL MON-FRI 9AM - 5PM E.S.COM
 G-80DB Instructions G-80DB IF YOU NEED ANY FURTHER HELP WITH YOUR GALILEO TELESCOPE PLEASE CALL US @ 305-245-8444 MON-FRI 9AM - 5PM E.S.T OR E-MAIL US AT CUSTOMERSERVICE@COSMOSOPTICS.COM 2 GALILEO G-80DB
Flexbar 6.3:1 MANUAL ZOOM STEREO MICROSCOPE. 250 Gibbs Road, Islandia, NY (P) (F)
 (F)") Flexbar 6.3:1 ZOOM STEREO MICROSCOPE MANUAL 250 Gibbs Road, Islandia, NY 11749 631-582-8440 (P) 631-582-8487 (F) www.flexbar.com sales@flexbar.com CONTENTS SAFETY NOTES... 3 CARE AND MAINTENANCE... 3 INTRODUCTION...
Flexbar 6.3:1 ZOOM STEREO MICROSCOPE MANUAL 250 Gibbs Road, Islandia, NY 11749 631-582-8440 (P) 631-582-8487 (F) www.flexbar.com sales@flexbar.com CONTENTS SAFETY NOTES... 3 CARE AND MAINTENANCE... 3 INTRODUCTION...
ASTRO-PHYSICS, INC. POLAR ALIGNMENT TELESCOPE (PASILL2)
") OBJECTIVE LENS ASTRO-PHYSICS, INC. POLAR ALIGNMENT TELESCOPE (PASILL2) This model shipped from January 2001 through July 2002. It fits all 400, 600, 600E, 800, 900 and 1200 models (except the original
OBJECTIVE LENS ASTRO-PHYSICS, INC. POLAR ALIGNMENT TELESCOPE (PASILL2) This model shipped from January 2001 through July 2002. It fits all 400, 600, 600E, 800, 900 and 1200 models (except the original
INSTRUCTION MANUAL. Laser Diode Sarcomere Length. Aurora Scientific Inc. 360 Industrial Parkway South, Unit 4 Aurora, Ontario, Canada L4G 3V7
 INSTRUCTION MANUAL Model 902A Laser Diode Sarcomere Length May 6, 2013, Revision 3 Copyright 2008-2013 Aurora Scientific Inc. Aurora Scientific Inc. 360 Industrial Parkway South, Unit 4 Aurora, Ontario,
Installation instructions, accessories. Snow chains
 Instruction No 30664147 Version 1.0 Part. No. Snow chains R7700468 страница 1 / 15 Equipment A0000162 R7700458 страница 2 / 15 R7700448 страница 3 / 15 INTRODUCTION Read through all of the instructions
SKELESCOPE REFLECTOR TELESCOPE WITH TABLE TOP TRIPOD SK-100 INSTRUCTION MANUAL
 TM SKELESCOPE REFLECTOR TELESCOPE WITH TABLE TOP TRIPOD SK-100 INSTRUCTION MANUAL TABLE OF CONTENTS Introduction Box Contents / Visual Key Diagram Telescope Assembly Setting up Your Telescope Attaching
Must Read Before Installation TadPoleTM Safety and Warnings
 Must Read Before Installation TadPoleTM Safety and Warnings The recommendations, requirements, rules, and instructions of your Vehicle's Roof-Top Rack System should ALWAYS be followed. The TadPole TM,
RP-100 TELESCOPE Instruction Manual
 2070 5th Avenue Ronkonkoma, NY 11779 Phone: 631-963-5000 Fax: 631-427-6749 For information, call toll-free: 1-800-967-8427 info@carson.com / sales@carson.com / www.carson.com RP-100 TELESCOPE Instruction
Instruction Manual. Kite-22 Camera Crane Starter Package (KITE-22-STARTER) Exclusive of Weights
 Exclusive of Weights") Instruction Manual Kite-22 Camera Crane Starter Package (KITE-22-STARTER) Exclusive of Weights All rights reserved No part of this document may be reproduced, stored in a retrieval system, or transmitted
Instruction Manual Kite-22 Camera Crane Starter Package (KITE-22-STARTER) Exclusive of Weights All rights reserved No part of this document may be reproduced, stored in a retrieval system, or transmitted
For Customer Service, Rev A - 6/ OF 6
 Item SP-6219 50 Universal Snow Plow Package RED Plow Item SP-6257 64 Universal Snow Plow Package RED Plow For Customer Service, Email CustomerService@yourfingertips-online.com Please read and understand
Altazimuth Mount. Altazimuth Mount
 instruction Manual Orion VersaGo II HD Altazimuth Mount #10104 Orion VersaGo II Altazimuth Mount #10105 #10104 #10105 Providing Exceptional Consumer Optical Products Since 1975 OrionTelescopes.com Customer
saxon Instruction Manual saxon Grandeur Brass Telescope High quality optics
 saxon High quality optics Instruction Manual saxon Grandeur Brass Telescope WARNING! Do not use the telescope to look at the sun without an appropriate solar filter. Looking at or near the sun can result
INSTALLATION INSTRUCTIONS FRONT PLOW MOUNT KIT Part Number: Application: Polaris Sportsman 400, 500, 800
 WARN INDUSTRIES, INC. 12900 S.E. Capps Road, Clackamas, OR USA 97015-8903, 1-503-722-1200, FAX: 1-503-722-3000 Customer Service: 1-800-543-9276 Dealer Locator Service: 1-800-910-1122 International Sales/Customer
Sensor Accessories. Rotary Motion Accessory Pack. Pendulum Rod with two masses, Angular Momentum disc set and Linear Rack with mini c-clamp
 Sensor Accessories Rotary Motion Accessory Pack (Product No 3288) Pendulum Rod with two masses, Angular Momentum disc set and Linear Rack with mini c-clamp DATA HARVEST Data Harvest Group Ltd 1 Eden Court,
Z650HR SERIES MANUAL ZOOM STEREO MICROSCOPE. 73 Mall Drive, Commack, NY (P) (F)
 (F)") Z650HR SERIES ZOOM STEREO MICROSCOPE MANUAL 73 Mall Drive, Commack, NY 11725 631-543-2000 (P) 631-589-6975 (F) www.unitronusa.com info@unitronusa.com CONTENTS SAFETY NOTES... 3 CARE AND MAINTENANCE...
Z650HR SERIES ZOOM STEREO MICROSCOPE MANUAL 73 Mall Drive, Commack, NY 11725 631-543-2000 (P) 631-589-6975 (F) www.unitronusa.com info@unitronusa.com CONTENTS SAFETY NOTES... 3 CARE AND MAINTENANCE...
WS-7047TWC Wireless 433 MHz Weather Station With Rainfall and Temperature. Instruction Manual
 WS-7047TWC Wireless 433 MHz Weather Station With Rainfall and Temperature Instruction Manual TABLE OF CONTENTS Topic Page Inventory of Contents 2 Additional Equipment 2 Quick Setup 3 Detailed Setup Guide
REPAIR PARTS. GPH14 H-SERIES R-410A Package Heat Pumps GPH1424H41AA GPH1430H41AA GPH1436H41AA GPH1442H41AA GPH1448H41AA GPH1460H41AA
 REPAIR PARTS GPH14 H-SERIES R-0A Package Heat Pumps GPH1424HAA GPH1430HAA GPH1436HAA GPH1442HAA GPH1448HAA GPH1460HAA This manual is to be used by qualified technicians only. 2009 Goodman Manufacturing
Directions for use
 Directions for use 40070 40080 60050 70060 70076 80060 90060 900114 Fig. 1 Fig. 1A Fig. 2 Fig. 3 Fig. 4 Fig. 5 Fig. 6 Fig. 7 english ENGLISH DIRECTIONS FOR USE 1 Tripod Leg 2 Tripod Leg Adjusting Screw
FLT5A FLT5A. abc. abc. Thermometer User Guide. Thermometer User Guide. Internet:
 abc instruments international FLT5A Thermometer Land Instruments International Dronfield, S18 1DJ England Telephone: (1246) 417691 Facsimile: (1246) 41585 Email: infrared.sales@landinst.com Internet: www.landinst.com
P4Xi TACTICAL Riflescope TECHNICAL MANUAL
 P4Xi TACTICAL Riflescope TECHNICAL MANUAL TABLE OF CONTENTS Page Mounting The Scope 2 Eyepiece Focusing 2 Windage / Elevation Adjustment 3 Setting The Zero Stop 4 Turret Cap Replacement 4 Parallax Focus
EPOCSELFIR LACITCATiX5T TECHNICAL MANUAL
 T5Xi TACTICAL RIFLESCOPE TECHNICAL MANUAL TABLE OF CONTENTS Page Mounting The Scope...2 Eyepiece Focusing...2 Windge / Elevation Adjustment...3 Setting The Zero Stop...4 Turret Cap Replacement...4 Parallax
nufacturing Company, L.P San Felipe, Suite
 REPAIR PARTS (2,3,4) Multi Zone Heat Pump Outdoor Unit 2MXS18GVJUAA 3MXS24JVJUAA 4MXS32GVJUAA nufacturing Company, L.P. 5151 San Felipe, Suite 500 www.amana-hac.com www.amana-hac.com This manual is to
nufacturing Company, L.P San Felipe, Suite
 Mini-Split Heat Pump Outdoor Unit RXS09LVJU RXS12LVJU RXS15LVJU RXS18LVJU RXS24LVJU REPAIR PARTS nufacturing Company, L.P. 5151 San Felipe, Suite 500 www.amana-hac.com www.amana-hac.com This manual is
Low Differential Pressure Gage
 Low Differential Pressure Gage NEW Manostar Gage Panel installation compact type Low Differential Pressure Gage RoHS compliant Utility model registration No.2027772 Compact and lightweight type Even when
PARTS MANUAL 2 INCH CHIPPER/SHREDDER. SC cc SUBARU
 www.bearcatproducts.com 2 INCH CHIPPER/SHREDDER SC2170 170cc SUBARU PARTS MANUAL PN: 1641-00 Rev. 0011 Companion to 1509-00 Range: D01688 - Current Before You Begin DEAR ECHO BEAR CAT CUSTOMER Thank you
SHARK Snow Plow. 52 (132 cm) / 60 (152 cm) Complete system blade INSTRUCTIONS / ESTABLISHMENT
 / 60 (152 cm) Complete system blade INSTRUCTIONS / ESTABLISHMENT") SHARK Snow Plow 52 (132 cm) / 60 (152 cm) Complete system blade INSTRUCTIONS / ESTABLISHMENT OPERATING INSTRUCTIONS Congratulations! You ve just purchased the most durable plow system in the industry.
SHARK Snow Plow 52 (132 cm) / 60 (152 cm) Complete system blade INSTRUCTIONS / ESTABLISHMENT OPERATING INSTRUCTIONS Congratulations! You ve just purchased the most durable plow system in the industry.
A.R.M. 52 POLY PLOW BLACK With QUICK ATTACH MOUNTING SYSTEM MODEL NUMBER Owner s Manual
 70 38TH AVE W PO BOX 57 SPENCER, IA 530 PHONE: 7-6-49 FAX: 7-6-048 SERVICE: 800-84- E-MAIL: ccac@cyclecountry.com www.cyclecountry.com A.R.M. 5 POLY PLOW BLACK With QUICK ATTACH MOUNTING SYSTEM MODEL NUMBER
Dual Red or Green Electronic Dot Sight Instruction Manual
 Dual Red or Green Electronic Dot Sight Instruction Manual 2007 VisionPlus INTRODUCTION: Congratulations on your purchase of a VisionPlus Dual Red/Green Electronic Dot Sight. This is a quality product engineered
u s e r m a n u a l w w w. v e l a. E U
 u s e r m a n u a l 100 w w w. v e l a. E U content 1.0. introduction...................................................... 3 1.1. safety.............................................................. 3
LUDLUM MODEL 42-5 NEUTRON BALL CART. August 2015 Serial Number PR and Succeeding Serial Numbers
 LUDLUM MODEL 42-5 NEUTRON BALL CART August 2015 Serial Number PR149512 and Succeeding Serial Numbers LUDLUM MODEL 42-5 NEUTRON BALL CART August 2015 Serial Number PR149512 and Succeeding Serial Numbers
INSTALLING TRAK SPORT TIRE CHAINS ON 20 MODEL 3 TIRES
 INSTALLING TRAK SPORT TIRE CHAINS ON 20 MODEL 3 TIRES 2018 TESLA, INC. All rights reserved. All information in this document and all MODEL 3 software is subject to copyright and other intellectual property
x Builders Level Service Manual
 40-690 22x Builders Level Service Manual Item Description Pages.0 Overall Instrument Assembly 2. Main Assembly 2.2 Telescope Assembly 3.3 Base Assembly 4.4 Frame Assembly 5 2.0 Calibration 6-8 2. Vial
Lamp and Control Panel (Lamp Panel)
") www.reinhausen.com Lamp and Control Panel (Lamp Panel) Operating Instructions BA 47/0 EN NOTE! Changes may have been made to a product after going to press with this documentation. We expressly reserve
www.reinhausen.com Lamp and Control Panel (Lamp Panel) Operating Instructions BA 47/0 EN NOTE! Changes may have been made to a product after going to press with this documentation. We expressly reserve
ASTRO-PHYSICS, INC. POLAR ALIGNMENT TELESCOPE
 Polar Alignment Telescope ASTRO-PHYSICS, INC. POLAR ALIGNMENT TELESCOPE This polar axis telescope will help you align your mount with the Celestial Poles. When your mount is properly aligned, your telescope's
REPAIR PARTS. DX17VS Outdoor Inverter. This manual is to be used by qualified technicians only.
 REPAIR PARTS DX17VS Outdoor Inverter DX17VSS181AA DX17VSS241AA DX17VSS01AA DX17VSS61AA DX17VSS421AA DX17VSS481AA DX17VSS601AA This manual is to be used by qualified technicians only. 2018 5151 San Felipe
Model: WT-3181PL Instruction Manual DC: Indoor/Outdoor Atomic Wall Clock. Get Started
 Model: WT-3181PL Instruction Manual DC: 041614 18 Indoor/Outdoor Atomic Wall Clock Round Battery Cover Get Started Step 1: Remove the round battery cover from the back of the clock. Step 2: Insert 1 fresh
Field Pro Operation and Installation Manual
 Field Pro Operation and Installation Manual Xtreme Research Corporation SkyScan Division P.O. Box 336, Port Richey, FL 34673-0336 1-800-732-0665 Table of Contents 1. Installation 3 2. Operation 5 3. Care
RYOBI 10 in. TABLE SAW MODEL NUMBER BTS21
 0 1 1 1 1 1 1 1 SEE FIGURE A 1 1 1 1 1 1 1 1 SEE FIGURE C 1 1 1 1 0 1 SEE FIGURE E 1 SEE FIGURE D 1 1 10 1 0 1 1 1 1 1 1 0 1 1 1 1 1 1 1 1 1 1 1 0 1 1 1 1 1 1 1 1 1 0 1 0 1 10 1 0 1 1 0 1 1 SEE FIGURE
REPAIR PARTS. ARPT Air Handlers
 REPAIR PARTS ARPT Air Handlers ARPT18B14AA ARPT18B14AB ARPT24B14AA ARPT24B14AB ARPT30B14AA ARPT30B14AB ARPT36C14AA ARPT36C14AB ARPT36D14AA ARPT36D14AB ARPT42D14AA ARPT42D14AB ARPT48D14AA ARPT48D14AB ARPT60D14AA
REPAIR PARTS. GPH13 "M" Series Horizontal Package Heat Pumps GPH1324M41AA GPH1330M41AA GPH1336M41AA GPH1342M41AA GPH1348M41AA GPH1360M41AA
 REPAIR PARTS GPH13 "M" Series Horizontal Package Heat Pumps GPH1324MAA GPH1330MAA GPH1336MAA GPH1342MAA GPH1348MAA GPH1360MAA This manual is to be used by qualified technicians only. 2009 Goodman Manufacturing
VELA Tango 100. VELA Tango 100A. VELA Tango 200 GAS
 UK VELA Tango 100 VELA Tango 100A VELA Tango 200 U S E R G U I D E V E L A T A N G O 1 0 0 / 1 0 0 F B / 1 0 0 A / 2 0 0 GAS CONTENT 1.0. INTRODUCTION... 3 1.1. SAFETY... 3 1.2. WARRENTY... 4 1.3. UNPACKING
Sitting height... 6 Back tilt and back height... 6 Armrest... 7 Brakes... 7 Charging VELA Tango 300E... 7
 U K u s e r m a n u a l w w w. v e l a. E U contents 1.0. introduction...................................................... 3 1.1. guarantee......................................................... 4
AIR CONDITIONER (SPLIT TYPE) SERVICE MANUAL
 SERVICE MANUAL") AIR CONDITIONER (SPLIT TYPE) SERVICE MANUAL FILE No. A10-023-1 REVISION 1 : Mar.2012 Re-edit version.( file volume down) Contents have NOT been changed. Model name: RAS-M10PKVP-E RAS-M13PKVP-E RAS-M16PKVP-E
AIR CONDITIONER (SPLIT TYPE) SERVICE MANUAL FILE No. A10-023-1 REVISION 1 : Mar.2012 Re-edit version.( file volume down) Contents have NOT been changed. Model name: RAS-M10PKVP-E RAS-M13PKVP-E RAS-M16PKVP-E
Installation, Maintenance and Operating Instructions
 Trunnion-Design Ball Valves 12 20 (DN 300 500) Series 7150 12 (DN 300) Series 730S 12 20 (DN 300 500) Series 7300 14 24 (DN 350 600) Series 9150 14 24 (DN 350 600) Series 9300 Installation, Maintenance
SUGAR/BRIX REFRACTOMETER INSTRUCTION MANUAL
 SUGAR/BRIX REFRACTOMETER 300003 INSTRUCTION MANUAL 1 TABLE OF CONTENTS INTRODUCTION...3 PANEL DESCRIPTION...3 OPERATING PROCEDURES...4-5 TEMPERATURE CORRECTION...5 TEMPERATURE CORRECTION TABLE...6 PRECAUTIONS...7
C4 PLUS RIFLESCOPES User Guide
 C4 Plus USER GUIDE_Layout 1 7/24/15 2:40 PM Page 1 C4 PLUS RIFLESCOPES User Guide This user guide includes information for the entire C4 Plus riflescope line. Please review thoroughly and pay close attention
Protective Coatings: Non-lead orange paint RAL red (optional) non-lead paint Hot dipped galvanized conforming to ASTM A-153.
 non-lead paint Hot dipped galvanized conforming to ASTM A-153.") Technical Services: Tel: (66) 500-76 / Fax: (01) 71-7317 www.grinnell.com Grinnell Mechanical Products Grooved Fittings, Ductile Iron & Fabricated Steel General Description Grooved fittings provide an
Technical Services: Tel: (66) 500-76 / Fax: (01) 71-7317 www.grinnell.com Grinnell Mechanical Products Grooved Fittings, Ductile Iron & Fabricated Steel General Description Grooved fittings provide an
National Optical & Scientific Instrument Inc Tri-County Parkway Schertz, Texas Phone (210) Fax (210)
 Fax (210)") National Optical & Scientific Instrument Inc. 6508 Tri-County Parkway Schertz, Texas 78154 Phone (210) 590-9010 Fax (210) 590-1104 INSTRUCTIONS FOR SHOP MICROSCOPES MODEL NUMBERS 186 187 188 189 National
National Optical & Scientific Instrument Inc. 6508 Tri-County Parkway Schertz, Texas 78154 Phone (210) 590-9010 Fax (210) 590-1104 INSTRUCTIONS FOR SHOP MICROSCOPES MODEL NUMBERS 186 187 188 189 National
Assembly Manual for the Brevard Astronomical Society 16 inch F4.5 Dobsonian Telescope Brevard Astronomical Society P.O. Box 1084 Cocoa, FL 32922
 BAS 16 Telescope Manual Rev 1 Assembly Manual for the Brevard Astronomical Society 16 inch F4.5 Dobsonian Telescope Brevard Astronomical Society P.O. Box 1084 Cocoa, FL 32922 TABLE OF CONTENTS SECTION
IRTS-P PRECISION INFRARED TEMPERATURE SENSOR INSTRUCTION MANUAL
 IRTS-P PRECISION INFRARED TEMPERATURE SENSOR INSTRUCTION MANUAL 4/02 COPYRIGHT (c) 2002 CAMPBELL SCIENTIFIC, INC., APOGEE INSTRUMENTS, INC. This is a blank page. Warranty and Assistance The IRTS-P PRECISION
NOVALYNX CORPORATION MODEL 110-WS-16BP BAROMETRIC PRESSURE SENSOR INSTRUCTION MANUAL
 NOVALYNX CORPORATION MODEL 110-WS-16BP BAROMETRIC PRESSURE SENSOR INSTRUCTION MANUAL REVISION DATE: OCT 2005 Receiving and Unpacking Carefully unpack all components and compare to the packing list. Notify
Telescope Sight 4 X 24 for G3 Rifle
 Telescope Sight 4 x 24 For G3 Rifle Telescope Sight 4 X 24 for G3 Rifle Instruction Manual HECKLER & KOCH, INC. 2148 Pacific Boulevard Sterling, Virginia 20166-8903 U.S.A. TEL. (703) 450-1900 TELEFAX (703)