RP-100 TELESCOPE Instruction Manual
|
|
|
- Marybeth Stokes
- 6 years ago
- Views:
Transcription


1 2070 5th Avenue Ronkonkoma, NY Phone: Fax: For information, call toll-free: / / RP-100 TELESCOPE Instruction Manual
2 Table of Contents: Introduction Box Contents Figures 1-8/Figure Key Telescope Assembly Setting up Your Tripod Attaching the U Mount Attaching the Telescope Tube to the Mount Attaching the Finder Scope Attaching the Eyepieces Aligning the Finder Scope Calculating Power Understanding Celestial Movement Using the Telescope Care and Maintenance of Your Telescope Cleaning Collimation of Optics Adjusting the Diagonal Holder Adjusting the Primary Mirror Night Time Star Collimation Testing Specifications Warnings Customer Service Warranty Information Congratulations on your purchase of a Carson RP-100 Red Planet Series TM telescope. This telescope features an easy-to-use design and high performance optics that are perfect for beginning astronomers looking to explore the wonders of outer space and the world around them. Please read this manual carefully to ensure that you assemble and use your telescope correctly. When used properly, your Red Planet TM telescope should provide years of exciting observations of the universe and the world around you. Please note that this Newtonian Reflector telescope was designed for both astronomical and terrestrial viewing. IMPORTANT: DO NOT USE YOUR RED PLANET TM TELESCOPE TO LOOK AT OR NEAR THE SUN! DOING SO WILL CAUSE INSTANT AND PERMANENT EYE DAMAGE. Each box contains the following: Complete Optical Tube Assembly U Mount Heavy-Duty Aluminum Tripod 8mm Huygenian Erecting Eyepiece (1.25 O.D.) 20mm Huygenian Erecting Eyepiece (1.25 O.D.) 10x30mm Erecting Finder Scope Please unpack your telescope carefully and make sure that all accessories are included in the box. 3


3 Fig.1 Fig.3 Fig.2 Fig.4 4 5


4 Fig.5 Fig.7 Fig.6 Fig.8 6 7
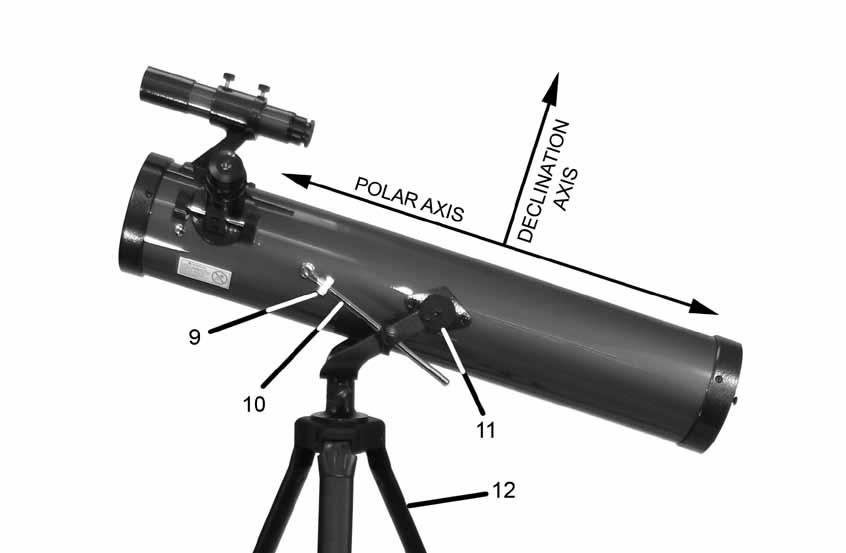
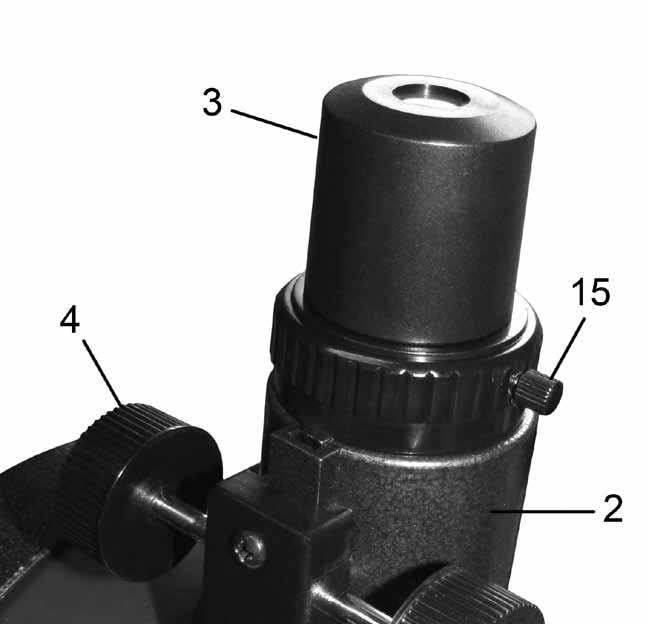
5 Key to Figures 1-8: 1. 10x30mm Finder Scope 2. Focuser 3. Eyepiece 4. Focus Knobs 5. Optical Tube Assembly 6. U Mount 7. Horizontal Lock Knob 8. U Mount Locking Screw 9. Altitude Rod Fine Adjustment Control 10. Altitude Rod 11. Locking Plates 12. Tripod Legs 13. Locking Plate Thumbscrews 14. Altitude Rod Coarse Adjustment Control 15. Focuser Thumbscrew 16. Finder Scope Bracket Thumbscrew 17. Finder Scope Focus Knob 18. Finder Scope Bracket 19. Finder Scope Bracket Mounting Bolts 20. Tripod Tightening Ring 21. Tripod Brace 22. Eyepiece Holder Slots 23. Tripod Hook 24. Tripod Leg Lock Closed 25. Tripod Leg Lock Open 26. Diagonal Mirror Tilt Screws 27. Diagonal Mirror Holder 28. Primary Mirror Locking Screws 29. Primary Mirror Tilt Screws Assembly of your Red Planet Telescope: Setting Up Your Tripod: The aluminum tripod comes preassembled and ready-to-use. Remove the tripod from the box and pull apart the legs. Gently push down the tripod braces (Fig. 6-21) until they are in the lowest position. Turn the tightening ring (Fig. 6-20) (located at the center of the tripod brace) clockwise to lock the tripod in the open position. You can then extend the legs to the desired height by pulling open the tab on each leg lock (Fig. 6-25), sliding the leg down the desired amount and then pushing the leg lock back against the leg into the locked position (Fig. 6-24). Repeat the process with each leg trying to keep the tripod as level as possible with the ground. You will notice there are holes in the tripod leg braces (Fig. 6-22). These are designed to hold eyepieces when not in use. Attaching the U Mount: Remove the U mount (Fig. 1-6) from the box. Place the bottom of the mount into the hole in the top of the tripod head and secure with the mount locking screw (Fig. 1-8). Please be careful to make sure that the mount is securely attached to the tripod. Attaching the Telescope Tube to the Mount: Carefully remove the optical tube assembly (Fig. 1-5) from the box. Gently place the optical tube between the forks of the U mount with the focuser (Fig. 1-2) towards the front. Slide the knobs located on the sides of the optical tube assembly into the corresponding openings at the top of the U mount. Twist the locking plates (Fig. 3-11) on the sides of the telescope until the thumbscrew (Fig. 3-13) is aligned with the holes on the forks of the mount. Tighten the thumbscrews to secure the telescope to the mount. Slide the altitude rod (Fig. 3-10) into the hole in the altitude coarse adjustment control (Fig. 3-14). Align the end of the altitude rod with the corresponding threaded hole on the telescope and secure using the included screw. Be careful not to over-tighten. Attaching the Finder Scope: There are two finder scope bracket mounting bolts (Fig. 5-19) located at the front end of the optical tube. Remove the nuts and set aside. Place the finder scope bracket (Fig. 5-18) onto the mounting bolts, replace the nuts and tighten down securely to the optical tube. Make sure the bracket is oriented as shown in Fig. 5. Slide the finder scope (Fig. 1-1) into the bracket facing forward. 8 9
6 Attaching the Eyepieces: Insert the Huygenian 20mm eyepiece (Fig. 4-3) into the focuser (Fig. 4-2) and tighten down using the focuser locking screw (Fig. 4-15). You have now completed the assembly of your Red Planet TM telescope. We will now need to make the necessary adjustments in order to use your telescope properly. Aligning the Finder Scope: The low power and wide field of view provided by the 10x30mm finder scope (Fig. 1-1) provides a quick and easy way to sight an object prior to looking through the high-power telescope. The finder scope must first be properly aligned with the telescope in order to work properly. This alignment is best performed during the daylight. Follow the steps below to align your finder scope properly: Place the Huygenian 20mm eyepiece (Fig. 1-3) into the focuser (Fig. 1-2) of the telescope. Loosen the horizontal lock knob (Fig. 1-7) and the altitude rod coarse adjustment lock knob (Fig. 3-14). Point the main telescope at a specific land object 200 yards or more away and center that object in the telescope field of view. Lock down the horizontal lock knob (Fig. 1-7) and the altitude rod coarse adjustment lock knob (Fig. 3-14) being careful to keep the object centered. Now look through the finder scope and loosen or tighten the finder scope bracket thumb screws (Fig. 5-16) until the crosshairs are centered on the same object. Focus by turning the finder scope focus knob (Fig. 5-17) until the image in the finder scope is sharp and clear. Check the alignment at nighttime by repeating this process with a bright star or the moon. Make any necessary adjustments. Calculating Power: The magnification of a telescope depends on both the focal length of your telescope as well as the eyepiece you use. There is a simple formula you can use to determine the magnification you are using at any given time. Simply divide the focal length of the telescope by the focal length of the eyepiece. For example, if you are using the 20mm eyepiece with your TP-100 telescope the power would be: Power = 700mm / 20mm = 35x Using an eyepiece with a smaller focal length will increase the magnification of your telescope. It is always best to start at the lowest magnification configuration. The wider field of view makes it easier to spot far away objects. Once an object is centered in your field of view you can switch to the higher power configurations. Understanding Celestial Movement: In order to get the most enjoyment out of your telescope it is necessary to know the basics of how celestial objects move across the sky. Due to the rotation of the earth, celestial objects appear to move from East to West across the sky, much like the Sun. You will notice this movement as an object in your telescope field of view will slowly move across the field and out of view. Continuous adjustment is needed to keep an object in the field of view. Now that your finder scope is properly aligned, any object centered in your finder scope should also be centered in your telescope
7 12 Using the Telescope: Once you have properly assembled and aligned your telescope you are finally ready to start using it. To locate an object using the telescope, first loosen the horizontal lock knob (Fig. 1-7) and the altitude rod coarse adjustment lock knob (Fig. 3-14) allowing the telescope to rotate along both axes. Look through the finder scope (Fig. 1-1) to sight the object you are looking for and center it in the finder scope cross-hairs. You may need to focus the finder scope by turning the finder scope focus knob (Fig. 5-17). Then re-tighten the horizontal lock knob and the altitude rod coarse adjustment lock knob. Coarse altitude adjustments can be made by loosening the altitude rod coarse adjustment lock knob (Fig. 3-14) and moving the telescope by hand. Finer altitude adjustments can be made by turning the altitude rod fine adjustment control (Fig. 3-9). It is best to use the lowest power eyepiece (the Huygenian 20mm eyepiece) at first. This allows for a wider field of view making it easier to locate objects. Once the object is centered in the field of view you can switch the eyepiece to higher magnifications. Once the object is centered in the field of view, turn the focus knobs (Fig. 1-4) on the eyepiece focuser (Fig. 1-2) until the image is clear and sharp. You will notice that the view through the finder scope and telescope are normal, unlike other telescopes that have inverted images. This normal view allows you to use this telescope for both terrestrial and astronomical viewing. It is best to start by viewing terrestrial objects during the day. This is a good way to practice observing with your telescope. At night it is best to start by looking at the moon or other easy to find celestial objects. As you become more experienced using your telescope you can begin to try locating harder to find objects. If you are viewing celestial objects, you will notice that the object will slowly move across the field of view (caused by the rotation of the Earth). You will need to slowly move the telescope vertically and/or horizontally to keep the object centered. There are many conditions that may affect your ability to focus or observe celestial objects clearly. Brightly lit areas (light pollution) will make it difficult to see faint objects in the sky. It will also make it difficult for your eyes to adjust to the dark. You should try and find a dark area and allow your eyes to adjust to the dark before making observations. Using a red filtered flashlight to view charts and your telescope components is recommended to preserve your night sight. The best viewing conditions are when the sky is inky black. Hazy skies, pollution, clouds and moisture can all affect the clarity of your viewing image. Avoid touching the eyepiece or optical tube while looking through the telescope. The vibrations caused by this contact will cause the object you are looking at to move. You should also make sure that the surface you place your telescope on does not vibrate or move as this will also cause your viewing object to move. You should avoid setting up your telescope inside a room looking through an open window. The difference in air temperatures may result in a blurry image. Viewing through a closed window might also result in a distorted image due to the varying densities of window glass. Avoid viewing objects that are low on the horizon. Objects that are higher up in the sky will appear much sharper. Sudden changes in temperature may cause condensation to appear on the optical components of the telescope. It is best to set up your telescope ahead of time and then wait while the telescope adjusts to the new temperature before using it. Care and Maintenance of Your Telescope: Cleaning: Always replace dust covers and lens caps when not in use. This will minimize the amount of dust and debris that gets into your telescope. Cleaning should be performed only if absolutely necessary. If dust has built up on the optics use a soft camel s hair brush or pressurized air to gently remove it. If dew collects on the optics of your telescope or moisture condenses inside the optics, remove all accessories and place the telescope in a dry, dust free environment and point the telescope downward. This should help eliminate the moisture. Avoid touching the surface of the mirror. Do not attempt to take apart your telescope to clean it. 13

8 Fig.9 Fig.10 Collimation of the Optics: The internal optics of the telescope have already been collimated or aligned at the factory. However, rough handling of the telescope may knock the optics out of collimation, resulting in poor optical performance. Please refer to Fig. 9 to better understand the internal layout of your telescope. To determine if your telescope needs collimation perform the following steps: Remove the eyepiece (Fig. 1-3) from the focuser (Fig. 1-2) and turn the focusing knob (Fig. 1-4) until the tube is at its innermost position. Point the telescope at a plain background and then peer through the empty focuser. You should see a series of concentric circles (See Fig. 10). The outer most circle being a reflection of the primary mirror (with three mirror clips). The inner circle is the diagonal mirror, which should be precisely centered inside the primary mirror. You should see the reflection of your eye in the diagonal mirror. Adjusting the Diagonal Holder: If the telescope is properly collimated you should see the primary mirror (See Fig. 10) and three clips in their entirety. If the primary mirror is not centered properly (See Fig. 11) you will need to adjust the diagonal mirror (See Fig. 9) to correct this. Loosen the diagonal mirror tilt screws (Fig. 7-26) so that you can move the diagonal holder (Fig. 7-27) with your hand. Tilt the diagonal holder until the entire primary mirror is visible and carefully retighten the screws to lock it into place. If necessary, turn the three screws slightly to make fine adjustments. Fig
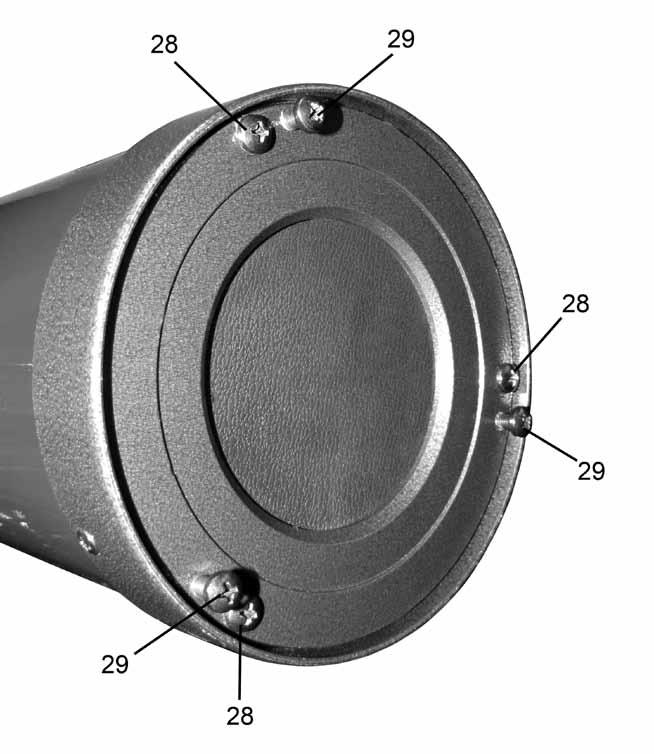
 you will need to adjust the primary mirror (See Fig.9) located on the outside lower-end of the main tube.")
9 Adjusting the Primary Mirror: If the telescope is properly collimated you should see the diagonal mirror (See Fig. 10) at the exact center of the primary mirror. If the diagonal mirror appears off-center (See Fig. 11) you will need to adjust the primary mirror (See Fig.9) located on the outside lower-end of the main tube. To do this you will first need to loosen the primary mirror locking screws (Fig. 8-28). These are the screws that are flush against the surface of the telescope. Then alternately loosen and tighten the primary mirror tilt screws (Fig. 8-29) until the diagonal mirror is centered inside the primary mirror. The primary mirror tilt screws are easily identified because they stick out from the surface of the telescope. Once the adjustment is complete, re-tighten the primary mirror locking screws. Night Time Star Collimation Testing: To test the accuracy of your collimation, equip your telescope with the 20mm eyepiece and focus on a moderately bright star. With the star centered in the field of view, slowly turn the focus knob (Fig. 1-4) until the star is out of focus. If properly collimated, you should see a series of concentric circles around a black center dot (Fig. 12-C). If the circles are not concentric and the black dot is not centered (Fig. 12A) you will need to make adjustments to the primary mirror. Loosen the primary mirror locking screws (Fig. 8-28) and use the horizontal and altitude adjustments to move the circles to the edge of the telescope field of view (Fig. 12-B). Then turn the primary mirror tilt screws (Fig. 8-29) until the black dot moves to the center of the image with the concentric circles radiating from it (Fig. 12-C). Once centered, tighten down the locking screws. Fig.12 Specifications: Optical Design: Newtonian Reflector Aperture: 76mm (2.99 ) Focal Length: 700mm (27.56 ) Focal Ratio: 9.21 Finder Scope: 10x30mm Eyepiece 1: Huygenian 20mm Erecting Magnification 1: 35x Eyepiece 2: Huygenian 8mm Erecting Magnification 2: 87.5x Mount: U Mount Weight: 8 lbs. Warnings: Never use this telescope (or its viewfinder) to look directly at or near the sun. Viewing the sun can cause instant and irreversible eye damage. Always supervise children when using this telescope. Do not leave telescope unattended at any time. Untrained adults or children may not be familiar with the correcting operating procedure. Do not point the telescope at the sun even when you are not looking through it. This will cause internal damage to the telescope. Handle this telescope with care. Rough handling might knock the internal optical components out of alignment. Customer Service: We will be happy to help you with any problems you may experience while using your telescope. Please call our toll-free customer service line at
10 Warranty Information: This Carson product is warranted to be free from defects in material and workmanship for a period of one year from date of purchase. During this period Carson will, at its option and without charge, either repair any part or assembly of parts found to be defective in material or workmanship, or replace this Carson product with a Carson product of comparable value and condition, subject to the limitations and exclusions noted herein. This warranty extends to the original purchaser only and is not assignable or transferable. It shall not apply to any product that has been subject to misuse, abuse, negligence or accident, or to any defects or damage directly or indirectly caused by the use of unauthorized replacement parts and/or service performed by unauthorized personnel. This warranty gives you specific legal rights, and you may also have other rights which could vary from state to state. Some states do not allow limitations on the life of an implied warranty and/or do not allow excluding or limiting incidental or consequential damages. If so, the above limitations or exclusions may not apply to you. Warranty Procedure: Provide proof of purchase. A receipt or other dated proof of purchase must be included with merchandise being returned for a warranty claim to be processed. Call or write for authorization. Before returning any product for a warranty claim, a Return Authorization (RA) number must be obtained. No merchandise will be accepted without an RA, and failure to obtain an RA will prevent or delay processing of the warranty claim. To obtain an RA call , or write to Carson Warranty Service, th Avenue, Ronkonkoma NY, with a description of the problem. Include your name, address and telephone number. Package the return carefully. Shippers will not reimburse for damages due to insufficient packaging, even if the merchandise is insured. Print the RA number prominently on the top of the package. Prepay shipping. Insure the package. Send it to: Carson Warranty Service, th Avenue, Ronkonkoma NY, Merchandise must be shipped prepaid. Carson will not accept merchandise C.O.D
SKELESCOPE REFLECTOR TELESCOPE WITH TABLE TOP TRIPOD SK-100 INSTRUCTION MANUAL
 TM SKELESCOPE REFLECTOR TELESCOPE WITH TABLE TOP TRIPOD SK-100 INSTRUCTION MANUAL TABLE OF CONTENTS Introduction Box Contents / Visual Key Diagram Telescope Assembly Setting up Your Telescope Attaching
RP-200 TELESCOPE Instruction Manual
 2070 5th Avenue Ronkonkoma, NY 11779 Phone: 631-963-5000 Fax: 631-427-6749 For information, call toll-free: 1-800-967-8427 info@carson.com / sales@carson.com / www.carson.com RP-200 TELESCOPE Instruction
RP-300 TELESCOPE Instruction Manual
 RP-300 TELESCOPE Instruction Manual 2070 5th Avenue Ronkonkoma, NY 11779 Phone: 631-963-5000 Fax: 631-427-6749 For information, call toll-free: 1-800-967-8427 info@carson.com / sales@carson.com / www.carson.com
RP-400 TELESCOPE Instruction Manual
 RP-400 TELESCOPE Instruction Manual 2070 5th Avenue Ronkonkoma, NY 11779 Phone: 631-963-5000 Fax: 631-427-6749 For information, call toll-free: 1-800-967-8427 info@carson.com / sales@carson.com / www.carson.com
JC-1000 Instruction Manual
 A. Micro adjustable Altitude control B. Focusing wheel C. Focusing tube D. Angle prism E. Eyepiece F. Finderscope bracket G. Finderscope H. Main telescope body I. Sunshade J. Lens K. Yoke locking screw
1 YEAR LIMITED WARRANTY TELESCOPES
 1 YEAR LIMITED WARRANTY TELESCOPES BARSKA Optics, as manufacturer, warrants this new precision optical product to be free of original defects in materials and/or workmanship for the length of time specified
Directions for use
 Directions for use 40070 40080 60050 70060 70076 80060 90060 900114 Fig. 1 Fig. 1A Fig. 2 Fig. 3 Fig. 4 Fig. 5 Fig. 6 Fig. 7 english ENGLISH DIRECTIONS FOR USE 1 Tripod Leg 2 Tripod Leg Adjusting Screw
saxon Instruction Manual saxon Grandeur Brass Telescope High quality optics
 saxon High quality optics Instruction Manual saxon Grandeur Brass Telescope WARNING! Do not use the telescope to look at the sun without an appropriate solar filter. Looking at or near the sun can result
Instruction Manual Meade 70AZ-T 70mm Compact Refractor Telescope Meade Instruments Corporation
 Instruction Manual Meade 70AZ-T 70mm Compact Refractor Telescope Meade Instruments Corporation 6001 Oak Canyon, Irvine, California 92618 (949) 451-1450 Meade 70mm Compact Refractor Telescope 1! 1) j ih
SCHIEBER TELESCOPES. Unique, High-Quality Telescopes
 SCHIEBER TELESCOPES Unique, High-Quality Telescopes 3.5 Refractor Astrophotography Bundle - Strike 90 PLUS Telescope Assembly Instructions and Digital Eyepiece Camera Instructions. (1) telescope assembly
Telescope. 1. Read these instructions carefully and familiarise yourself with the procedure before assembling the unit.
 Telescope a Simple assembly instructions- Please keep for future reference IMPORTANT 1. Read these instructions carefully and familiarise yourself with the procedure before assembling the unit. 2. Check
Owner's Manual NSL100B BUILDERS LEVEL NSL500B TRANSIT LEVEL
 Owner's Manual NSL100B BUILDERS LEVEL NSL500B TRANSIT LEVEL 1 1. CONTENTS 2. Nomenclature page 3 3. Care and Maintenance page 4 4. Using your Instrument 4.1 Setting up your Instrument page 5 4.2 Stadia
Spotting Scope Instruction Manual
 Spotting Scope Instruction Manual Here are the Main Parts of Your orbitor OR7030 B A C A. Telescope Tube F E D B. Dew Shield I C. Eyepiece G D. Diagonal Mirror E. Focuser F. Mount Lock Knob H G. Aiming
Owner's Manual. for AUTOMATIC LEVEL. NBL Series. FOR CUSTOMER SERVICE, PARTS & REPAIR, CALL Toll Free:
 Owner's Manual for AUTOMATIC LEVEL NBL Series FOR CUSTOMER SERVICE, PARTS & REPAIR, CALL Toll Free: 1-888-247-1960 1 1. CONTENTS 2. Nomenclature page 3 3. Care and Maintenance page 4 4. Using your Instrument
CASSINI CQR-120 OPERATING INSTRUCTIONS
 CASSINI CQR-120 OPERATING INSTRUCTIONS INTRODUCTION CONGRATULATIONS ON YOUR PURCHASE OF THE CASSINI CQR-120 TELESCOPE. THIS TELESCOPE HAS BEEN PRODUCED TO PRECISE SPECIFICATIONS. PRIOR TO USING YOUR NEW
Instruction Manual. Model #: (Reflector) Lit #: / 06-07
 Lit #: / 06-07") Instruction Manual Model #: 49114500 (Reflector) Model #: 49060700 () Model #: 49070800 () Lit #: 93-0468 / 06-07 PARTS DIAGRAM C E D B A F G H I J NOTE: Actual product may have improvements that are not
Instruction Manual Model #: 49114500 (Reflector) Model #: 49060700 () Model #: 49070800 () Lit #: 93-0468 / 06-07 PARTS DIAGRAM C E D B A F G H I J NOTE: Actual product may have improvements that are not
C A S S I N I. MODEL : C EQ3 900mm X 135mm COSMO BRANDS INC.
 C A S S I N I MODEL : C-900135EQ3 900mm X 135mm COSMO BRANDS INC. WWW.COSMOSOPTICS.COM 2 C A S S I N I C-900135EQ3 TELESCOPE OPERATING INSTRUCTIONS INTRODUCTION CONGRATULATIONS ON YOUR PURCHASE OF THE
CASSINI CQR-800 OPERATING INSTRUCTIONS INTRODUCTION
 HQR-800 CASSINI CQR-800 OPERATING INSTRUCTIONS INTRODUCTION CONGRATULATIONS ON YOUR PURCHASE OF THE CASSINI CQR-800 TELESCOPE. THIS TELESCOPE HAS BEEN PRODUCED TO PRECISE SPECIFICATIONS. PRIOR TO USING
Altazimuth Mount. Altazimuth Mount
 instruction Manual Orion VersaGo II HD Altazimuth Mount #10104 Orion VersaGo II Altazimuth Mount #10105 #10104 #10105 Providing Exceptional Consumer Optical Products Since 1975 OrionTelescopes.com Customer
How to use your astronomical telescope for the first time.
 How to use your astronomical telescope for the first time. A quick guide to setting up and using your telescope for the first time. There are 10 pages in this section which cover a variety of topics to
Instruction Manual. AC 70/700 AZ-2 English version Rev A
 Instruction Manual AC 70/700 AZ-2 English version 5. 2016 Rev A The Omegon AC 70/700 AZ-2 Congratulations on the purchase of the new Omegon AC 70/700 AZ-2. This small telescope will give you hours of fun,
C A S S I N I TRACKER
 C A S S I N I TRACKER ASTRONOMICAL REFLECTOR T ELESCOPE SERIES #C-80080TR #C-1100102TR #C-1000120TR #C-1000120TREF #C-900135TR COSMO BRANDS INC. WWW.COSMOSOPTICS.COM 2 CASSINI REFLECTING TELESCOPE OPERATING
Series. Quantum 100 Refractor (Equatorial Mount not included) INSTRUCTION MANUAL models s11160
 INSTRUCTION MANUAL models s11160") Series Quantum 100 Refractor (Equatorial Mount not included) INSTRUCTION MANUAL models s11160 Warning Never look directly at the Sun with the naked eye or with a telescope ( unless you have the proper
Series Quantum 100 Refractor (Equatorial Mount not included) INSTRUCTION MANUAL models s11160 Warning Never look directly at the Sun with the naked eye or with a telescope ( unless you have the proper
PowerSeeker 114 INSTRUCTION MANUAL #21045
 PowerSeeker 114 INSTRUCTION MANUAL #21045 INTRODUCTION Congratulations on your purchase and welcome to the Celestron world of amateur astronomy. Some of the terms and parts described in these instructions
IF YOU NEED ANY FURTHER HELP WITH YOUR GALILEO TELESCOPE PLEASE CALL MON-FRI 9AM - 5PM E.S.COM
 G-80DB Instructions G-80DB IF YOU NEED ANY FURTHER HELP WITH YOUR GALILEO TELESCOPE PLEASE CALL US @ 305-245-8444 MON-FRI 9AM - 5PM E.S.T OR E-MAIL US AT CUSTOMERSERVICE@COSMOSOPTICS.COM 2 GALILEO G-80DB
COMMODORE BRASS TELESCOPE ZHUMELL COMMODORE BRASS TELESCOPE
 3 0 15 15 E OWNER S MANUAL COMMODORE BRASS TELESCOPE ZHUMELL COMMODORE BRASS TELESCOPE 5 W 60 W 30 W 45 W Zhumell customers know that there are plenty of ways to experience the world. They also understand
Instructions Manual Zoomion Apollo 80
 Instructions Manual Zoomion Apollo 80 English version 7.2015 Rev A 1 The Zoomion Apollo 80 Figure 1. Parts description. Congratulations on the purchase of the new Zoomion Apollo 80. This telescope will
AGES CF600PM. 50 mm Telescope w/ AZ Pan Tilt Mount Instruction Manual. WARNING! SUN HAZARD: Never look directly at the sun with this device.
 AGES CF600PM 50 mm Telescope w/ AZ Pan Tilt Mount Instruction Manual WARNING! SUN HAZARD: Never look directly at the sun with this device. 1 WARNING: Never attempt to observe the sun with this telescope.
CAUTION: BEFORE YOU BEGIN, ALWAYS MAKE SURE THE WEAPON IS UNLOADED AND SAFE TO HANDLE.
 CAUTION: BEFORE YOU BEGIN, ALWAYS MAKE SURE THE WEAPON IS UNLOADED AND SAFE TO HANDLE. ON Press either brightness button ( + or - ) to turn on the sight. The sight is also programmed to turn on when it
CAUTION! NEVER ATTEMPT TO LOOK AT THE SUN WITH UNLESS YOU HAVE A FULL-APERTURE SOLAR FILTER (NOT INCLUDED WITH
 CAUTION! X NEVER ATTEMPT TO LOOK AT THE SUN WITH YOUR APERTURA DOBSONIAN TELESCOPE UNLESS YOU HAVE A FULL-APERTURE SOLAR FILTER (NOT INCLUDED WITH TELESCOPE) INSTALLED OVER THE OPEN END OF THE OPTICAL
instruction Manual #9974 Customer Support (800) IN 293 Rev. C 02/09
 IN 293 Rev. C 02/09") instruction Manual Orion StarBlast Imaging Optical Tube Assembly #9974 Providing Exceptional Consumer Optical Products Since 1975 Customer Support (800) 676-1343 E-mail: support@telescope.com Corporate
instruction Manual Orion StarBlast Imaging Optical Tube Assembly #9974 Providing Exceptional Consumer Optical Products Since 1975 Customer Support (800) 676-1343 E-mail: support@telescope.com Corporate
Orion Argonaut 6" Maksutov-Newtonian
 INSTRUCTION MANUAL Orion Argonaut 6" Maksutov-Newtonian #9068 Optical Tube Assembly #21481 With GP-DX Equatorial Mount Providing Exceptional Consumer Optical Products Since 1975 Customer Support (800)
Orion StarBlast 4.5" Telescope
 Orion StarBlast 4.5" Telescope INSTRUCTION MANUAL 507-328-2309 www.rochesterskies.org WARNING: Never look directly at the Sun through any telescope or its finder scope even for an instant as permanent
RECON. How to Setup the Telescope to Observe. This guide will show you how to setup your telescope for observing. Written By: Brittany McCrigler
 RECON How to Setup the Telescope to Observe This guide will show you how to setup your telescope for observing. Written By: Brittany McCrigler 2017 recon.dozuki.com Page 1 of 30 INTRODUCTION This guide
Telescope Instruction Manual mm RefLECtor
 Telescope Instruction Manual 78-4501 114mm RefLECtor Lit. #: 91-0246/06-01 Never Look Directly At The Sun With Your Telescope Permanent Damage To Your Eyes May Occur 2. WHERE DO I START? Your Bushnell
Orion EQ-1 Equatorial Mount
 instruction Manual Orion EQ-1 Equatorial Mount #9011 Providing Exceptional Consumer Optical Products Since 1975 Customer Support (800) 676-1343 E-mail: support@telescope.com Corporate Offices (831) 763-7000
THE LOSMANDY G-11 MOUNT
 Checking the parts THE LOSMANDY G-11 MOUNT Depending on which accessories you ordered, your G-11 mount was shipped in four or more boxes. The contents of each box are as follows: Equatorial Mount Adjustable
MODELS #21052 MODEL #21071
 FIRSTSCOPE 60 AZ REFRACTORS MODELS #21052 FIRSTSCOPE 70 AZ REFRACTOR MODEL #21071 INSTRUCTION MANUAL 2 INTRODUCTION Congratulations on your purchase and welcome to the Celestron world of amateur astronomy.
EQ-1 Equatorial Mount
 instruction Manual Orion EQ-1 Equatorial Mount #9011 Providing Exceptional Consumer Optical Products Since 1975 Customer Support: www.oriontelescopes.com/contactus Corporate Offices: 89 Hangar Way, Watsonville
NEVER USE A TELESCOPE TO LOOK AT THE SUN DIRECTLY!
 Quick Start Guide AstroBoy -70e Computerized Telescope With Electronic Eyepiece #9102 (Astro Blue) FEATURES Alt-Azimuth Mount with GoToNova computer control technology Computerized automatic pointing and
Observing Procedure for C11 GPS
 Observing Procedure for C11 GPS By T. W. Fuller Preparation Customize observing list You can install a list of up to 25 custom objects in the telescope database ahead of time, so that you will have them
Assembly Manual for the Brevard Astronomical Society 16 inch F4.5 Dobsonian Telescope Brevard Astronomical Society P.O. Box 1084 Cocoa, FL 32922
 BAS 16 Telescope Manual Rev 1 Assembly Manual for the Brevard Astronomical Society 16 inch F4.5 Dobsonian Telescope Brevard Astronomical Society P.O. Box 1084 Cocoa, FL 32922 TABLE OF CONTENTS SECTION
Online Assembly Guide : 4.5 inch Reflector Telescope
 Online Assembly Guide : 4.5 inch Reflector Telescope INTRODUCTION Congratulations! You have bought a wonderful telescope. This is a precision optical instrument, and you have many wonderful evenings of
Instruction Manual 1
 Instruction Manual 1 Dobson 76/300 DOB English version 8.2014 Rev A The Omegon 76/300 DOB Congratulations on the purchase of the new Omegon 76/3006 DOB. This small telescope will give you hours of fun,
Instruction Manual. Omegon EQ-500 Equatorial Mount English version Rev A
 Instruction Manual Omegon EQ-500 Equatorial Mount English version 10.2014 Rev A Instruction Manual Omegon EQ-500 Equatorial Mount Congratulations on the purchase of the new Omegon EQ-500 Equatorial Mount.
C4 PLUS RIFLESCOPES User Guide
 C4 Plus USER GUIDE_Layout 1 7/24/15 2:40 PM Page 1 C4 PLUS RIFLESCOPES User Guide This user guide includes information for the entire C4 Plus riflescope line. Please review thoroughly and pay close attention
INSTRUCTION MANUAL. Laser Diode Sarcomere Length. Aurora Scientific Inc. 360 Industrial Parkway South, Unit 4 Aurora, Ontario, Canada L4G 3V7
 INSTRUCTION MANUAL Model 902A Laser Diode Sarcomere Length May 6, 2013, Revision 3 Copyright 2008-2013 Aurora Scientific Inc. Aurora Scientific Inc. 360 Industrial Parkway South, Unit 4 Aurora, Ontario,
22X Builder s Level Model No Instruction Manual
 2594H 7/29/09 10:12 AM Page 1 22X Builder s Level Model No. 40-6900 Instruction Manual Congratulations on your choice of this 22X Builder s Level. We suggest you read this instruction manual thoroughly
INSTRUCTION MANUAL REFRACTORS/REFLECTORS WITH ALT-AZIMUTH MOUNT V2
 INSTRUCTION MANUAL REFRACTORS/REFLECTORS WITH ALT-AZIMUTH MOUNT 090103V2 AZ1 & AZ2 MOUNTS I A Refractor/AZ2 C B G H I J K a b F L E 1 D 5 4 2 3 C B D A Reflector/AZ1 E F G H AZ2 A. Dust Cap / Mask (Remove
CBRD30CP3 & BOWRD30CP INSTRUCTION MANUAL
 CBRD30CP3 & BOWRD30CP INSTRUCTION MANUAL PROLOGUE Your BSA Illuminated sight is for use on both compound and standard bows. Each version of the BSA illuminated sight has a specific reticle to help maintain
22X Builder s Transit Level Model No Instruction Manual
 2595H 7/29/09 10:15 AM Page 1 22X Builder s Transit Level Model No. 40-6910 Instruction Manual Congratulations on your choice of this 22X Builder s Transit Level. We suggest you read this instruction manual
RT-6 Riflescopes. User Guide
 RT-6 Riflescopes User Guide This user guide includes information for low-magnification RT-6 riflescopes. Please review thoroughly, and pay close attention to the details pertaining to your specific riflescope
Library Loaner Telescope Program
 St. Louis County Library in partnership with the St. Louis Astronomical Society presents Library Loaner Telescope Program Loaner Scope s 250 Eyes Quick Start User s Guide Telescopes can be complicated,
WARNING! DO NOT USE THE TELESCOPE TO LOOK AT THE SUN!
 WARNING! DO NOT USE THE TELESCOPE TO LOOK AT THE SUN! LOOKING AT OR CLOSE TO THE SUN WITH A TELESCOPE OR FINDERSCOPE WILL CAUSE INSTANT AND PERMANENT DAMAGE TO YOUR EYES. CHILDREN SHOULD AT ALL TIMES BE
P4Xi TACTICAL Riflescope TECHNICAL MANUAL
 P4Xi TACTICAL Riflescope TECHNICAL MANUAL TABLE OF CONTENTS Page Mounting The Scope 2 Eyepiece Focusing 2 Windage / Elevation Adjustment 3 Setting The Zero Stop 4 Turret Cap Replacement 4 Parallax Focus
EPOCSELFIR LACITCATiX5T TECHNICAL MANUAL
 T5Xi TACTICAL RIFLESCOPE TECHNICAL MANUAL TABLE OF CONTENTS Page Mounting The Scope...2 Eyepiece Focusing...2 Windge / Elevation Adjustment...3 Setting The Zero Stop...4 Turret Cap Replacement...4 Parallax
One-Year Limited Warranty
 INDEX Product overview...3 Installing the batteries...4 Mounting the Rifle Scope...5 Operation...6 Windage and Elevation adjustments...7-8 Infrared Illumination...8 Focusing...9 Power display & battery
Collimation with a Takahashi collimating scope
 Collimation with a Takahashi collimating scope These instructions describe how you can adjust your Alluna Ritchey-Chrétien telescope to perfection in just a few steps and just a few minutes using a Takahashi
FIELD GUIDE FOR HORUS SCOPES
 www.horusvision.com TM FIELD GUIDE FOR HORUS SCOPES Your Horus scope combines fine-quality optics, combat-proven hardware and the patented Horus reticle to deliver speed and accuracy for all shooters.
INSTRUCTION MANUAL. Model # LIT. #: /08-06
 INSTRUCTION MANUAL Model # 78-6114 LIT. #: 98-0810/08-06 QVC 78-6114 Telescope 1LIM.indd 1 9/6/2006 3:02:21 PM WHERE DO I START? Your Bushnell telescope can bring the wonders of the universe to your eye.
National Optical & Scientific Instrument Inc Tri-County Parkway Schertz, Texas Phone (210) Fax (210)
 Fax (210)") National Optical & Scientific Instrument Inc. 6508 Tri-County Parkway Schertz, Texas 78154 Phone (210) 590-9010 Fax (210) 590-1104 INSTRUCTIONS FOR SHOP MICROSCOPES MODEL NUMBERS 186 187 188 189 National
National Optical & Scientific Instrument Inc. 6508 Tri-County Parkway Schertz, Texas 78154 Phone (210) 590-9010 Fax (210) 590-1104 INSTRUCTIONS FOR SHOP MICROSCOPES MODEL NUMBERS 186 187 188 189 National
Instructions Manual Omegon Dobson Advanced 203
 Instructions Manual Omegon Dobson Advanced 203 English version 10.2015 Rev A 1 The Omegon Advanced Dobson 203 Congratulations on the purchase of the new Omegon Advanced Dobson 203 telescope. This telescope
ASTRO-PHYSICS, INC. POLAR ALIGNMENT TELESCOPE
 Polar Alignment Telescope ASTRO-PHYSICS, INC. POLAR ALIGNMENT TELESCOPE This polar axis telescope will help you align your mount with the Celestial Poles. When your mount is properly aligned, your telescope's
900X70 Refractor Telescope Instruction Manual
 900X70 Refractor Telescope Instruction Manual For products #6001 & #6002 www.ioptron.com Table of Contents Table of Contents... 2 1. Telescope Assembly... 3 1.1. 900X70 Assembly Terms... 3 1.2. Telescope
NG114mm 114mm Newtonian Telescope w/ Equatorial Mount Instruction Manual
 Visit us at: nationalgeographic.com AGES 10+ NG114mm 114mm Newtonian Telescope w/ Equatorial Mount Instruction Manual WARNING:! CHOKING HAZARD Small parts. Not for children under 3 years. WARNING:! SUN
NG700AZ 70 MM TELESCOPE W/ SLOW-MOTION ALT-AZIMUTH MOUNT INSTRUCTION MANUAL
 AGES 10+ 80-10070 NG700AZ 70 MM TELESCOPE W/ SLOW-MOTION ALT-AZIMUTH MOUNT INSTRUCTION MANUAL SPECIFICATIONS OPTICAL DESIGN MAGNIFICATION (WITH 2X BARLOW LENS) FRONT LENS (CLEAR APERTURE) FOCAL LENGTH
HS515G-M. PARALOW Circle Dot Sight. User's Manual. Holosun Technologies Inc. Phone: (909) Fax: (909)
 Fax: (909)") HS515G-M PARALOW Circle Dot Sight User's Manual Multi Reticle Holosun Technologies Inc. Phone: (909) 594-2888 Fax: (909) 598-4888 E-mail: info@holosun.com COLOR www.holosun.com PARALOW HS515G-M PARALOW
HS515G-M PARALOW Circle Dot Sight User's Manual Multi Reticle Holosun Technologies Inc. Phone: (909) 594-2888 Fax: (909) 598-4888 E-mail: info@holosun.com COLOR www.holosun.com PARALOW HS515G-M PARALOW
AGES INSTRUCTION MANUAL. Juno 50mm Telescope Space Exploration Gear
 8+ AGES INSTRUCTION MANUAL Juno 50mm Telescope Space Exploration Gear CONTENTS 01 02 04 03 06 07 05 08 WARNING CHOKING HAZARD Small parts. Not for children under 3 years. 2 CONTENTS Contents Parts Overview
LEAPERS, INC. RED/GREEN DOTS
 LEAPERS, INC. 1 RED/GREEN DOTS range estimating scopes UTG reticle intensified scopes TOTAL SOLUTION TO YOUR NEEDS -COMMITMENT TO BEST QUALITY, BEST VALUE AND BEST SERVICEwww.LEAPERS.com 32700 Capitol
NT114CF 114 mm Carbon Fiber Newtonian Telescope w/ Pan Handle Mount Instruction Manual
 AGES 10+ 80-20114 NT114CF 114 mm Carbon Fiber Newtonian Telescope w/ Pan Handle Mount Instruction Manual Optical design Magnification (with 2x Barlow lens) Front lens (clear aperture) Focal length Standard
ASTRO-PHYSICS, INC. POLAR ALIGNMENT TELESCOPE (PASILL2)
") OBJECTIVE LENS ASTRO-PHYSICS, INC. POLAR ALIGNMENT TELESCOPE (PASILL2) This model shipped from January 2001 through July 2002. It fits all 400, 600, 600E, 800, 900 and 1200 models (except the original
OBJECTIVE LENS ASTRO-PHYSICS, INC. POLAR ALIGNMENT TELESCOPE (PASILL2) This model shipped from January 2001 through July 2002. It fits all 400, 600, 600E, 800, 900 and 1200 models (except the original
product manual H-3220A Benkelman Beam
 05.12 product manual H-3220A Benkelman Beam General The H-3220A Benkelman Beam Apparatus is a convenient and accurate device used for measuring the deflection of flexible pavements under moving wheel
WARNING! DO NOT USE THE TELESCOPE TO LOOK AT THE SUN!
 WARNING! DO NOT USE THE TELESCOPE TO LOOK AT THE SUN! LOOKING AT OR CLOSE TO THE SUN WITH A TELESCOPE OR FINDERSCOPE WILL CAUSE INSTANT AND PERMANENT DAMAGE TO YOUR EYES. CHILDREN SHOULD AT ALL TIMES BE
Quick Start Guide. ZEQ25GT Center Balanced GoTo Equatorial Mount Models: #7100, #7101, #7102
 Quick Start Guide ZEQ25GT Center Balanced GoTo Equatorial Mount Models: #7100, #7101, #7102 PACKAGE CONTENTS 1 Telescope mount with GPS, and AccuAligning TM dark field illuminated Polar Scope (except Model
Automatic Level Maintenance Manual SAL-XX W/ AIR DAMPENED COMPENSATOR
 Automatic Level Maintenance Manual SAL-XX W/ AIR DAMPENED COMPENSATOR CST/Berger 2001 SAL 20/24/28/32 PAGE 1 REV. C 071803 Automatic Level Maintenance Manual User Calibration and Testing... 3 Circular
MODELS #21067 MODEL #21076 MODELS #21086
 FIRSTSCOPE 60 EQ REFRACTORS MODELS #21067 FIRSTSCOPE 70 EQ REFRACTOR MODEL #21076 FIRSTSCOPE 80 EQ REFRACTORS MODELS #21086 INSTRUCTION MANUAL 3 FIRSTSCOPE EQ REFRACTORS FIGURE 1 LIST OF PARTS: FIRSTSCOPE
1.25 Laser Collimator with 2 Adapter Instruction Manual SKU#
 1.25 Laser Collimator with 2 Adapter Instruction Manual SKU# 651002 Saxon 1.25 Laser Collimator with 2 Adapter Features Quickly and conveniently collimate your telescope with the saxon Laser Collimator!
DEEP SPACE SERIES 525X3 REFLECTOR
 DEEP SPACE SERIES 525X3 REFLECTOR MODEL 78-9003 1 17 16 15 2 14 3 13 4 5 12 6 11 10 8 9 7 1. Finderscope 2. Rack & Pinion Focusing Mechanism 3..965" Format Eyepiece 4. Vertical Stabilizer Bar 5. Azimuth
LT8-300LTU Owner s Guide
 LT8-300LTU Owner s Guide LT8-300LTU LT8-300LTULP FOR CUSTOMER SERVICE, PARTS AND REPAIR CALL (765) 581-4097 www.davidwhite.us.com IMPORTANT: IMPORTANT : IMPORTANTE: Read Before Using Lire avant usage Leer
Orion SkyView Deluxe Equatorial Mount
 INSTRUCTION MANUAL Orion SkyView Deluxe Equatorial Mount #9400 Providing Exceptional Consumer Optical Products Since 1975 Customer Support (800) 676-1343 E-mail: support@telescope.com Corporate Offices
INSTRUCTION MANUAL DOBSONIANS
 INSTRUCTION MANUAL DOBSONIANS 150mm/1200mm 200mm/1200mm 254mm/1200mm TABLE OF CONTENTS Assembling Your Telescope Parts List Base Assembly Optical Tube Assembly Operating Your Telescope Aligning the Finderscope
ZENITHSTAR 61 APO. Owner s Manual ver
 ZENITHSTAR 61 APO Owner s Manual ver. 1.1 2017.07 Contents Specification 3 Telescope Diagram 4 Accessories Map 5 Usage 6 Storage and Cleaning 7 Caution and Safety, Optional Equipment 8 Optional Equipment
RIFLESCOPES User Guide
 Scout USER GUIDE_Layout 1 7/24/15 8:49 AM Page 1 SCOUT RIFLESCOPES User Guide This user guide includes information for the entire Scout riflescope line. Please review thoroughly and pay close attention
Coma Correction. Diagram. Introduction
 Starlight Instruments, LLC 2380 E. Cardinal Drive, Columbia City, Indiana 46725 USA t: 260.244.0020 f.260.244.3077 e: sales@starlightinstruments.com web: starlightinstruments.com Introduction Thank you
INSTRUCTIONS FOR ATTACHING THE NORDIC PLOW TO THE ACTION TRACKCHAIR
 1 INSTRUCTIONS FOR ATTACHING THE NORDIC PLOW TO THE ACTION TRACKCHAIR Nordic Auto Plow LLC is pleased to provide a plow blade that can be used with your Action Trackchair year round. We are not affiliated
Quick Start Guide. The ieq45 GoTo German Equatorial Mount # 8000C
 Quick Start Guide The ieq45 GoTo German Equatorial Mount # 8000C PACKAGE CONTENTS Telescope Mount (with built-in GPS) 3.5 Vixen type dovetail saddle (installed on the mount) 8 Losmandy-D type dovetail
Automatic Level NP-732
 INSTRUCTIONS FOR USE Automatic Level NP-732 Contents Before use 2 1.Nomenclature. 3 2.Operation....4 2-1 Preparing before surveying...4 2-2 Surveying method..........5 2-2-1 Measuring altitude difference...5
10 - Celestron Telescope II: Operation
 10 - Celestron Telescope II: Operation Purpose: Gain more experience setting up a 6 Celestron telescope, familiarize yourself with the software interface, and acquire an image with the CCD camera. Due:
Optronic SkyLine Dobsonian Telescopes
 instruction Manual Optronic SkyLine Dobsonian Telescopes #52908 8", #52910 10", #52912 12" #52908 Copyright 2014 Optronic Technologies All Rights Reserved. No part of this product instruction or any of
WHEN BRIGHTNESS COUNTS
 WHEN BRIGHTNESS COUNTS CAUTION: BEFORE INSTALLATION, CONFIRM THAT FIREARM IS UNLOADED AND IN SAFE OPERABLE CONDITION. MOUNTING (Handgun Slide/Plate mount) To mount the TRU TEC MICRO on the slide of an
x Builders Level Service Manual
 40-690 22x Builders Level Service Manual Item Description Pages.0 Overall Instrument Assembly 2. Main Assembly 2.2 Telescope Assembly 3.3 Base Assembly 4.4 Frame Assembly 5 2.0 Calibration 6-8 2. Vial
Quick Start Guide. ZEQ25GT Balanced GoTo Equatorial Mount Models: #7100, #7101, #7102
 Quick Start Guide ZEQ25GT Balanced GoTo Equatorial Mount Models: #7100, #7101, #7102 PACKAGE CONTENTS 1 Telescope Mount with GPS, and AccuAligning TM dark field illuminated Polar Scope (except Model #7101)
NG114mm 114mm Newtonian Telescope w/ Equatorial Mount Instruction Manual
 AGES 10+ 80-10114 NG114mm 114mm Newtonian Telescope w/ Equatorial Mount Instruction Manual! WARNING:! WARNING: WARNING: SUN HAZARD Never look directly at the sun with this device. CHOKING HAZARD Small
SK Series BOX PLOW INSTALLATION & OWNER S MANUAL TABLE OF CONTENTS
 SK Series BOX PLOW INSTALLATION & OWNER S MANUAL TABLE OF CONTENTS SAFETY... 2 INTRODUCTIONS... 5 TIPS ON PLOWING SNOW... 6 BOX PLOW ASSEMBLY PROCEDURE... 7 BOX PLOW BLADE ASSEMBLY DRAWING AND PARTS LIST...
Polar Alignment of LX200R and Ultra Wedge For The Southern Hemisphere by Chris James
 Return To How To Menu Polar Alignment of LX200R and Ultra Wedge For The Southern Hemisphere by Chris James Overview This document goes thru the process required to Polar Align the LX200R using a Ultra
Meade Instruments Corporation
 INSTRUCTION MANUAL Meade 114ST EQ-D 4.5" Equatorial Reflecting Telescope Meade Instruments Corporation 2 WARNING! NEVER USE A MEADE 114ST EQ-D TELESCOPE TO LOOK AT THE SUN! LOOKING AT OR NEAR THE SUN WILL
Quick Start Guide. The ieq45 Pro GoTo German Equatorial Mount #8000E, #8000EP and #8000E-AZ
 Quick Start Guide The ieq45 Pro GoTo German Equatorial Mount #8000E, #8000EP and #8000E-AZ PACKAGE CONTENTS 1 Telescope Mount (with built-in GPS) Losmandy/Vixen dual saddle Go2Nova 8407+ Hand Controller
AZ TRACKING TELESCOPES
 ESC RATE NGC OBJECT ID 0 AZ KING TELESCOPES UP ENTER TOUR UTILITY M IC PLANET USER 7 8 9 Instruction manual for AZ GoTo telescopes on reverse flip side TR0808V TABLE OF CONTENTS TELESCOPE ASSEMBLY - AUTOKING
取扱説明書 /INSTRUCTION MANUAL 自動レベル /AUTOMATIC LEVEL AT-B2/B3/B4 FC10386-A012-02
 取扱説明書 /INSTRUCTION MANUAL 自動レベル /AUTOMATIC LEVEL AT-B2/B3/B4 FC10386-A012-02 SURVEYING INSTRUMENTS INSTRUCTION MANUAL AUTOMATIC LEVEL AT-B2/B3/B4 Thank you for selecting the AT-B2/B3/B4. Please read this
Appendix 2: Disassembling and Assembling the Telescopes and the Celestron Equatorial Mounts
 Appendix 2: Disassembling and Assembling the Telescopes and the Celestron Equatorial Mounts Disassembling (classroom) 1. The mount must be locked with the telescope situated horizontally. Note the telescope