SmartStar CubePro TM Telescope Mount. Instruction Manual
|
|
|
- Rudolf Shelton
- 6 years ago
- Views:
Transcription


1 SmartStar CubePro TM Telescope Mount Instruction Manual
2 Table of Content Table of Content SmarStar CubePro TM Mount Overview SmartStar CubePro TM Mount Assembly Terms Go2Nova 8408 Hand Controller Key Description The LCD Screen Check the Battery CubePro TM Mount Assembly Setup a Mount in AA Mode Install Counterweight Setup a Mount in EQ Mode Get Started Setup the Mount Get Familiar with Telescope Use the telescope Move the telescope Initial Star Alignment Go to the Moon and Other Stars Star Identification Function GOTO and Tracking Position Memorization Turn Off the Mount Complete Functions of Go2Nova 8408 Hand Controller Slew to an Object Solar System Deep Sky Objects Stars: Comets Asteroids Constellations Custom Objects Custom R.A. and DEC Sync to Target Alignment Pole Star Position (Only for EQ Mode) One Star Alignment Two Star Alignment Three Star Align Polar Iterate Align (Only for EQ Mode) Solar System Align Display Model Error Clear Alignment Data Set tings Set Time and Site Set Beep Set Display Set Tracking Rate Set Altitude Limit

3 GPS Status Language Enter EQ/AA Mode Edit User Objects Enter a New Comet Enter Other Objects or Observation List Firmware Information Zero Position Goto Zero Position Set Zero Position Maintenance and Servicing Maintenance Troubleshooting ioptron Customer Service Product End of Life Disposal Instructions Battery Replacement and Disposal Instructions Appendix A. Technical Specifications Appendix B. Go2Nova 8408 HC MENU STRUCTURE Appendix C. Firmware Upgrade Appendix D. Computer Control a CubePro Mount Appendix E. Go2Nova Star List IOPTRON TWO YEAR TELESCOPE, MOUNT, AND CONTROLLER WARRANTY WARNING! NEVER USE A TELESCOPE TO LOOK AT THE SUN! Looking at or near the Sun will cause instant and irreversible damage to your eye. Children should always have adult supervision while observing Ver 1.0 3
4 1. SmarStar CubePro TM Mount Overview 1.1. SmartStar CubePro TM Mount Our proprietary Grab 'N Go Alt-Azimuth Mount, a.k.a. The Cube, is one of the most functional and flexible units on the market. The CubePro TM mount has metal worms and ring gears. Both axis motors are built into a small single unit which is universally compatible with all telescopes using a Vixen-type dovetail connection. The Go2Nova hand controller on each CubePro mount is easy to use with menus for planets, stars, nebulas, and constellations. And at only 3.1 lb you can take it anywhere and get accurate tracking! The controller is designed so you can easily set up your telescope and command it where to point to. It also has a large LCD screen displaying more text lines than the competition s (so you don t have to keep scrolling to read the screen). The revolutionary GOTONOVA computerized control system is one of the most technologically advanced automated tracking systems available on the market today. There are no "dead spots" -- so you can point your telescope to anywhere above the horizon. This mount can be operated by 8 AA batteries or an external AC/DC power adapter, makes it an idea travel mount. The new CubePro TM mount has a completely redesigned electronics and firmware while keeping the simplicity and sturdy of the original CubePro mount. The new features including: All new electronics Super quiet tracking 8408 Go2Nova hand controller with AA/EQ dual operation Large database with 150,000+ objects Fully computer controllable using latest ioptron Commander and ASCOM New 1.25 stainless steel tripod Attaches to a camera tripod with 3/8 thread (or ¼ thread via a converter) Wireless control with optional StarFi TM Wi-Fi adapter Features: Grab N Go altazimuth mount The CubePro: the only mount of its kind for ultimate rotation Metal worms and ring gears 8 lbs payload for various scopes and cameras, with 3.1 lb mount head Go2Nova 8408 hand controller with Advanced GOTONOVA GOTO Technology 150,000+ object database with 60 user-defined objects Large LCD screen with 4 lines and 21-characters hand control with backlit LED buttons Dual-axis servomotor with optical encoder 9 speed for precise mount moving control Built-in 32-channel Global Positioning System (GPS) Altazimuth/equatorial (AA/EQ) dual operation (need a wedge for EQ operation) Vixen-type dovetail saddle 3lbs counterweight and stainless steel CW shaft included Operate on 8 AA batteries (not included) 3/8" threads to fit on camera mount 100~240V AC power adapter included, optional 12V DC adapter (#8418) available Serial port for firmware upgrade and computer control Latest ASCOM and ioptron Commander for mount remote control RS232-RJ9 serial cable for firmware upgrade and computer control Sturdy 1.25 stainless steel tripod Optional StarFi TM WiFi adapter #8434 for mount wireless control 4


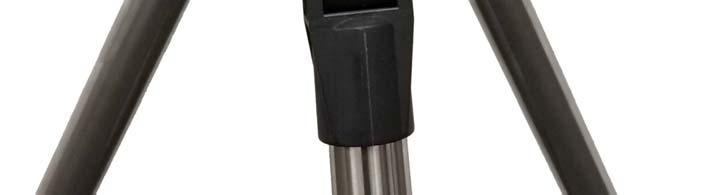
5 1.2. Assembly Terms CubePro Assembly Terms 1. Telescope Tube 2. Dovetail lock screw 3. Hand controller 4. Altitude lock 5. Mount 6. Azimuth lock screw 7. Tripod 8. Tray 1.3. Go2Nova 8408 Hand Controller RA+ DEC+ RA DEC Serial Port HBX Port 8408 Hand Controller 5
 and a serial port (4-pin) at the bottom. 1.3.1. Key Description MENU Key: Press MENU to enter the Main Menu.")
 Keys: The arrow keys are used to control the movement of DEC and R.A. axes.")
6 The Go2Nova 8408 hand controller (HC) is the standard controllers that used for a CubePro mount. It has a 4 line, 21 character large LCD screen, function keys, direction keys and number keys on the front, a HBX port (6- pin) and a serial port (4-pin) at the bottom Key Description MENU Key: Press MENU to enter the Main Menu. BACK Key: Move back to the previous screen, or end/cancel current operation, such as slewing. ENTER Key: Confirm an input, go to the next menu, select a choice, or slew the telescope to a selected object. Arrow ( ) Keys: The arrow keys are used to control the movement of DEC and R.A. axes. Press and hold (DEC+), (DEC-) buttons to move a telescope along the DEC direction, (R.A.+), (R.A.-) to move a telescope along the RA direction. They are also used to browse the menu or move the cursor while in the menu. Holding an arrow key for a fast scrolling. Number Keys: Input numerical values. Also used to adjust slewing speeds (1: 1X; 2: 2X; 3: 8X; 4: 16X; 5: 64X; 6: 128X; 7: 256X; 8: 512X; 9: MAX)? Key: Identify and display nearby bright stars or objects where the telescope points to. 0 Key: Stop the mount during GOTO. Also toggling between start and stop tracking. HBX (Handbox) port: connect the HC to a CubePro mount using a 6 pin 4 wire (6P4C) or 6 pin 6 wire (6P6C) RJ11 plug. Serial port: connect the HC to a computer via a RS232 to 4 pin 4 wire (4P4C) RJ9 cable for firmware upgrade and computer controller. The pin out of the serial port is shown as below. Serial port pin out on an 8408 hand controller The LCD Screen The 8408 HC has a large 4-line, 21-character per line LCD screen. The user interface is simple and easy to learn. When the mount first turned on, an initial Zero Position/User Position screen may be displayed after company logo displayed. The Zero Position with current date and time is displayed as: 8408 Initial Information Screen The LCD screen will switch to the operation screen after the operation of slew or goto, as indicated in the following photo: 6

7 Target Name Right Ascension Azimuth Mount Status GPS Status Declination Altitude N/S Hemisphere Slew Speed Current Time 8408 HC LCD Information Screen 1. Target Name/Mount Position: displays the name of the target that telescope is currently pointed to or the current mount position. An object name, such as Mercury or Andromeda Galaxy : Name of the Star or celestial object that the mount is currently slewing to, GOTO or tracking; User Position: The mount is point to a user defined position, which could be a real sky object or just simply due to press an arrow key. 2. GPS Status: ON indicates GPS module is installed; OK GPS connected to satellites; OFF GPS module not installed/disconnected/malfunctioned 3. Right Ascension: Right Ascension of the telescope, or R.A. 4. Declination: Declination of the telescope, or DEC. 5. Azimuth: Azimuth of the telescope (north is 0º, east 90º, south 180º, and west 270º). 6. Altitude: Altitude of the telescope (degrees vertical from the local horizon - zenith is 90º). 7. Mount Status: Display current operation status of the mount. Stop: mount is not moving; Slew: mount is moving with an arrow key is pressed; GoTo: mount is slewing to a celestial object using Select and Slew ; Track: mount is tracking 8. Slew speed: It has 9 speeds: 1X, 2X, 8X, 16X, 64X, 128X, 256X, 512X, MAX(~ 4 /sec). 9. Current Time: display local time in a format of HH:MM:SS Check the Battery The hand controller has a real time clock (RTC) which should display the correct time every time the mount is turned on. If the time is incorrect, please check the battery inside the hand controller and replace it if needed. The battery is a 3V, CR1220 button battery. 7
 when an EQ wedge is used. 2.1. Setup a Mount in AA Mode STEP 1. Tripod Setup 1.")
 4.")


 into the battery holder, with the polarities match the diagram on the holder.")
8 2. CubePro TM Mount Assembly CubePro mount is operated as an alt-azimuth mount (AA Mode) in most cases. It can also be operated as an equatorial mount (EQ Mode) when an EQ wedge is used Setup a Mount in AA Mode STEP 1. Tripod Setup 1. Extend tripod legs to full extension and lock knobs. 2. Stand Tripod upright. Then press down to lock center arms in place. 3. Place tray on center knob and turn tray until it locks in place. (The tray will turn underneath the center knob) 4. Use an extra level to level the tripod top. Tray Center locks in knob place STEP 2 Attach the CubePro Mount Put the mount on top of the tripod head and secure it using the Azimuth Lock Screw. AZ Lock Screw STEP 3. Install Batteries The mount can be operated by either 8 AA batteries or an AC/DC adapter (STEP 5). To install the batteries, lift the battery cover. Carefully pull out the battery holder from the compartment. Be sure not to accidentally disconnect the wires. Insert 8 AA batteries (not included) into the battery holder, with the polarities match the diagram on the holder.. Replace the holder back into the battery compartment and replace the lid. The battery holder only fits into the battery compartment in one direction. If it can t fit in, turn the holder 90 degree and make sure the wires are not block the holder. Do not mix new batteries with old ones. 8
 with a Vixen dovetail bar. Release the dovetail lock knob.")

 tends to move down, move the scope backward.")

9 Battery direstion STEP 4. Attach and Balance a Telescope The mount has a Vixen-type dovetail saddle. It accepts any telescope (under payload limit) with a Vixen dovetail bar. Release the dovetail lock knob. Slide the telescope dovetail bar into the dovetail saddle. Retighten the dovetail lock knob. Attach all the accessories to the telescope. Loosen altitude lock a little, with another hand hold the scope. Check the mount balance. If the telescope eyepiece end tends to move down, move the scope forward. If the telescope objective lens end (front side) tends to move down, move the scope backward. You may leave the telescope a little bit front heavy. Dovetail lock knob STEP 5. Connect Cables Connect the Go2Nova 8408 hand controller into either one of the two HBX ports on the mount using coiled control cable. Plug 12V DC power supply into the power socket on the mount panel, if use external power source to power the mount. The red LED will be on when power switch is turned on. Plug in AC adaptor here HC cable STEP 6. Level the Mount 9


10 Leveling is critical for a good GOTO and tracking accuracy. To level the mount: 1. Locate the air bubble inside the bull s eye circular level, as shown on the left. Adjust the tripod legs to move the bubble inside the small circle. It is always help if you level the tripod first when set it up. 2. Turn on the mount. Press 9 button to change the slew speed to MAX. 3. Rotate the mount 90 incremental by pressing or button to check if the bubble stays inside the circle. If it wonders out of the circle, adjust the legs to bring it back in. 4. Slew the mount 360 in azimuth to make sure the mount is leveled. 5. Fully tighten/lock the tripod legs. If the bubble does not stay inside the small circle, you may need to calibrate the level by make sure it stays at the same position while rotating the mount. Mark the new bubble position as a calibrated center position. STEP 7. Setup Zero Position This STEP is for AA Mode Only. For EQ mode, please refer to Section 2.2. Setup a Mount in EQ Mode. The start point of a CubePro mount is the Zero Position. For an alt-azimuth (AA) operation mode, its altitude is 90º00 00 and azimuth is 180º00 00, which means the SOUTH mark is pointing to south and the telescope is pointing straight up at the zenith. To set the Zero Position (after leveling the mount): 1. Turn on the mount. Press 9 button to change the slew speed to MAX. 2. Slew the mount and rotate the SOUTH mark pointing to south using or button. Use a compass to assist the process. Please do not put the compass on top of the mount. The electronics inside the mount will affect the compass. Also be aware that the magnetic south pointed by the 2) Up compass is not the true south that we are looking for. If you use a compass in your smart phone, you may set the compass to Use True North, if it has this option. 3. Slew the mount and rotate the telescope to point straight up at the Zenith using or button. A torpedo level may help. 4. Press MENU=> Zero Position => Set Zero Position and ENTER to complete the Zero Position setting. 1) South Any Zero Position discrepancy will be correct by star alignment or target synchronization operation later. STEP 8. Setup Hand Controller Correct time and location info is needed for precise GOTO. The CubePro is equipped with a GPS, the mount will receive the UTC time, longitude and latitude information from satellites after the link is established. However, there are still some parameters need to be entered to reflect your location, such as time zone info (UTC offset) and daylight saving time (DST). The information will be stored inside the hand controller memory along with longitude and latitude coordinates until they need to be changed. A clear sky outside is needed for GPS to communicate well with the satellites. To set up the controller, turn the mount power ON. Press MENU=> Settings : Select and Slew Sync. to Target Alignment Settings Press ENTER and select Set Time and Site 10
11 Set Time and Site Set Beep Set Display Set Guiding Rate Press ENTER. A time and site information screen will be displayed: :01:36 UTC -300 Minute(s) W071d08m50s DST: N N42d30m32s Northern Daylight Saving Time Set Local Time The time will be updated automatically when the GPS receiver has established its link with the GPS satellites. In the event that the GPS module is unable to establish a link to the satellites, local time can be entered manually. Use the or key to move the cursor _ and use the number keys to change the numbers. Use the or button to toggle between Y and N for Daylight Saving Time, or + and - for UTC (Coordinated Universal Time) setting. Hold the arrow key to fast forward or rewind the cursor. In order to make the Hand Controller reflect your correct local time, time zone information has to be entered. Press the or key, move the cursor to the third line UTC -300 Minute(s) to set the time zone information (add or subtract 60 minutes per time zone). For example: Boston is UTC -300 minutes Los Angeles is UTC -480 minutes Rome is UTC +60 minutes Beijing is UTC +480 minutes Sydney is UTC +600 minutes All the time zones in North America are UTC, as shown in the following table, so ensure the display shows UTC - instead of UTC + if in North or South America. Time Zone Hawaii Alaska Pacific Mountain Central Eastern Hour behind UT Enter UTC To adjust minutes, move the cursor to each digit and use the number keys to input the number directly. Use or key to toggle between + and -. When the time information entered is correct, press ENTER and go back to the previous screen. Note that fractional time zones can be entered. Do not manually add or subtract an hour from displayed time to reflect Daylight Saving Time (DST). Only select Y after DST begins. For other parts of the world you can find your time zone information from internet. Set Observation Site Coordinate The third and fourth lines display the longitude and latitude coordinates, respectively. The longitude and latitude coordinates will be automatically updated when the GPS picks up satellite signals. W/E means western/eastern hemisphere; N/S means northern/southern hemisphere; d means degree; m means minute; and s means second. If, for any reason, your GPS can t pick up a signal, you can manually enter the GPS coordinates. Press or key to move the cursor and using or key to toggle between W and E, N and S, using number 11


12 key to change the numbers. It is always a good idea to do your home work to get the GPS coordinates before traveling to a new observation site. The site coordinates information can be found from your smart phone, GPS receiver or via the internet. Site information in decimal format can be converted into d:m:s format by multiplying the decimal numbers by 60. For example, N47.53 can be changed to N47º31'48 : 47.53º = 47º +0.53º, 0.53º=0.53x60'=31.8', 0.8'=0.8x60"=48". Therefore, 47.53º=47º31'48" or 47d31m48s. The time and site information will be stored inside the hand controller s memory chip. If you are not traveling to another observation site, they do not need to be changed. Set Daylight Saving Time Keep moving the cursor by pressing key after setting the coordinate until it moves on DST section. Change the DST to N or Y accordingly. Check Mount Operation Mode The hand controller support both AA and EQ operation. Make sure the operation mode is same as your mount set up. If the mount is set at AA operation, as in most cases, make sure the hand controller setting is in AA mode. Press MENU=> Settings : Select and Slew Sync. to Target Alignment Settings Press ENTER and scroll the cursor down. If it displays Enter EQ Mode at the end of the menu, the mount is already at the A/A mode. Otherwise, select Enter AA Mode Set Altitude Limit GPS Status Language Enter EQ Mode Check the Hand Controller Battery The hand controller has a real time clock which should display the correct time every time the mount is turned on. If the time is off too much, please check the battery inside the hand controller and replace it if required. The battery is a 3V, CR1220 button battery Install Counterweight The CubePro mount comes with a 3 lbs counterweight (CW) and a stainless steel CW shaft. It is optional to use a CW in AA operation. It should improve the mount performance when installed, especially for a OTA with a relative large diameter and/or long tube length. It is required for EQ operation. 12
13 Unlock and remove the altitude lock (#4). Screw on the CW shaft and tighten it. Slide the CW onto the counterbalance shaft. Secure the CW by tightening the lock knob Setup a Mount in EQ Mode With a proper wedge, such as ioptron dual AZ/EQ tripod (#8601), the CubePro mount can be operated at the EQ mode. Please Note: the Zero Position of an EQ mode is different from that of an AA mode. It is the position with the CW shaft pointing toward the ground, OTA at the highest position with its axis parallel to the polar axis and the OTA pointing to the Celestial Pole (see photo below). R.A. Axis (azi axle) DEC Axis (alt axle) north-facing tripod leg Follow the steps below to set the mount in EQ mode (with ioptron AZ/EQ dual tripod): 1. Align the north-facing tripod leg (the leg under the wedge hinge) to the north. A compass is needed. A true north will give you better tracking performance. Use this link to find out how to determine the true north ( 2. Level the tripod. 3. Find the latitude of the observation site. 4. Raise the wedge by loosen the tilt locks, until its tilt angle equals to the observation site latitude. 5. Replace the ALT lock with counterweight shaft (optional) if an optional counterweight is needed. 13
14 6. Align the altitude axle (with or without CW) that is pointing straight down, in line with the northfacing tripod leg. This can be done by either loosen the azimuth lock or turn the mount using or key. The altitude axle will served as the DEC axis of the EQ mode. 7. Mount the OTA onto the mount and align its optical axis parallel to the azimuth axle of the mount. This can be done by either loosen the altitude lock or turn the mount using or key. The azimuth axle will served as the R.A. axis of the EQ mode. 8. Adjust the mount in altitude by tilt the wedge up/down and in azimuth by turn the tripod left/right to locate the Polaris (if you are in northern hemisphere) in your finder scope and/or your telescope eyepiece. Center it. Tighten the tilt locking screws. 9. Power the mount on. Press MENU => Settings => Enter EQ Mode. Power OFF/ON the mount. 10. Press MENU => Zero Position => Set Zero Position to set the Zero Position. 11. Press MENU => Alignment to perform star alignment or polar alignment. 14

, the image is right-side-up, but reversed from left-to-right (i.e., mirror image). If inserting the eyepiece directly into the visual back (i.e., without the star diagonal), the image is upside-down and reversed from left-to-right (i.")
15 3. Get Started 3.1. Setup the Mount If you are using the mount in AA mode (majority of the users), assemble the mount and set the Zero Position follow the instruction. If you are using the mount in EQ mode, set the mount on a wedged tripod. Set the hand controller to EQ mode. Polar align the mount Get Familiar with Telescope Use the telescope Image Orientation The image orientation changes depending on how the eyepiece is inserted into the telescope. When using the star diagonal (the 90º mirror diagonal), the image is right-side-up, but reversed from left-to-right (i.e., mirror image). If inserting the eyepiece directly into the visual back (i.e., without the star diagonal), the image is upside-down and reversed from left-to-right (i.e., inverted). This is normal for the refractor design. Actual image orientation as seen with the unaided eye Reversed from left to right, as viewed with a Star Diagonal Inverted image, as viewed with the eyepiece directly in telescope Corrected image, as viewed with a Erect Lens or Erect Diagonal For terrestrial observation, such as land mark or bird viewing, you can buy an optional 45º Erect Diagonal to have a correct image from your eyepiece. Select an Eyepiece The magnification of a telescope is defined by the focal lengths of the telescope and the eyepiece. A formula can be used to determine the power of each eyepiece: Telescope focal length divided by eyepiece focal length equals magnification. For example, for a R90 telescope with a focal length of 500mm, if a 25mm eyepiece is used, the magnification will be 500mm 25mm = 20X (magnification) If more magnification is wanted, you may order higher power eyepieces. (Note: a 25 mm focal length eyepiece has a lower power than a 10 mm one.) Always start with the lowest power eyepiece for easy locating the objects. Focus a Telescope 1. After selecting the desired eyepiece, aim the telescope tube at a land-based target at least 200 yards away (e.g. A telephone pole or building). Fully extend focusing tube by turning the focus knob. 2. While looking through selected eyepiece, slowly retract focusing tube by turning focusing knob until object comes into focus. Aligning Finderscope 15
16 1. Look through main telescope tube and establish a well-defined target (see focusing telescope section). Tighten all lock knobs (Right Ascension, Declination, Altitude, Azimuth, etc) so that telescope s aim is not disturbed. 2. Turn on the red dot finder and look through the finder window. Adjust the red dot alignment screws to center the red dot on the object. 3. Now, objects centered in the finderscope will be shown in the field of view of the main telescope Move the telescope Manually Move the Telescope Slightly loose Altitude Lock (part #5 on the mount, as indicated in Assembly Terms) and Azimuth Lock (as shown in Assembly Step 2); push the mount to rotate left or right and push the telescope to point up or down. When you finished observation, please re-tighten both locks to avoid accidentally drop of the mount or telescope. Move the Telescope using a Hand Controller Insert 8 fresh AA batteries into the mount battery holder, or using an optional AC adapter, Tighten all the screws and locks on tripod, mount and telescope. Flip the ON/OFF switch on the mount to turn the mount power on. After a beep and LCD displays information screen, press the number 9 button to change the slew speed to MAX. Press or button to move the telescope UP, DOWN, RIGHT or LEFT. Aim and focus the telescope to a distant object. Press the arrow button while viewing through the eyepiece. Press a number button to change the speed, if the object is moving too fast Initial Star Alignment Perform a simple one star alignment/synchronization after set up the hand controller to correct any pointing discrepancy of the Zero Position and to improve the GOTO accuracy. To perform One Star Align, press MENU=> Alignment => One Star Align =>ENTER. The screen will display a list of bright objects for you to select from. Select an object using or key. Then press ENTER. After the mount slews to the target, use the arrow keys to center it in your eyepiece. Then press ENTER. (More align details in 4.3) An alternate way is to perform Sync to Target. Press MENU=> Sync. To Target, follow the on-screen instruction to center the star and press ENTER. You may need to use the number keys to change the slewing speed to make the centering procedure easier Go to the Moon and Other Stars After performing these setups, the mount is ready to GOTO and track objects. One of the most common objects is the Moon. To slew to the Moon press MENU=> Select and Slew => Solar System =>Moon=>ENTER. The telescope will automatically slew to the Moon and lock on it. It will automatically begin to track once it locks on. If the Moon is not centered in your eyepiece, use the arrow keys to center the Moon. You may use Sync to Target to improve the tracking. You may also select other bright celestial objects to start with, such as Jupiter or Saturn. 16
17 3.6. Star Identification Function The 8408 hand controller has a star identification function. After slew the telescope to an bright star, manually or using GOTO, press? button to identify the star name telescope is pointing to, as well as nearby bright stars if there is any GOTO and Tracking Position Memorization The CubePro mount can memorize its positions if the mount loses power by accident, even during high speed slewing. Just do a Select and Slew to the same star the power is back. The mount will continue to track Turn Off the Mount After finishing observation, just simply turn the mount power off and disassemble the mount and tripod. If the mount is set up on a pier or inside an observatory, you can return the mount to Zero Position. This will ensure that there is no need for you to perform the initial setup again when you power up the mount subsequently, if the mount is not moved. To return the mount to its Zero Position, press the MENU => Zero Position => Goto Zero Position and press ENTER. Once the telescope returns to Zero Position turn the power off. 17
18 4. Complete Functions of Go2Nova 8408 Hand Controller 4.1. Slew to an Object Press MENU => Select and Slew. Select an object that you would like to observe and press the ENTER key. The Go2Nova 8408 hand controller for CubePro mount has a database of over 150,000 objects. Use the or buttons to move the cursor. Use the number buttons to enter the number, or the or buttons to change the individual number. Hold on a button to fast scroll through the list. The indicates the object is above the horizon, and a cross mark means it is below the horizon. The mount will only goto those object above the horizon. In some catalogs those stars below the horizon will not display on the hand controller Solar System There are 9 objects in the Solar system catalog Deep Sky Objects This menu includes objects outside our Solar system such as galaxies, star clusters, quasars, and nebulae Stars: Named Objects: consists of 60 deep sky objects with their common names. A list of named deep sky objects is included in Appendix E. Messier Catalog: consists of all 110 Messier objects. NGC Catalog: consists of 7,840 objects in NGC catalog. IC Catalog: consists of 5,386 objects in IC catalog. UGC Catalog: consists of 12,921 objects. Caldwell Catalog: consists of 109 objects. Abell Catalog: consists of 4076 objects. Herschel Catalog: consists of 400 objects. Named Stars: consists of 259 stars with their common names. They are listed alphabetically. A list is included in Appendix E. Double/Multi Stars: consists of 208 double/multi stars. A list is attached in Appendix E. Hipparcos Catalog: the new HIP catalog consists of 120,404 records (2008) Comets This catalog contains 15 comets Asteroids This catalog contains 116 asteroids Constellations This catalog consists of 88 modern constellations with their names. They are listed alphabetically. A list is attached in Appendix E Custom Objects It can store up to 60 used entered objects, including comets Custom R.A. and DEC Here you can go to a target by entering its R.A. and DEC numbers. 18
19 4.2. Sync to Target This operation will match the telescope's current coordinates to Target Right Ascension and Declination. Press MENU => Sync to Target => ENTER. Select an object to want to sync to. Follow the instruction on the screen to perform the sync. You can change the slewing speed to make the centering procedure easier. Simply press a number (1 through 9) to change the speed. The default slew speed is 64X. Using this function will re-calibrate the computer to the selected object. This operation is most useful to find a faint star or nebula near a bright star. Sync to Target will improve the local goto accuracy around the synced star Alignment This function is used to create a sky model to calibrate the mount s GOTONOVA functionality. Solar System Align, One Star Align, Two Star Align and Three Star Align are designed for AA mode It also provides methods to align the telescope to the celestial pole for the EQ mode. The Two Star Polar Align in EQ mode can used to refine the physical polar axis alignment. Polar Iterate Align uses a set of 2 bright stars for polar alignment providing a viable polar alignment approach for those who can t see the pole Pole Star Position (Only for EQ Mode) This function displays the position of the Pole. In the Northern Hemisphere the position of Polaris is displayed, while in the Southern Hemisphere the position of Sigma Octantis is shown. This function is only useful for the EQ mode and the mount has an ioptron polar scope One Star Alignment Press MENU => Alignment => One Star Alignment. A list of alignment stars that are above the horizon is computed based on your local time and location. With the mount in the Zero Position, use the and buttons to select a star and press ENTER. Center the target in your eyepiece using the arrow keys. Press ENTER when finished. If your mount is set up correctly and polar aligned, one star alignment should be sufficient for good GoTo accuracy. To increase the pointing accuracy over the sky, you may choose to do a two star alignment (for AA) or three star alignment (for EQ) Two Star Alignment Two Star Alignment can further improve the mount pointing accuracy. Press MENU => Alignment => Two Star Alignment A list of alignment stars that are above the horizon is computed based on your local time and location. With the mount at the Zero Position, use the and buttons to select the first alignment star and press ENTER. Center the target in your eyepiece using the arrow keys after the mount slews to it. Press ENTER when finished. The hand controller will prompt you to choose a second star. After centering the second star, the two-star alignment is finished. After the two-star alignment, the altitude and azimuth misalignment error will be displayed. In EQ mode, this number can be used to fine tune the mount R.A. axis misalignment. Therefore this will further improve the accuracy of the mount s polar alignment. For example, if the screen shows 7.5" low and 4.3" east, it means that THE MOUNT R.A. axis is pointing 7.5 lower and 4.3 to the east of the Celestial Pole Three Star Align The three-star alignment will further determine the cone error between the OTA and mount axis in EQ mode. The system will use these data to calculate the goto model. If the cone error is too big, it is suggested to shim the OTA in DEC to minimize it. Press MENU => Alignment => Three Star Alignment A list of alignment stars that are above the horizon is computed based on your local time and location. With the mount at the Zero Position, use the and buttons to select the first alignment star and press ENTER. Center the target in your eyepiece using the arrow keys. 19
20 Press ENTER when finished. The hand controller will prompt you to choose a second star. Select third star after the mount aligned to the second star. The system will display the pointing and cone errors after the three star alignment accepted. The system will update the pointing model accordingly Polar Iterate Align (Only for EQ Mode) This alignment method allows you to polar align the mount even if you cannot view the Celestial Pole. Press the MENU => Alignment => Polar Iterate Align. The HC will display a list of bright alignment stars near the meridian as Alignment Star A. Follow the HC instructions to move Alignment Star A to the center of the eyepiece using a combination of the Latitude Adjustment Knob and the and buttons. Press ENTER to confirm the settings. Next, select a bright star that is close to the horizon as Alignment Star B. Center it using the Azimuth Adjustment Knobs and the and buttons (the and buttons will not function). Press ENTER to confirm the settings. The telescope will now slew back to Alignment Star A to repeat the above steps. The iteration can be stopped when it is determined that the alignment error has been minimized. Press the BACK button to exit the alignment procedure. NOTE: It is highly recommended to use an eyepiece with illuminated crosshairs for accurate centering. NOTE: The movement of the alignment star in your eyepiece may not be perpendicular depending on its location in the sky Solar System Align This function uses a planet or the moon as an alignment object. Press MENU => Alignment => Solar System Align for a list of available alignment objects Display Model Error This will display linear RA error, linear DEC error, polar misalignment, non-perpendicular between OTA and DEC, and non-perpendicular between HA and DEC Clear Alignment Data This will clear all alignment data created during one star, two star or three star alignment process. It is recommended to clear the alignment data if a planetarium software with integrated alignment function is used to control the mount Set tings Set Time and Site Refer to STEP 8 in Section Set Beep The Hand Controller allows a user to turn off the beep partially, or even go to a silent mode. To change this setting press MENU => Settings => Set Beep, Set Up Time and Site Set Beep Set Display Set Guiding Rate Select one of three available modes: 20
21 "Always On a beep will be heard on each button operation or mount movement; On but Keyboard a beep will be heard only when the mount is slewing to the object or there is a warning message; Always Off all sounds will be turned off, including the SUN warning message Set Display Press MENU => Settings => Set Display, Set Up Time and Site Set Beep Set Display Set Guiding Rate Use the arrow keys to adjust LCD display contrast (LCD contrast), LCD backlight intensity (LCD light), and keypad s backlight intensity (Key light) Set Tracking Rate You can set up the mount tracking rate by selecting Set Tracking Rate. Then the user can select Sidereal Rate, Lunar Rate, Solar Rate, King Rate, and User Defined Speed. The User defined speed can be adjusted from X to X of sidereal. The King Rate, developed by Edward S. King, corrects the tracking rate of a telescope to account for atmospheric refraction. This is more useful for unguided tracking Set Altitude Limit This function allows the mount to keep tracking an object even if it is below the horizon but can still be seen, for example from an elevated observation site, such as a hill. The default setting is 0 degree, which means the mount will stop tracking when the object is below horizon. ioptron is not responsible for any equipment damage due to the mount keep tracking below horizon GPS Status Display the GPS connection status. GPS ON indicates that the mount is still acquiring the satellite data. GPS OK indicates the link has been established. GPS OFF indicates either there is no GPS installed or the GPS is malfunctioning. Do not leave the hand controller at this submenu Language Select one of supported menu languages Enter EQ/AA Mode Switch the mount between AA and EQ mode Edit User Objects Besides various star lists available in the hand controller, you can add, edit or delete your own user-defined objects. This is especially useful for newly found comets. You can also add your favorite observation object into the user object list for easy sky surfing. Up to 60 comets and other user objects can be stored Enter a New Comet Press MENU => Edit User Objects to set user objects. 21
22 User Defined Comet Other Objects Select User Defined Comet to add/browse/delete the user-defined comet list. Find the orbit parameters of a comet in the SkyMap format. For example, the C/2012 ISON has an orbit parameter: No. Name Year M Day q e ω Ω I H G C/2012 S1 ISON Select Add a New Comet to add a new one: Add a New Comet Browse Comets Delete a Comet Clear All Comets The hand controller will display the parameter entry screen: Date: q: e: ω: Ω: i: Enter the parameters using the arrow buttons and number keys. Press ENTER and a confirmation screen will be displayed. Press ENTER again to store the object under the assigned user object number, or press BACK button to cancel Enter Other Objects or Observation List Press MENU => Edit User Objects to set user objects. User Defined Comet Other Objects Select Other Objects to enter you own object: Add a New Object Browse Objects Delete an Object Clear All Objects Select Add a New Object. A screen will be displayed asking you to Enter R.A. and DEC coordinates: Enter R.A. and DEC R.A.: 00h00m00s DEC: +00d00m00s You may enter the R.A. and DEC coordinates of the object you want to store, and press ENTER to confirm. 22
23 A more useful application of this function is to store your favorite viewing objects before heading to the field. When the Enter R.A. and DEC screen appears, press the MENU button. It brings up the catalogs that you can select the object from. Follow the screen instructions to add your favorite objects. Press BACK button to go back one level. Press the BACK button to go back to the object entry submenu. You may review the records or delete those that are no longer wanted. Press the BACK button to finish the operation. Now you can slew to your favorite stars from Custom Objects catalog using Select and Slew Firmware Information This option will display the mount type, firmware version information for the hand controller (HC), R.A. board (RA), and DEC board (DEC) Zero Position Goto Zero Position This moves your telescope to its Zero Position. When the power is turned on, the mount assumes the Zero Position. This is the reference point for alignment and GoTo functions Set Zero Position This set the current mount position as the Zero Position. 23
24 5. Maintenance and Servicing 5.1. Maintenance The SmartStar CubePro TM mount to be maintenance free. Do not overload the mount. Do not drop the mount which will damage the mount or affect the GOTO tracking accuracy permanently. Use a wet cloth to clean the mount and hand controller. Do not use solvent. When not in use, store the mount in a cool, dry place. Do not expose the instrument to excessive heat or moisture. It is best to store the mount in its original box with the altitude lock knob unlocked. If shipping the mount, use the original box and packing material to protect the mount during shipment. If your mount is not to be used for an extended period, dismount the OTAs and counterweight. Remove the batteries from the battery holder if they were installed Troubleshooting The following suggestions may be helpful with operation of the SmartStar CubePro mount. The power indicator light on the mount does not come on or there is no response when pressing hand controller s arrow keys: (1) Verify that the power switch on the mount is in the ON position. (2) Verify that the hand controller cord is firmly connected to the HBX port on the mount, or switch the cord to the other HBX port. (3) Press #9 button to change the slew speed to MAX and try it again. (4) Check the power source, which include: Using the battery? Are the batteries installed correctly? Are the batteries fresh? How long have they been used? (frequent slew and GOTO will deplete battery power very quickly) Using AC or DC adapter? Check the plugs to the mount and to the power outlet. Using extension cord? Make sure the cord is in good condition. Power drop along the extension cord was known to cause the problem. Also check all the plugs and connections. (5) If the mount does not respond to commands, set the power switch to OFF and then back to ON. (6) If the mount does not slew after power is applied or if the motor quits or stalls, verify that there are no physical obstructions that would impede telescope movement. Error Message Warning! DEC. (or R.A.) driver motor over current. Please check balance. (1) Check if the mount or OTA is blocked by any obstructions. (2) Try to operate the mount without an OTA. (3) Check the power supply. This is a common reason for this message and unexpected slew behavior or movement. which include: Batteries: Are the batteries fresh? How long have they been used? (frequent slewing and GOTO will deplete battery power very quickly) AC or DC adapter: Check the plugs to the mount and to the power outlet. Extension cord: Make sure the cord is in good condition. Power drop along the extension cord has been known to cause this error message. Also check all the plugs and connections. (4) Check the hand controller cord. Unplug it and re-plug into the other HBX port. Error Message Warning! Can not communicate with RA/DEC motor controller. (1) Check the hand controller cord. Unplug it and re-plug into another HBX port. (2) Check the power supply, which include: Using the battery? Is the battery fresh? How long it has been used? (frequent slew and GOTO will deplete battery power very quickly) Using AC or DC adapter? Check the plugs to the mount and to the power outlet. Using extension cord? Make sure the cord is in good condition. Power drop along the extension cord was known to cause the problem. Also check all the plugs and connections. 24
25 The object is jumping up and down in the eyepiece or over-slewed, and other unexpected slew behavior or movement. (1) Use most updated firmware. (2) Check the power supply, which include: Using the battery? Is the battery fresh? How long it has been used? (frequent slew and GOTO will deplete battery power very quickly) Using AC or DC adapter? Check the plugs to the mount and to the power outlet. Using extension cord? Make sure the cord is in good condition. Power drop along the extension cord was known to cause the problem. Also check all the plugs and connections. (3) System balancing. The telescope does not GOTO the right object, or the alignment is always wrong: (1) Check the Zero Position by MENU=> Zero Position => Goto Zero Position. The mount should go back to zero position. (2) Leveling (very important). (3) Check site information (UTC offset and DST). (4) System balancing. (5) Use most updated firmware. (6) Select right mount type (A/A or EQ). (7) Check the power supply, which include: Using the battery? Is the battery fresh? How long it has been used? (frequent slew and GOTO will deplete battery power very quickly) Using AC or DC adapter? Check the plugs to the mount and to the power outlet. Using extension cord? Make sure the cord is in good condition. Power drop along the extension cord was known to cause the problem. Also check all the plugs and connections ioptron Customer Service If you have a question concerning your telescope, contact the ioptron Customer Service Department. Customer Service hours are 9:00 AM to 5:00 PM, Easter Time, Monday through Friday. It is strongly suggested to send technical questions to support@ioptron.com for prompt response during off hour. Call in the U.S In the unlikely event that the telescope requires factory servicing or repairs, write or call the ioptron Customer Service Department first to receive a RMA# before returning the mount to the factory. Please provide details as to the nature of the problem as well as your name, address, address, purchase info and daytime telephone number. We have found that most problems can be resolved by s or telephone calls. So please contact ioptron first to avoid returning the mount for repair Product End of Life Disposal Instructions This electronic product is subject to disposal and recycling regulations that vary by country and region. It is your responsibility to recycle your electronic equipment per your local environmental laws and regulations to ensure that it will be recycled in a manner that protects human health and the environment. To find out where you can drop off your waste equipment for recycling, please contact your local waste recycle/disposal service or the product representative Battery Replacement and Disposal Instructions Battery Disposal- Batteries contain chemicals that, if released, may affect the environment and human health. Batteries should be collected separately for recycling, and recycled at a local hazardous material disposal location adhering to your country and local government regulations. To find out where you can drop off your waste battery for recycling, please contact your local waste disposal service or the product representative. 25
26 Appendix A. Technical Specifications Model Number 8200 Mount AltAzimuth Mount Body Materials Die cast Aluminum Payload 8 lb Mount Weight 3.1 lb (w/o batteries) Motor DC Servo motor with encoders Gear Aluminum ring gear/brass worm Bearing 4 steel ball bearings Hand Controller Go2Nova 8408 w AA/EQ dual mode Database 150,000+ object database Speed 1x,2,8,16x,64,128x, 256x,512x, MAX Resolution 0.5 arc minute Tracking Sidereal, Solar, Lunar, King and User Defined Dovetail Saddle Vixen GPS Yes Battery AA x 8(Not Included) Power Requirement 12V DC(10~14V), >1.5Amp AC Adapter 100V ~ 240V (included) Base Connect 3/8 threaded socket Tripod 1.25 Stainless Steel (~ 6 lb. or 3kg) Serial Port Yes (on hand controller) Firmware Upgrade Yes PC Computer Control Yes (ioptron Commander and ASCOM) Wireless Control Yes (with optional StarFi TM adapter #8434) Operating Temp. 0 ~ 40 C Warranty Twoyear limited 26
27 Appendix B. Go2Nova 8408 HC MENU STRUCTURE Cube-II MENU Select and Slew Solar System Mercury Venus Mars Jupiter Saturn Uranus Neptune Moon Sun Deep Sky Objects Named Object Messier Catalog NGC Catalog IC Catalog UGC Catalog Caldwell Catalog Abell Catalog Herschel Catalog Stars Named Stars Binary Stars Hipparcos Catalog Comets Asteroids Constellations Custom Objects Custom R.A. and DEC Sync. To Target 27
28 Alignment Pole Star Position One Star Alignment Two Star Alignment Three Star Alignment Polar Iterate Align Solar System Align Display Model Error Clear Alignment Data Settings Set Time and Site Set Beep Set Display Set Tracking Rate Set Altitude Limit GPS Status Language Enter EQ/Alt-Azi Mode Edit User Objects User Def ined Comets Other Objects Firmware Inf ormation Zero Position Goto Zero Position Set Zero Position Two Star Alignment Pole Star Position : For both AA and EQ mode : For EQ mode only 28
29 Appendix C. Firmware Upgrade The firmware in the 8408 hand controller and main control boards can be upgraded by the customer. Please check ioptron s website, under the product page or Support Directory, select CubePro w/ 8408HC for detail. 29
30 Appendix D. Computer Control a CubePro Mount The CubePro mount can be controlled by a SmartPhone, a Tablet or a computer. It is supported by two types of computer connections: 1. Connect to a computer via RS232 serial port. A serial cable (8412), and an optional RS232 to USB adapter (ioptron part# 8435), will be needed. Follow the adapter instructions to install the adapter driver. The mount can be controlled via ASCOM protocol (Windows OS), or directly by some software, such as Sky Safari (Mac OS) 2. Connect wirelessly with ioptron StarFi TM adapter (#8434) or some other third party adapter (may with limited function). The mount can be controlled via ASCOM protocol (Windows OS), SmartPhone/Tablet and Mac OS wirelessly. See StarFi Instruction Manual for detailed information. To control the mount via ASCOM protocol, you need: 1. Download and install the latest ASCOM Platform, currently 6.2, from Make sure your PC meets the software requirement. For 6.2 SP1, Windows XP users should install.net Framework 4. (not the Client Profile). Windows Vista and Windows 7 users should install.net Framework Windows 8 and beyond users do not need install any additional components. 2. Download and install the latest ioptron Telescope ASCOM drive for CubePro/8408 mount from ioptron website. 3. Planetarium software that supports ASCOM protocol. Follow software instructions to select the ioptron Telescope. Please refer to ioptron website, under the product page, or Support Directory, ioptron ASCOM Driver for more detail. 30
31 Appendix E. Go2Nova Star List Go2Nova Deep Sky Object List for 8408 ID No. OBJECT NGC # Messier # IC# A(Abell) U(UGC) 1 Andromeda Galaxy Barnards Galaxy Beehive Cluster Blackeye Galaxy Blinking Planetary Nebula Blue Flash Nebula Blue Planetary Blue Snowball Nebula Box Nebula Bubble Nebula Bipolar Nebula Butterfly Cluster California Nebula Cat's Eye Nebula Cocoon Nebula Cone Nebula Cork Nebula Crab Nebula Crescent Nebula Draco Dwarf Duck Nebula Dumbbell Nebula Eagle Nebula Eight-Burst Nebula Eskimo Nebula Flaming Star Nebula Ghost of Jupiter Great Cluster Helix Nebula Hercules Galaxy Cluster Hind's Variable Nebula Hubble's Variable Nebula Integral Sign Galaxy Jewel Box Cluster Keyhole Nebula Lagoon Nebula Little Gem Little Gem Nebula
32 39 Little Ghost Nebula North American Nebula Omega Nebula Orion Nebula Owl Nebula Pelican Nebula Phantom Streak Nebula Pinwheel Galaxy Pleiades Ring Nebula Ring Tail Galaxy Rosette Nebula Saturn Nebula Sextans B Dwarf Small Magellanic Cloud Sombrero Galaxy Spindle Galaxy Tank Track Nebula Trifid Nebula Ursa Minor Dwarf Whirlpool Galaxy Wild Duck Cluster

33 Messier This table is licensed under the GNU Free Documentation License. It uses material from the Wikipedia article List of Messier objects 33
Quick Start Guide. The ieq45 GoTo German Equatorial Mount # 8000C
 Quick Start Guide The ieq45 GoTo German Equatorial Mount # 8000C PACKAGE CONTENTS Telescope Mount (with built-in GPS) 3.5 Vixen type dovetail saddle (installed on the mount) 8 Losmandy-D type dovetail
SmartStar Cube TM -II Series Mount and Telescopes (For 8520, 8620 and 8820 Serials) Instruction Manual
 Instruction Manual") SmartStar Cube TM -II Series Mount and Telescopes (For 8520, 8620 and 8820 Serials) Instruction Manual Table of Content Table of Content... 2 1. SmarStar Cube TM -II Series Overview... 4 1.1. SmartStar
SmartStar Cube TM -II Series Mount and Telescopes (For 8520, 8620 and 8820 Serials) Instruction Manual Table of Content Table of Content... 2 1. SmarStar Cube TM -II Series Overview... 4 1.1. SmartStar
Quick Start Guide. The ieq30 Pro GoTo German Equatorial Mount #3000E
 Quick Start Guide The ieq30 Pro GoTo German Equatorial Mount #3000E PACKAGE CONTENTS Telescope Mount (with built-in GPS) Go2Nova #8407 Hand Controller 1.5-inch Tripod One 10lb (4.5 kg) counterweight Dark
AccuAligning TM Polar Scope for SmartEQ TM Portable German Equatorial GOTO Mount. Installation and User Manual. Product #3130
 AccuAligning TM Polar Scope for SmartEQ TM Portable German Equatorial GOTO Mount Installation and User Manual Product #3130 ioptron Corporation, 6E Gill Street, Woburn, MA 01801 www.ioptron.com ioptron
Quick Start Guide. For SmartEQ TM Pro+ (#3200) Portable German Equatorial GOTO Mount
 Portable German Equatorial GOTO Mount") Quick Start Guide For SmartEQ TM Pro+ (#3200) Portable German Equatorial GOTO Mount PACKAGE CONTENTS Telescope Mount Go2Nova 8408 Hand Controller 1.25 inch tripod with accessory tray One 1 kg (2.2 lbs)
Quick Start Guide For SmartEQ TM Pro+ (#3200) Portable German Equatorial GOTO Mount PACKAGE CONTENTS Telescope Mount Go2Nova 8408 Hand Controller 1.25 inch tripod with accessory tray One 1 kg (2.2 lbs)
ioptron ZEQ25GT Balanced GoTo Equatorial Mount With Go2Nova 8408 Hand Controller Instruction Manual
 ioptron ZEQ25GT Balanced GoTo Equatorial Mount With Go2Nova 8408 Hand Controller Instruction Manual Product #7100 and #7101 Table of Content Table of Content...2 1. ZEQ25GT Overview...4 2. ZEQ25 Terms...5
ioptron CEM25P Center Balanced Equatorial Mount Instruction Manual
 ioptron CEM25P Center Balanced Equatorial Mount Instruction Manual Product #7100P, #7102P Read the included CEM25 Quick Setup Guide (QSG) BEFORE taking the mount out of the case! This product is a precision
ioptron ZEQ25GT Balanced GoTo Equatorial Mount With Go2Nova 8408 Hand Controller Instruction Manual
 ioptron ZEQ25GT Balanced GoTo Equatorial Mount With Go2Nova 8408 Hand Controller Instruction Manual Product #7100, #7101 and #7102 Table of Content Table of Content...2 1. ZEQ25GT Overview...4 2. ZEQ25
SmartStar ieq30 TM With Go2Nova 8407 Hand Controller. Instruction Manual
 SmartStar ieq30 TM With Go2Nova 8407 Hand Controller Instruction Manual Table of Content Table of Content...2 1. ieq30 TM Overview...4 2. ieq30 TM Terms...5 2.1. Parts List...5 2.2. Assembly Terms...6
SmartStar ieq45 TM GOTO German Equatorial Mount With Go2Nova 8407 Hand Controller. Instruction Manual
 SmartStar ieq45 TM GOTO German Equatorial Mount With Go2Nova 8407 Hand Controller Instruction Manual Table of Content Table of Content...2 1. ieq45 TM Mount Overview...4 2. ieq45 TM Mount Assembly...5
SmartStar ieq45 TM. Instruction Manual
 SmartStar ieq45 TM Instruction Manual Table of Content Table of Content...2 1. ieq45 TM Overview...4 2. ieq45 TM Assembly...5 2.1. Parts List...5 2.2. Assembly terms...6 2.3. ieq45 Ports...7 2.4. Introduction...7
Quick Start Guide. The ieq45 GoTo German Equatorial Mount #8000D, #8000DP and #8000AZ
 Quick Start Guide The ieq45 GoTo German Equatorial Mount #8000D, #8000DP and #8000AZ PACKAGE CONTENTS 1 Telescope Mount (with built-in GPS) Losmandy/Vixen dual saddle Go2Nova 8407 Hand Controller Two 5
NEVER USE A TELESCOPE TO LOOK AT THE SUN DIRECTLY!
 Quick Start Guide AstroBoy -70e Computerized Telescope With Electronic Eyepiece #9102 (Astro Blue) FEATURES Alt-Azimuth Mount with GoToNova computer control technology Computerized automatic pointing and
Products #8000D/#8000DP. SmartStar ieq45 TM With Go2Nova TM 8407 Hand Controller. Instruction Manual
 Products #8000D/#8000DP SmartStar ieq45 TM With Go2Nova TM 8407 Hand Controller Instruction Manual Table of Content Table of Content...2 1. ieq45 TM German Equatorial Mount Overview...4 2. ieq45 TM Mount
ioptron ieq30 Pro TM Equatorial Mount Instruction Manual Product #3000E
 ioptron ieq30 Pro TM Equatorial Mount Instruction Manual Product #3000E This product is a precision instrument. Please read the included QSG before assembling the mount. Please read the entire Instruction
Quick Start Guide. The ieq45 Pro GoTo German Equatorial Mount #8000E, #8000EP and #8000E-AZ
 Quick Start Guide The ieq45 Pro GoTo German Equatorial Mount #8000E, #8000EP and #8000E-AZ PACKAGE CONTENTS 1 Telescope Mount (with built-in GPS) Losmandy/Vixen dual saddle Go2Nova 8407+ Hand Controller
ioptron CEM120 Center-Balanced Equatorial Mount Instruction Manual
 ioptron CEM120 Center-Balanced Equatorial Mount Instruction Manual Product #7300, #7301 & #7302 1 Read the Instruction BEFORE setting up and using the mount! Worm/gear system damage due to improperly use
ioptron ieq45 Pro TM Equatorial Mount Instruction Manual Products #8000E
 ioptron ieq45 Pro TM Equatorial Mount Instruction Manual Products #8000E This product is a precision instrument. Please read the included QSG before assembling the mount. Please read the entire Instruction
Manual www. ioptron. com
 SmartStar -PR EQ Mount Manual www. ioptron. com WARNING! NEVER USE A TELESCOPE TO LOOK AT THE SUN! Looking at or near the Sun will cause instant and irreversible damage to your eye. Children should always
Quick Start Guide. CEM25 Center Balanced GoTo Equatorial Mount Models: #7100E, #7102E
 Quick Start Guide CEM25 Center Balanced GoTo Equatorial Mount Models: #7100E, #7102E PACKAGE CONTENTS 1 Telescope mount with GPS, and AccuAlign TM dark field illuminated Polar Scope Hand controller (HC)
Quick Start Guide. ZEQ25GT Balanced GoTo Equatorial Mount Models: #7100, #7101, #7102
 Quick Start Guide ZEQ25GT Balanced GoTo Equatorial Mount Models: #7100, #7101, #7102 PACKAGE CONTENTS 1 Telescope Mount with GPS, and AccuAligning TM dark field illuminated Polar Scope (except Model #7101)
Quick Start Guide. ZEQ25GT Center Balanced GoTo Equatorial Mount Models: #7100, #7101, #7102
 Quick Start Guide ZEQ25GT Center Balanced GoTo Equatorial Mount Models: #7100, #7101, #7102 PACKAGE CONTENTS 1 Telescope mount with GPS, and AccuAligning TM dark field illuminated Polar Scope (except Model
Quick Start Guide. CEM25P Center Balanced GoTo Equatorial Mount Models: #7100P, #7102P
 Quick Start Guide CEM25P Center Balanced GoTo Equatorial Mount Models: #7100P, #7102P PACKAGE CONTENTS 1 Telescope mount with GPS, and AccuAlign TM dark field illuminated Polar Scope Hand controller (HC)
ioptron CEM60 Center-Balanced Equatorial Mount Instruction Manual
 ioptron CEM60 Center-Balanced Equatorial Mount Instruction Manual Product #7200 and#7201 Please read the included CEM60 Quick Setup Guide (QSG) BEFORE taking the mount out of the case! This product is
Figure 3-1 The Advanced GT Hand Control
 The following is a supplemental addendum to the included instruction manual that explains the new features of Celestron's Advanced Series Telescopes. Please refer to this addendum for information concerning
Addendum For NexStar GT Hand Control Section Of The Owner's Manual.
 Addendum For NexStar GT Hand Control Section Of The Owner's Manual. The following is an addendum to the NexStar GT section of the owner's manual that explains the current operation and added features to
THE LOSMANDY G-11 MOUNT
 Checking the parts THE LOSMANDY G-11 MOUNT Depending on which accessories you ordered, your G-11 mount was shipped in four or more boxes. The contents of each box are as follows: Equatorial Mount Adjustable
Observing Procedure for C11 GPS
 Observing Procedure for C11 GPS By T. W. Fuller Preparation Customize observing list You can install a list of up to 25 custom objects in the telescope database ahead of time, so that you will have them
Instructions Manual Zoomion Apollo 80
 Instructions Manual Zoomion Apollo 80 English version 7.2015 Rev A 1 The Zoomion Apollo 80 Figure 1. Parts description. Congratulations on the purchase of the new Zoomion Apollo 80. This telescope will
Directions for use
 Directions for use 40070 40080 60050 70060 70076 80060 90060 900114 Fig. 1 Fig. 1A Fig. 2 Fig. 3 Fig. 4 Fig. 5 Fig. 6 Fig. 7 english ENGLISH DIRECTIONS FOR USE 1 Tripod Leg 2 Tripod Leg Adjusting Screw
INSTRUCTIONS. Go-To Maksutov-Cassegrain. 90mm (3.6 ) F f/13.8
 F f/13.8") INSTRUCTIONS Go-To Maksutov-Cassegrain 90mm (3.6 ) F. 1250 f/13.8 SKYSCAN AZ The Skyscan AZ is a precision-engineered instrument that will allow you to easily find and enjoy viewing night sky treasures,
INSTRUCTIONS Go-To Maksutov-Cassegrain 90mm (3.6 ) F. 1250 f/13.8 SKYSCAN AZ The Skyscan AZ is a precision-engineered instrument that will allow you to easily find and enjoy viewing night sky treasures,
Polar Alignment of LX200R and Ultra Wedge For The Southern Hemisphere by Chris James
 Return To How To Menu Polar Alignment of LX200R and Ultra Wedge For The Southern Hemisphere by Chris James Overview This document goes thru the process required to Polar Align the LX200R using a Ultra
INSTRUCTION MANUAL. SynScan TM V3. Copyright Sky-Watcher
 INSTRUCTION MANUAL SynScan TM SynScan TM Copyright Sky-Watcher 150113V3 Basic Operations CONTENT PART I : INTRODUCTION 1.1 Outline and Interface... 4 1.2 Connecting to a Telescope Mount... 4 1.3 Slew the
SCHIEBER TELESCOPES. Unique, High-Quality Telescopes
 SCHIEBER TELESCOPES Unique, High-Quality Telescopes 3.5 Refractor Astrophotography Bundle - Strike 90 PLUS Telescope Assembly Instructions and Digital Eyepiece Camera Instructions. (1) telescope assembly
C A S S I N I. MODEL : C EQ3 900mm X 135mm COSMO BRANDS INC.
 C A S S I N I MODEL : C-900135EQ3 900mm X 135mm COSMO BRANDS INC. WWW.COSMOSOPTICS.COM 2 C A S S I N I C-900135EQ3 TELESCOPE OPERATING INSTRUCTIONS INTRODUCTION CONGRATULATIONS ON YOUR PURCHASE OF THE
INTRODUCTION... 4 Warning... 4 ASSEMBLY... 7 Assembling the NexStar... 7 Attaching the Hand Control Holder... 8 Attaching the Fork Arm to the
 INSTRUCTION MANUAL NexStar 60. NexStar 80. NexStar 102. NexStar 114. NexStar 130 T A B L E O F C O N T E N T S INTRODUCTION... 4 Warning... 4 ASSEMBLY... 7 Assembling the NexStar... 7 Attaching the Hand
Appendix 2: Disassembling and Assembling the Telescopes and the Celestron Equatorial Mounts
 Appendix 2: Disassembling and Assembling the Telescopes and the Celestron Equatorial Mounts Disassembling (classroom) 1. The mount must be locked with the telescope situated horizontally. Note the telescope
instruction Manual IN 285 Rev. B 02/09
 instruction Manual StarSeeker 100mm IN 285 Rev. B 02/09 TABLE OF CONTENTS INTRODUCTION...4 Warning...4 ASSEMBLY...4 Assembling the StarSeeker....4 Attaching the Telescope to the Tripod...5 The Star Diagonal...5
EQUATORIAL MOUNT AND TRIPOD. INSTRUCTION MANUAL Model #91531
 EQUATORIAL MOUNT AND TRIPOD INSTRUCTION MANUAL Model #91531 TABLE OF CONTENTS Introduction.................................................... 3 System Requirements...............................................
INSTRUCTION MANUAL. EQ8 Mount V2. Copyright Sky-Watcher
 INSTRUCTION MANUAL EQ8 Mount Copyright Sky-Watcher 121213V2 PART I : SETTING UP THE EQ8 MOUNT PART II : POLAR ALIGNMENT PART III : ELECTRONIC CONTROL INTERFACE PART IV : OTHER FEATURES OF THE EQ8 MOUNT
ASTRO-PHYSICS, INC. POLAR ALIGNMENT TELESCOPE (PASILL2)
") OBJECTIVE LENS ASTRO-PHYSICS, INC. POLAR ALIGNMENT TELESCOPE (PASILL2) This model shipped from January 2001 through July 2002. It fits all 400, 600, 600E, 800, 900 and 1200 models (except the original
OBJECTIVE LENS ASTRO-PHYSICS, INC. POLAR ALIGNMENT TELESCOPE (PASILL2) This model shipped from January 2001 through July 2002. It fits all 400, 600, 600E, 800, 900 and 1200 models (except the original
INTRODUCTION...4 Warning...4 ASSEMBLY...7 Setting up the Tripod...7 Attaching the Equatorial Mount...7 Attaching the Center Leg Brace...
 Advanced Series Advanced Series GT INSTRUCTION MANUAL C8-N / C8-NGT C10-N / C10-N 1 INTRODUCTION...4 Warning...4 ASSEMBLY...7 Setting up the Tripod...7 Attaching the Equatorial Mount...7 Attaching the
INTRODUCTION...4 Warning...4 QUICK SETUP...5 ASSEMBLY...10 Assembling the NexStar...10 Attaching the Telescope Tube to the Mount...
 INSTRUCTION MANUAL N e x S t a r 6 0. N e x S t a r 8 0. N e x S t a r 7 6. N e x S t a r 1 0 2. N e x S t a r 1 1 4. N e x S t a r 1 3 0 T A B L E O F C O N T E N T S INTRODUCTION...4 Warning...4 QUICK
C A S S I N I TRACKER
 C A S S I N I TRACKER ASTRONOMICAL REFLECTOR T ELESCOPE SERIES #C-80080TR #C-1100102TR #C-1000120TR #C-1000120TREF #C-900135TR COSMO BRANDS INC. WWW.COSMOSOPTICS.COM 2 CASSINI REFLECTING TELESCOPE OPERATING
COMPUTERIZED TELESCOPE. SkyProdigy 6 ITEM # SkyProdigy 102 ITEM #22090 INSTRUCTION MANUAL
 COMPUTERIZED TELESCOPE SkyProdigy 6 ITEM #11076 SkyProdigy 102 ITEM #22090 INSTRUCTION MANUAL INSTRUCTION MANUAL TABLE OF CONTENTS INTRODUCTION Warning SkyProdigy Models ASSEMBLY Assembling SkyProdigy
Series Telescopes. For Models:
 Series Telescopes Instruction Manual For Models: 91519 32054 32062 22020 12079 12026 12046 12067 12031 Table of Contents Introduction 5 Advanced VX Mount 6 Assembly 7 Computerized Hand Control 12 Object
Guide to Polar Alignment of a Meade LX200GPS Telescope
 Guide to Polar Alignment of a Meade By Dale A. Chamberlain dale@dchamberlain.net April 18, 2006 Page 1 of 11 1 Why Polar Align? After making an investment in a telescope such as the Meade LX200GPS, you
TABLE OF CONTENTS. Introduction. 5. Assembly. 7. Computerized Hand Control 12. Object Catalog 16. Slewing to an Object 16. Polar Aligning the Mount 25
 INSTRUCTION MANUAL For Models: 91523 12010 12011 12012 12017 12018 12019 TABLE OF CONTENTS Introduction. 5 CGEM II Mount. 6 Assembly. 7 Computerized Hand Control 12 Object Catalog 16 Slewing to an Object
ASTRO-PHYSICS, INC. POLAR ALIGNMENT TELESCOPE
 Polar Alignment Telescope ASTRO-PHYSICS, INC. POLAR ALIGNMENT TELESCOPE This polar axis telescope will help you align your mount with the Celestial Poles. When your mount is properly aligned, your telescope's
SynScan V4 GoTo Hand Controller
 instruction Manual SynScan V4 GoTo Hand Controller Providing Exceptional Consumer Optical Products Since 1975 Customer Support: www.oriontelescopes.com/contactus Corporate Offices: 89 Hangar Way, Watsonville
PoleMaster User Manual (Northern Hemisphere)
") PoleMaster User Manual (Northern Hemisphere) 1. Hardware Installation 1.1 Attach the PoleMaster camera unit to the quick install plate using the three bolts supplied. In the case of the AZ EQ5-GT and Mesu
PoleMaster User Manual (Northern Hemisphere) 1. Hardware Installation 1.1 Attach the PoleMaster camera unit to the quick install plate using the three bolts supplied. In the case of the AZ EQ5-GT and Mesu
10 - Celestron Telescope II: Operation
 10 - Celestron Telescope II: Operation Purpose: Gain more experience setting up a 6 Celestron telescope, familiarize yourself with the software interface, and acquire an image with the CCD camera. Due:
Instruction Manual. Omegon EQ-500 Equatorial Mount English version Rev A
 Instruction Manual Omegon EQ-500 Equatorial Mount English version 10.2014 Rev A Instruction Manual Omegon EQ-500 Equatorial Mount Congratulations on the purchase of the new Omegon EQ-500 Equatorial Mount.
CASSINI CQR-800 OPERATING INSTRUCTIONS INTRODUCTION
 HQR-800 CASSINI CQR-800 OPERATING INSTRUCTIONS INTRODUCTION CONGRATULATIONS ON YOUR PURCHASE OF THE CASSINI CQR-800 TELESCOPE. THIS TELESCOPE HAS BEEN PRODUCED TO PRECISE SPECIFICATIONS. PRIOR TO USING
User manual. July /34
 User manual July 2014 1/34 www.trackthestars.com Contents Introduction... 3 Product safety... 3 Receiving the mounting... 3 Quick start... 4 Setting up the pier... 4 Installation of the mounting head...
1 YEAR LIMITED WARRANTY TELESCOPES
 1 YEAR LIMITED WARRANTY TELESCOPES BARSKA Optics, as manufacturer, warrants this new precision optical product to be free of original defects in materials and/or workmanship for the length of time specified
SkyTracker Pro Camera Mount Instruction Manual
 SkyTracker Pro Camera Mount Instruction Manual Product #3322 Table of Content Table of Content... 2 1. SkyTracker TM Pro Camera Mount Overview... 3 2. SkyTracker TM Pro Camera Mount Assembly... 5 2.1.
SimpleDreamEQ2. Upgrade kit equatorial mounts Synta EQ2, Celestron CG3. User guide. Micro GoTo system. Micro GoTo system
 SimpleDreamEQ2 Upgrade kit equatorial mounts Synta EQ2, Celestron CG3 User guide Micro GoTo system Micro GoTo system AstroGadget 2017 1. DESCRIPTION The kit consists of a control unit and a set of drives
Instruction Manual. LX85 Series with AudioStar German Equatorial Mounted Telescopes
 Instruction Manual LX85 Series with AudioStar German Equatorial Mounted Telescopes WARNING! Never use an unfiltered telescope to look at the Sun! Looking at or near the Sun will cause instant and irreversible
INTRODUCTION... 4 WARNING... 4 QUICK SETUP... 5
 INSTRUCTION MANUAL INTRODUCTION... 4 WARNING... 4 QUICK SETUP... 5 ASSEMBLY... 8 ASSEMBLING THE NEXSTAR... 8 Setting Up The Tripod... 8 Adjusting the Tripod Height... 9 Vibration Suppression Pads... 9
SmartStar Cube TM -E Series Mount and Telescopes (For 8500, 8502, 8503 and 8504) Instruction Manual
 Instruction Manual") SmartStar Cube TM -E Series Mount and Telescopes (For 8500, 8502, 8503 and 8504) Instruction Manual 1 Table of Content Table of Content... 2 1. SmarStar Cube TM -E Series Overview... 4 1.1. SmartStar Cube
SmartStar Cube TM -E Series Mount and Telescopes (For 8500, 8502, 8503 and 8504) Instruction Manual 1 Table of Content Table of Content... 2 1. SmarStar Cube TM -E Series Overview... 4 1.1. SmartStar Cube
Nexus DSC firmware/catalogues releases
 Nexus DSC firmware/catalogues releases 1.2.1 released 5 th of November 2018 Firmware date: 2018.11.05 Implemented a new tracking method with AstroLock that can be tuned in Settings->AstroLock Added an
C5-S C8-S C9.25-S C11-S
 Advanced Series Advanced Series GT INSTRUCTION MANUAL C5-S C8-S C9.25-S C11-S INTRODUCTION... 4 Warning... 4 ASSEMBLY... 7 Setting up the Tripod... 7 Attaching the Equatorial Mount... 8 Attaching the Center
Orion EQ-1 Equatorial Mount
 instruction Manual Orion EQ-1 Equatorial Mount #9011 Providing Exceptional Consumer Optical Products Since 1975 Customer Support (800) 676-1343 E-mail: support@telescope.com Corporate Offices (831) 763-7000
THE HAVERFORD UNIVERSITY S STRAWBRIDGE OBSERVATORY S OF THE 16 MEADE. A quick guide to using the 16 Meade Schmidt-Cassegrain Telescope
 THE S OF THE 16 MEADE HAVERFORD UNIVERSITY S STRAWBRIDGE OBSERVATORY A quick guide to using the 16 Meade Schmidt-Cassegrain Telescope First draft: Scott Engle, Fall 2010; Update: Steve Boughn, Fall 2012
ESC SETUP ENTER V1 TOUR RATE UTILITY M NGC PLANET
 ESC SETUP ENTER TOUR RATE UTILITY 1 2 3 M NGC IC 4 5 6 PLANET OBJECT USER 7 8 9 ID 0 210305V1 TABLE OF CONTENTS THE SynScan TM Introduction to the SynScan TM Powering the SynScan TM SynScan TM Hand Control
INSTRUCTION MANUAL. AZ-EQ5 GT Mount. Standard Tripod. Deluxe Pier Tripod V1. Copyright Sky-Watcher
 INSTRUCTION MANUAL AZ-EQ5 GT Mount Standard Tripod Deluxe Pier Tripod Copyright Sky-Watcher 280814V1 CONTENT PART I : SETTING UP THE AZ-EQ5 GT MOUNT 1.1 Setting Up The Tripod...3 1.2 Putting On The AZ-EQ5
AZ TRACKING TELESCOPES
 ESC RATE NGC OBJECT ID 0 AZ KING TELESCOPES UP ENTER TOUR UTILITY M IC PLANET USER 7 8 9 Instruction manual for AZ GoTo telescopes on reverse flip side TR0808V TABLE OF CONTENTS TELESCOPE ASSEMBLY - AUTOKING
GERMAN TYPE EQUATORIAL MOUNT (FM 51/52 - FM 100/102 - FM150) USER MANUAL
 USER MANUAL") GERMAN TYPE EQUATORIAL MOUNT (FM 51/52 - FM 100/102 - FM150) USER MANUAL NOMENCLATURE MANUAL KNOB WORM DRIVE TIGHTENING SCREW FIXING CLUTCH CONTROL PLUG POLAR SCOPE PEEP HOLE PLATFORM ALTITUDE MOUNTING
GERMAN TYPE EQUATORIAL MOUNT (FM 51/52 - FM 100/102 - FM150) USER MANUAL NOMENCLATURE MANUAL KNOB WORM DRIVE TIGHTENING SCREW FIXING CLUTCH CONTROL PLUG POLAR SCOPE PEEP HOLE PLATFORM ALTITUDE MOUNTING
INTRODUCTION...4 ASSEMBLY...6 HAND CONTROL...16
 INSTRUCTION MANUAL CGE800 CGE925 CGE1100 CGE1400 INTRODUCTION...4 Warning...4 ASSEMBLY...6 Setting up the Tripod...6 Attaching the Center Leg Brace...7 Attaching the Electronics Pier...7 Attaching the
CASSINI CQR-120 OPERATING INSTRUCTIONS
 CASSINI CQR-120 OPERATING INSTRUCTIONS INTRODUCTION CONGRATULATIONS ON YOUR PURCHASE OF THE CASSINI CQR-120 TELESCOPE. THIS TELESCOPE HAS BEEN PRODUCED TO PRECISE SPECIFICATIONS. PRIOR TO USING YOUR NEW
TABLE OF CONTENTS INTRODUCTION
 INSTRUCTION MANUAL NexStar 80GTL TABLE OF CONTENTS INTRODUCTION...4 Warning...4 ASSEMBLY...5 Assembling the NexStar...6 Attaching the Telescope to the Tripod...7 Balancing the Telescope tube...7 The Erect
EQ-1 Equatorial Mount
 instruction Manual Orion EQ-1 Equatorial Mount #9011 Providing Exceptional Consumer Optical Products Since 1975 Customer Support: www.oriontelescopes.com/contactus Corporate Offices: 89 Hangar Way, Watsonville
Instructions Manual Omegon Dobson Advanced 203
 Instructions Manual Omegon Dobson Advanced 203 English version 10.2015 Rev A 1 The Omegon Advanced Dobson 203 Congratulations on the purchase of the new Omegon Advanced Dobson 203 telescope. This telescope
INSTRUCTION MANUAL DOBSONIAN SYNSCAN ENTER SETUP ESC TOUR RATE UTILITY PLANET ID
 0 INSTRUCTION MANUAL DOBSONIAN SYNSCAN - 8 10 12 14 16 SETUP ENTER ESC TOUR RATE UTILITY 1 2 3 M NGC IC 4 5 6 PLANET OBJECT USER 7 8 9 ID 180610V6-3.08 240412V1 TABLE OF CONTENTS DOBSONIAN BASE ASSEMBLY
Orion Sirius Pro AZ/EQ-G GoTo Telescope Mount
 instruction Manual Orion Sirius Pro AZ/EQ-G GoTo Telescope Mount #10088 Providing Exceptional Consumer Optical Products Since 1975 Customer Support: www.oriontelescopes.com/contactus Corporate Offices:
Metochi Amfiet Quick Start Guide
 Filename: GoTo Telescope Meade ETX -70AT Quick start Metochi Amfiet Quick Start Guide ETX: «Your Personal Window to the Universe» 1 Manual of Meade ETX-70AT 2 Parts Listing ETX-70AT Astro Telecope with
CGE Pro Series INSTRUCTION MANUAL CGE Pro 925 CGE Pro 1100 CGE Pro 1400
 CGE Pro Series INSTRUCTION MANUAL CGE Pro 925 CGE Pro 1100 CGE Pro 1400 INTRODUCTION... 4 Warning... 4 ASSEMBLY... 5 Setting up the Tripod... 6 Attaching the Accessory Tray... 7 Attaching the Electronics
Altazimuth Mount. Altazimuth Mount
 instruction Manual Orion VersaGo II HD Altazimuth Mount #10104 Orion VersaGo II Altazimuth Mount #10105 #10104 #10105 Providing Exceptional Consumer Optical Products Since 1975 OrionTelescopes.com Customer
SkyCruiser. SkyCruiser for Android
 SkyCruiser General Description SkyCruiser is software running under the Android operating system, developed for the purpose of controlling telescopes wirelessly employing Bluetooth and GPS. After mount
Thank you for purchasing this product CONTENT Sky Memo S Features For your Safety Polar Scope WARNING:
 INSTRUCTION MANUAL Thank you for purchasing this product Sky Memo S is user-friendly and provides various combinations to satisfy all your needs for astrophotography and time-lapse photography. It is a
RIGHT-ANGLE POLAR ALIGNMENT SCOPE (RAPAS) INSTRUCTIONS
 INSTRUCTIONS") RIGHT-ANGLE POLAR ALIGNMENT SCOPE (RAPAS) INSTRUCTIONS Congratulations on your receipt of our new polar alignment scope and your new-found freedom from neck strain. The Astro-Physics Right-Angle Polar
RIGHT-ANGLE POLAR ALIGNMENT SCOPE (RAPAS) INSTRUCTIONS Congratulations on your receipt of our new polar alignment scope and your new-found freedom from neck strain. The Astro-Physics Right-Angle Polar
Equatorial Mount. instruction Manual #9995. Customer Support (800) IN 280 Rev. B 02/06
 IN 280 Rev. B 02/06") instruction Manual Orion Sirius EQ-G Equatorial Mount #9995 Providing Exceptional Consumer Optical Products Since 1975 Customer Support (800) 676-1343 E-mail: support@telescope.com Corporate Offices (831)
instruction Manual Orion Sirius EQ-G Equatorial Mount #9995 Providing Exceptional Consumer Optical Products Since 1975 Customer Support (800) 676-1343 E-mail: support@telescope.com Corporate Offices (831)
Instruction Manual. AC 70/700 AZ-2 English version Rev A
 Instruction Manual AC 70/700 AZ-2 English version 5. 2016 Rev A The Omegon AC 70/700 AZ-2 Congratulations on the purchase of the new Omegon AC 70/700 AZ-2. This small telescope will give you hours of fun,
RP-300 TELESCOPE Instruction Manual
 RP-300 TELESCOPE Instruction Manual 2070 5th Avenue Ronkonkoma, NY 11779 Phone: 631-963-5000 Fax: 631-427-6749 For information, call toll-free: 1-800-967-8427 info@carson.com / sales@carson.com / www.carson.com
Operating the Celestron 14 Telescope
 Operating the Celestron 14 Telescope 1. The Telescope and Its Controls The Celestron 14-inch telescope is located in the east bay of the observatory (Fig. 1). It is a Schmidt-Cassegrain type instrument;
High Precision for your astronomical future
 High Precision for your astronomical future 10MICRON: NO COMPROMISES The developement of 10micron products is aimed to provide both the best performances and the maximum ease of use The availability on
Online Assembly Guide : 4.5 inch Reflector Telescope
 Online Assembly Guide : 4.5 inch Reflector Telescope INTRODUCTION Congratulations! You have bought a wonderful telescope. This is a precision optical instrument, and you have many wonderful evenings of
RP-200 TELESCOPE Instruction Manual
 2070 5th Avenue Ronkonkoma, NY 11779 Phone: 631-963-5000 Fax: 631-427-6749 For information, call toll-free: 1-800-967-8427 info@carson.com / sales@carson.com / www.carson.com RP-200 TELESCOPE Instruction
Assignment #0 Using Stellarium
 Name: Class: Date: Assignment #0 Using Stellarium The purpose of this exercise is to familiarize yourself with the Stellarium program and its many capabilities and features. Stellarium is a visually beautiful
Instruction Manual ETX. Premier Edition Telescope Series AutoStar LNT SmartFinder
 Instruction Manual ETX Premier Edition Telescope Series AutoStar LNT SmartFinder WARNING! Never use a Meade ETX PE Telescope to look at the Sun! Looking at or near the Sun will cause instant and irreversible
Instruction Manual. DS-2000 Series Reflecting and Refracting Telescopes. AutoStar LNT SmartFinder MEADE.COM
 Instruction Manual DS-2000 Series Reflecting and Refracting Telescopes AutoStar LNT SmartFinder MEADE.COM WARNING! Never use a Meade DS2000 Telescope to look at the Sun! Looking at or near the Sun will
Spotting Scope Instruction Manual
 Spotting Scope Instruction Manual Here are the Main Parts of Your orbitor OR7030 B A C A. Telescope Tube F E D B. Dew Shield I C. Eyepiece G D. Diagonal Mirror E. Focuser F. Mount Lock Knob H G. Aiming
EQ6 SkyScan TM. Dec. Lock Level. Mounting Plate Lock Knob. Dec. Setting Circle. R.A. Setting Circle. Counterweight Rod Lock Knob
 ESC SETUP ENTER TOUR RATE EVENT 1 2 3 M NGC IC 4 5 6 PLANET OBJECT USER 7 8 9 ID 0 EQ6 SkyScan TM Mounting Plate Lock Knob Dec. Lock Level Dec. Setting Circle R.A. Setting Circle Polarscope Holder (not
How to use your astronomical telescope for the first time.
 How to use your astronomical telescope for the first time. A quick guide to setting up and using your telescope for the first time. There are 10 pages in this section which cover a variety of topics to
Telescope. 1. Read these instructions carefully and familiarise yourself with the procedure before assembling the unit.
 Telescope a Simple assembly instructions- Please keep for future reference IMPORTANT 1. Read these instructions carefully and familiarise yourself with the procedure before assembling the unit. 2. Check
RP-100 TELESCOPE Instruction Manual
 2070 5th Avenue Ronkonkoma, NY 11779 Phone: 631-963-5000 Fax: 631-427-6749 For information, call toll-free: 1-800-967-8427 info@carson.com / sales@carson.com / www.carson.com RP-100 TELESCOPE Instruction
RP-400 TELESCOPE Instruction Manual
 RP-400 TELESCOPE Instruction Manual 2070 5th Avenue Ronkonkoma, NY 11779 Phone: 631-963-5000 Fax: 631-427-6749 For information, call toll-free: 1-800-967-8427 info@carson.com / sales@carson.com / www.carson.com
Hinode Solar Guider User Manual
 Hinode Solar Guider User Manual 1.15 Hutech Corporation 25691 Atlantic Ocean Dr., Unit B 11 Lake Forest, CA 92630 http://hutech.com Introduction The Hinode Solar Guider is a fully self contained unit designed
Instruction Manual. Model #: (Reflector) Lit #: / 06-07
 Lit #: / 06-07") Instruction Manual Model #: 49114500 (Reflector) Model #: 49060700 () Model #: 49070800 () Lit #: 93-0468 / 06-07 PARTS DIAGRAM C E D B A F G H I J NOTE: Actual product may have improvements that are not
Instruction Manual Model #: 49114500 (Reflector) Model #: 49060700 () Model #: 49070800 () Lit #: 93-0468 / 06-07 PARTS DIAGRAM C E D B A F G H I J NOTE: Actual product may have improvements that are not