SkEye User Manual. A How-to guide and reference for SkEye. Harshad R J
|
|
|
- Terence Hawkins
- 6 years ago
- Views:
Transcription
1
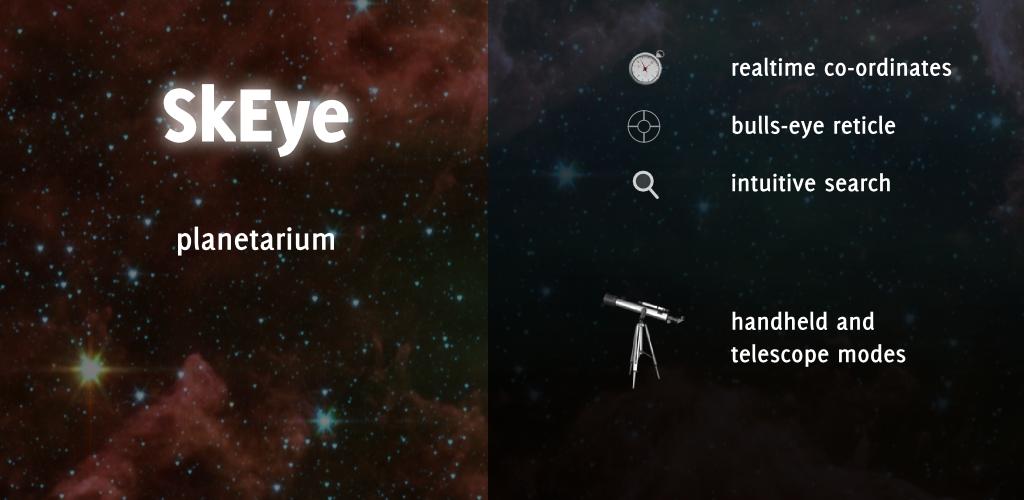
2 2
3 SkEye User Manual A How-to guide and reference for SkEye Harshad R J
4 ii
5 Contents Preface v 1 Introduction A note about Accuracy Operational Modes Magnetometer Calibration Calibration procedure Substances that cause interference Virtual DSC Advantages over a real DSC Disadvantage Tutorial for Virtual DSC Prepare your phone Attach to telescope First Alignment Adding more Alignments User Interface Features Color themes Catalog filters Double Tap to launch Menu Principal Orientation iii
6 iv CONTENTS 4.6 FOV angles Sensitivity settings Search Manual mode Misc Features Appendix A - Managing system time 19 6 Appendix B - Adjusting Sensitivity 21
7 Preface This document was written for SkEye version 6.6 in the summer of Get the latest updates from SkEye website. v
8 vi PREFACE
9 Chapter 1 Introduction SkEye is a planetarium for Android devices (phones and tablets). It can orient its view using sensors available on the device. The unique feature in SkEye is that you can use your Android device as a PushTo guide for telescopes, binoculars and other observing equipment. 1.1 A note about Accuracy The accuracy of SkEye is affected by a number of factors, both internal and external. The external factors have the maximum effect and include the following: Accuracy of the phone s sensors and environmental effects such as surrounding magnetic fields. The effect of external factors can be mitigated to a large extent by multiple alignments. Internally, SkEye is yet to account for the following (tiny) effects: Atmospheric refraction (which is most evident near the horizon) Proper motions of stars. 1
10 2 CHAPTER 1. INTRODUCTION 1.2 Operational Modes Hand-held mode Users of Google SkyMap would be familiar with this mode. It lets you quickly identify objects visible in the sky as well as search for them. Virtual-DSC This is the most innovative feature in SkEye. It is the cheaper, convenient (and possibly less accurate) alternative to encoder based DSCs. After attaching your phone to the telescope OTA, you can use it as a finder-scope and a PushTo guide, without any additional equipment. Please make sure you read the detailed tutorial below before using it. Bluetooth DSC Support for encoder based Digital Setting Circles connected over Bluetooth is in the works. (Checkout the DSC test app in the Play Store).
11 Chapter 2 Magnetometer Calibration IMPORTANT: Please read this section before using SkEye. It is a simple procedure but a crucial one for the proper operation of SkEye on some phones. Android phones are equipped with a device called a Magnetometer. This device helps to determine the orientation of the phone relative to the Earth s magnetic field. (Similar to a compass needle but in three dimensions). The magnetometer on some phones requires to be calibrated. This needs to be done every time you use an app that needs the magnetometer! 2.1 Calibration procedure The procedure is very simple and takes just a few seconds. After starting the application, wave your arm (holding the phone) in a figure-8 motion. You may have to repeat this a couple of times. This is best illustrated with a video. (If you can t click the link, try searching YouTube for best compass calibration method). After doing so, check whether North as shown in the app, is approximately where you think it is. (If the sensors are not calibrated, you will see really wild errors that are easy to notice). 3
12 4 CHAPTER 2. MAGNETOMETER CALIBRATION 2.2 Substances that cause interference Since the operation of SkEye is affected by interference from metals, it is worthwhile to understand this phenomenon in brief. Every substance interacts with ambient magnetic fields (such as the Earth s magnetic field) in a unique way. Their level of interaction is measured by the relative magnetic permeability of the substance. Higher the value, the more the substance distorts ambient magnetic fields. The relative permeability of some materials can be found in this wikipedia article. Among the commonly found materials the following are cause for concern to us: Iron Nickel Cobalt Alloys of the above. For example, Steel. All other materials don t pose a problem. Examples are: Aluminum Copper and it s alloys like Brass Wood, Plastic and most of the other commonly found substances The latest versions of SkEye show a warning if abnormal magnetic fields are detected. This warning may only be shown in certain directions. When you see this warning, you should consider shifting the device to a different location.
13 Chapter 3 Virtual DSC DSC stands for Digital Setting Circles. These are typically implemented using optical or magnetic encoders in the mount. It is quite accurate (typically within 5 arc-minutes on an amateur setup), but it is costly and cumbersome to install. In contrast, the Virtual DSC mode in SkEye uses only the sensors on your device to guide the planetarium view. 3.1 Advantages over a real DSC Cheaper (if you already own an Android device) Isn t affected by mounting errors. Quicker to install and get started Less messy (no wires, batteries, etc) 3.2 Disadvantage Possibly less accurate than a real DSC. The source of the inaccuracy is in the magnetic field measurement. Magnetometers sense the direction of Earth s magnetic field to provide orientation. There are various errors introduced at this stage: 5
14 6 CHAPTER 3. VIRTUAL DSC The Earth s magnetic field itself is not consistent. It varies from place to place, and time to time, quite unpredictably. The major components of the variation are more predictable and taken care of but smaller components aren t. There is often some magnetic interference from the environment, such as large metal structures, electric circuits, underground metal deposits, and so on. Some phones induce a magnetic field around themselves, affecting their own sensors. In-spite of all these caveats, I have found this method to be accurate to about 15 arc-minutes with single point alignment. With two or three alignment points, accuracy can be improved further to about 8 arc-minutes. Complete accuracy is possible under ideal conditions. 3.3 Tutorial for Virtual DSC Since SkEye is the only application (that I know of) with a Virtual DSC feature, I am writing a detailed step-by-step guide for using it. It s actually quite simple once you get familiar with it Prepare your phone Make sure the phone s system time is accurate to within a minute (if not seconds). You can use, for example, the Navy Time application to verify system time accuracy. (See Appendix A for more details) Start the SkEye application. You will be prompted for your location when you first start the app. Specify your precise location for maximum accuracy. I recommend you use GPS to specify the location. The locations you specify are remembered so you can use them quickly later.
15 3.3. TUTORIAL FOR VIRTUAL DSC 7 If you specify the location manually, note that the input is in decimal degrees. Hence, a latitude of should be entered as 15.5 and not 15.3! You can use Google Maps to find the co-ordinates of your location. Important! Calibrate the magnetometer as described in the previous section. Now attach the phone to the OTA, as described below Attach to telescope You need to attach your phone to the telescope s Optical Tube Assembly (OTA), such that the phone moves whenever the OTA moves. See figure below for an example.


16 8 CHAPTER 3. VIRTUAL DSC
17 3.3. TUTORIAL FOR VIRTUAL DSC 9 You can use a phone jacket (or case, holster, etc) and attach the jacket permanently to the OTA. That way, you can plug-in the phone quickly when needed. To attach the jacket to the OTA you can use, for example, Velcro or two sided tape. Checkout several ideas contributed by users on my website. The direction in which you attach doesn t matter. The type of mount doesn t matter either. Attach in such a way that the display is conveniently visible and operable. You will get best results if your telescope doesn t have steel 1 tubes or mounts, since they cause magnetic interference. If they do, try to attach the phone farthest from the metallic content. Try to observe from a location where there is little magnetic interference, for example, keep away from electric poles and wires, large buildings or steel railings First Alignment Although, in theory, you need just one alignment, you would be making about three alignments in practice. Choose a bright and well-known star/planet for your first alignment. Click Menu button Indirect Mode Add new Alignment. You will see a list of objects sorted by their ease of viewing. SkEye prioritizes objects by their current altitude and visual magnitude. Chose one of these objects and a dialog will show up asking for confirmation: 1 Not all metals are problematic. Read the note on substances that cause interference.

18 10 CHAPTER 3. VIRTUAL DSC
19 3.3. TUTORIAL FOR VIRTUAL DSC 11 Now move your telescope so that this object is centered in the field-of-view. Only then, press Accept. Keep the telescope stationary for a few seconds, after clicking Accept. The alignment is done! To help you to center the star in the field-of-view you can use an illuminated reticule eyepiece. If you don t have that you can use a high-power eyepiece and defocus it so that the star appears like a blob. Centering a large blob of light is easier than centering a pin-point source of light. In the alignment screen click Return to get back to the planetarium view. The object you selected in the previous step should now appear in the center of the cross-hairs. If you move the telescope now, you will see the display changing in tandem! You can now try finding a few objects or do more alignments as described in the next section Adding more Alignments You can add more alignments by repeating the procedure above, but SkEye\ offers a quicker way to do this: Insta-Align. Here s how you use it. Slew your scope to find another bright object. If there is a difference between the scope s view and the planetarium s view, you can simply drag the view until it is centered in the cross-hairs. The words Insta-Align will be shown along with a couple of buttons as in the figure below:

20 12 CHAPTER 3. VIRTUAL DSC Once the object is centered, press the + button and you are done! As a further shortcut, SkEye will show a button to align to the nearest object. For example the Align to Pollux button in the figure. This is handy and more precise than relying on your eyes to match the cross-hairs. To cancel the alignment procedure you can click the red X button, or simply move the telescope away. You can add as many alignment points as necessary. SkEye uses a weighted average of the alignment points, with the alignments nearest to current location having more weight. TIP: Here is a typical observation session: Let s say I have made the first alignment to Sirius. Now, I try to find M33. But first, I will check the alignment in this direction. I see that there is a nearby star called Mirach. I get it into the FOV, and observe that Mirach is slightly off-center on the phone. I Insta-Align to it. When I push to M33 using SkEye I see it right in the center of the FOV.
21 3.3. TUTORIAL FOR VIRTUAL DSC 13 I can now find several objects in this part of the sky without checks or alignments. When I move to another part of the sky, it is time to check the alignment with a nearby bright star and Insta-align if needed.
22 14 CHAPTER 3. VIRTUAL DSC
23 Chapter 4 User Interface Here is a walk-through of the main user interface of SkEye. 4.1 Features There are many features packed inside SkEye, some of which may not be immediately obvious. I recommend reading or at least skimming through this section once. 4.2 Color themes The night color theme is designed to preserve dark adaptation. Accessed via Menu Change Color Theme There are actually three color themes to chose from: Day No color filtering, display brightness is kept normal. Dusk Green and Blue colors are filtered by 50%, display brightness is kept normal, Android navigation buttons are dimmed. Night Only Red color shows through, display brightness is kept at minimum, Android navigation buttons are dimmed. 15
24 16 CHAPTER 4. USER INTERFACE 4.3 Catalog filters Only available in SkEye Pro. Accessed via Menu Catalogs. With filters, you can choose which catalog objects are shown in the display based on their surface brightness and size. In the case of Open Clusters, magnitude is used instead of surface brightness. 4.4 Double Tap to launch Menu Android has a dedicated menu button but on most phones this button requires a hard-press, which might disturb the telescope s or phone s alignment. As an alternative you can double tap anywhere on the screen to bring up the menu. (Tapping requires less force than pressing a hardware button). 4.5 Principal Orientation The default orientation of SkEye s main screen is portrait. But if you prefer landscape, you can change it via the Settings screen. There is also an Auto mode which changes the orientation dynamically to match the phone s orientation, but beware, there is a noticeable pause while switching orientations. 4.6 FOV angles The FOV angles in the horizontal and vertical directions are shown in the HUD and updated when you zoom in or zoom out, or change the principal orientation. 4.7 Sensitivity settings Each Android phone model has slightly different sensors (types and sensitivity). If you find the display is too jerky or too laggy, SkEye lets you alter the sensitivity of each sensor. Seen Appendix B for more details.
25 4.8. SEARCH Search You can search for any of the objects in SkEye s database. Click the search button or invoke via Menu Search. After selecting the object to search, an arrow is shown to guide you the target. Also shown are the Alt-Azm and RA-Dec co-ordinates and the delta angle between the current position and the target. 4.9 Manual mode When you drag your finger on the main display, SkEye switches to manual mode. You can move the view around by single touch gestures. You can even zoom and rotate the display with multi-touch gestures. Click the Back button to return to normal mode. Or click the Align button to align to the highlighted object (if you are using it with a telescope) Misc Features Precession of the equator calculated to arc-minute accuracy. Alt-azimuth and Equatorial grids. Real-time Alt/Azimuth, RA/HA/Dec coordinates Complete Messier catalog NGC Catalog The Free version has a subset of NGC (the most prominent 200 NGCs). The Pro version has the complete NGC and IC catalogs. Intelligent positioning of labels that avoids overlap. Pinch to zoom in and zoom out, twist to rotate the view.
26 18 CHAPTER 4. USER INTERFACE Major star names Constellation lines and labels Multiple locations that are saved between sessions
27 Chapter 5 Appendix A - Managing system time The accuracy of phone s system time is important for all planetarium apps. It is especially important in the case of SkEye since it uses real time object locations for alignment. If the time is wrong by a few minutes the errors add up, sometimes up to several degrees of bearing. Normally, Android doesn t let applications change the system time. There are basically two choices to the user for setting the system time: Automatically set to network provided time (the mobile carrier network, not the Internet). The problem with this is that the network s time may not be accurate or may not even exist in certain parts of the globe. Set to the time manually. The problem with this is that the timer may drift over a period of time. So you will have to periodically check and reset the clock. To check how accurate your system time is you can use a GPS app or the Clock Sync app (former uses GPS time while the other uses the Internet to access the atomic time). 19
28 20 CHAPTER 5. APPENDIX A - MANAGING SYSTEM TIME I recommend the Clock Sync app. If you have a rooted phone, this app can automatically sync the system time to the atomic time. If you don t have a rooted phone, the app pops out notifications when the phone s time drifts too far from the atomic time.
29 Chapter 6 Appendix B - Adjusting Sensitivity How to adjust the sensitivity of the display. First, start SkEye and calibrate the sensors with a figure 8 motion. Now observe the display for a few seconds. In case of too much jitter, keep the phone on a level surface. If the jitter is such that the display rotates around the Nadir, then you need to reduce sensitivity of the magnetometer. If the jitter seems random, then you need to reduce the sensitivity of the accelerometer. On the other hand, if there is too much lag, determine the direction of the lag. If there is a lag when moving along the horizon (azimuth change), you need to increase the sensitivity of the magnetometer. If there is a lag when going from horizon to Nadir (altitude change), then you need to increase the sensitivity of the accelerometer. 21
Observing Procedure for C11 GPS
 Observing Procedure for C11 GPS By T. W. Fuller Preparation Customize observing list You can install a list of up to 25 custom objects in the telescope database ahead of time, so that you will have them
EZ PUSH-TO MANUAL EZ PUSH TO MANUAL. romer-optics.com.
 EZ PUSH-TO MANUAL EZ PUSH TO MANUAL romer-optics.com www.romer-optics.com 1 Living Apart, Sharing the Sky 2 CONTENTS 1. EZ PUSH TO Introduction and Specification 4 2. Hardware and Software Installation
Students will explore Stellarium, an open-source planetarium and astronomical visualization software.
 page 22 STELLARIUM* OBJECTIVE: Students will explore, an open-source planetarium and astronomical visualization software. BACKGROUND & ACKNOWLEDGEMENTS This lab was generously provided by the Red Rocks
Astronomy 101 Lab: Stellarium Tutorial
 Name: Astronomy 101 Lab: Stellarium Tutorial Please install the Stellarium software on your computer using the instructions in the procedure. If you own a laptop, please bring it to class. You will submit
DobsonDream. Push-TO DSC controller User guide
 DobsonDream Push-TO DSC controller User guide Astro-Gadget.com 2017 1. APPOINTMENT AND OPPORTUNITIES DobsonDream is a DSC controller (digital telescope guidance circles). It helps observers to accurately
Addendum For NexStar GT Hand Control Section Of The Owner's Manual.
 Addendum For NexStar GT Hand Control Section Of The Owner's Manual. The following is an addendum to the NexStar GT section of the owner's manual that explains the current operation and added features to
Quick Start Guide. The ieq45 GoTo German Equatorial Mount # 8000C
 Quick Start Guide The ieq45 GoTo German Equatorial Mount # 8000C PACKAGE CONTENTS Telescope Mount (with built-in GPS) 3.5 Vixen type dovetail saddle (installed on the mount) 8 Losmandy-D type dovetail
Assignment #0 Using Stellarium
 Name: Class: Date: Assignment #0 Using Stellarium The purpose of this exercise is to familiarize yourself with the Stellarium program and its many capabilities and features. Stellarium is a visually beautiful
Guide to Polar Alignment of a Meade LX200GPS Telescope
 Guide to Polar Alignment of a Meade By Dale A. Chamberlain dale@dchamberlain.net April 18, 2006 Page 1 of 11 1 Why Polar Align? After making an investment in a telescope such as the Meade LX200GPS, you
GERMAN TYPE EQUATORIAL MOUNT (FM 51/52 - FM 100/102 - FM150) USER MANUAL
 USER MANUAL") GERMAN TYPE EQUATORIAL MOUNT (FM 51/52 - FM 100/102 - FM150) USER MANUAL NOMENCLATURE MANUAL KNOB WORM DRIVE TIGHTENING SCREW FIXING CLUTCH CONTROL PLUG POLAR SCOPE PEEP HOLE PLATFORM ALTITUDE MOUNTING
GERMAN TYPE EQUATORIAL MOUNT (FM 51/52 - FM 100/102 - FM150) USER MANUAL NOMENCLATURE MANUAL KNOB WORM DRIVE TIGHTENING SCREW FIXING CLUTCH CONTROL PLUG POLAR SCOPE PEEP HOLE PLATFORM ALTITUDE MOUNTING
Starry Night Version 5.7 Features What s new and how to use them!
 Starry Night Version 5.7 Features What s new and how to use them! New Features Overview 1. Space Missions (Probe Paths) 2. 3-D Object Models 3. Advanced Telescope Control panel 4. Google Maps Integration
INSTRUCTION MANUAL. SynScan TM V3. Copyright Sky-Watcher
 INSTRUCTION MANUAL SynScan TM SynScan TM Copyright Sky-Watcher 150113V3 Basic Operations CONTENT PART I : INTRODUCTION 1.1 Outline and Interface... 4 1.2 Connecting to a Telescope Mount... 4 1.3 Slew the
Mounts and Coordinate Systems
 Mounts and Coordinate Systems Part 3: Some Advanced Techniques For Mounts Last month we looked at the basic mount types and methods for aligning them. This month s article, and the last for this series
Polar Alignment of LX200R and Ultra Wedge For The Southern Hemisphere by Chris James
 Return To How To Menu Polar Alignment of LX200R and Ultra Wedge For The Southern Hemisphere by Chris James Overview This document goes thru the process required to Polar Align the LX200R using a Ultra
THE HAVERFORD UNIVERSITY S STRAWBRIDGE OBSERVATORY S OF THE 16 MEADE. A quick guide to using the 16 Meade Schmidt-Cassegrain Telescope
 THE S OF THE 16 MEADE HAVERFORD UNIVERSITY S STRAWBRIDGE OBSERVATORY A quick guide to using the 16 Meade Schmidt-Cassegrain Telescope First draft: Scott Engle, Fall 2010; Update: Steve Boughn, Fall 2012
Polar alignment in 5 steps based on the Sánchez Valente method
 1 Polar alignment in 5 steps based on the Sánchez Valente method Compared to the drift alignment method, this one, allows you to easily achieve a perfect polar alignment in just one step. By "perfect polar
Best Pair II User Guide (V1.2)
") Best Pair II User Guide (V1.2) Paul Rodman (paul@ilanga.com) and Jim Burrows (burrjaw@earthlink.net) Introduction Best Pair II is a port of Jim Burrows' BestPair DOS program for Macintosh and Windows computers.
Best Pair II User Guide (V1.2) Paul Rodman (paul@ilanga.com) and Jim Burrows (burrjaw@earthlink.net) Introduction Best Pair II is a port of Jim Burrows' BestPair DOS program for Macintosh and Windows computers.
SkyCruiser. SkyCruiser for Android
 SkyCruiser General Description SkyCruiser is software running under the Android operating system, developed for the purpose of controlling telescopes wirelessly employing Bluetooth and GPS. After mount
CHARTING THE HEAVENS USING A VIRTUAL PLANETARIUM
 Name Partner(s) Section Date CHARTING THE HEAVENS USING A VIRTUAL PLANETARIUM You have had the opportunity to look at two different tools to display the night sky, the celestial sphere and the star chart.
Figure 3-1 The Advanced GT Hand Control
 The following is a supplemental addendum to the included instruction manual that explains the new features of Celestron's Advanced Series Telescopes. Please refer to this addendum for information concerning
Telescopes come in three basic styles
 Telescopes come in three basic styles Refracting telescopes use lenses Refractors are either achromatic (some color distortion) or apochromatic (very little if any color distortion). Apo refractors use
10 - Celestron Telescope II: Operation
 10 - Celestron Telescope II: Operation Purpose: Gain more experience setting up a 6 Celestron telescope, familiarize yourself with the software interface, and acquire an image with the CCD camera. Due:
Understanding Positional Astronomy Part 2 Celestial Co-ordinates Difficulty: Intermediate
 Exercise: Understanding Positional Astronomy Part 2 Celestial Co-ordinates Difficulty: Intermediate Objectives In Part 1 you learned about Celestial Sphere and how the stars appear to move across the night
The CSC Interface to Sky in Google Earth
 The CSC Interface to Sky in Google Earth CSC Threads The CSC Interface to Sky in Google Earth 1 Table of Contents The CSC Interface to Sky in Google Earth - CSC Introduction How to access CSC data with
Introduction to Astronomy Laboratory Exercise #1. Intro to the Sky
 Introduction to Astronomy Laboratory Exercise #1 Partners Intro to the Sky Date Section Purpose: To develop familiarity with the daytime and nighttime sky through the use of Stellarium. Equipment: Computer
INTRODUCTION TO THE TELESCOPE
 AST 113/114 Fall 2014 / Spring 2016 NAME: INTRODUCTION TO THE TELESCOPE What will you learn in this Lab? For a few of the labs this semester, you will be using an 8-inch Celestron telescope to take observations.
Appendix 2: Disassembling and Assembling the Telescopes and the Celestron Equatorial Mounts
 Appendix 2: Disassembling and Assembling the Telescopes and the Celestron Equatorial Mounts Disassembling (classroom) 1. The mount must be locked with the telescope situated horizontally. Note the telescope
Stellarium Walk-through for First Time Users
 Stellarium Walk-through for First Time Users Stellarium is the computer program often demonstrated during our planetarium shows at The MOST, Syracuse s science museum. It is our hope that visitors to our
PoleMaster User Manual (Northern Hemisphere)
") PoleMaster User Manual (Northern Hemisphere) 1. Hardware Installation 1.1 Attach the PoleMaster camera unit to the quick install plate using the three bolts supplied. In the case of the AZ EQ5-GT and Mesu
PoleMaster User Manual (Northern Hemisphere) 1. Hardware Installation 1.1 Attach the PoleMaster camera unit to the quick install plate using the three bolts supplied. In the case of the AZ EQ5-GT and Mesu
Astronomy 102 Lab: Stellar Parallax and Proper Motion
 Name: Astronomy 102 Lab: Stellar Parallax and Proper Motion If you own a laptop, please bring it to class. You will use Stellarium again. The Stellarium shortcuts you used in the first lab are on the inside
SOFT 423: Software Requirements
 SOFT 423: Software Requirements Week 11 Class 1 Telescope Example End-to-End SOFT 423 Winter 2015 1 Last Class CRUDO Activity Diagrams SOFT 423 Winter 2015 2 This Class Telescope System Example We won
CLEA/VIREO PHOTOMETRY OF THE PLEIADES
 CLEA/VIREO PHOTOMETRY OF THE PLEIADES Starting up the program The computer program you will use is a realistic simulation of a UBV photometer attached to a small (diameter=0.4 meters) research telescope.
CHARTING THE HEAVENS USING A VIRTUAL PLANETARIUM
 Name Partner(s) Section Date CHARTING THE HEAVENS USING A VIRTUAL PLANETARIUM You have had the opportunity to look at two different tools to display the night sky, the celestial sphere and the star chart.
a) Set the declination to trace the winter Sun's path and rising and setting points in
 Set the declination to trace the winter Sun's path and rising and setting points in") Astronomy 3130 Spring 2017 Observation Lab 1 (Beta Version) Getting around the sky and observing with the 6 doghouse telescope As an observer, a primary skill is getting your telescope pointed to an appropriate
Astronomy 3130 Spring 2017 Observation Lab 1 (Beta Version) Getting around the sky and observing with the 6 doghouse telescope As an observer, a primary skill is getting your telescope pointed to an appropriate
1. Electrostatic Lab [1]
![1. Electrostatic Lab [1]](/thumbs/72/67418586.jpg "1. Electrostatic Lab [1]") 1. Electrostatic Lab [1] Purpose: To determine the charge and charge distribution on insulators charged by the triboelectric effects and conductors charged by an Electrostatic Voltage Source. Equipment:
1. Electrostatic Lab [1] Purpose: To determine the charge and charge distribution on insulators charged by the triboelectric effects and conductors charged by an Electrostatic Voltage Source. Equipment:
FIELD SPECTROMETER QUICK-START GUIDE FOR FIELD DATA COLLECTION (LAST UPDATED 23MAR2011)
") FIELD SPECTROMETER QUICK-START GUIDE FOR FIELD DATA COLLECTION (LAST UPDATED 23MAR2011) The ASD Inc FieldSpec Max spectrometer is a precision instrument designed for obtaining high spectral resolution
FIELD SPECTROMETER QUICK-START GUIDE FOR FIELD DATA COLLECTION (LAST UPDATED 23MAR2011) The ASD Inc FieldSpec Max spectrometer is a precision instrument designed for obtaining high spectral resolution
Introduction to Telescopes Pre-lab
 AST 114 Spring 2005 Introduction to Telescopes Introduction to Telescopes Pre-lab 1. Read through the "Parts of a Telescope" section of the lab. You may be asked to point out the different parts of the
SynScan V4 GoTo Hand Controller
 instruction Manual SynScan V4 GoTo Hand Controller Providing Exceptional Consumer Optical Products Since 1975 Customer Support: www.oriontelescopes.com/contactus Corporate Offices: 89 Hangar Way, Watsonville
Circular Motion and Centripetal Force
 [For International Campus Lab ONLY] Objective Measure the centripetal force with the radius, mass, and speed of a particle in uniform circular motion. Theory ----------------------------- Reference --------------------------
Assembly and Operation Manual. April 2016
 Assembly and Operation Manual April 2016 Table of Contents What is in the OurWeather Box? 3 Step by Step Assembly 13 Building the Weather Sensors 18 Testing the OurWeather Weather Station 28 Power Up OurWeather
Operating the Celestron 14 Telescope
 Operating the Celestron 14 Telescope 1. The Telescope and Its Controls The Celestron 14-inch telescope is located in the east bay of the observatory (Fig. 1). It is a Schmidt-Cassegrain type instrument;
INSTRUCTIONS. Go-To Maksutov-Cassegrain. 90mm (3.6 ) F f/13.8
 F f/13.8") INSTRUCTIONS Go-To Maksutov-Cassegrain 90mm (3.6 ) F. 1250 f/13.8 SKYSCAN AZ The Skyscan AZ is a precision-engineered instrument that will allow you to easily find and enjoy viewing night sky treasures,
INSTRUCTIONS Go-To Maksutov-Cassegrain 90mm (3.6 ) F. 1250 f/13.8 SKYSCAN AZ The Skyscan AZ is a precision-engineered instrument that will allow you to easily find and enjoy viewing night sky treasures,
MAG Magnetic Fields revised May 27, 2017
 MAG Magnetic Fields revised May 7, 017 (You will do two experiments; this one (in Rock 40) and the Magnetic Induction experiment (in Rock 403). Sections will switch rooms and experiments half-way through
AccuAligning TM Polar Scope for SmartEQ TM Portable German Equatorial GOTO Mount. Installation and User Manual. Product #3130
 AccuAligning TM Polar Scope for SmartEQ TM Portable German Equatorial GOTO Mount Installation and User Manual Product #3130 ioptron Corporation, 6E Gill Street, Woburn, MA 01801 www.ioptron.com ioptron
Hubble's Law and the Age of the Universe
 Hubble's Law and the Age of the Universe Procedure: Name: 1. Login into the network using your user ID and your password. 2. Double click on the Astronomy shortcuts folder on the desktop. 3. Double click
C2A for Pulsar2 how to control your telescope from C2A
 C2A for Pulsar2 how to control your telescope from C2A C2a is a free and powerful planetarium program available from.http://www.astrosurf.com/c2a/english/ that offers native support for Pulsar2 without
Indoor Lab #2: The Starry Sky
 17 Indoor Lab #2: The Starry Sky Objectives: To tour the sky and explore the way in which it moves, using the sky simulation program Starry Night Pro. Check out the information sheet on SN first, and try
Photoelectric Photometry of the Pleiades Student Manual
 Name: Lab Partner: Photoelectric Photometry of the Pleiades Student Manual A Manual to Accompany Software for the Introductory Astronomy Lab Exercise Edited by Lucy Kulbago, John Carroll University 11/24/2008
INTRODUCTION TO THE TELESCOPE
 INTRODUCTION TO THE TELESCOPE What will you learn in this Lab? For a few of the labs this semester, you will be using an 8-inch Celestron telescope to take observations. This lab will introduce you to
Astro 101 Lab #2. Start up the Stellarium program. If you do not remember how to use the user interface, please refer to Lab#1 or the user s guide.
 Name: Astro 101 Lab #2 Lab objectives 1) Learn about how the Sun s path, through the sky, changes with the changing seasons. 2) Learn about how the Sun s path changes while viewing it at different locations
Infrared Experiments of Thermal Energy and Heat Transfer
 Infrared Experiments of Thermal Energy and Heat Transfer You will explore thermal energy, thermal equilibrium, heat transfer, and latent heat in a series of hands-on activities augmented by the thermal
Astro 101 Lab #1. To advance time forward and backward, click on the arrow toolbar. From left to right, the buttons will
 Name: Astro 101 Lab #1 Lab objectives 1) Learn how to use the Stellarium planetarium program, by becoming familiar with the user interface and configuring the planetarium to your present location on Earth.
Pre-Lab Questions. Physics 1BL MAGNETISM Spring 2010
 In this lab, you will focus on the concepts of magnetism and magnetic fields and the interaction between flowing charges (electric current) and magnetic fields. You will find this material in Chapter 19
Introduction: Objectives: (a) To understand how to compile a list of objects for imaging with a CCD.
 To understand how to compile a list of objects for imaging with a CCD.") Texas Tech University Department of Physics Astronomy 2401 Observational Astronomy Lab 2:- Planning Observations Introduction: Observing time at the telescope is generally very limited. Therefore, in order
Texas Tech University Department of Physics Astronomy 2401 Observational Astronomy Lab 2:- Planning Observations Introduction: Observing time at the telescope is generally very limited. Therefore, in order
GPS Measurement Protocol
 GPS Measurement Protocol Purpose To determine the latitude, longitude, and elevation of your school and of all your GLOBE sites Overview The GPS receiver will be used to determine the latitude, longitude
Telescopen > Catadioptrisch Spiegel /lens > Celestron > Celestron NexStar Evolution > Celestron NexStar Evolution 9.25 (23,5 cm) Robtics
 Robtics") Celestron NexStar Model: - Artikel: Celestron NexStar Fabrikant: Celestron Celestron NexStar Celestron's signature telescopes reach a new level with NexStar Evolution 9.25, the first Schmidt-Cassegrain
Celestron NexStar Model: - Artikel: Celestron NexStar Fabrikant: Celestron Celestron NexStar Celestron's signature telescopes reach a new level with NexStar Evolution 9.25, the first Schmidt-Cassegrain
Indoor Lab #1: The Celestial Sphere
 11 Indoor Lab #1: The Celestial Sphere Objective: The celestial globe is a simple device but one of the best ways to develop clear ideas on how the sky works. Go slowly through sections 1 3 to make sure
Telescopen > Catadioptrisch Spiegel /lens > Celestron > Celestron NexStar Evolution > Celestron NexStar Evolution 6 inch (15 cm) Robtics
 Robtics") Model: - Artikel: Fabrikant: Celestron» Control your telescope wirelessly from your ios or Android smartphone or tablet with the free CELESTRON Celestron mobile NEXSTAR app with EVOLUTION planetarium interface
Model: - Artikel: Fabrikant: Celestron» Control your telescope wirelessly from your ios or Android smartphone or tablet with the free CELESTRON Celestron mobile NEXSTAR app with EVOLUTION planetarium interface
THE LOSMANDY G-11 MOUNT
 Checking the parts THE LOSMANDY G-11 MOUNT Depending on which accessories you ordered, your G-11 mount was shipped in four or more boxes. The contents of each box are as follows: Equatorial Mount Adjustable
PHYS133 Lab 7 The HR Diagram
 PHYS133 Lab 7 Goals: Measure brightness of various stars in the Pleiades star cluster in two different wavelength bands. Create an HR diagram based on the data taken. Use the distance modulus to determine
Assignment #12 The Milky Way
 Name Date Class Assignment #12 The Milky Way For thousands of years people assumed that the stars they saw at night were the entire universe. Even after telescopes had been invented, the concept of a galaxy
AlphaLab Gaussmeter Model VGM -- Instructions
 AlphaLab Gaussmeter Model VGM -- Instructions Power: As shipped, a standard 9 volt battery is installed. Battery life is about 10 hours (25 ma drain; 6.5 volt dropout). Low battery appears when about one
Where IS North? LabQuest OBJECTIVES
 Where IS North? LabQuest 3 It depends. Do you mean geographic north or magnetic north? The geographic (true) north pole is the point at 90 o N latitude. It is aligned with the rotational axis of the Earth.
EQASCOM PolarScope Alignment Tool
 EQASCOM PolarScope Alignment Tool Note: If you find the polar reticule appears too bright, on later mounts (Check your SW handcontroller settings) it is possible to dim the illumination by down loading
The Galilean Moons of Jupiter
 The Galilean Moons of Jupiter Image credit: NASA/JPL Mokusei Ver 1.04 This manual is provided in English language only. The author is not a native speaker of English. The author assumes and provides that
EOS 102: Dynamic Oceans Exercise 1: Navigating Planet Earth
 EOS 102: Dynamic Oceans Exercise 1: Navigating Planet Earth YOU MUST READ THROUGH THIS CAREFULLY! This exercise is designed to familiarize yourself with Google Earth and some of its basic functions while
Physics E-1ax, Fall 2014 Experiment 3. Experiment 3: Force. 2. Find your center of mass by balancing yourself on two force plates.
 Learning Goals Experiment 3: Force After you finish this lab, you will be able to: 1. Use Logger Pro to analyze video and calculate position, velocity, and acceleration. 2. Find your center of mass by
Using Nexus-II with Deep Sky Browser, SkySafari and SiTech motor controller
 Using Nexus-II with Deep Sky Browser, SkySafari and SiTech motor controller This note describes how to setup your Nexus-II with your iphone/ipad/ipod touch for use with Deep Sky Browser, SkySafari and
VeloAngle Enthusiast - Phone Calibration and Attachment
 VeloAngle Enthusiast - Phone Calibration and Attachment Video containing more complete instruction can be found at https://www.veloangle.com/blog/category/usage-tips/ 1. Load Multi-Clinometer app from
RIGHT-ANGLE POLAR ALIGNMENT SCOPE (RAPAS) INSTRUCTIONS
 INSTRUCTIONS") RIGHT-ANGLE POLAR ALIGNMENT SCOPE (RAPAS) INSTRUCTIONS Congratulations on your receipt of our new polar alignment scope and your new-found freedom from neck strain. The Astro-Physics Right-Angle Polar
RIGHT-ANGLE POLAR ALIGNMENT SCOPE (RAPAS) INSTRUCTIONS Congratulations on your receipt of our new polar alignment scope and your new-found freedom from neck strain. The Astro-Physics Right-Angle Polar
CELESTIAL COORDINATES
 ASTR 1030 Astronomy Lab 27 Celestial Coordinates CELESTIAL COORDINATES GEOGRAPHIC COORDINATES The Earth's geographic coordinate system is familiar to everyone - the north and south poles are defined by
Nexus DSC firmware/catalogues releases
 Nexus DSC firmware/catalogues releases 1.2.1 released 5 th of November 2018 Firmware date: 2018.11.05 Implemented a new tracking method with AstroLock that can be tuned in Settings->AstroLock Added an
Quick Start and Troubleshooting Guide
 Quick Start and Troubleshooting Guide By RXDesign Copyright July 2003 Quick Start and Troubleshooting Guide Rev 2 Welcome... tto tthe worrl ld off tthe CAT. 1 Addendum - Quick Start Alright... it is installed!
LAB: Photometry of the Pleiades Cluster
 LAB: Photometry of the Pleiades Cluster ASTR 203 - Instructors Olszewski & Rigby Due IN CLASS on Oct. 30 You may work with 1 partner. If you do, only turn in 1 assignment with both your names on it! You
instruction Manual IN 285 Rev. B 02/09
 instruction Manual StarSeeker 100mm IN 285 Rev. B 02/09 TABLE OF CONTENTS INTRODUCTION...4 Warning...4 ASSEMBLY...4 Assembling the StarSeeker....4 Attaching the Telescope to the Tripod...5 The Star Diagonal...5
Photoelectric Photometry of the Pleiades Student Manual
 Photoelectric Photometry of the Pleiades Student Manual A Manual to Accompany Software for the Introductory Astronomy Lab Exercise Document SM 2: Version 1.1.1 lab Department of Physics Gettysburg College
Ocean Optics Red Tide UV-VIS Spectrometer (Order Code: SPRT-UV-VIS)
") Ocean Optics Red Tide UV-VIS Spectrometer (Order Code: SPRT-UV-VIS) The UV-VIS spectrometer is a portable ultraviolet light and visible light spectrophotometer, combining a spectrometer and a light source/cuvette
Ocean Optics Red Tide UV-VIS Spectrometer (Order Code: SPRT-UV-VIS) The UV-VIS spectrometer is a portable ultraviolet light and visible light spectrophotometer, combining a spectrometer and a light source/cuvette
Ursa Minor SkyTour Planetarium en montering aansturing software. Robtics
 > Model: - Artikel: Fabrikant: Ursa Minor Ursa Minor SkyTour is the lighter version of Ursa Minor Pro program. Ursa Minor SkyTour is a planetarium and telescope controller program for portable Sky-Watcher
RECON. How to Setup the Telescope to Observe. This guide will show you how to setup your telescope for observing. Written By: Brittany McCrigler
 RECON How to Setup the Telescope to Observe This guide will show you how to setup your telescope for observing. Written By: Brittany McCrigler 2017 recon.dozuki.com Page 1 of 30 INTRODUCTION This guide
This is the third of 3 parts detailing my experience of auto guiding for astrophotography.
 AstronomyShed Tutorials Autoguiding - Part 3 - Using you autoguiding setup This is the third of 3 parts detailing my experience of auto guiding for astrophotography. Prerequisites In writing this article
Where IS North? Experiment OBJECTIVES
 Where IS North? Experiment 3 It depends. Do you mean geographic north or magnetic north? The geographic (true) north pole is the point at 90 o N latitude. It is aligned with the rotational axis of the
LAB 2 - ONE DIMENSIONAL MOTION
 Name Date Partners L02-1 LAB 2 - ONE DIMENSIONAL MOTION OBJECTIVES Slow and steady wins the race. Aesop s fable: The Hare and the Tortoise To learn how to use a motion detector and gain more familiarity
DAY LABORATORY EXERCISE: SPECTROSCOPY
 AS101 - Day Laboratory: Spectroscopy Page 1 DAY LABORATORY EXERCISE: SPECTROSCOPY Goals: To see light dispersed into its constituent colors To study how temperature, light intensity, and light color are
UNIWERSAŁ observatory dome
 -see the best with us- UNIWERSAŁ observatory dome sofware manual UNIWERSAŁ the oldest and best known manufacturer of top-quality astronomy and optical equipment in Poland System requirements : - windows
Department of Physics and Astronomy University of Iowa 29:137 Astronomical Laboratory Fall 2011 Lab 4: Stellar Spectroscopy
 Department of Physics and Astronomy University of Iowa 29:137 Astronomical Laboratory Fall 2011 Lab 4: Stellar Spectroscopy 1 Introduction Throughout your astronomy education, you have read about stellar
SCHIEBER TELESCOPES. Unique, High-Quality Telescopes
 SCHIEBER TELESCOPES Unique, High-Quality Telescopes 3.5 Refractor Astrophotography Bundle - Strike 90 PLUS Telescope Assembly Instructions and Digital Eyepiece Camera Instructions. (1) telescope assembly
PAPERLESS SURVEYING UPDATE Easier DistoX2 Calibration, TopoDroid Software, Tablet and Stylus Options, Technical Lessons Learned It is still early in
 PAPERLESS SURVEYING UPDATE Easier DistoX2 Calibration, TopoDroid Software, Tablet and Stylus Options, Technical Lessons Learned It is still early in the paperless cave survey game, but, with the aid of
5-Star Analysis Tutorial!
 5-Star Analysis Tutorial This tutorial was originally created by Aaron Price for the Citizen Sky 2 workshop. It has since been updated by Paul York to reflect changes to the VStar software since that time.
Mees Observatory telescope checklist
 Mees Observatory telescope checklist Last revised 30 April 2003 DMW Startup 1. Turn on all circuit breakers in the breaker box by the front door. (Those with tape on them are always on; don t turn them
COMMODORE BRASS TELESCOPE ZHUMELL COMMODORE BRASS TELESCOPE
 3 0 15 15 E OWNER S MANUAL COMMODORE BRASS TELESCOPE ZHUMELL COMMODORE BRASS TELESCOPE 5 W 60 W 30 W 45 W Zhumell customers know that there are plenty of ways to experience the world. They also understand
EQASCOM PolarScope Alignment Tool
 EQASCOM PolarScope Alignment Tool Initial Set-up Procedure: 1. Set up the mount in the HOME position i.e. counterweight shaft down. You may want to mark this position on you mount in some way to ensure
Instructions Manual Omegon Dobson Advanced 203
 Instructions Manual Omegon Dobson Advanced 203 English version 10.2015 Rev A 1 The Omegon Advanced Dobson 203 Congratulations on the purchase of the new Omegon Advanced Dobson 203 telescope. This telescope
INTRODUCTION... 4 Warning... 4 ASSEMBLY... 7 Assembling the NexStar... 7 Attaching the Hand Control Holder... 8 Attaching the Fork Arm to the
 INSTRUCTION MANUAL NexStar 60. NexStar 80. NexStar 102. NexStar 114. NexStar 130 T A B L E O F C O N T E N T S INTRODUCTION... 4 Warning... 4 ASSEMBLY... 7 Assembling the NexStar... 7 Attaching the Hand
INSTRUCTION MANUAL DOBSONIAN SYNSCAN ENTER SETUP ESC TOUR RATE UTILITY PLANET ID
 0 INSTRUCTION MANUAL DOBSONIAN SYNSCAN - 8 10 12 14 16 SETUP ENTER ESC TOUR RATE UTILITY 1 2 3 M NGC IC 4 5 6 PLANET OBJECT USER 7 8 9 ID 180610V6-3.08 240412V1 TABLE OF CONTENTS DOBSONIAN BASE ASSEMBLY
The Night Sky [Optional - only for those interested] by Michael Kran - Thursday, 2 October 2008, 03:49 PM
![The Night Sky [Optional - only for those interested] by Michael Kran - Thursday, 2 October 2008, 03:49 PM](/thumbs/95/125831744.jpg "The Night Sky [Optional - only for those interested] by Michael Kran - Thursday, 2 October 2008, 03:49 PM") The Night Sky [Optional - only for those interested] by Michael Kran - Thursday, 2 October 2008, 03:49 PM A question sometimes arises: "What's up in the sky at a particular moment?" There are several ways
The Night Sky [Optional - only for those interested] by Michael Kran - Thursday, 2 October 2008, 03:49 PM A question sometimes arises: "What's up in the sky at a particular moment?" There are several ways
ASTRO-PHYSICS, INC. POLAR ALIGNMENT TELESCOPE
 Polar Alignment Telescope ASTRO-PHYSICS, INC. POLAR ALIGNMENT TELESCOPE This polar axis telescope will help you align your mount with the Celestial Poles. When your mount is properly aligned, your telescope's
Parts II-V Sabbatical Leave Report
 Parts II-V Sabbatical Leave Report II. III. Re-statement of Sabbatical Leave Application I propose to spend my sabbatical updating all of the lab manuals for the five physics courses. The lab manuals are
Rain Watch TM Set up Manual. IC System with Rain Bird IC CONNECT
 Rain Watch TM Set up Manual IC System with Rain Bird IC CONNECT December 2018 Table of Contents Required materials to configure Rain Watch TM... 3 Installation... 4 Location... 4 Field Installation...
Selecting an Observing Target
 Chapter 2: Selecting an Observing Target Selection Criteria There are several factors that must be considered when selecting a target to observe: Is the target visible from Winnipeg? For what dates is
INSTRUCTION MANUAL. EQ8 Mount V2. Copyright Sky-Watcher
 INSTRUCTION MANUAL EQ8 Mount Copyright Sky-Watcher 121213V2 PART I : SETTING UP THE EQ8 MOUNT PART II : POLAR ALIGNMENT PART III : ELECTRONIC CONTROL INTERFACE PART IV : OTHER FEATURES OF THE EQ8 MOUNT