PoleMaster User Manual (Northern Hemisphere)
|
|
|
- Ruth Joseph
- 6 years ago
- Views:
Transcription
1
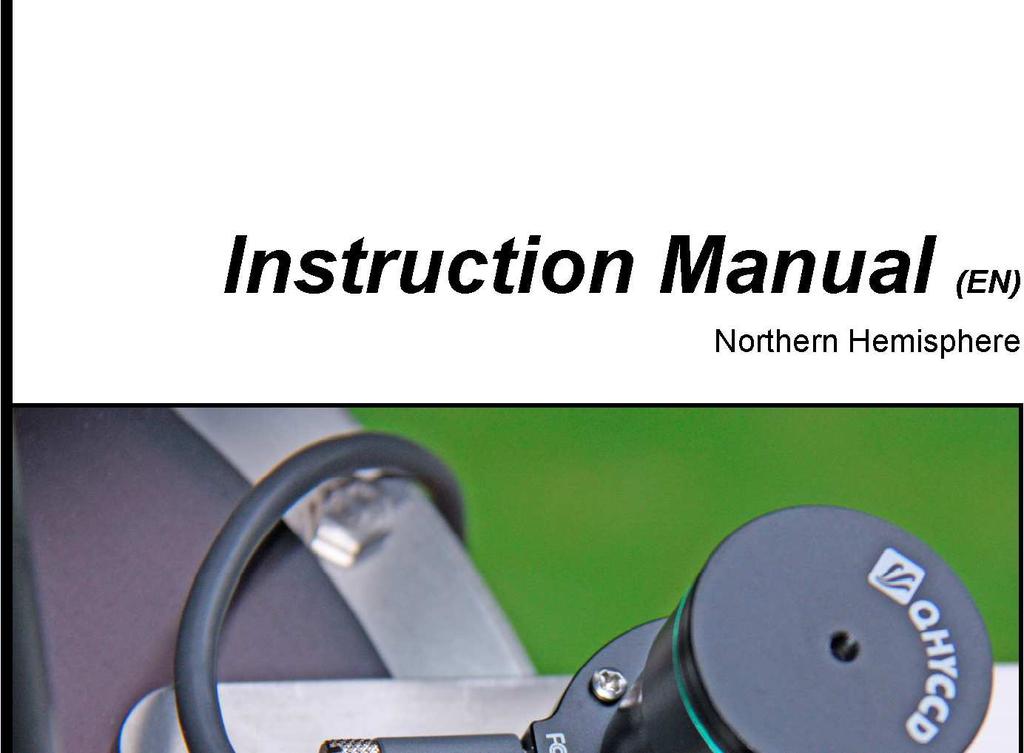
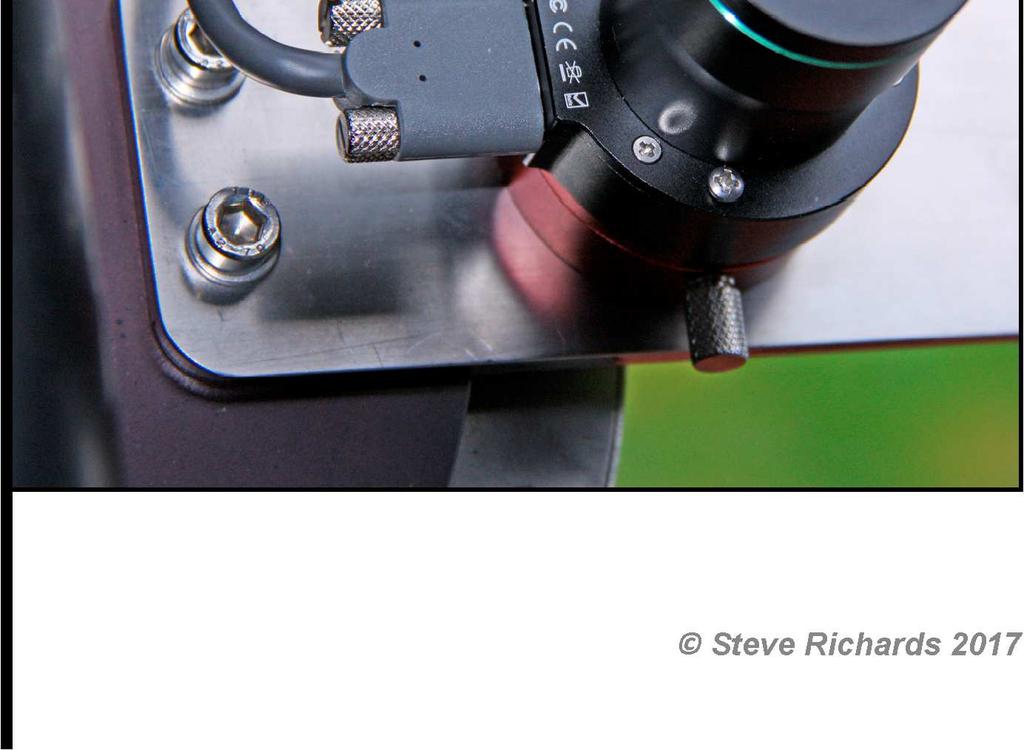
2 PoleMaster User Manual (Northern Hemisphere) 1. Hardware Installation 1.1 Attach the PoleMaster camera unit to the quick install plate using the three bolts supplied. In the case of the AZ EQ5-GT and Mesu mounts, attach the PoleMaster camera unit directly to the mounting plate. 1.2 With the exception of the AZ EQ5-GT and Mesu mounts, attach your PoleMaster s base mount on to your mount. In many cases, this will be achieved by placing the base mount in the exit hole of your mount s existing polarscope tube and using an Allen key to tighten the inner screw(s) to lock the adapter in place. For other mounts, you may need to use one or more bolts to secure the base mount in the correct position on the face of the equatorial mount. 1.3 Attach the USB cable to the camera and tighten the two cable retaining bolts 1.4 With your mount in the park position (weights down, telescope pointing up), stand to the north of the mount facing south. Insert the quick install plate into the base mount adapter ensuring that the USB socket faces to the left (east). This position aligns the PoleMaster s sensor correctly and makes azimuth and altitude adjustments during polar alignment more intuitive as the up/down directions on the image will be the mount's elevation angle directions and the left/right directions will the azimuth angle directions without there being too much adverse interaction between the two. Furthermore, when carrying out the atmospheric refraction calibration, which is required for locations with a latitude of below 40 degrees, this orientation is vital. 1.5 Tighten the thumbscrew and make sure that the quick install plate is secured. In future alignments you can simply install/uninstall the PoleMaster with the a quick install plate/polemaster combination. However, always ensure that the USB cable faces to the east after installation. 1.6 Adjust the altitude of the mount to match your local latitude and adjust the azimuth so that it is pointing in the direction of north as identified by the presence of the magnitude star, Polaris 2. Software Installation PoleMaster requires two pieces of software, the camera s driver software and the PoleMaster application software. These can be download from Unzip the two downloads and run POLEMASTERDriver******.exe to install the camera s driver 2.2 Run PoleMasterV*.*.*.*Setup.exe to install the PoleMaster application software 2.3 Attach the USB cable to the camera and tighten the two cable retaining bolts 2.4 Attach the other end of the USB cable to a spare USB 2.0 socket on your PC and wait for the system to identify the camera

3 3. Focusing Each PoleMaster s lens is focused at infinity before shipping from the factory. However, if for some reason re-focusing is required, the lens can be focused manually. Focusing steps: 3.1 Point the PoleMaster at the magnitude star, Polaris 3.2 Remove the front protective tube by carefully unscrewing it while holding the camera base firmly 3.3 Use an M2 Allen Key to unscrew the set screw (focus locking screw) on the side of the lens barrel 3.4 Rotate the lens in or out until the star is correctly focused i.e. bright and small 3.5 Retighten the set screw and reinstall the protective tube removed in step Software Operation Some of the operations here will lead to multiple dialogue screens, simply follow the instructions shown on each screen. 4.1 Ensure that the PoleMaster USB cable is connected to both the camera and the PC s USB ports 4.2 Set your mount to the Park position 4.3 Run the PoleMaster application and select Connect from the top menu bar The PoleMaster camera has a wide field of view (11 degrees * 6 degrees), so you should now be able to identify Polaris in the image. If no stars are apparent, adjust the gain and exposure time by clicking on the relevant buttons at the left hand side of the screen until the stars are clearly visible. When you can see a good selection of stars, click on the Finished button.

4 Double click on the bright star Polaris and rotate the template that appears by using the Matching Template slider at the left hand side of the screen or you can use the + and buttons, up and down cursor keys on your keyboard, left and right cursor keys on your keyboard or your mouse s centre roller button. If each white circle in the template aligns with a dimmer star then you can be sure that you have chosen the correct star for Polaris. Align these circles accurately on the relevant stars as this process is also the start of the rotation centre calculation. Because of manufacturing tolerances and, therefore, slight differences in the focal lengths between the lenses supplied with the PoleMaster, the stars may not appear in the exact centre of each white circle. This is not critical, just achieve the rotation that averages the star positions most evenly by imagining lines drawn from Polaris through each white circle as shown below. Click on the Success button when you have the best alignment. 5. Calculate the rotation centre The centre of rotation is the point in the sky around which the Right Ascension (RA) axis rotates. The aim of Polar Alignment is make this point coincident with the North Celestial Pole (NCP), the point in the sky that represents the axis of the Earth s rotation.

 that is not too close to the edge of the field of view and not too close to Polaris. Once selected, Star Pos 1 at the left hand side of the screen will have a Green Tick alongside it.")
5 If this is your first PoleMaster alignment, follow steps If your installation is permanent and this is a subsequent PoleMaster alignment and you haven t moved the PoleMaster camera, you will be asked if you want to use the last calibration click on YES to start the Precise Polar Alignment process from 5.9 onwards. Rough Polar Alignment 5.1 Use your mouse to select a star (other than Polaris!) that is not too close to the edge of the field of view and not too close to Polaris. Once selected, Star Pos 1 at the left hand side of the screen will have a Green Tick alongside it. The blue circles shown in the following images are not shown on the PoleMaster screen, they are presented here simply to highlight the chosen star.
6 5.2 While keeping an eye on the chosen star, use your mount s handset or the virtual controls on your mount s control software, to rotate the mount in RA between 30 and 45 degrees following the direction of the arrow shown on the image. Do not release your mount s clutch and rotate by hand as this may disturb the RA axis slightly. Click on the original star s new position. Once selected, Star Pos 2 at the left hand side of the screen will have a Green Tick alongside it. 5.3 Rotate the RA axis a further degrees. Select the same star in its new position for a third time, Star Pos 3 at the left hand side of the screen will have a Green Tick alongside it. The software will draw a large green circle on the screen just touching your chosen star. This circle will be used to confirm that the centre of rotation has been calculated correctly by the previous process.
7

8 5.4 While keeping an eye on the chosen star and its position on the green circle, use your mount s handset or the virtual controls on your mount s control software, to rotate the mount back to the Park position. If your chosen star does not follow the green circle as the mount returns to the Park position, restart the Rough Polar alignment from Double click on Polaris and use the template rotation controls to align the template with the visible stars for a second time. A small red circle will remain on the image. This red circle is the centre of rotation of your mount. Nearby, you will also see a slightly larger green circle. This green circle represents the approximate position of the NCP.

9 5.6 When you have aligned the template on the stars, click the Success button. This will place a white rotating circle around Polaris 5.7 Using the manual adjustments on your mount, adjust the mount in azimuth and altitude to move Polaris to the centre of the rotating circle.
10 Precise Polar Alignment 5.8 Double click on Polaris and use the template rotation controls to align the template with the visible stars (for a third time if this is your first PoleMaster Alignment).


11 5.9 Click on the Start Monitor button to produce a pair of white rectangles surrounding a star each on the main screen and a green and red marker on the main screen but magnified in a new zoom window at the left of the screen. Please note that if there are no stars in the two white rectangles, the green circle will fly about randomly and it will not be possible to proceed further, polar alignment will not be achieved and the process will need to be re-started.


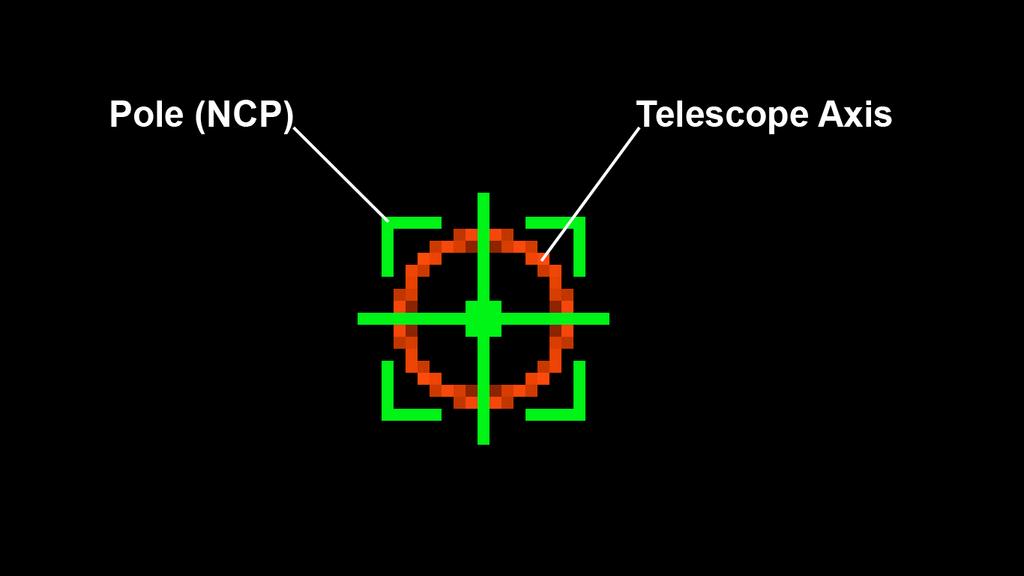
12 5.10 Using the manual adjustments, adjust the mount in azimuth and altitude to match the green and red markers in the magnified view at the left of the screen perfectly to obtain a polar alignment with an accuracy of up to 30 arcseconds. The last figure shows a highly magnified facsimile of what you are trying to achieve but you won t see the markers at this magnification, it is included here for clarification only.

13 Steve Richards 2017
Quick Start Guide. The ieq45 GoTo German Equatorial Mount # 8000C
 Quick Start Guide The ieq45 GoTo German Equatorial Mount # 8000C PACKAGE CONTENTS Telescope Mount (with built-in GPS) 3.5 Vixen type dovetail saddle (installed on the mount) 8 Losmandy-D type dovetail
RIGHT-ANGLE POLAR ALIGNMENT SCOPE (RAPAS) INSTRUCTIONS
 INSTRUCTIONS") RIGHT-ANGLE POLAR ALIGNMENT SCOPE (RAPAS) INSTRUCTIONS Congratulations on your receipt of our new polar alignment scope and your new-found freedom from neck strain. The Astro-Physics Right-Angle Polar
RIGHT-ANGLE POLAR ALIGNMENT SCOPE (RAPAS) INSTRUCTIONS Congratulations on your receipt of our new polar alignment scope and your new-found freedom from neck strain. The Astro-Physics Right-Angle Polar
AccuAligning TM Polar Scope for SmartEQ TM Portable German Equatorial GOTO Mount. Installation and User Manual. Product #3130
 AccuAligning TM Polar Scope for SmartEQ TM Portable German Equatorial GOTO Mount Installation and User Manual Product #3130 ioptron Corporation, 6E Gill Street, Woburn, MA 01801 www.ioptron.com ioptron
THE LOSMANDY G-11 MOUNT
 Checking the parts THE LOSMANDY G-11 MOUNT Depending on which accessories you ordered, your G-11 mount was shipped in four or more boxes. The contents of each box are as follows: Equatorial Mount Adjustable
GERMAN TYPE EQUATORIAL MOUNT (FM 51/52 - FM 100/102 - FM150) USER MANUAL
 USER MANUAL") GERMAN TYPE EQUATORIAL MOUNT (FM 51/52 - FM 100/102 - FM150) USER MANUAL NOMENCLATURE MANUAL KNOB WORM DRIVE TIGHTENING SCREW FIXING CLUTCH CONTROL PLUG POLAR SCOPE PEEP HOLE PLATFORM ALTITUDE MOUNTING
GERMAN TYPE EQUATORIAL MOUNT (FM 51/52 - FM 100/102 - FM150) USER MANUAL NOMENCLATURE MANUAL KNOB WORM DRIVE TIGHTENING SCREW FIXING CLUTCH CONTROL PLUG POLAR SCOPE PEEP HOLE PLATFORM ALTITUDE MOUNTING
ASTRO-PHYSICS, INC. POLAR ALIGNMENT TELESCOPE (PASILL2)
") OBJECTIVE LENS ASTRO-PHYSICS, INC. POLAR ALIGNMENT TELESCOPE (PASILL2) This model shipped from January 2001 through July 2002. It fits all 400, 600, 600E, 800, 900 and 1200 models (except the original
OBJECTIVE LENS ASTRO-PHYSICS, INC. POLAR ALIGNMENT TELESCOPE (PASILL2) This model shipped from January 2001 through July 2002. It fits all 400, 600, 600E, 800, 900 and 1200 models (except the original
Polar alignment in 5 steps based on the Sánchez Valente method
 1 Polar alignment in 5 steps based on the Sánchez Valente method Compared to the drift alignment method, this one, allows you to easily achieve a perfect polar alignment in just one step. By "perfect polar
INSTALLATION GUIDE OF THE LIGHTRACK II SET-UP
 INSTALLATION GUIDE OF THE LIGHTRACK II SET-UP LighTrack II Star Tracker Don t be fooled by the small size of the LighTrack II. It s a very powerful and accurate tracking mount and, with proper polar alignment,
C2A for Pulsar2 how to control your telescope from C2A
 C2A for Pulsar2 how to control your telescope from C2A C2a is a free and powerful planetarium program available from.http://www.astrosurf.com/c2a/english/ that offers native support for Pulsar2 without
Metochi Amfiet Quick Start Guide
 Filename: GoTo Telescope Meade ETX -70AT Quick start Metochi Amfiet Quick Start Guide ETX: «Your Personal Window to the Universe» 1 Manual of Meade ETX-70AT 2 Parts Listing ETX-70AT Astro Telecope with
ASTRO-PHYSICS, INC. POLAR ALIGNMENT TELESCOPE
 Polar Alignment Telescope ASTRO-PHYSICS, INC. POLAR ALIGNMENT TELESCOPE This polar axis telescope will help you align your mount with the Celestial Poles. When your mount is properly aligned, your telescope's
Polar Alignment of LX200R and Ultra Wedge For The Southern Hemisphere by Chris James
 Return To How To Menu Polar Alignment of LX200R and Ultra Wedge For The Southern Hemisphere by Chris James Overview This document goes thru the process required to Polar Align the LX200R using a Ultra
Telescope. 1. Read these instructions carefully and familiarise yourself with the procedure before assembling the unit.
 Telescope a Simple assembly instructions- Please keep for future reference IMPORTANT 1. Read these instructions carefully and familiarise yourself with the procedure before assembling the unit. 2. Check
Observing Procedure for C11 GPS
 Observing Procedure for C11 GPS By T. W. Fuller Preparation Customize observing list You can install a list of up to 25 custom objects in the telescope database ahead of time, so that you will have them
EQASCOM PolarScope Alignment Tool
 EQASCOM PolarScope Alignment Tool Note: If you find the polar reticule appears too bright, on later mounts (Check your SW handcontroller settings) it is possible to dim the illumination by down loading
EQASCOM PolarScope Alignment Tool
 EQASCOM PolarScope Alignment Tool Initial Set-up Procedure: 1. Set up the mount in the HOME position i.e. counterweight shaft down. You may want to mark this position on you mount in some way to ensure
Mounts and Coordinate Systems
 Mounts and Coordinate Systems Part 3: Some Advanced Techniques For Mounts Last month we looked at the basic mount types and methods for aligning them. This month s article, and the last for this series
SCHIEBER TELESCOPES. Unique, High-Quality Telescopes
 SCHIEBER TELESCOPES Unique, High-Quality Telescopes 3.5 Refractor Astrophotography Bundle - Strike 90 PLUS Telescope Assembly Instructions and Digital Eyepiece Camera Instructions. (1) telescope assembly
Obtain an optical "bench" setup (there should be three sliding mounts on the calibrated horizontal bar. The setup is shown in the diagram below.
 Astronomy 100 Name(s): Exercise 4: Telescopes and spectroscopy Once the various focal issues are resolved, magnification of a small image is a significant consideration for a telescope. Though a planet
Instructions Manual Zoomion Apollo 80
 Instructions Manual Zoomion Apollo 80 English version 7.2015 Rev A 1 The Zoomion Apollo 80 Figure 1. Parts description. Congratulations on the purchase of the new Zoomion Apollo 80. This telescope will
Instruction Manual. Model #: (Reflector) Lit #: / 06-07
 Lit #: / 06-07") Instruction Manual Model #: 49114500 (Reflector) Model #: 49060700 () Model #: 49070800 () Lit #: 93-0468 / 06-07 PARTS DIAGRAM C E D B A F G H I J NOTE: Actual product may have improvements that are not
Instruction Manual Model #: 49114500 (Reflector) Model #: 49060700 () Model #: 49070800 () Lit #: 93-0468 / 06-07 PARTS DIAGRAM C E D B A F G H I J NOTE: Actual product may have improvements that are not
Guide to Polar Alignment of a Meade LX200GPS Telescope
 Guide to Polar Alignment of a Meade By Dale A. Chamberlain dale@dchamberlain.net April 18, 2006 Page 1 of 11 1 Why Polar Align? After making an investment in a telescope such as the Meade LX200GPS, you
CHARTING THE HEAVENS USING A VIRTUAL PLANETARIUM
 Name Partner(s) Section Date CHARTING THE HEAVENS USING A VIRTUAL PLANETARIUM You have had the opportunity to look at two different tools to display the night sky, the celestial sphere and the star chart.
Directions for use
 Directions for use 40070 40080 60050 70060 70076 80060 90060 900114 Fig. 1 Fig. 1A Fig. 2 Fig. 3 Fig. 4 Fig. 5 Fig. 6 Fig. 7 english ENGLISH DIRECTIONS FOR USE 1 Tripod Leg 2 Tripod Leg Adjusting Screw
Instruction Manual. Omegon EQ-500 Equatorial Mount English version Rev A
 Instruction Manual Omegon EQ-500 Equatorial Mount English version 10.2014 Rev A Instruction Manual Omegon EQ-500 Equatorial Mount Congratulations on the purchase of the new Omegon EQ-500 Equatorial Mount.
One-Year Limited Warranty
 INDEX Product overview...3 Installing the batteries...4 Mounting the Rifle Scope...5 Operation...6 Windage and Elevation adjustments...7-8 Infrared Illumination...8 Focusing...9 Power display & battery
Quick Start Guide New Mountain Visit our Website to Register Your Copy (weatherview32.com)
") Quick Start Guide New Mountain Visit our Website to Register Your Copy (weatherview32.com) Page 1 For the best results follow all of the instructions on the following pages to quickly access real-time
Quick Start Guide New Mountain Visit our Website to Register Your Copy (weatherview32.com) Page 1 For the best results follow all of the instructions on the following pages to quickly access real-time
THE HAVERFORD UNIVERSITY S STRAWBRIDGE OBSERVATORY S OF THE 16 MEADE. A quick guide to using the 16 Meade Schmidt-Cassegrain Telescope
 THE S OF THE 16 MEADE HAVERFORD UNIVERSITY S STRAWBRIDGE OBSERVATORY A quick guide to using the 16 Meade Schmidt-Cassegrain Telescope First draft: Scott Engle, Fall 2010; Update: Steve Boughn, Fall 2012
10 - Celestron Telescope II: Operation
 10 - Celestron Telescope II: Operation Purpose: Gain more experience setting up a 6 Celestron telescope, familiarize yourself with the software interface, and acquire an image with the CCD camera. Due:
1 YEAR LIMITED WARRANTY TELESCOPES
 1 YEAR LIMITED WARRANTY TELESCOPES BARSKA Optics, as manufacturer, warrants this new precision optical product to be free of original defects in materials and/or workmanship for the length of time specified
RP-400 TELESCOPE Instruction Manual
 RP-400 TELESCOPE Instruction Manual 2070 5th Avenue Ronkonkoma, NY 11779 Phone: 631-963-5000 Fax: 631-427-6749 For information, call toll-free: 1-800-967-8427 info@carson.com / sales@carson.com / www.carson.com
Astronomy 102 Lab: Stellar Parallax and Proper Motion
 Name: Astronomy 102 Lab: Stellar Parallax and Proper Motion If you own a laptop, please bring it to class. You will use Stellarium again. The Stellarium shortcuts you used in the first lab are on the inside
EQ-1 Equatorial Mount
 instruction Manual Orion EQ-1 Equatorial Mount #9011 Providing Exceptional Consumer Optical Products Since 1975 Customer Support: www.oriontelescopes.com/contactus Corporate Offices: 89 Hangar Way, Watsonville
COLLIMATING THE ASTROTRAC POLAR SCOPE By Darryl Hedges
 COLLIMATING THE ASTROTRAC POLAR SCOPE By Darryl Hedges Why Collimate The AstroTrac Polar Scope? The word collimate means to accurately align, typically used when talking about light. The purpose of collimating
Appendix 2: Disassembling and Assembling the Telescopes and the Celestron Equatorial Mounts
 Appendix 2: Disassembling and Assembling the Telescopes and the Celestron Equatorial Mounts Disassembling (classroom) 1. The mount must be locked with the telescope situated horizontally. Note the telescope
How to use your astronomical telescope for the first time.
 How to use your astronomical telescope for the first time. A quick guide to setting up and using your telescope for the first time. There are 10 pages in this section which cover a variety of topics to
SimpleDreamEQ2. Upgrade kit equatorial mounts Synta EQ2, Celestron CG3. User guide. Micro GoTo system. Micro GoTo system
 SimpleDreamEQ2 Upgrade kit equatorial mounts Synta EQ2, Celestron CG3 User guide Micro GoTo system Micro GoTo system AstroGadget 2017 1. DESCRIPTION The kit consists of a control unit and a set of drives
Quick Start Guide. The ieq45 GoTo German Equatorial Mount #8000D, #8000DP and #8000AZ
 Quick Start Guide The ieq45 GoTo German Equatorial Mount #8000D, #8000DP and #8000AZ PACKAGE CONTENTS 1 Telescope Mount (with built-in GPS) Losmandy/Vixen dual saddle Go2Nova 8407 Hand Controller Two 5
Indoor Lab #2: The Starry Sky
 17 Indoor Lab #2: The Starry Sky Objectives: To tour the sky and explore the way in which it moves, using the sky simulation program Starry Night Pro. Check out the information sheet on SN first, and try
INSTRUCTION MANUAL. EQ8 Mount V2. Copyright Sky-Watcher
 INSTRUCTION MANUAL EQ8 Mount Copyright Sky-Watcher 121213V2 PART I : SETTING UP THE EQ8 MOUNT PART II : POLAR ALIGNMENT PART III : ELECTRONIC CONTROL INTERFACE PART IV : OTHER FEATURES OF THE EQ8 MOUNT
The Rotating Sky Student Guide
 Name: The Rotating Sky Student Guide Horizon Coordinates Work through the explanatory material on the Observer, Two Systems Celestial, Horizon, Bands in the Sky, and the Paths of Stars. All of the concepts
CHARTING THE HEAVENS USING A VIRTUAL PLANETARIUM
 Name Partner(s) Section Date CHARTING THE HEAVENS USING A VIRTUAL PLANETARIUM You have had the opportunity to look at two different tools to display the night sky, the celestial sphere and the star chart.
INSTRUCTION MANUAL. AZ-EQ5 GT Mount. Standard Tripod. Deluxe Pier Tripod V1. Copyright Sky-Watcher
 INSTRUCTION MANUAL AZ-EQ5 GT Mount Standard Tripod Deluxe Pier Tripod Copyright Sky-Watcher 280814V1 CONTENT PART I : SETTING UP THE AZ-EQ5 GT MOUNT 1.1 Setting Up The Tripod...3 1.2 Putting On The AZ-EQ5
HMS-5000 Manual. Product Name: HMS-5000 Hall Effect Measurement System with variable temperature from 80K to 350K. - Manual version: ver 5.
 HMS-5000 Manual Product Name: HMS-5000 Hall Effect Measurement System with variable temperature from 80K to 350K - Manual version: ver 5.01- www.ecopia21.co.kr - Table of contents - 1. Hardware Installation
Orion EQ-1 Equatorial Mount
 instruction Manual Orion EQ-1 Equatorial Mount #9011 Providing Exceptional Consumer Optical Products Since 1975 Customer Support (800) 676-1343 E-mail: support@telescope.com Corporate Offices (831) 763-7000
Instructions Manual Omegon Dobson Advanced 203
 Instructions Manual Omegon Dobson Advanced 203 English version 10.2015 Rev A 1 The Omegon Advanced Dobson 203 Congratulations on the purchase of the new Omegon Advanced Dobson 203 telescope. This telescope
JC-1000 Instruction Manual
 A. Micro adjustable Altitude control B. Focusing wheel C. Focusing tube D. Angle prism E. Eyepiece F. Finderscope bracket G. Finderscope H. Main telescope body I. Sunshade J. Lens K. Yoke locking screw
RECON. How to Setup the Telescope to Observe. This guide will show you how to setup your telescope for observing. Written By: Brittany McCrigler
 RECON How to Setup the Telescope to Observe This guide will show you how to setup your telescope for observing. Written By: Brittany McCrigler 2017 recon.dozuki.com Page 1 of 30 INTRODUCTION This guide
The Rotating Sky Student Guide
 III. Horizon Coordinates The Rotating Sky Student Guide Don t write your answers on here! 1.) Complete the following table involving the horizon coordinate system. You should predict the answers and then
Quick Start Guide. The ieq45 Pro GoTo German Equatorial Mount #8000E, #8000EP and #8000E-AZ
 Quick Start Guide The ieq45 Pro GoTo German Equatorial Mount #8000E, #8000EP and #8000E-AZ PACKAGE CONTENTS 1 Telescope Mount (with built-in GPS) Losmandy/Vixen dual saddle Go2Nova 8407+ Hand Controller
Warning. PowerSeeker telescopes carry a two year limited warranty.
 PowerSeeker Series Telescopes INSTRUCTION MANUAL PowerSeeker 60EQ # 21043 PowerSeeker 70EQ # 21037 PowerSeeker 80EQ # 21048 PowerSeeker 114EQ # 21045 PowerSeeker 127EQ # 21049 Table of Contents INTRODUCTION...
RP-300 TELESCOPE Instruction Manual
 RP-300 TELESCOPE Instruction Manual 2070 5th Avenue Ronkonkoma, NY 11779 Phone: 631-963-5000 Fax: 631-427-6749 For information, call toll-free: 1-800-967-8427 info@carson.com / sales@carson.com / www.carson.com
Physics Lab #2: Learning Starry Night, Part 1
 Physics 10293 Lab #2: Learning Starry Night, Part 1 Introduction In this lab, we'll learn how to use the Starry Night software to explore the sky, and at the same time, you ll get a preview of many of
HMS-5000 Manual. Product Name: HMS-5000 Hall Effect Measurement System with variable temperature from 80K to 350K. - Manual version: ver 5.
 HMS-5000 Manual Product Name: HMS-5000 Hall Effect Measurement System with variable temperature from 80K to 350K - Manual version: ver 5.01- www.ecopia21.co.kr - Table of contents - 1. Hardware Installation
Hinode Solar Guider User Manual
 Hinode Solar Guider User Manual 1.15 Hutech Corporation 25691 Atlantic Ocean Dr., Unit B 11 Lake Forest, CA 92630 http://hutech.com Introduction The Hinode Solar Guider is a fully self contained unit designed
a) Set the declination to trace the winter Sun's path and rising and setting points in
 Set the declination to trace the winter Sun's path and rising and setting points in") Astronomy 3130 Spring 2017 Observation Lab 1 (Beta Version) Getting around the sky and observing with the 6 doghouse telescope As an observer, a primary skill is getting your telescope pointed to an appropriate
Astronomy 3130 Spring 2017 Observation Lab 1 (Beta Version) Getting around the sky and observing with the 6 doghouse telescope As an observer, a primary skill is getting your telescope pointed to an appropriate
Quick Start Guide. The ieq30 Pro GoTo German Equatorial Mount #3000E
 Quick Start Guide The ieq30 Pro GoTo German Equatorial Mount #3000E PACKAGE CONTENTS Telescope Mount (with built-in GPS) Go2Nova #8407 Hand Controller 1.5-inch Tripod One 10lb (4.5 kg) counterweight Dark
EQUATORIAL MOUNT AND TRIPOD. INSTRUCTION MANUAL Model #91531
 EQUATORIAL MOUNT AND TRIPOD INSTRUCTION MANUAL Model #91531 TABLE OF CONTENTS Introduction.................................................... 3 System Requirements...............................................
C A S S I N I. MODEL : C EQ3 900mm X 135mm COSMO BRANDS INC.
 C A S S I N I MODEL : C-900135EQ3 900mm X 135mm COSMO BRANDS INC. WWW.COSMOSOPTICS.COM 2 C A S S I N I C-900135EQ3 TELESCOPE OPERATING INSTRUCTIONS INTRODUCTION CONGRATULATIONS ON YOUR PURCHASE OF THE
NEVER USE A TELESCOPE TO LOOK AT THE SUN DIRECTLY!
 Quick Start Guide AstroBoy -70e Computerized Telescope With Electronic Eyepiece #9102 (Astro Blue) FEATURES Alt-Azimuth Mount with GoToNova computer control technology Computerized automatic pointing and
Assignment #0 Using Stellarium
 Name: Class: Date: Assignment #0 Using Stellarium The purpose of this exercise is to familiarize yourself with the Stellarium program and its many capabilities and features. Stellarium is a visually beautiful
Quick Start Guide. ZEQ25GT Center Balanced GoTo Equatorial Mount Models: #7100, #7101, #7102
 Quick Start Guide ZEQ25GT Center Balanced GoTo Equatorial Mount Models: #7100, #7101, #7102 PACKAGE CONTENTS 1 Telescope mount with GPS, and AccuAligning TM dark field illuminated Polar Scope (except Model
EZ PUSH-TO MANUAL EZ PUSH TO MANUAL. romer-optics.com.
 EZ PUSH-TO MANUAL EZ PUSH TO MANUAL romer-optics.com www.romer-optics.com 1 Living Apart, Sharing the Sky 2 CONTENTS 1. EZ PUSH TO Introduction and Specification 4 2. Hardware and Software Installation
INSTRUCTION MANUAL Versione February 2014
 EQUATORIAL MOUNT (Made in Italy) INSTRUCTION MANUAL Versione 1.6.0 February 2014 All the pictures and contents included here are propriety of AVALON INSTRUMENTS. They cannot be reproduced, published, copied
D.A.R.V. (DSLR / CCD Drift Alignment by Robert Vice)
") 1 of 5 5/2/2011 13:55 D.A.R.V. (DSLR / CCD Drift Alignment by Robert Vice) For many years I have spent time learning the Star drift method of alignment for my telescope. Although tedious, it has turned
1 of 5 5/2/2011 13:55 D.A.R.V. (DSLR / CCD Drift Alignment by Robert Vice) For many years I have spent time learning the Star drift method of alignment for my telescope. Although tedious, it has turned
CAUTION! NEVER ATTEMPT TO LOOK AT THE SUN WITH UNLESS YOU HAVE A FULL-APERTURE SOLAR FILTER (NOT INCLUDED WITH
 CAUTION! X NEVER ATTEMPT TO LOOK AT THE SUN WITH YOUR APERTURA DOBSONIAN TELESCOPE UNLESS YOU HAVE A FULL-APERTURE SOLAR FILTER (NOT INCLUDED WITH TELESCOPE) INSTALLED OVER THE OPEN END OF THE OPTICAL
Stellarium Walk-through for First Time Users
 Stellarium Walk-through for First Time Users Stellarium is the computer program often demonstrated during our planetarium shows at The MOST, Syracuse s science museum. It is our hope that visitors to our
INTRODUCTION TO THE TELESCOPE
 INTRODUCTION TO THE TELESCOPE What will you learn in this Lab? For a few of the labs this semester, you will be using an 8-inch Celestron telescope to take observations. This lab will introduce you to
M-uno. Single Arm Mount (Made in Italy) USER S Manual Version November 2015
 USER S Manual Version November 2015") M-uno Single Arm Mount (Made in Italy) USER S Manual Version 1.6.3 November 2015 All the pictures and contents included here are propriety of AVALON INSTRUMENTS They cannot be reproduced, published, copied
M-uno Single Arm Mount (Made in Italy) USER S Manual Version 1.6.3 November 2015 All the pictures and contents included here are propriety of AVALON INSTRUMENTS They cannot be reproduced, published, copied
SkyGlobe Planetarium
 SkyGlobe Planetarium Introduction: This exercise will simulate the night sky and demonstrate a number of principles of the celestial sphere and the motions of the Earth and planets. Getting Started: 1.
Introduction to Astronomy Laboratory Exercise #1. Intro to the Sky
 Introduction to Astronomy Laboratory Exercise #1 Partners Intro to the Sky Date Section Purpose: To develop familiarity with the daytime and nighttime sky through the use of Stellarium. Equipment: Computer
Quick Start Guide. CEM25 Center Balanced GoTo Equatorial Mount Models: #7100E, #7102E
 Quick Start Guide CEM25 Center Balanced GoTo Equatorial Mount Models: #7100E, #7102E PACKAGE CONTENTS 1 Telescope mount with GPS, and AccuAlign TM dark field illuminated Polar Scope Hand controller (HC)
Students will explore Stellarium, an open-source planetarium and astronomical visualization software.
 page 22 STELLARIUM* OBJECTIVE: Students will explore, an open-source planetarium and astronomical visualization software. BACKGROUND & ACKNOWLEDGEMENTS This lab was generously provided by the Red Rocks
RP-100 TELESCOPE Instruction Manual
 2070 5th Avenue Ronkonkoma, NY 11779 Phone: 631-963-5000 Fax: 631-427-6749 For information, call toll-free: 1-800-967-8427 info@carson.com / sales@carson.com / www.carson.com RP-100 TELESCOPE Instruction
Coma Correction. Diagram. Introduction
 Starlight Instruments, LLC 2380 E. Cardinal Drive, Columbia City, Indiana 46725 USA t: 260.244.0020 f.260.244.3077 e: sales@starlightinstruments.com web: starlightinstruments.com Introduction Thank you
THE MOON. G. Iafrate (a), M. Ramella (a) e V. Bologna (b) (a) INAF - Osservatorio Astronomico di Trieste (b)
, M. Ramella (a) e V. Bologna (b) (a) INAF - Osservatorio Astronomico di Trieste (b)") THE MOON G. Iafrate (a), M. Ramella (a) e V. Bologna (b) (a) INAF - Osservatorio Astronomico di Trieste (b) Istituto Comprensivo S. Giovanni Sc. Sec. di primo grado M. Codermatz" - Trieste Information
THE MOON G. Iafrate (a), M. Ramella (a) e V. Bologna (b) (a) INAF - Osservatorio Astronomico di Trieste (b) Istituto Comprensivo S. Giovanni Sc. Sec. di primo grado M. Codermatz" - Trieste Information
AZ TRACKING TELESCOPES
 ESC RATE NGC OBJECT ID 0 AZ KING TELESCOPES UP ENTER TOUR UTILITY M IC PLANET USER 7 8 9 Instruction manual for AZ GoTo telescopes on reverse flip side TR0808V TABLE OF CONTENTS TELESCOPE ASSEMBLY - AUTOKING
Manual www. ioptron. com
 SmartStar -PR EQ Mount Manual www. ioptron. com WARNING! NEVER USE A TELESCOPE TO LOOK AT THE SUN! Looking at or near the Sun will cause instant and irreversible damage to your eye. Children should always
Quick Start Guide. ZEQ25GT Balanced GoTo Equatorial Mount Models: #7100, #7101, #7102
 Quick Start Guide ZEQ25GT Balanced GoTo Equatorial Mount Models: #7100, #7101, #7102 PACKAGE CONTENTS 1 Telescope Mount with GPS, and AccuAligning TM dark field illuminated Polar Scope (except Model #7101)
Addendum For NexStar GT Hand Control Section Of The Owner's Manual.
 Addendum For NexStar GT Hand Control Section Of The Owner's Manual. The following is an addendum to the NexStar GT section of the owner's manual that explains the current operation and added features to
SKELESCOPE REFLECTOR TELESCOPE WITH TABLE TOP TRIPOD SK-100 INSTRUCTION MANUAL
 TM SKELESCOPE REFLECTOR TELESCOPE WITH TABLE TOP TRIPOD SK-100 INSTRUCTION MANUAL TABLE OF CONTENTS Introduction Box Contents / Visual Key Diagram Telescope Assembly Setting up Your Telescope Attaching
CBRD30CP3 & BOWRD30CP INSTRUCTION MANUAL
 CBRD30CP3 & BOWRD30CP INSTRUCTION MANUAL PROLOGUE Your BSA Illuminated sight is for use on both compound and standard bows. Each version of the BSA illuminated sight has a specific reticle to help maintain
Instruction Manual. Made in Japan
 Instruction Manual www.ultimax6.eu Made in Japan Congratulation on the purchase of your new UltimaX scope! Introduction These instructions are provided to guide you in the correct use of the riflescope.
RP-200 TELESCOPE Instruction Manual
 2070 5th Avenue Ronkonkoma, NY 11779 Phone: 631-963-5000 Fax: 631-427-6749 For information, call toll-free: 1-800-967-8427 info@carson.com / sales@carson.com / www.carson.com RP-200 TELESCOPE Instruction
Figure 3-1 The Advanced GT Hand Control
 The following is a supplemental addendum to the included instruction manual that explains the new features of Celestron's Advanced Series Telescopes. Please refer to this addendum for information concerning
Astro 101 Lab #1. To advance time forward and backward, click on the arrow toolbar. From left to right, the buttons will
 Name: Astro 101 Lab #1 Lab objectives 1) Learn how to use the Stellarium planetarium program, by becoming familiar with the user interface and configuring the planetarium to your present location on Earth.
C A S S I N I TRACKER
 C A S S I N I TRACKER ASTRONOMICAL REFLECTOR T ELESCOPE SERIES #C-80080TR #C-1100102TR #C-1000120TR #C-1000120TREF #C-900135TR COSMO BRANDS INC. WWW.COSMOSOPTICS.COM 2 CASSINI REFLECTING TELESCOPE OPERATING
Photoelectric Photometry of the Pleiades Student Manual
 Name: Lab Partner: Photoelectric Photometry of the Pleiades Student Manual A Manual to Accompany Software for the Introductory Astronomy Lab Exercise Edited by Lucy Kulbago, John Carroll University 11/24/2008
WARNING: Ensure weapon is not loaded prior to mounting riflescope.
 Xp8 The Atibal 1-8x24 Riflescope At Atibal, we continuously strive to bring you high-quality, high-performance, precision optics at a price you can afford. The 1-8x24 offers speed and versatility for AR
USER MANUAL Version June 2014
 SINGLE ARM MOUNT (Made in Italy) USER MANUAL Version 1.6.3 June 2014 All the pictures and contents here included are property of AVALON INSTRUMENTS. The content cannot be reproduced, published, copied
INSTRUCTION MANUAL. SynScan TM V3. Copyright Sky-Watcher
 INSTRUCTION MANUAL SynScan TM SynScan TM Copyright Sky-Watcher 150113V3 Basic Operations CONTENT PART I : INTRODUCTION 1.1 Outline and Interface... 4 1.2 Connecting to a Telescope Mount... 4 1.3 Slew the
Physics Lab #6:! Mercury!
 Physics 10293 Lab #6: Mercury Introduction Today we will explore the motions in the sky of the innermost planet in our solar system: Mercury. Both Mercury and Venus were easily visible to the naked eye
Quick Start Guide. For SmartEQ TM Pro+ (#3200) Portable German Equatorial GOTO Mount
 Portable German Equatorial GOTO Mount") Quick Start Guide For SmartEQ TM Pro+ (#3200) Portable German Equatorial GOTO Mount PACKAGE CONTENTS Telescope Mount Go2Nova 8408 Hand Controller 1.25 inch tripod with accessory tray One 1 kg (2.2 lbs)
Quick Start Guide For SmartEQ TM Pro+ (#3200) Portable German Equatorial GOTO Mount PACKAGE CONTENTS Telescope Mount Go2Nova 8408 Hand Controller 1.25 inch tripod with accessory tray One 1 kg (2.2 lbs)
Assembly Manual for the Brevard Astronomical Society 16 inch F4.5 Dobsonian Telescope Brevard Astronomical Society P.O. Box 1084 Cocoa, FL 32922
 BAS 16 Telescope Manual Rev 1 Assembly Manual for the Brevard Astronomical Society 16 inch F4.5 Dobsonian Telescope Brevard Astronomical Society P.O. Box 1084 Cocoa, FL 32922 TABLE OF CONTENTS SECTION
Galileo Telescope Solar Viewer Joseph Hora, Elizabeth Hora 2017/09/18
 Galileo Telescope Solar Viewer Joseph Hora, Elizabeth Hora 2017/09/18 17 7.75 5 2 1.5 3 2 1.5 Materials: (all dimensions in inches) 3x plywood sheet 17 x 7.75 x ½ 3x wood block cut from 2x4: 5 x 2 x 1.5
INTRODUCTION...4 ASSEMBLY...6 HAND CONTROL...16
 INSTRUCTION MANUAL CGE800 CGE925 CGE1100 CGE1400 INTRODUCTION...4 Warning...4 ASSEMBLY...6 Setting up the Tripod...6 Attaching the Center Leg Brace...7 Attaching the Electronics Pier...7 Attaching the
COMPUTERIZED TELESCOPE. SkyProdigy 6 ITEM # SkyProdigy 102 ITEM #22090 INSTRUCTION MANUAL
 COMPUTERIZED TELESCOPE SkyProdigy 6 ITEM #11076 SkyProdigy 102 ITEM #22090 INSTRUCTION MANUAL INSTRUCTION MANUAL TABLE OF CONTENTS INTRODUCTION Warning SkyProdigy Models ASSEMBLY Assembling SkyProdigy
This is the third of 3 parts detailing my experience of auto guiding for astrophotography.
 AstronomyShed Tutorials Autoguiding - Part 3 - Using you autoguiding setup This is the third of 3 parts detailing my experience of auto guiding for astrophotography. Prerequisites In writing this article
ESC SETUP ENTER V1 TOUR RATE UTILITY M NGC PLANET
 ESC SETUP ENTER TOUR RATE UTILITY 1 2 3 M NGC IC 4 5 6 PLANET OBJECT USER 7 8 9 ID 0 210305V1 TABLE OF CONTENTS THE SynScan TM Introduction to the SynScan TM Powering the SynScan TM SynScan TM Hand Control
CGE Pro Series INSTRUCTION MANUAL CGE Pro 925 CGE Pro 1100 CGE Pro 1400
 CGE Pro Series INSTRUCTION MANUAL CGE Pro 925 CGE Pro 1100 CGE Pro 1400 INTRODUCTION... 4 Warning... 4 ASSEMBLY... 5 Setting up the Tripod... 6 Attaching the Accessory Tray... 7 Attaching the Electronics