TECHNICAL DATA. Spot size over full 42 mm field: 8 to 14 microns
|
|
|
- Andrea Norris
- 6 years ago
- Views:
Transcription

1 Instruction Manual
2 Thank You and compliments on Your purchasing this Officina Stellare Veloce RH200 telescope! This highly innovative, hi-technology telescope, is been thought and designed with maximum care and with the use of space age materials and components. Your telescope is designed to give you years of fun and rewarding observations still requiring little maintenance as possible. However, there are a few things to consider before using your telescope that will ensure your safety and protect your equipment. Even for those experienced users of telescopes and astronomical equipments, we would like to encourage to spend a little time in reading this instructions manual. This will ensure You the full enjoyment of the potential and characteristics of Your brand new OS Veloce RH200 telescope. WARNING Never look directly at the sun with the naked eye or with a telescope (unless you have the proper solar filter). Permanent and irreversible eye damage may result. Never use your telescope to project an image of the sun onto any surface. Internal heat build-up can damage the telescope and any accessories attached to it. At worst, it is possible that some items catch fire, generating extremely dangerous situations. Never use an eyepiece solar filter or a Herschel wedge. Internal heat build-up inside the telescope can cause these devices to crack or break, allowing unfiltered sunlight to pass through to the eye. Never leave the telescope unsupervised, either when children are present or adults who may not be familiar with the correct operating procedures of Your telescope. This particular Veloce RH200 telescope, is been thought and designed particularly for deep sky photography, nevertheless, enyone intending to use it for photographing the sun, MUST use a full aperture solar filter. This filter will be applied IN FRONT of the telescope, without leaving any leaks or leaving any part, even small, of the front lens uncovered and directly exposed to the sun. Non-compliance with these standards, can cause serious damage to the telescope itself and/or to any device connected to the telescope. Officina Stellare can not in any way be held responsible for any damage to persons, animals or things arising from the total non-compliance with these rules. Such failure is also cause for invalidating the warranty. NOTICES Always try to avoid leaving the telescope opened duryng daytimes, sunrays could eventually flow into the optics, damaging the telescope itself and/or any connected accessories. Avoid using the telescope in extremely wet environment. Do not handle the telescope with wet hands. Do not leave the telescope in the car exposed to direct sunlight or in very hot places. In case You need to clean the telescope tube, always avoid the use of aggressive solvents, normally a soft moderately wet cotton towel is all You need. Never touch the front or back lenses with fingertips or any other object. A little dust or small debris could sometimes be present on the front lens, this is normally not an issue or a decreasing performance factor. If You want to remove this dirt, always use a commercial air blower or a brush (made of camel s hair). Do not use compressed air. When not in use, store the telescope in fresh, dry place not exposed to direct sunlight. Page 2
3 TECHNICAL DATA Optical set: Riccardi-Honders, flat field, improved design Substrate materials: BK7 Mirrors Coatings: Enhanced protected aluminum coating Lenses Coatings: High transmission anti-reflect coating Clear aperture: 200 mm Focal ratio: F/3 Obstruction: 55% Back focus length: 115 mm from back plate Spot size over full 42 mm field: 8 to 14 microns Weight with rings: 8,6 Kg Length: 248 mm Length with light shield: 419 mm Max outside diameter: 252 mm (282 mm with dovetail) Standard configuration: Special, termo compensated material, close tube design, unique and innovative primary cell design, piggy back camera support, standard dovetails type Page 3
 Mounting accessories on the piggyback 6) Collimating the telescope 7) Adjusting field planarity Step 1 In this Officina Stellare RH200 telescope, the lightshield was")

 To exctract the lightshield, place the telescope on a stable, flat place with the front lens facing up or, in case the scope is been already placed on a mount, looking at zenith.")
4 Workflow 1) Extracting the lightshield 2) Mounting photographic accessories (version using finefocus focuser) 3) Mounting photographic accessories (version without finefocus focuser) 4) Placing the telescope on the mount 5) Mounting accessories on the piggyback 6) Collimating the telescope 7) Adjusting field planarity Step 1 In this Officina Stellare RH200 telescope, the lightshield was designed to be an integral part of the optical design, acting as a diaphragm and baffle. for correct operation is necessary to work with the lightshield fully extended. The retracted position is only used for comfortable carrying the telescope. If you do not plan to carry the scope, it s a good idea to leave the hood in the working position. a) First of all, unscrew the two locking screws D of the hood from their carrying housings on the backplate of the telescope and keep them aside in a safe place and ready for the use (Pic. 1). b) To exctract the lightshield, place the telescope on a stable, flat place with the front lens facing up or, in case the scope is been already placed on a mount, looking at zenith. c) The external carbon-fiber hood, when retracted, is locked in place by a rubber clutch under the piggyback, it is also used as a locking knob A for accessories placed on the piggyback. Loosen the knob turning it counterclockwise in order to let the lightshield slide free (Pic. 2). d) When retracted for carrying purposes, the downside knob should be completely loosen (Pic. 3). Slide the carbon fiber lightshield toward the front lens carefully, avoiding jerking, until the rail guide under the hood gently slide on the downside sled to the steel limit switch (Pic. 4). e) Once it stops, match the two holes 1 and 2 to the corrisponding fillets on the main telescope tube. Small movements are sufficient for the purpose, avoid unnecessary twists to the hood. f) Now retrieve the two locking screw You initially removed from the back plate and screw it into the two holes to lock the hood in place (Pic. 5). g) Ag) Finally turn the downside locking knob clockwise for the final lcok of the hood and the sled (Pic. 6). This procedure may seem complex but will ensure the perfect and stable positioning of the lightshield, providing the proper functioning of the optics. This also ensure the correct acquisition for flat frames that must be taken with the lightshield fully extracted. For retracting the hood in the carrying position, just redo the whole sequence inverted. Page 4


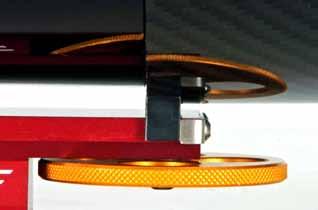
5 D A Pic. 1 Pic. 2 Pic. 3 Pic. 4 Hole #1 (#2 is on the opposite side) Pic. 5 Pic. 6 Page 5
, please refer to step 3.")

. We wish to remind You that the backfocus of the Veloce RH200 is about 115mm calculated from tha back plate of the scope. Pic.")
6 Step 2 Installing photographic accessories the the Veloce RH200 For those who bought the telescope with the finefocus focuser (Veloce RH200OTA package), the instructions on how to install photographic accessories are discussed on step 2. Customers that have bought the telescope without the focuser (Veloce RH200NO- FOC), please refer to step 3. Connecting photographic accessories to the Finefocus focuser The Finefocus from Officina Stellare, is a very low profile focuser. It comes with a standard 2 adapter for using standard 2 accessories. Simply insert Pic. 7 Your accessories to the stop, give them the right orientation eventually and use the three 120 M4 allen wrench steel setscrews to lock them in place. For those who wish to use all the free opening of the focuser, just unscrew the 2 adapter from the main body of the focuser. The Finefocus has a native clear aperture of 72mm with 72x1mm thread (Pic. 8). We wish to remind You that the backfocus of the Veloce RH200 is about 115mm calculated from tha back plate of the scope. Pic. 8 Using the Finefocus focuser The Finefocus comes already calibrated from the factory. The travel tube runs about 16mm and has a graduated millimeter scale. This is useful to have a consistent and repeatable positioning of the focus. The focus is obtained rotating the upper black knob. On the knob itself is engraved a reference scale subdivided in 16 marks, rotating the knob corrisponds to 50 microns movement per mark. The yellow knob act as a lock for the focus. This knob is positioned near the back plate at close contact with the it, to lock the focus, simply screw the knob untili it stops on the plate. For unlock just unscrew leaving about 1mm of space from the knob and the back plate. (Pic. 9). The Finefocus focuser comes standard reducer/ adapter from its original 72x1mm to 2. When using very big sized CCD chips, the standard 2 aperture, could introduce vignetting due to the very fast f ratio (F3) of the telescope. In such situations is preferable to use an adapter (optional) specifically made for the CCD You intend to use. It will be threaded directly into the finefocus using the original 72mm clear aperture. Pic. 9 Page 6

7 Step 3 Connecting photographic accessories to the Veloce RH200 without focuser For Those who wish to connect their equipments straight to the telescope and/or leave them always connected (like a permanent observatory etc.) it is possible to buy the Veloce RH200 without the Finefocus focuser (Veloce RH200NOFOC), in this case a custom built adapter/s is/are needed for coupling the optical train to the telescope. Officina Stellare will take care of this for You, building whatever knid of custom adapter that You will need. Just let us know about any optical train or device You would like to couple to the scope and we will arrange the possible solution for You. For those who wish to build the needed adapters by themselves, precise sizes and tecnichal datas can be found in the appendix at pages Step 4 Mounting the scope on the mount Your new Officina stellare Veloce RH200 telescope uses a Vixen standard dovetail plate. It is always a good idea to put the telescope on the mount in his final working configuration, with all the imaging train already coupled with the telescope. Always preffer to insert the telescope sled on the mount with the declination axe parallel to the ground, this will prevent the scope to fall down, causing potentially dangerous situations (if You can t for whatever reason prevent the scope falling, DON T try to catch it or put any arm, hand or feet below it. Trying to save the scope could cause svere injuries to You, remember: the scope has less chancens to broke than Your hand or foot!). The telescope wieght is about 9Kg (20 lbs.), be sure You can handle it yourself, if unsure ask someone s help. Safety first! Step 5 The Veloce RH200 comes with an integrated piggyback with a standard Vixen doveplate receptacle. It is possible so to attatch any accessories compliant to this standard. Use the underneath knob to lock them in place, turning the knob clockwise.the lock works with a pin that pushes on the dovetail. For it to work properly it is necessary that the pin itself could be in direct contact with the inserted plate (Pic. 10 e 11). Officina Stellare propose, as an option, a specifically designed dovetail to use on the piggyback. In case of using a drilled dovetail, it is necessary to shim the plate to let the pin apply the needed pressure to lock it in place. Be sure of the lock and stiffness prior to move the telescope, if the lock is too loose, the mounted accessories may slip and aventually fall down. Be carefoul all the times, safety first. Don t overload the piggyback, use common sense. Where possible, avoid applying loads exceeding 1 kg (2,5lbs.) Pic. 10 Pic. 11 Page 7

8 Step 6 Collimating the telescope Your brand new Veloce RH200 is been already collimated at the factory. With time and use it may sometimes be needed to re-collimate the optics. The collimation procedure is quite simple an has to be done adjusting the primary mangim mirror only using the allen wrench N 4 that comes with the telescope. Using first a low power eyepiece, find a medium bright star and center it in the field of view. Defocus the telescope so that the central obstruction from the secondary mirror is clearly visible. Verify that the obstruction is in the very center of the illuminated disk. If the dark spot is out of center, use the collimating screws on the back of the telescope (Pic. 12). These adjustment screws are spring loaded so no push-pull operations are needed. Turning the screw clockwise pulls the mirror while turning counterclockwise pull it. When a big disalignment is present, avoid turning just 1 screw, if the degree of needed adjustment is over half of a turn, use the other two screw to compensate. This is important for not change the distance between the optical elements, the design distance is been laready calibrated at the factory. Refine the collimation using different, more magnifying eyepiece with the test star always close to the center of the field view. WARNING: the collimating procedure requires just small movements, certanly under 1 full turn of the screws. Do not uscrew the adjustment screws too much as the internal main optic element may disconnect from the tube. Step 7 Orthogonality alignment of the ccd to the optical axis Your Veloce RH200 is a very fast focal ratio telescope with a large corrected and illuminated field (42mm). For that reasons if the photographic accessories (CCD, DSLR atc.) are not perfectly squared to the optical path, the very border of the resulting image, could appear sligtly out of focus or bad shaped. For orthogonality alignment of the applyed accessories, the telescope is provided with a 4 point regulation points disposed at 45, 135, 225 and 315, that corrisponds to the four corner positions of the used acquisition sensor. The squaring is obtained in a push-pull fashion, using the allen wrench N 2 (included) to unlock and then using the 2.5 allen wrenc (included) to adjust. The sistem is spring loaded and so lock tha 2mm screw only after the adjustment is been done. This system is designed to be as solid as possible. One complete turn of the adjustment screw corrispond to 0,5 angle variation. WARNING: the squaring procedure requires just small movements, certanly under 1 full turn of the screws. Do not uscrew the orthogonality adjustment screws too much as the focuser or the attached optical train may disconnect from the tube. Pic. 13 Pic. 12 Page 8
9 Maintainance This Officina Stellare Veloce RH200 telesocpe is been designed in to require a minimal maintainance. There are no parts of the telescope, not already described in this manual, that the final user can remove. If per chance the telescope should have been collected water, or moisture or appears to be foggy, don t try to clean it immediately and/or store it in a closed carrying case. Leave it open and carry it exposed to the air. Wait for the condensation to evaporate on its own. Normally, if nothing is being touched, the telescope will results perfectly clean again with no visible haloes. Except for the adjustment operations already descibed, no other maintainance is needed. Presence of a small amount of dust or very small dots leaved from water or other polluttants is not a reason to be alarmed. In normal operations, these impurities don t affect the quality of the images. It is always a good idea to alean the optics only when is really needed. Cleaning an optics that don t really requires to be cleaned, colud sometimes results in no improvements or, in worse cases could lead to deteriorations. If uncertain, just call us prior to clean the optics. Write an to us at info@offcinastellare.com attaching some pictures of the optics. The only warning to give You more is: always use common sense, do not use the telescope for any purpose other than for which it was designed. Page 9
10 Page 10
11 Page 11
12 Page 12
13 OFFICINA STELLARE TWO YEAR LIMITED WARRANTY A. Officina Stellare warrants your telescope to be free from defects in materials and workmanship for two years. Officina Stellare will repair or replace such product or part thereof which, upon inspection by Officina Stellare, is found to be defective in materials or workmanship. As a condition to the obligation of Officina Stellare to repair or replace such product, the product must be returned to Officina Stellare together with proof-of-purchase satisfactory to Officina Stellare. B. The Proper Return Authorization Number must be obtained from Officina Stellare in advance of return. to Officina Stellare ( info@officinastellare.com ) to receive the number to be displayed on the outside of your shipping container. All returns must be accompanied by a written statement setting forth the name, address, and daytime telephone number of the owner, together with a brief description of any claimed defects. Parts or product for which replacement is made shall become the property of Officina Stellare. The customer shall be responsible for all costs of transportation and insurance, both to and from the factory of Officina Stellare, and shall be required to prepay such costs. Officina Stellare shall use reasonable efforts to repair or replace any telescope covered by this warranty within thirty days of receipt. In the event repair or replacement shall require more than thirty days, Officina Stellare shall notify the customer accordingly. Officina Stellare reserves the right to replace any product which has been discontinued from its product line with a new product of comparable value and function. This warranty shall be void and of no force of effect in the event a covered product has been modified in design or function, or subjected to abuse, misuse, mishandling or unauthorized repair. Further, product malfunction or deterioration due to normal wear is not covered by this warranty. OFFICINA STELLARE DISCLAIMS ANY WARRANTIES, EXPRESS OR IMPLIED, WHETHER OF MERCHANTABILITY OF FITNESS FOR A PARTICULAR USE, EXCEPT AS EXPRESSLY SET FORTH HEREIN. THE SOLE OBLIGATION OF OFFICINA STELLARE UNDER THIS LIMITED WARRANTY SHALL BE TO REPAIR OR REPLACE THE COVERED PRODUCT, IN ACCORDANCE WITH THE TERMS SET FORTH HEREIN. OFFICINA STELLARE EXPRESSLY DISCLAIMS ANY LOST PROFITS, GENERAL, SPECIAL, INDIRECT OR CONSEQUENTIAL DAMAGES WHICH MAY RESULT FROM BREACH OF ANY WARRANTY, OR ARISING OUT OF THE USE OR INABILITY TO USE ANY OFFICINA STELLARE PRODUCT. ANY WARRANTIES WHICH ARE IMPLIED AND WHICH CANNOT BE DISCLAIMED SHALL BE LIMITED IN DURATION TO A TERM OF TWO YEARS FROM THE DATE OF ORIGINAL RETAIL PURCHASE. Officina Stellare reserves the right to modify or discontinue, without prior notice to you, any model or style telescope. If warranty problems arise, or if you need assistance in using your telescope contact: Officina Stellare Srl Via San Sebastiano, 27 Thiene, Italy Tel Fax Page 13
14 Officina Stellare Srl Via San Sebastiano, 27 Thiene, Italy Ph Fax Web site at http// Copyright 2012 Officina Stellare All rights reserved. (Products or instructions may change without notice or obligation
Series. Quantum 100 Refractor (Equatorial Mount not included) INSTRUCTION MANUAL models s11160
 INSTRUCTION MANUAL models s11160") Series Quantum 100 Refractor (Equatorial Mount not included) INSTRUCTION MANUAL models s11160 Warning Never look directly at the Sun with the naked eye or with a telescope ( unless you have the proper
Series Quantum 100 Refractor (Equatorial Mount not included) INSTRUCTION MANUAL models s11160 Warning Never look directly at the Sun with the naked eye or with a telescope ( unless you have the proper
SKELESCOPE REFLECTOR TELESCOPE WITH TABLE TOP TRIPOD SK-100 INSTRUCTION MANUAL
 TM SKELESCOPE REFLECTOR TELESCOPE WITH TABLE TOP TRIPOD SK-100 INSTRUCTION MANUAL TABLE OF CONTENTS Introduction Box Contents / Visual Key Diagram Telescope Assembly Setting up Your Telescope Attaching
RP-200 TELESCOPE Instruction Manual
 2070 5th Avenue Ronkonkoma, NY 11779 Phone: 631-963-5000 Fax: 631-427-6749 For information, call toll-free: 1-800-967-8427 info@carson.com / sales@carson.com / www.carson.com RP-200 TELESCOPE Instruction
RP-100 TELESCOPE Instruction Manual
 2070 5th Avenue Ronkonkoma, NY 11779 Phone: 631-963-5000 Fax: 631-427-6749 For information, call toll-free: 1-800-967-8427 info@carson.com / sales@carson.com / www.carson.com RP-100 TELESCOPE Instruction
CAUTION: BEFORE YOU BEGIN, ALWAYS MAKE SURE THE WEAPON IS UNLOADED AND SAFE TO HANDLE.
 CAUTION: BEFORE YOU BEGIN, ALWAYS MAKE SURE THE WEAPON IS UNLOADED AND SAFE TO HANDLE. ON Press either brightness button ( + or - ) to turn on the sight. The sight is also programmed to turn on when it
PowerSeeker 114 INSTRUCTION MANUAL #21045
 PowerSeeker 114 INSTRUCTION MANUAL #21045 INTRODUCTION Congratulations on your purchase and welcome to the Celestron world of amateur astronomy. Some of the terms and parts described in these instructions
Owner's Manual NSL100B BUILDERS LEVEL NSL500B TRANSIT LEVEL
 Owner's Manual NSL100B BUILDERS LEVEL NSL500B TRANSIT LEVEL 1 1. CONTENTS 2. Nomenclature page 3 3. Care and Maintenance page 4 4. Using your Instrument 4.1 Setting up your Instrument page 5 4.2 Stadia
CASSINI CQR-120 OPERATING INSTRUCTIONS
 CASSINI CQR-120 OPERATING INSTRUCTIONS INTRODUCTION CONGRATULATIONS ON YOUR PURCHASE OF THE CASSINI CQR-120 TELESCOPE. THIS TELESCOPE HAS BEEN PRODUCED TO PRECISE SPECIFICATIONS. PRIOR TO USING YOUR NEW
NEVER USE A TELESCOPE TO LOOK AT THE SUN DIRECTLY!
 Quick Start Guide AstroBoy -70e Computerized Telescope With Electronic Eyepiece #9102 (Astro Blue) FEATURES Alt-Azimuth Mount with GoToNova computer control technology Computerized automatic pointing and
Instruction Manual Meade 70AZ-T 70mm Compact Refractor Telescope Meade Instruments Corporation
 Instruction Manual Meade 70AZ-T 70mm Compact Refractor Telescope Meade Instruments Corporation 6001 Oak Canyon, Irvine, California 92618 (949) 451-1450 Meade 70mm Compact Refractor Telescope 1! 1) j ih
FIELD GUIDE FOR HORUS SCOPES
 www.horusvision.com TM FIELD GUIDE FOR HORUS SCOPES Your Horus scope combines fine-quality optics, combat-proven hardware and the patented Horus reticle to deliver speed and accuracy for all shooters.
Altazimuth Mount. Altazimuth Mount
 instruction Manual Orion VersaGo II HD Altazimuth Mount #10104 Orion VersaGo II Altazimuth Mount #10105 #10104 #10105 Providing Exceptional Consumer Optical Products Since 1975 OrionTelescopes.com Customer
Owner's Manual. for AUTOMATIC LEVEL. NBL Series. FOR CUSTOMER SERVICE, PARTS & REPAIR, CALL Toll Free:
 Owner's Manual for AUTOMATIC LEVEL NBL Series FOR CUSTOMER SERVICE, PARTS & REPAIR, CALL Toll Free: 1-888-247-1960 1 1. CONTENTS 2. Nomenclature page 3 3. Care and Maintenance page 4 4. Using your Instrument
IF YOU NEED ANY FURTHER HELP WITH YOUR GALILEO TELESCOPE PLEASE CALL MON-FRI 9AM - 5PM E.S.COM
 G-80DB Instructions G-80DB IF YOU NEED ANY FURTHER HELP WITH YOUR GALILEO TELESCOPE PLEASE CALL US @ 305-245-8444 MON-FRI 9AM - 5PM E.S.T OR E-MAIL US AT CUSTOMERSERVICE@COSMOSOPTICS.COM 2 GALILEO G-80DB
LEAPERS, INC. RED/GREEN DOTS
 LEAPERS, INC. 1 RED/GREEN DOTS range estimating scopes UTG reticle intensified scopes TOTAL SOLUTION TO YOUR NEEDS -COMMITMENT TO BEST QUALITY, BEST VALUE AND BEST SERVICEwww.LEAPERS.com 32700 Capitol
WHEN BRIGHTNESS COUNTS
 WHEN BRIGHTNESS COUNTS CAUTION: BEFORE INSTALLATION, CONFIRM THAT FIREARM IS UNLOADED AND IN SAFE OPERABLE CONDITION. MOUNTING (Handgun Slide/Plate mount) To mount the TRU TEC MICRO on the slide of an
saxon Instruction Manual saxon Grandeur Brass Telescope High quality optics
 saxon High quality optics Instruction Manual saxon Grandeur Brass Telescope WARNING! Do not use the telescope to look at the sun without an appropriate solar filter. Looking at or near the sun can result
SV102-25SV 102 MM APO REFRACTOR
 STELLARVUE C LIMITED WARRANTY FOR U.S.A. END PURCHASERS ONLY Stellarvue (Sv) warrants that each Sv brand telescope and accessory Shall be free from defects in materials and workmanship for two years from
INSTRUCTION MANUAL. Laser Diode Sarcomere Length. Aurora Scientific Inc. 360 Industrial Parkway South, Unit 4 Aurora, Ontario, Canada L4G 3V7
 INSTRUCTION MANUAL Model 902A Laser Diode Sarcomere Length May 6, 2013, Revision 3 Copyright 2008-2013 Aurora Scientific Inc. Aurora Scientific Inc. 360 Industrial Parkway South, Unit 4 Aurora, Ontario,
HS515G-M. PARALOW Circle Dot Sight. User's Manual. Holosun Technologies Inc. Phone: (909) Fax: (909)
 Fax: (909)") HS515G-M PARALOW Circle Dot Sight User's Manual Multi Reticle Holosun Technologies Inc. Phone: (909) 594-2888 Fax: (909) 598-4888 E-mail: info@holosun.com COLOR www.holosun.com PARALOW HS515G-M PARALOW
HS515G-M PARALOW Circle Dot Sight User's Manual Multi Reticle Holosun Technologies Inc. Phone: (909) 594-2888 Fax: (909) 598-4888 E-mail: info@holosun.com COLOR www.holosun.com PARALOW HS515G-M PARALOW
Quick Start Guide. For SmartEQ TM Pro+ (#3200) Portable German Equatorial GOTO Mount
 Portable German Equatorial GOTO Mount") Quick Start Guide For SmartEQ TM Pro+ (#3200) Portable German Equatorial GOTO Mount PACKAGE CONTENTS Telescope Mount Go2Nova 8408 Hand Controller 1.25 inch tripod with accessory tray One 1 kg (2.2 lbs)
Quick Start Guide For SmartEQ TM Pro+ (#3200) Portable German Equatorial GOTO Mount PACKAGE CONTENTS Telescope Mount Go2Nova 8408 Hand Controller 1.25 inch tripod with accessory tray One 1 kg (2.2 lbs)
ZENITHSTAR 61 APO. Owner s Manual ver
 ZENITHSTAR 61 APO Owner s Manual ver. 1.1 2017.07 Contents Specification 3 Telescope Diagram 4 Accessories Map 5 Usage 6 Storage and Cleaning 7 Caution and Safety, Optional Equipment 8 Optional Equipment
Quick Start Guide. The ieq30 Pro GoTo German Equatorial Mount #3000E
 Quick Start Guide The ieq30 Pro GoTo German Equatorial Mount #3000E PACKAGE CONTENTS Telescope Mount (with built-in GPS) Go2Nova #8407 Hand Controller 1.5-inch Tripod One 10lb (4.5 kg) counterweight Dark
COMMODORE BRASS TELESCOPE ZHUMELL COMMODORE BRASS TELESCOPE
 3 0 15 15 E OWNER S MANUAL COMMODORE BRASS TELESCOPE ZHUMELL COMMODORE BRASS TELESCOPE 5 W 60 W 30 W 45 W Zhumell customers know that there are plenty of ways to experience the world. They also understand
AGES CF600PM. 50 mm Telescope w/ AZ Pan Tilt Mount Instruction Manual. WARNING! SUN HAZARD: Never look directly at the sun with this device.
 AGES CF600PM 50 mm Telescope w/ AZ Pan Tilt Mount Instruction Manual WARNING! SUN HAZARD: Never look directly at the sun with this device. 1 WARNING: Never attempt to observe the sun with this telescope.
CASSINI CQR-800 OPERATING INSTRUCTIONS INTRODUCTION
 HQR-800 CASSINI CQR-800 OPERATING INSTRUCTIONS INTRODUCTION CONGRATULATIONS ON YOUR PURCHASE OF THE CASSINI CQR-800 TELESCOPE. THIS TELESCOPE HAS BEEN PRODUCED TO PRECISE SPECIFICATIONS. PRIOR TO USING
Telescope. 1. Read these instructions carefully and familiarise yourself with the procedure before assembling the unit.
 Telescope a Simple assembly instructions- Please keep for future reference IMPORTANT 1. Read these instructions carefully and familiarise yourself with the procedure before assembling the unit. 2. Check
RP-400 TELESCOPE Instruction Manual
 RP-400 TELESCOPE Instruction Manual 2070 5th Avenue Ronkonkoma, NY 11779 Phone: 631-963-5000 Fax: 631-427-6749 For information, call toll-free: 1-800-967-8427 info@carson.com / sales@carson.com / www.carson.com
1 YEAR LIMITED WARRANTY TELESCOPES
 1 YEAR LIMITED WARRANTY TELESCOPES BARSKA Optics, as manufacturer, warrants this new precision optical product to be free of original defects in materials and/or workmanship for the length of time specified
CAUTION: BEFORE INSTALLATION, CONFIRM THAT THE CROSSBOW IS UNLOADED AND IS IN SAFE OPERATING CONDITION.
 CAUTION: BEFORE INSTALLATION, CONFIRM THAT THE CROSSBOW IS UNLOADED AND IS IN SAFE OPERATING CONDITION. MOUNTING THE SCOPE Position the scope roughly on the optic rail of the crossbow (only gently tightening
RP-300 TELESCOPE Instruction Manual
 RP-300 TELESCOPE Instruction Manual 2070 5th Avenue Ronkonkoma, NY 11779 Phone: 631-963-5000 Fax: 631-427-6749 For information, call toll-free: 1-800-967-8427 info@carson.com / sales@carson.com / www.carson.com
C A S S I N I. MODEL : C EQ3 900mm X 135mm COSMO BRANDS INC.
 C A S S I N I MODEL : C-900135EQ3 900mm X 135mm COSMO BRANDS INC. WWW.COSMOSOPTICS.COM 2 C A S S I N I C-900135EQ3 TELESCOPE OPERATING INSTRUCTIONS INTRODUCTION CONGRATULATIONS ON YOUR PURCHASE OF THE
NG114mm 114mm Newtonian Telescope w/ Equatorial Mount Instruction Manual
 Visit us at: nationalgeographic.com AGES 10+ NG114mm 114mm Newtonian Telescope w/ Equatorial Mount Instruction Manual WARNING:! CHOKING HAZARD Small parts. Not for children under 3 years. WARNING:! SUN
C A S S I N I TRACKER
 C A S S I N I TRACKER ASTRONOMICAL REFLECTOR T ELESCOPE SERIES #C-80080TR #C-1100102TR #C-1000120TR #C-1000120TREF #C-900135TR COSMO BRANDS INC. WWW.COSMOSOPTICS.COM 2 CASSINI REFLECTING TELESCOPE OPERATING
NcSTAR SHOOTER II SERIES SCOPE
 NcSTAR SHOOTER II SERIES SCOPE Congratulations on the purchase of your New NcSTAR Shooter II Series Scope! The Shooter II Series of scopes gives you many great options, so you can choose the scope that
CBRD30CP3 & BOWRD30CP INSTRUCTION MANUAL
 CBRD30CP3 & BOWRD30CP INSTRUCTION MANUAL PROLOGUE Your BSA Illuminated sight is for use on both compound and standard bows. Each version of the BSA illuminated sight has a specific reticle to help maintain
RT-6 Riflescopes. User Guide
 RT-6 Riflescopes User Guide This user guide includes information for low-magnification RT-6 riflescopes. Please review thoroughly, and pay close attention to the details pertaining to your specific riflescope
RECON. How to Setup the Telescope to Observe. This guide will show you how to setup your telescope for observing. Written By: Brittany McCrigler
 RECON How to Setup the Telescope to Observe This guide will show you how to setup your telescope for observing. Written By: Brittany McCrigler 2017 recon.dozuki.com Page 1 of 30 INTRODUCTION This guide
Spotting Scope Instruction Manual
 Spotting Scope Instruction Manual Here are the Main Parts of Your orbitor OR7030 B A C A. Telescope Tube F E D B. Dew Shield I C. Eyepiece G D. Diagonal Mirror E. Focuser F. Mount Lock Knob H G. Aiming
Quick Start Guide. ZEQ25GT Center Balanced GoTo Equatorial Mount Models: #7100, #7101, #7102
 Quick Start Guide ZEQ25GT Center Balanced GoTo Equatorial Mount Models: #7100, #7101, #7102 PACKAGE CONTENTS 1 Telescope mount with GPS, and AccuAligning TM dark field illuminated Polar Scope (except Model
Coma Correction. Diagram. Introduction
 Starlight Instruments, LLC 2380 E. Cardinal Drive, Columbia City, Indiana 46725 USA t: 260.244.0020 f.260.244.3077 e: sales@starlightinstruments.com web: starlightinstruments.com Introduction Thank you
Directions for use
 Directions for use 40070 40080 60050 70060 70076 80060 90060 900114 Fig. 1 Fig. 1A Fig. 2 Fig. 3 Fig. 4 Fig. 5 Fig. 6 Fig. 7 english ENGLISH DIRECTIONS FOR USE 1 Tripod Leg 2 Tripod Leg Adjusting Screw
Observing Procedure for C11 GPS
 Observing Procedure for C11 GPS By T. W. Fuller Preparation Customize observing list You can install a list of up to 25 custom objects in the telescope database ahead of time, so that you will have them
Quick Start Guide. ZEQ25GT Balanced GoTo Equatorial Mount Models: #7100, #7101, #7102
 Quick Start Guide ZEQ25GT Balanced GoTo Equatorial Mount Models: #7100, #7101, #7102 PACKAGE CONTENTS 1 Telescope Mount with GPS, and AccuAligning TM dark field illuminated Polar Scope (except Model #7101)
Quick Start Guide. The ieq45 Pro GoTo German Equatorial Mount #8000E, #8000EP and #8000E-AZ
 Quick Start Guide The ieq45 Pro GoTo German Equatorial Mount #8000E, #8000EP and #8000E-AZ PACKAGE CONTENTS 1 Telescope Mount (with built-in GPS) Losmandy/Vixen dual saddle Go2Nova 8407+ Hand Controller
CAUTION! NEVER ATTEMPT TO LOOK AT THE SUN WITH UNLESS YOU HAVE A FULL-APERTURE SOLAR FILTER (NOT INCLUDED WITH
 CAUTION! X NEVER ATTEMPT TO LOOK AT THE SUN WITH YOUR APERTURA DOBSONIAN TELESCOPE UNLESS YOU HAVE A FULL-APERTURE SOLAR FILTER (NOT INCLUDED WITH TELESCOPE) INSTALLED OVER THE OPEN END OF THE OPTICAL
5-25x56 PMII PSR With Double Turn
 Page 1 of 20 5-25x56 PMII PSR 5-25x56 PMII PSR With Double Turn Page 3 of 20 1. Scope description... 5 1.1 Introduction... 5 1.2 Safety instructions... 5 2. Technical data... 6 2.1 General data... 6 2.2
MODELS #21052 MODEL #21071
 FIRSTSCOPE 60 AZ REFRACTORS MODELS #21052 FIRSTSCOPE 70 AZ REFRACTOR MODEL #21071 INSTRUCTION MANUAL 2 INTRODUCTION Congratulations on your purchase and welcome to the Celestron world of amateur astronomy.
SV80ST-25SV 80MM APO TRIPLET REFRACTOR
 STELLARVUE C LIMITED WARRANTY FOR U.S.A. END PURCHASERS ONLY Stellarvue (Sv) warrants that each Sv brand telescope and accessory Shall be free from defects in materials and workmanship for two years from
Instruction Manual MODELS # 71237, 71238
 Conforms to and meets the Transmission Requirements of ISO 12312-2, Filters for Direct Observation of the Sun Instruction Manual MODELS # 71237, 71238 CELESTRON ECLIPSMART BINOCULARS Solar Binoculars Thank
Quick Start Guide. CEM25 Center Balanced GoTo Equatorial Mount Models: #7100E, #7102E
 Quick Start Guide CEM25 Center Balanced GoTo Equatorial Mount Models: #7100E, #7102E PACKAGE CONTENTS 1 Telescope mount with GPS, and AccuAlign TM dark field illuminated Polar Scope Hand controller (HC)
instruction Manual #9974 Customer Support (800) IN 293 Rev. C 02/09
 IN 293 Rev. C 02/09") instruction Manual Orion StarBlast Imaging Optical Tube Assembly #9974 Providing Exceptional Consumer Optical Products Since 1975 Customer Support (800) 676-1343 E-mail: support@telescope.com Corporate
instruction Manual Orion StarBlast Imaging Optical Tube Assembly #9974 Providing Exceptional Consumer Optical Products Since 1975 Customer Support (800) 676-1343 E-mail: support@telescope.com Corporate
SVR90T-25SV RAPTOR 90 MM APO TRIPLET REFRACTOR
 STELLARVUE C LIMITED WARRANTY FOR U.S.A. END PURCHASERS ONLY Stellarvue (Sv) warrants that each Sv brand telescope and accessory Shall be free from defects in materials and workmanship for two years from
22X Builder s Transit Level Model No Instruction Manual
 2595H 7/29/09 10:15 AM Page 1 22X Builder s Transit Level Model No. 40-6910 Instruction Manual Congratulations on your choice of this 22X Builder s Transit Level. We suggest you read this instruction manual
SK Series BOX PLOW INSTALLATION & OWNER S MANUAL TABLE OF CONTENTS
 SK Series BOX PLOW INSTALLATION & OWNER S MANUAL TABLE OF CONTENTS SAFETY... 2 INTRODUCTIONS... 5 TIPS ON PLOWING SNOW... 6 BOX PLOW ASSEMBLY PROCEDURE... 7 BOX PLOW BLADE ASSEMBLY DRAWING AND PARTS LIST...
22X Builder s Level Model No Instruction Manual
 2594H 7/29/09 10:12 AM Page 1 22X Builder s Level Model No. 40-6900 Instruction Manual Congratulations on your choice of this 22X Builder s Level. We suggest you read this instruction manual thoroughly
P4Xi TACTICAL Riflescope TECHNICAL MANUAL
 P4Xi TACTICAL Riflescope TECHNICAL MANUAL TABLE OF CONTENTS Page Mounting The Scope 2 Eyepiece Focusing 2 Windage / Elevation Adjustment 3 Setting The Zero Stop 4 Turret Cap Replacement 4 Parallax Focus
Quick Start Guide. CEM25P Center Balanced GoTo Equatorial Mount Models: #7100P, #7102P
 Quick Start Guide CEM25P Center Balanced GoTo Equatorial Mount Models: #7100P, #7102P PACKAGE CONTENTS 1 Telescope mount with GPS, and AccuAlign TM dark field illuminated Polar Scope Hand controller (HC)
Telescope Manual. 40mm AZ. Diagional.965 Compass, Software and Star Chart Included AGE
 40mm AZ Telescope Manual Optical design Achromatic refractor Objective 40mm Focal Length 400mm Focuser Rack And Pinion Tripod Table Top Eyepieces 6mm and 20mm Diagional.965 Compass, Software and Star Chart
Telescope Sight 4 X 24 for G3 Rifle
 Telescope Sight 4 x 24 For G3 Rifle Telescope Sight 4 X 24 for G3 Rifle Instruction Manual HECKLER & KOCH, INC. 2148 Pacific Boulevard Sterling, Virginia 20166-8903 U.S.A. TEL. (703) 450-1900 TELEFAX (703)
Melton Series. Owners Manual. Lab Centrifuge. Model # s A C, A C, B C, B C, C C, C C, D C, D C
 Melton Series Owners Manual Lab Centrifuge Model # s A-4-115-C, A-4-220-C, B-4-115-C, B-4-220-C, C-4-115-C, C-4-220-C, D-4-115-C, D-4-220-C Serial Numbers 85500 & Above NOTICE Wire this centrifuge according
Observatory 8 inch Telescopes: Tips, Tools & Quick Fixes
 Observatory 8 inch Telescopes: Tips, Tools & Quick Fixes Rhiannon Griffin August 7, 2014 1 Tools Needed Allen wrenches for set screws, 2 sizes For collimating: Phillips head screwdriver & slotted screwdriver
Quick Start Guide. The ieq45 GoTo German Equatorial Mount #8000D, #8000DP and #8000AZ
 Quick Start Guide The ieq45 GoTo German Equatorial Mount #8000D, #8000DP and #8000AZ PACKAGE CONTENTS 1 Telescope Mount (with built-in GPS) Losmandy/Vixen dual saddle Go2Nova 8407 Hand Controller Two 5
15 E OWNER S MANUAL PIRATE SPYGLASS BRING EM NEAR PIRATE SPYGLASS TELESCOPE 5 W 30 W 60 W 45 W
 3 0 15 15 E OWNER S MANUAL PIRATE SPYGLASS BRING EM NEAR PIRATE SPYGLASS TELESCOPE 5 W 60 W 30 W 45 W Zhumell customers know that there are plenty of ways to experience the world. They also understand
Latest generation testo air velocity & IAQ probes with cable handle. Instruction manual
 Latest generation testo air velocity & IAQ probes with cable handle Instruction manual Contents Contents 1 About this document... 5 2 Safety and disposal... 5 3 System description... 6 4 Description of
5-25x56 PMII PSR Illuminated with Double Turn
 Page 1 of 20 5-25x56 PMII PSR Illuminated with Double Turn Page 3 of 20 1. Scope description... 5 1.1 Introduction... 5 1.2 Safety instructions... 5 2. Technical data... 6 2.1 General data... 6 2.2 Dimensions...
National Optical & Scientific Instrument Inc Tri-County Parkway Schertz, Texas Phone (210) Fax (210)
 Fax (210)") National Optical & Scientific Instrument Inc. 6508 Tri-County Parkway Schertz, Texas 78154 Phone (210) 590-9010 Fax (210) 590-1104 INSTRUCTIONS FOR SHOP MICROSCOPES MODEL NUMBERS 186 187 188 189 National
National Optical & Scientific Instrument Inc. 6508 Tri-County Parkway Schertz, Texas 78154 Phone (210) 590-9010 Fax (210) 590-1104 INSTRUCTIONS FOR SHOP MICROSCOPES MODEL NUMBERS 186 187 188 189 National
Galileo Telescope Solar Viewer Joseph Hora, Elizabeth Hora 2017/09/18
 Galileo Telescope Solar Viewer Joseph Hora, Elizabeth Hora 2017/09/18 17 7.75 5 2 1.5 3 2 1.5 Materials: (all dimensions in inches) 3x plywood sheet 17 x 7.75 x ½ 3x wood block cut from 2x4: 5 x 2 x 1.5
User Manual for Blackhawk Riflescope
 User Manual for Blackhawk Riflescope Scope with Adjustable Objective page 3 Scope with Sniper Edge page 7 WARNING BE CERTAIN THAT YOUR FIREARM IS NOT LOADED AND POINTED AWAY FROM YOU IN A SAFE DIRECTION.
Richter Optica. Instructions for Model: S850 Stereo Zoom Microscope
 Richter Optica info@richter-optica.com Instructions for Model: S850 Stereo Zoom Microscope Microscope Head Focus Knob Stage Clips Zoom Knob C-Mount Adapter Eyepiece Focusing Holder Focusing Holder Set
SCHIEBER TELESCOPES. Unique, High-Quality Telescopes
 SCHIEBER TELESCOPES Unique, High-Quality Telescopes 3.5 Refractor Astrophotography Bundle - Strike 90 PLUS Telescope Assembly Instructions and Digital Eyepiece Camera Instructions. (1) telescope assembly
USER MANUAL REFLEX SIGHT. Ultra Shot Z Series. English / Francais / Español / Deutsch
 USER MANUAL REFLEX SIGHT Ultra Shot Z Series English / Francais / Español / Deutsch ABOUT SIGHTMARK Sightmark offers a wide range of products that include red dot scopes, reflex sights, rangefinders, riflescopes,
ASTRO-PHYSICS, INC. POLAR ALIGNMENT TELESCOPE
 Polar Alignment Telescope ASTRO-PHYSICS, INC. POLAR ALIGNMENT TELESCOPE This polar axis telescope will help you align your mount with the Celestial Poles. When your mount is properly aligned, your telescope's
Flexbar 6.3:1 MANUAL ZOOM STEREO MICROSCOPE. 250 Gibbs Road, Islandia, NY (P) (F)
 (F)") Flexbar 6.3:1 ZOOM STEREO MICROSCOPE MANUAL 250 Gibbs Road, Islandia, NY 11749 631-582-8440 (P) 631-582-8487 (F) www.flexbar.com sales@flexbar.com CONTENTS SAFETY NOTES... 3 CARE AND MAINTENANCE... 3 INTRODUCTION...
Flexbar 6.3:1 ZOOM STEREO MICROSCOPE MANUAL 250 Gibbs Road, Islandia, NY 11749 631-582-8440 (P) 631-582-8487 (F) www.flexbar.com sales@flexbar.com CONTENTS SAFETY NOTES... 3 CARE AND MAINTENANCE... 3 INTRODUCTION...
ULTRA SHOT PLUS - DARK EARTH REFLEX SIGHT SM26008DE
 USER MANUAL ULTRA SHOT PLUS - DARK EARTH REFLEX SIGHT SM26008DE ABOUT SIGHTMARK Sightmark offers a wide range of products that include red-dot sights, reflex sights, riflescopes, laser sights, night vision,
product manual H-3220A Benkelman Beam
 05.12 product manual H-3220A Benkelman Beam General The H-3220A Benkelman Beam Apparatus is a convenient and accurate device used for measuring the deflection of flexible pavements under moving wheel
ASTRO-PHYSICS, INC. POLAR ALIGNMENT TELESCOPE (PASILL2)
") OBJECTIVE LENS ASTRO-PHYSICS, INC. POLAR ALIGNMENT TELESCOPE (PASILL2) This model shipped from January 2001 through July 2002. It fits all 400, 600, 600E, 800, 900 and 1200 models (except the original
OBJECTIVE LENS ASTRO-PHYSICS, INC. POLAR ALIGNMENT TELESCOPE (PASILL2) This model shipped from January 2001 through July 2002. It fits all 400, 600, 600E, 800, 900 and 1200 models (except the original
Orion StarBlast 4.5" Telescope
 Orion StarBlast 4.5" Telescope INSTRUCTION MANUAL 507-328-2309 www.rochesterskies.org WARNING: Never look directly at the Sun through any telescope or its finder scope even for an instant as permanent
EPOCSELFIR LACITCATiX5T TECHNICAL MANUAL
 T5Xi TACTICAL RIFLESCOPE TECHNICAL MANUAL TABLE OF CONTENTS Page Mounting The Scope...2 Eyepiece Focusing...2 Windge / Elevation Adjustment...3 Setting The Zero Stop...4 Turret Cap Replacement...4 Parallax
One-Year Limited Warranty
 INDEX Product overview...3 Installing the batteries...4 Mounting the Rifle Scope...5 Operation...6 Windage and Elevation adjustments...7-8 Infrared Illumination...8 Focusing...9 Power display & battery
Assembly Manual for the Brevard Astronomical Society 16 inch F4.5 Dobsonian Telescope Brevard Astronomical Society P.O. Box 1084 Cocoa, FL 32922
 BAS 16 Telescope Manual Rev 1 Assembly Manual for the Brevard Astronomical Society 16 inch F4.5 Dobsonian Telescope Brevard Astronomical Society P.O. Box 1084 Cocoa, FL 32922 TABLE OF CONTENTS SECTION
THE LOSMANDY G-11 MOUNT
 Checking the parts THE LOSMANDY G-11 MOUNT Depending on which accessories you ordered, your G-11 mount was shipped in four or more boxes. The contents of each box are as follows: Equatorial Mount Adjustable
Dual Red or Green Electronic Dot Sight Instruction Manual
 Dual Red or Green Electronic Dot Sight Instruction Manual 2007 VisionPlus INTRODUCTION: Congratulations on your purchase of a VisionPlus Dual Red/Green Electronic Dot Sight. This is a quality product engineered
NG700AZ 70 MM TELESCOPE W/ SLOW-MOTION ALT-AZIMUTH MOUNT INSTRUCTION MANUAL
 AGES 10+ 80-10070 NG700AZ 70 MM TELESCOPE W/ SLOW-MOTION ALT-AZIMUTH MOUNT INSTRUCTION MANUAL SPECIFICATIONS OPTICAL DESIGN MAGNIFICATION (WITH 2X BARLOW LENS) FRONT LENS (CLEAR APERTURE) FOCAL LENGTH
PLOW MOUNT KIT FOR POLARIS RANGER P/N ASSEMBLY / OWNERS MANUAL
 PLOW MOUNT KIT FOR POLARIS RANGER P/N 34-3010 ASSEMBLY / OWNERS MANUAL Application PLOW PUSH FRAME NO. 34-0000 or 34-0070 Before you begin, please read these instructions and check to be sure all parts
取扱説明書 /INSTRUCTION MANUAL 自動レベル /AUTOMATIC LEVEL AT-B2/B3/B4 FC10386-A012-02
 取扱説明書 /INSTRUCTION MANUAL 自動レベル /AUTOMATIC LEVEL AT-B2/B3/B4 FC10386-A012-02 SURVEYING INSTRUMENTS INSTRUCTION MANUAL AUTOMATIC LEVEL AT-B2/B3/B4 Thank you for selecting the AT-B2/B3/B4. Please read this
???? The Vortex Crossfire II Riflescopes
 OWNER S 1-Inch Tubes MANUAL???? The Vortex Crossfire II Riflescopes Specifically designed for discriminating hunters and shooters, the Crossfire II series of riflescopes offer the highest levels of performance
WARNING! DO NOT USE THE TELESCOPE TO LOOK AT THE SUN!
 WARNING! DO NOT USE THE TELESCOPE TO LOOK AT THE SUN! LOOKING AT OR CLOSE TO THE SUN WITH A TELESCOPE OR FINDERSCOPE WILL CAUSE INSTANT AND PERMANENT DAMAGE TO YOUR EYES. CHILDREN SHOULD AT ALL TIMES BE
USER MANUAL REFLEX SIGHT. Ultra Shot Plus
 USER MANUAL REFLEX SIGHT Ultra Shot Plus ABOUT SIGHTMARK Sightmark offers a wide range of products that include red dot scopes, reflex sights, rangefinders, riflescopes, laser sights, night vision and
MARINE BINOCULARS ZHUMELL 7X50 MARINE BINOCULARS WITH COMPASS AND RETICLE
 0 OWNER S MANUAL MARINE BINOCULARS ZHUMELL 7X50 MARINE BINOCULARS WITH COMPASS AND RETICLE 75 W 60 W 30 W 45 W Zhumell customers know that there are plenty of ways to experience the world. They also understand
DRIFTER PLOW-IN-A-BOX
 DRIFTER PLOW-IN-A-BOX ASSEMBLY / OWNER S MANUAL Part No: 10-0550 OPERATING INSTRUCTIONS Congratulations! You ve just purchased one of the industry s top plow systems. The DRIFTER Plow System works great
Electron Microscopy Sciences INSTRUCTION MANUAL. Stereo Microscopes Non-illuminated Stands
 Electron Microscopy Sciences 1 INSTRUCTION MANUAL Stereo Microscopes Non-illuminated Stands Model GL7-207: Binocular, 6.5:1 Zoom Ratio 10X to 65X, smooth ball bearing construction and Model GL7-307: Trinocular,
FOR CAN-AM ATV s P/N ASSEMBLY / OWNERS MANUAL
 MID-MOUNT KIT FOR CAN-AM ATV s P/N 15-7580 ASSEMBLY / OWNERS MANUAL Application PLOW PUSH FRAME NO. 15-0070, 33-0000 or 33-0070 Before you begin, please read these instructions and check to be sure all
30 mm Diameter Main Tube 1-4x24 Models
 CrossFire MANUAL 30 mm Diameter Main Tube 1-4x24 Models The Crossfire Riflescopes Specifically designed for discriminating hunters and shooters, the Crossfire series of riflescopes offer the highest levels
x Builders Level Service Manual
 40-690 22x Builders Level Service Manual Item Description Pages.0 Overall Instrument Assembly 2. Main Assembly 2.2 Telescope Assembly 3.3 Base Assembly 4.4 Frame Assembly 5 2.0 Calibration 6-8 2. Vial
Automatic Level Maintenance Manual SAL-XX W/ AIR DAMPENED COMPENSATOR
 Automatic Level Maintenance Manual SAL-XX W/ AIR DAMPENED COMPENSATOR CST/Berger 2001 SAL 20/24/28/32 PAGE 1 REV. C 071803 Automatic Level Maintenance Manual User Calibration and Testing... 3 Circular
Instruction Manual 1
 Instruction Manual 1 Dobson 76/300 DOB English version 8.2014 Rev A The Omegon 76/300 DOB Congratulations on the purchase of the new Omegon 76/3006 DOB. This small telescope will give you hours of fun,
Red and Green Dot Sight FF26002 USER MANUAL
 Red and Green Dot Sight FF26002 USER MANUAL The Firefield brand has recently launched with products designed to maximize every intense moment. Originally designed for consumers who need products to hold
A.R.M. 52 PLOW With QUICK ATTACH MOUNTING SYSTEM MODEL NUMBER BLACK MODEL NUMBER GRAY. Owner s Manual
 70 8TH AVE W PO BOX 7 SPENCER, IA 0 PHONE: 7-6-9 FAX: 7-6-08 SERVICE: 800-8- E-MAIL: ccac@cyclecountry.com www.cyclecountry.com A.R.M. PLOW With QUICK ATTACH MOUNTING SYSTEM MODEL NUMBER 0-00 BLACK MODEL
Library Loaner Telescope Program
 St. Louis County Library in partnership with the St. Louis Astronomical Society presents Library Loaner Telescope Program Loaner Scope s 250 Eyes Quick Start User s Guide Telescopes can be complicated,